Ice accessory
This crown has a “candy” effect due to the use of non-standard material.
To work on the product you will need:
- transparent PVC film or plastic (you can take old document covers);
- tulle with silver pattern;
- cardboard;
- shiny fabric (silver look);
- thread, needle;
- scissors;
- thin wire;
- silver braid;
- elastic band 2 cm wide;
- hot glue;
- decorative elements (for decoration).
First of all, the circumference of the head is measured. Based on the obtained measurement, you need to calculate the width of the base of the vertices of the future crown. There are seven of them in the product.
The height of the triangles is selected individually. You just need to take into account that the central triangle will be the highest. The parts adjacent to the central part are cut 2 cm shorter than the main part. The next two triangles are 2 cm lower than the previous ones, etc. Based on the principle described above, 7 triangles are cut out of PVC film. The same parts are cut out separately from tulle.
A corresponding tulle detail is applied to each workpiece. A wire is sewn along the edge of the blanks using an overcast stitch. All triangles are framed with silver braid. It is advisable to bend the figures slightly so that they hold their shape better. The finished transparent parts are assembled with elastic. The most convenient way to do this is on a sewing machine. The ends of the product are connected into a ring.
To create a volumetric effect, you need to complement the crown with opaque elements. To do this, two triangles are cut out of cardboard. Since these parts will be located on the front of the crown, their height should be slightly lower than the transparent triangles.
Cardboard blanks are covered with shiny fabric and secured with safety pins to the front “ice pieces” of the crown, as in the photo.
Dense and transparent parts are attached to each other. All that remains is to decorate the crown to your own taste. You can use rhinestones, beads, sequins, and lace elements in your work.
The royal ice accessory is ready.
Let's make an openwork lace crown: tips for craftswomen
A crown made of openwork lace will look very beautiful and impressive. This royal crown is very easy and quick to make. Even a novice craftswoman can handle this process.
For work, prepare all the necessary materials and tools:
- lace ribbon of the required length (depending on the circumference of your child’s head);
- starch or special spray to stiffen your royal crown;
- acrylic paints;
- sharp scissors;
- needle and thread;
- glue "Moment";
- brush;
- three-liter glass jar;
- decorative elements: beads, rhinestones, seed beads, sequins and much more.
First, cut the openwork lace to the length you need and roll this strip into a circle. Stitch very carefully so that the threads are not visible on your crown. After you have sewn the frame of the product, you should starch it well. After this, straighten your crown and put it on a three-liter glass jar. Leave your structure in this position until it dries completely.
After the entire crown structure has dried, begin painting it with a brush and paint. The paint can be applied only to the edges of the crown or to its entire surface.
When the paint is completely dry, use glue to attach beads, rhinestones, sequins, stones or beads to the crown.
Your lace lace crown is ready.
Quick option
Advice! It is quite possible to make a crown faster if you do not cut out each tooth of the product separately, but use the continuous pattern technique.
To do this you should prepare:
- cardboard;
- fabric packaging for flowers;
- scissors;
- elastic band;
- silver braid;
- silver paper;
- threads;
- glue;
- sequins in the shape of snowflakes.
A crown template is drawn on cardboard. The workpiece is cut out. The pattern is placed on the fabric and traced taking into account the allowances.
The fabric part needs to be cut out, then placed on a cardboard mockup. The allowances are folded over to the reverse side and glued to the cardboard.
Glue is applied to the underside of the workpiece, after which the crown is glued onto silver paper. This hides unsightly allowances on the back of the product.
The crown is carefully cut out. The product is decorated with large sequins in the shape of snowflakes.
The outline of the crown is framed with silver braid. Depending on the quality of the braid, you can glue it with hot glue or sew it on yourself.
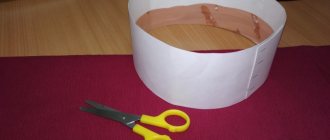
The crown is ready. If the holiday is just around the corner and you urgently need to acquire a “snow” crown, then you can try a simplified version – a product made from cardboard. To prevent the crown from looking like a “hurried craft,” it is advisable to replace the cardboard with a piece of light wallpaper with a pattern.
A model of the crown is drawn on it. The template needs to be cut out.
Then the workpiece is painted with silver spray paint. Since the aerosol tends to be sprayed in all directions, it is recommended to provide for this moment and carry out painting in the corridor, having previously covered the floor with newspaper or polyethylene.
First you should paint the back of the product. On the front side you need to carry out two stages of staining. After applying the first layer, you need to dry the product and repeat the coloring.
When the crown has completely dried, you can begin decorating it. The edges of the product are decorated with edging with rhinestones or any silver braid. The crown is decorated with additional elements corresponding to the theme of the carnival costume.
The final step is to sew a wide elastic band along the edges of the product. You need to measure the elastic so that the crown fits tightly around your head.
The carnival headdress is ready to delight its owner. Any proposed master class will allow you to create an accessory not only for a child, but also for an adult. This is especially true for kindergarten teachers and directors of theater clubs.
How to make the crown of the snow queen Elsa from a cold heart with your own hands
The Snow Queen Elsa is one of the most attractive modern cartoon heroines. Surely your little one also dreams of feeling like a snow queen. What is a queen without a crown? Of course, to create the image of a snow queen, you will have to put extra effort into at least a coat and shoes, and ideally also a dress.
Of course, you can always buy Elsa's crown in the store, but it's much more interesting to make it yourself. Moreover, you can call your princess for help, who will certainly happily participate in its creation.
If you cannot find a ready-made Elsa crown in the store, you can buy some other one, even a silver one. And repaint it yourself gold with spray paint and glue on a blue stone.
Unusual crowns of the snow queen
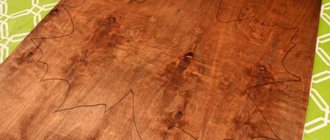
First, let's look at the wooden crown. You wouldn't think so - it's made of wood. True, you will have to work hard to create it. You will need a jigsaw, wood (you can take plywood), sanding paper, paint and rhinestones for decoration, plus a husband with golden hands won’t hurt.
So, you can make your own sketches or print ready-made ones. [197.79 Kb]
We glue the sheet with the design to the wood and cut out the details.
Next, we sand all the parts and glue them together. Once again we sand the almost finished product, paint it, and glue on the decorations.
The result is a rather original snow queen crown.
Don't forget that you can always use available materials, for example, plastic packaging for sour cream or yogurt. Cut out the crown according to the template and paint it.
In addition, the lace deserves attention. Choose some beautiful lace - the length should correspond to the desired circumference of the crown. And you will need a pan or can (paint) with a suitable circumference. Generously coat the lace with pva glue, wrap it around the jar, closing the edges, and leave to dry. Next, paint and decorate it to your taste.
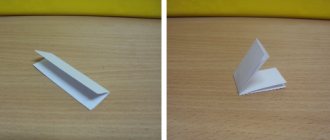
And finally, hot glue. Print the template [10.35 Kb] on paper, place parchment on top. Apply hot glue to the parchment along the outline and let it dry. Next, cover the dried glue with gold paint, and glue the bead on the wire from the inside out (as shown in photo No. 5). Glue the scallop on the bottom. That's it, Elsa's beautiful crown is ready.
There is another option for using glue. This time you will need a base. We use hot glue to make strips of different lengths (wide at the bottom, tapering towards the end). Sprinkle glitter onto the strips until they dry.
It is better to use multi-colored sparkles.
When the strips are dry, glue them to the base.
It turns out to be a very impressive crown for a girl - worthy of a real snow queen.
Our small selection of ideas has come to an end. I hope we have inspired you to take on the idea that you like as a basis and create your own masterpiece! Good luck with your experiments!
DIY crown for the Snow Queen - a simple embodiment of exquisite ideas
On the eve of the New Year, everyone begins to think about how to spend the holiday, what outfit to choose, what to give and to whom. But those who are preparing for the carnival have one more concern - which costume to choose, and most importantly - how and what to make it from.
One of the most popular images for the main winter holiday has always been and remains the image of the Snow Queen. Girls, girls and women love her shiny white outfit and, of course, the majestic decoration on her head - the crown.
Don't throw away old discs
You can make a wonderful DIY crown for the Snow Queen from old CDs. They need to be cut into small pieces of arbitrary shape and size, and then glued onto a wire base in the form of a wreath. To secure the CD pieces, you can use double-sided tape, fabric adhesive tape, or a glue gun (this is the most reliable option).
After decorating the base, you need to take care of comfort, because you may have to wear the costume throughout the New Year celebration. To prevent the hard wire from rubbing your forehead or clinging to your hair, you need to attach a strip of soft fabric to the inside of such a wreath, placing it on glue or tape. It is important that the color of this fabric is neutral so as not to stand out if suddenly a piece of it is visible.
Of course, to understand how to make a crown for the Snow Queen from a CD with your own hands, the video shows best, but by turning on your imagination, you can imagine what the final result will look like.
Paper vytynankas for New Year's windows - snowmen: download, print stencils
Snowman-shaped vytynanki will help decorate a bedroom, nursery, school classroom and even an office workplace. And by attaching the product to the window, you can give the New Year's mood to all passersby. To do this you need to prepare:
- White sheets of cardboard or paper
- Scissors
- Printable templates
- Pencil
- Eraser
- Cutter
- Scotch
- Rubber or plastic stand
Snowmen Snowmen
The step-by-step process for making a vytynanka looks like this:
- Place a stand under your work area
- Attach the printed template image to paper or cardboard
- Trace the outline with a simple pencil, clearly outlining the designated boundaries
- Use paper scissors to separate the image from the excess paper.
- Using a cutter, cut out small parts and small areas inside the protrusion
- Cut the tape into small pieces
- Attach the decoration to the window
- Secure its position with tape
As additional decor you can use:
- Vatu
- Paints (any except watercolors)
- Glitter glue
- Finely chopped rain
- New Year's tinsel
- Broken and shredded Christmas tree decorations
- Sequins
- Rhinestones