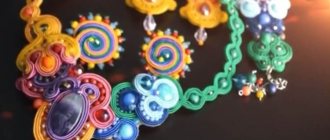
The parrot is a bright and beautiful exotic bird. Today, many people keep these birds in their homes and enjoy their chirping. True admirers of parrots should appreciate this article, as we will make an origami parrot with our own hands.
This master class is simple, and therefore even beginner craftsmen can make it. In the note you will be able to read two step-by-step instructions, which will include photos, assembly diagrams, templates and video tutorials.
Why do you need origami?
A paper craft is perfect as a gift, and given the cheapness of the materials, you can make truly beautiful and grandiose things. If you decide to decorate your house, then origami is a wonderful solution to this problem. For such purposes, good, high-quality paper that does not fade in the sun is suitable. Before you start doing anything, practice on regular pieces of paper - this way you won’t ruin good paper. Using modular paper techniques, you can create snowflakes for the New Year's tree, hearts for Valentine's Day and many other intricate things. Using patterns found on the Internet, you can make boxes, lampshades, and vases.
Origami is especially suitable for children. Firstly, it perfectly develops the baby’s memory, fine motor skills, accuracy, attentiveness and thinking. Secondly, the child will probably enjoy this pastime. If you have several children, then such a toy will be even better - the children will prompt and help each other in this matter. Origami is a great hobby for kids.
general information
There are several ways to create a colored parrot from paper. The most popular of them are:
- classical;
- modular.
The first option is perfect for children who are just starting to master this skill. Creating a parrot from modules is a more difficult task, which not everyone can handle.
The art of creating a parrot out of paper with your own hands came to us from Japan. Even in ancient times, the art of origami was diligently developed in this country, after which it spread throughout the world. Using ordinary pieces of paper, you can easily create your own Kesha parrot or any other figurine. You can do this using the classic method
in the form of processing ordinary paper. It is also possible to insert the tail and other modules into the paper structure separately.
You need to stock up on a sufficient amount of patience and time, as well as plain paper. It is best to use paper structures that are not too thick. This will make it easier to perform the necessary actions on the figure.
First you need to prepare as much paper as possible. After this, you can figure out how to make a parrot out of paper. The diagram looks like this:
To make a paper parrot using this method, it is recommended to follow a certain algorithm. It looks like this:
At this point, the procedure for creating a parrot using the classical method can be considered complete. All that remains is to draw the eyes, feathers and color the entire craft.
Paper parrot
As already mentioned, in our article we will tell you how to make a parrot out of paper - this is one of the most visual examples of origami. The figurine is not very simple, but it is also not complicated - ideal for a beginner, which will introduce him to this art and show him some complex techniques. So let's start:
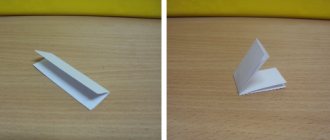
- 1. First, you need to take an A4 sheet and make a square out of it, while cutting off the unnecessary part.
- 2. Bend the workpiece along one diagonal and fold the side corners inward. Smooth all folds well.
- 3. Now bend the top of the workpiece away from you, towards the center. You should end up with an inverted triangle.
- 4. Fold the two upper corners into the center and fold the workpiece in half inward. Draw the lines well.
- 5. Now we need to make the tail of our parrot. To do this, part of the narrow side of the workpiece needs to be bent inward and then bent outward.
- 6. To make the parrot's beak, fold the wide side inward. The parrot is ready!
- 2. For the parrot, you can use colored paper or color regular paper using paints, markers or pencils. If you know how to draw well, you will be able to highlight the eyes, wing feathers and many other small details on the figure - this will make the parrot more realistic.
As you can see, making a parrot out of paper is not at all difficult. Having mastered this figure, you can move on to more complex origami, and from time to time, to modular origami. Good luck to you!
Very simple ones (boat, airplane), which even a preschooler can handle assembling. Others are not suitable for every adult. This parrot can be easily made from paper by a 7-10 year old child. Moreover, the instructions are very detailed. For this craft, it is better to take one-sided glossy colored paper - the parrot will turn out more impressive. Thick paper is not suitable for this purpose, as it will result in a crumpled parrot's head.
Sequencing
Fold the square sheet diagonally and unfold it again.
Turn over to the wrong side. Fold the edges of the sheet, starting from the corner, towards the fold.
Turn over to the front side. Fold the bottom of the sheet up. The fold should go through the corners of the craft.
Turn over to the other side. The top should be at the bottom.
Bend the corners of the craft down, aligning the top edge with the center line.
Grasp the corner of the top sheet and pull down.
Bend the sheet along the top fold again. You will end up with a moving part like this.
Bend it down.
Do the same with the second side.
At the top of the craft there are two multi-colored diamonds. Fold the edge of the diamond from the center to the outside of the craft.
“Pockets” have formed at the top. Place your finger in one “pocket” and pull it to the side.
Press along the new folds.
Fold the craft along exactly in the center.
Fold the top of the workpiece along the fold.
Having fixed this fold with your finger, open the “pocket” with your other hand.
Pinch it on both sides - you get another moving part.
Bend it to the right, there will be a parrot's breast. To make the head, also bend the top corner to the right.
Unfold the very top of the craft (where the index finger of your left hand is) and hide the folded part of the sheet inside.
The result was something like this.
Bend the head piece down, folding it in half.
Turn the top of the piece from the breast to the back.
Parrots are bright exotic birds that have long become pets. The singing of a parrot and its imitation of the human voice leaves unprecedented emotions. But what if you don’t have the opportunity to keep a bird in your home? We are looking for an alternative and making a craft in the shape of a parrot. How to make a parrot out of paper?
Other paper birds
From multi-colored paper you can make not only a parrot, but also other birds. Perhaps the most popular traditionally are figurines of cranes. In Japan, the birthplace of origami, the crane is traditionally considered a symbol of prosperity and longevity, so people often give paper figurines of these birds to each other for the holidays. You can also make an owl - a symbol of wisdom, stability, spiritual balance. Any images of birds are made according to approximately the same principle. In order for the silhouette to become recognizable, you will need to draw details on the finished product: beak, eyes, plumage.
Such bird figurines will serve as excellent interior decor in the spring season. You can also make birds using the origami technique with your children, while simultaneously telling them about spring and the upcoming arrival of feathered friends. The main thing is to stock up on high-quality colored paper and make sure that the child uses scissors correctly while working. Before you make a parrot or any other bird from modules, you need to think about the color of the product in advance.
Making an elegant and cheerful bird out of paper is not as difficult as it seems. The main thing is to show accuracy, attentiveness and imagination.
And then a bright, cheerful parrot will certainly give you a good mood. Over time, you will be able to master other similar crafts. The ancient Japanese art of origami will never go out of style.
Today in our article we will tell you what origami is and, using a diagram, we will show you how to make a parrot figurine out of paper.
Origami is the art of creating various paper crafts without using glue or scissors. Japan and China are considered the birthplace of origami; it was in these countries that paper was first invented. Mentions of the art of creating paper forgeries can be found in chronicles that date back to the 600s AD. The first paper was made from silkworm cocoons, but later the material was replaced and bamboo and tree bark were used. In some areas of Japan, in small workshops, it is still made using ancient technologies - it is considered very expensive. Despite everything, origami still remains relevant in Japanese society.
The name origami comes from “ori kami”, which means “folded deity” or “folded paper”. It should be explained that in their homeland origami was used in burial rites; in some areas it still remains quite sacred. The Japanese believe that when you create a figurine out of paper, you put a piece of your will, feelings, and energy into it. Therefore, some of the animals have additional meaning, and placing them in certain places can bring good luck. For example, kusudama - they believe that if it is hung above the bed, it will protect the sleep of a sleeping person.
Like everything in our life, origami does not stand still and new types of this art appear. There are classic origami and modular. The latter is considered more complex - it uses special, separate modules to create paper figures. Also, glue is sometimes used in modular origami. In ordinary origami, everything is much simpler and it is designed for beginners.
This art uses two folding technologies: using a sweep and wet.
The wet folding technology uses preliminary markings on a sheet of paper, bending the workpiece along all lines, and only then forming the entire figure. The difficulty is that if you do it incorrectly, the figurine can easily be damaged. It uses wet paper, which gives the fake smoothness and expressiveness.
Oh, and a green parrot...
In the famous children's fairy tale, Little Red Riding Hood sang that in Africa the mountains “are so high... and there is a green parrot.” In general, this exotic bird is often found in fairy tales and cartoons, for example, the smart parrot that lived with Aibolit, or the grumpy birds sitting on the shoulders of pirates.
For various reasons, not everyone can keep a parrot at home. Even a banal allergy prevents this. We will tell you how to make a parrot out of paper. Its design is very simple, and even a child can make a beautiful and bright bird. Let's take multi-colored paper for the craft. The more varied the range of colors, the brighter and more cheerful the parrot will be.
- For the parrot's body, you can take a sheet of larger format than A4. We take it and connect the edges along the length. It turns out to be a cylinder.
- Measure 8 cm from the top and cut along the marked line. This can be done immediately before gluing.
- The resulting cylinder is the base of our parrot.
- The most painstaking part of creating a craft is cutting out the feathers. Cut strips 6 cm wide from colored paper.
- Now we make an accordion out of the strips. This way we can cut several blanks at the same time.
- On a separate sheet of paper, draw a feather template. Its height is 6 cm and width is 5 cm.
- We cut out the required number of feathers, and then arm ourselves with nail scissors with rounded blades and make a fringe on three sides of the feather.
- Try carefully folding the edges of the paper to make the parrot look voluminous.
- We return to our body and conditionally determine the middle. There we glue a white feather.
- Now we move in a circle and glue the prepared feathers.
- We do this in a checkerboard pattern from top to bottom. We place the feathers as close to each other as possible so that the white paper cylinder is not visible.
- We covered the body with feathers and put it aside for now to dry.
- On colored paper we draw two circles with a diameter of 7 cm.
- We cut out the eyes and use scissors to make a fine fringe all around the circumference.
- In the middle we glue pupils cut out of black paper.
- We will make a beak from red paper.
- We carefully look at the diagram and transfer it to paper. We cut out and get two parts of the beak: upper and lower.
- We glue the eyes symmetrically to the body on both sides.
- Now we connect the edges of the beak with glue and fix it on the body.
- We fix the lower and upper parts at a short distance from each other. The beak will be open.
- According to the diagram, we draw the blanks of two legs on red paper.
- We make folds along the outlined dotted lines inside. This trick will help us make the paws voluminous.
- From white paper, you can take cardboard, cut out two blanks for the wings.
- The height of the wing is 12 cm, and its width is 7 cm. In appearance, the base of the wings resembles a droplet.
- We cut out ovals from paper of various colors and bend them slightly in the middle. Feathers look like grooves.
- Glue the feathers to the base of the wing from top to bottom. To make them voluminous, the lower part of the feather can be cut in the middle and the edges glued together.
- Glue the wings to the parrot's body.
- We cut out oblong lines from paper and make a fringe along them.
- Glue one on top. This will be a tuft.
- Glue a multi-colored tail to the back.
- This is the kind of pet we got.
Video lessons
Children will definitely love this paper parrot, as it is very easy and quick to make. You can experiment with colors and combine a variety of bright shades. It is based on just a small piece of triangular-shaped paper and a few simple complementary details in the form of a beak, eyes, wings and paws.
Materials for work:
- Double-sided colored paper or cardboard of any shades;
- White paper for eyes or purchased moving eyes;
- A simple pencil, scissors, glue stick.
Like magic: origami technique
Today, many homes are home to exotic birds - parrots. They never cease to delight their owners with their bright plumage and sonorous chirping. Lovers of such pets will be interested to know how a parrot is made from origami paper. You just need to be patient and have some free time.
Required materials and tools:
- paper;
- scissors;
- ruler;
- simple pencil.
Step-by-step description of the creative process:
- Cut out a square of the desired size from a landscape sheet.
- First, fold the square in half, smoothing the fold thoroughly.
- We straighten the sheet and now fold it diagonally. We get something like this.
- We fold the square in half so that we get a double square, but smaller.
- We bend the corners and carefully smooth out the folds.
- Now along these lines we need to bend the corners inward.
- Let's open the other side of the workpiece and flatten it. We will get something like this.
- Bend opposite corners towards the center, smoothing out the folds.
- We have formed a triangle on the outside; we need to bend it to make the parrot’s legs.
- We bend the resulting triangle again. This is what we get.
- To make it more convenient to hold the bends and corners, we will use clothespins or paper clips.
- Now we need to similarly construct the second foot and turn the workpiece over to the opposite side.
- Align the side cuts and bend them. The paws should be folded together.
- In the upper part we get a rhombus, which is freely separated from the rest of the structure. We will model the tail from it. To do this, bend the paper to the right.
- The parrot's tail is thin, so we fold the resulting triangle in half.
- All we have to do is bend the wings and carefully smooth out the folds.
- From the top of the paper we form the head and beak.
- We make symmetrical bends in two places.
The parrot is a bright and beautiful exotic bird. Now these cute creatures live in the homes of many of us, delighting the eyes and ears with their chirping. True fans of parrots should like our article, since in it we will create a parrot from paper using the origami technique; The diagram of not even one, but several options is available, and I hope you will also like the video lessons.
Origami parrot using classical technique
For those who do not know how to make an origami parrot out of paper, the diagram of which is presented in this lesson, step-by-step photos will be very helpful. You may also find the video at the end of the article useful.
A sheet of brightly colored paper works well for a parrot to make it look lively and attractive.
1. Take a square sheet, fold it along two diagonals and across. We iron the folds well and straighten them.
2. We form a small, but double, square from a large flat square. We fold the corners of one of its sides together and carefully iron the folds. We straighten them, now bend them inward.
3. Open another side of the workpiece and flatten it.
4. Fixing the folds, bend the opposite corners towards each other. Then we straighten them and bend them inward. We will get a small triangle on the outside; we bend it several times, forming the legs of a parrot.
5. For the paws, make a fold in the middle, and a couple more on both sides of it.
6. The assembly diagram of the second side exactly repeats the first: open, straighten, and bend the triangle of the foot three times in the same way.
7. Turn the workpiece over to the other side. In this case, the triangle legs will be barely visible due to the folds. We put the top parts of the rhombus together.
8. We fold the workpiece so that the parrot’s legs are together.
9. Bend the sides above the paws in half.
10. Open the workpiece. We should have a freely extending element on top.
11. We form a tail from it. We take it to the right and fold it back.
12. The tail needs to be made thinner. To do this, fold both parts in half twice.
13. Turn over the parts of the workpiece so that the paws are on different sides.
14. We bend both wings of the parrot towards ourselves, then the upper part of the neck.
15. Make a fold on it.
16. Fold the workpiece, bringing the legs together.
17. We make the parrot's head and beak by bending and arching the corners.
18. We bend part of the wings inward, giving them a rounded shape.
19. Bend the corners of the legs into a hook shape.
Our MK is finished, the parrot is ready! Thanks to its hook legs, it will tenaciously sit wherever it is placed and decorate the entire room.
Origami parrot made from triangular modules
In the second lesson we will fold a modular origami Parrot, the master class is not very complicated, so it will be understandable to beginners in origamism.
To work you will need 167 pink triangular modules, 85 blue, 46 yellow, 30 orange, 52 red, and 10 blue modules. For the tail we use a multi-colored assortment of modules; leftovers from previous works will do.
1. We collect the first 5 rows of 6 pink modules and 5 yellow ones, close them in a ring.
2. Turn the workpiece over to the other side.
3. We assemble pink and yellow modules separately, adding two rows.
4. In the middle of the 8th row of yellow modules, insert 2 pink ones.
5. The pink modules are the parrot’s chest, and the yellow ones are its back. We connect them in the ninth row with two yellow modules. The ninth row consists of 10 pink breast modules, 6 yellow and 2 pink back modules.
6. In the tenth row we have 9 pink modules on the chest, 2 yellow ones along the edges and 6 pink ones.
7. In the eleventh row, we begin to add blue modules: 2 on the chest and 3 on the back, the rest are pink.
8. From rows 12 to 15, increase the number of blue modules on the chest and back, 1 in each row.
10. Glue the last row.
11. We assemble the head from 5 blue modules: 3-2. Glue it together and press it with a clothespin.
12. Attach the head to the body, tilting it towards the stomach.
It is believed that a parrot is one of man's best friends; it will never disappoint or disappoint, since it is your pet. Arriving home, he greets you with his loud singing and screaming, showing how glad he is to see you, that he missed you. And if you try hard, you can teach your pet to speak some words and phrases. His conversations are very uplifting and give strength. But, there are cases when the owner or another family member has an allergy, then there is no choice but to give your pet to someone or give it to good hands. But if you love parrots so much, we suggest you learn how to make an origami parrot. Such a bird will definitely not harm anyone, but will only bring pleasure and delight your eyes. We invite you to a master class on folding paper parrots using the origami technique.
What you need for work
To learn how to make funny parrots, Cash or Gosh, all you need to do is purchase a modular origami kit. Their main advantage is that the kit includes exactly as many parts as you need for assembly. Making origami modules from paper by hand is a rather long and monotonous task, so using a ready-made kit will save the novice master from a lot of hassle. If the needlewoman nevertheless decided to make the modules on her own, for the work you will need:
- thick colored paper of different colors, preferably double-sided. It can be matte or glossy;
- sharpened stationery scissors;
- ruler to make straight folds;
- module manufacturing scheme.
Usually children can easily cope with such work, so you can involve your baby in this task. The main thing is to understand the general principle of making parts, and soon the skill will be brought to automaticity. Having made the required number of parts, you can begin assembling the parrot. You can buy the “Modular Origami Parrot” assembly diagram kit not only in stores, but also on the Internet, on sites that sell goods for hobbies and creativity, for example, on ozon.ru sites.
A parrot can be of absolutely any color. If you want to make a budgie, you will need colored paper in blue, blue, green, and purple colors. White office paper is perfect for cockatoos. The bright South American macaw can be red, orange, or yellow. Using approximately the same scheme as a parrot, you can make a toucan - a black bird with a large bright orange beak.
Simple scheme
To fold the parrot, we will need two sheets of paper of different colors: one for the body and the second for the tail. The sheet from which we will make the tail should be 2/3 smaller than the first sheet.
Let's move on to the assembly diagram of our bird.
1) First, we will fold a large sheet of paper; it should be square. Fold the top and left corners into the middle.
2) And now we fold the two sides into the center so that they come together.
3) Fold our workpiece in half.
4) In order to form the head, we need to wrap the tip of the upper corner inward. And then we bend the tail inward.
5) Here the body of our parrot is ready, and the letter A in the diagram shows the place where the tail is glued.
6) Let's make a tail. To do this, take a second sheet of paper, it should also be square and fold it along the lines, as indicated in the diagram.
7) All that remains is to glue our tail.
 This is what our parrot will look like.
9) Now you can paint it, it’s up to your imagination. You can invite your child to do this together, you will spend a very fun time together, you will be alone, and the child will be busy with useful and developmental activities. This craft can also be glued to a postcard or to a drawing that you and your child can also draw.