Choosing a type of trestle bed
Before you make a trestle bed with your own hands, you must think through its design features. It can be in the form of a lounger, sofa or bed. In the first case, the structure is a structure with a wooden deck and a frame made of concrete or metal. A trestle bed in the form of a sofa is usually free-standing or built-in. But if you make a trestle bed in the form of a bed, then it should be supplemented with a headboard.
Materials for production
How to make a trestle bed with your own hands? Initially, it is necessary to determine its functions. If it will be used as a sleeping place, it is better to give preference to natural materials in its manufacture: wood, plywood, stone. For the construction of structures that will be placed outdoors, metal, brick or any natural agglomerate are perfect.
Note. It is much easier to make trestle beds with your own hands from wood. This material is practical and durable.
Quite often, structures are made from plastic bottles. This is a country option that does not require special material and time costs.
Preparatory work before making a trestle bed
If you decide to make a trestle bed with your own hands, then you must first prepare tools and materials, including:
- plastic bottles;
- scotch;
- scissors;
- glue;
- cardboard;
- foam;
- rope;
- needle;
- threads;
- knife;
- artificial fur.
If the base will be plastic bottles, then you should prepare 72 containers of 1.5 liters each. The tape should be simple and double-sided. When purchasing foam rubber, you should choose one whose thickness is 5 cm.
What could a trestle bed be like?
As mentioned above, often when making a trestle bed, its simple design was supplemented with various elements such as awnings, canopies, etc. Now, if you have high-quality tools and materials, you can make an ergonomic relaxation area from a simple bed, even on your own.
So, the trestle bed can be:
- Open - that is, it is an ordinary spacious lounger, raised above the ground or floor with the help of legs;
- With a canopy that protects people relaxing on the platform from rain, sun, etc.;
- With a canopy or tent, the fabric of which will also protect the trestle bed from the sun, but will also perform a decorative function especially well;
- With drawers, shelves, a small ladder, seats, a table for meals, etc. - with any additional elements that you have enough imagination for.
In addition, you can make a trestle bed that will be used either as a platform for gatherings with family and friends, or as a sunbathing bed in the garden or as a sofa for a gazebo.
Within the framework of the article, we will dwell in more detail on trestle beds with awnings. There are many options for implementing such an idea, and you can easily choose the one that is suitable for your room, veranda, gazebo or even loggia. But first, let's talk about how to make the design of a simple trestle bed with your own hands.
Step-by-step instruction
Before you make a trestle bed with your own hands, you must think about its features. If the base is bottles, then one link can be created from three products. The top part of two bottles is cut off, while the bottom parts are put on the whole bottle. There should be 24 such links. Three are folded together and wrapped with tape. As a result, you should get 8 sections. They are connected to each other and fixed with adhesive tape.
Having measured the top plane of the plastic structure, you must prepare a rectangle of foam rubber and cardboard. Using suitable glue, cardboard is glued to the base and secured with tape. Double-sided tape should be applied to the sides, along which the rope will be stretched. It should be laid in dense rows on the sides. The winding starts from the bottom and ends 5 cm short of the top.
Making a sunbed frame with your own hands
The basis of the trestle bed for a summer residence consists of plastic containers, each element is a block of 3 bottles.
You cut and remove the necks of two bottles and cover the whole closed vessel top and bottom with the remaining parts and the bottom. This results in a reinforced component of the frame. You make as many of these links as you need for the trestle bed of the size you choose.
Then you fasten the resulting elements with tape in sections of 2-3 pieces. The resulting sections are firmly connected together with adhesive tape, leveling the level of the bottles. Here you will need help to keep all the elements of the sections in a stationary state.
By gradually adding sections of three elements, in a couple of hours you will get a lounger frame of the selected size. Do not skimp on the tape; wrap it along the entire height of the bottles.
To strengthen the base of the trestle bed for your summer cottage, you will need a rope. It will additionally connect all the components of the frame. To do this, stick double-sided tape vertically on the resulting frame in increments of 10-12 cm. Remove the paper from the outside of the adhesive tape and start winding the rope around the perimeter of the platform from the bottom of the structure. As you work, tighten the rope so that the rows of the harness are tightly adjacent to each other.
Finish this work within 5 cm of the top of the structure and secure the end of the rope with glue.
Carrying out plating
If you decide to make a trestle bed with your own hands, then strips of fur fabric should be glued to the walls that are left without winding. The width of the strips should be 6 cm. To secure the winding, the strips are also glued along the side edges. A flap should be cut out of fur fabric; its size should be slightly larger than the cardboard base on each side. The allowance will be 7 cm.
The corners of the fabric are sewn up and placed on foam rubber. Place a few drops of glue on the cardboard to strengthen the fur seat. At this stage, we can assume that the budget trestle bed is ready.
A trestle bed made from boxes
If plywood sheets will be used for the work, then you must first prepare a drawing. The thickness of the plywood should be 12 cm. 3 boxes are made from it. They are painted in a color that matches the living room interior. The elements are fastened together. Baskets should be installed inside, and pillows and a mattress should be placed on top. At this point we can assume that the trestle bed is ready.
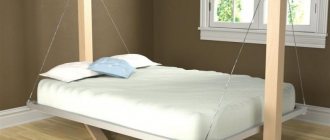
Making a trestle bed from wood
If you decide to make a wooden trestle bed with your own hands, then first you need to prepare:
- bolts;
- bars;
- nuts;
- pine planks;
- washers;
- MDF;
- threaded rods;
- glue;
- Allen key;
- sandpaper;
- stain.
The design will be multifunctional. You can sleep on it or convert it into a coffee table. This piece of furniture will be useful in the country and will easily fit into a small apartment. It wouldn’t hurt to have a trestle bed on the loggia, where you can relax in the fresh air.
Features of making a trestle bed from chipboard
Before you make a trestle bed for your dacha with your own hands, you need to look at a photo of such a design. The pictures will help you understand which material is best to use. An alternative solution is chipboard, which can be regular or laminated. The dimensions will depend on the area of the room and its layout.
Indicative parameters may be limited to the following dimensions: seat depth 70 cm or less, backrest height 40 cm or more. The covers of the trestle bed are fixed to the rear walls using piano hinges. The soft elements of the back and headboard can be made of polyurethane foam, while the covers are made removable; in this case, zippers are sewn into them.
How to make a canopy for a trestle bed with your own hands
The option with a canopy is especially suitable for those trestle beds that are planned to be placed on the street. Let's consider several options for installing a canopy on a trestle bed with your own hands:
- A removable awning is perfect for summer residents who use a trestle bed only in the warm season;
- You can stretch an opaque film over the high supports, which will serve as protection for the trestle bed during rains;
- To create a solid trestle bed, a canopy made of corrugated sheets is suitable, which is usually used for canopies in parking lots, roofs of open balconies, etc.;
- Thick fabric or tarpaulin stretched over a wooden frame is a more aesthetically pleasing option, but in this case there will be no protection from moisture and gusts of wind;
- The most original option is to grow climbing plants along a wooden or plastic frame. In just one or two seasons, your trestle bed will become the most picturesque part of the site, and all guests will admire your ingenuity. But in this situation, you will have to suffer with rainwater and insects;
- If you decide to place the trestle bed in a living room or at least in a covered gazebo, then to decorate it you can hang a canopy made of light translucent fabric from the ceiling. In addition, long pieces of material can be thrown over the upper frame of the trestle bed. Such decoration will give it oriental notes, and you will feel like you are in a fairy tale on the trestle bed.
In this simple way you can solve several problems of organizing a recreation area both in an apartment and in a garden at the dacha. We hope that the above options and ideas will help you realize your unique ideas, and your trestle bed will turn out to be comfortable and spacious in a Russian way, and chic in an oriental way.
An easy option for making a trestle bed:
Similar articles
- Do-it-yourself wooden porch: step-by-step construction technology
The porch must be attached to the house if the height of the basement of the foundation does not allow you to immediately leave the room. By choosing the optimal… - Do-it-yourself balcony roof: varieties (photos and videos)
Residents of the middle floors of an apartment building do not need balcony roofs, because their functions are performed by the lower slabs of the extensions located above them. A… - Do-it-yourself columnar foundation: photo, video instructions
In construction practice, there are several types of foundations, one of which is columnar. It is very popular among…
Main types of trestle beds: photos
Open trestle beds
- Lounge beds are structures made entirely of wood or having a metal or concrete frame with wooden flooring. They are ordinary beds without a headboard. But, if you place such a trestle bed near the facade of a house or a fence, then a wall or a span of fence can serve as a headboard.
- The sofa bed can be built-in or free-standing. It has a headboard and armrests that can be anywhere from half a meter long to the width of the sides. This sofa is designed for several people who can sit on it in a reclining position.
- The trestle bed is a very comfortable couch with a headboard. It can be freely placed both in the garden and just in the yard. Such a bed can have headboards not only on one side, but also on both sides.
Manufacturing technology
- Lounge beds are structures made entirely of wood or having a metal or concrete frame with wooden flooring. They are ordinary beds without a headboard. But, if you place such a trestle bed near the facade of a house or a fence, then a wall or a span of fence can serve as a headboard.
- The sofa bed can be built-in or free-standing. It has a headboard and armrests that can be anywhere from half a meter long to the width of the sides. This sofa is designed for several people who can sit on it in a reclining position.
- The trestle bed is a very comfortable couch with a headboard. It can be freely placed both in the garden and just in the yard. Such a bed can have headboards not only on one side, but also on both sides.
Top beds for a summer residence
A trestle bed under an awning can be organized in several ways:
- for a summer residence it is convenient to use removable awnings, since they can be easily removed when leaving;
- Portable canopies - umbrellas - are very convenient. In this case, the trestle bed is not tied to one place; it can be moved if desired;
- If the awning is mounted on high supports, it will protect a large area not only from the sun, but also from rain. It is also best to make them removable so that you can put them indoors for the winter;
- canopies can be made into rigid structures by connecting them to the bases of trestle beds. The structures can be made with openings from branches or reeds and then they will serve only for shading;
- as a trestle bed, they use a quadrangular structure with a roof, which has a raised floor for a mattress;
- Several trestle beds can be placed under a large canopy, thus organizing an outdoor recreation area for the whole family.
- We make the lower harness, which will later be placed on the legs (you can use 100 by 100 timber).
- The harness, fastened into half a tree, is installed on legs, which are inserted into the tree using a tenon connection into the socket.
- Armrests are installed around the perimeter.
Very often, trestle beds are decorated with wood carvings, the complexity of which is assessed by category. The first is the most difficult and expensive. The third is cheaper and simpler. I suggest you enjoy several photographs above and below this text.
- Size: custom made
- Material: pine, larch
- Coating: 1 layer of tinting and 3 layers of water-based acrylic varnish
Price on request
Medium sized trestle bed. Dimensions are (WxL) – 200cm x 200cm. Seat height – 45cm, backrest height – 25cm.
The trestle bed is perfect for installation in a summer outdoor seating area and under a canopy. When the trestle bed is fully equipped with a table, a ladder for climbing, as well as pillows and a blanket, it is possible to equip specialized halls of cafes and teahouses with it.
The trestle bed model has a “light” visual design of the elements, not overloaded with unnecessary forms. The result is a durable and reliable product at an affordable price.
The frame design is designed taking into account possible loads. Indeed, unlike other types of furniture, the load on the trestle beds is many times greater. The base consists of four massive carved supports, connected along the perimeter by powerful drawers. There is a massive cross beam in the center to provide greater rigidity.
The high-quality furniture fittings used ensure high reliability of the trestle bed.
All wooden parts have a smooth surface with rounded edges. The wood is processed in a way that allows you to visually highlight the natural texture of the wood fibers.
The surface of the wood is subjected to special treatment, which results in a reliable and beautiful protective and decorative coating. Most often, tinting is used in the color of your choice and coated with clear varnish. A durable varnish coating not only reliably protects the wood from dirt and moisture, but also emphasizes the natural beauty of the wood.
A little history
- plastic bottles;
- scotch;
- scissors;
- glue;
- cardboard;
- foam;
- rope;
- needle;
- threads;
- knife;
- artificial fur.
If the base will be plastic bottles, then you should prepare 72 containers of 1.5 liters each. The tape should be simple and double-sided. When purchasing foam rubber, you should choose one whose thickness is 5 cm.
- bolts;
- bars;
- nuts;
- pine planks;
- washers;
- MDF;
- threaded rods;
- glue;
- Allen key;
- sandpaper;
- stain.
The design will be multifunctional. You can sleep on it or convert it into a coffee table. This piece of furniture will be useful in the country and will easily fit into a small apartment. It wouldn’t hurt to have a trestle bed on the loggia, where you can relax in the fresh air.
DIY trestle bed options
To make the simplest version of a country trestle bed you will need:
- seventy-two plastic bottles with a volume of one and a half liters;
- simple and double-sided tape;
- special glue;
- scissors;
- cardboard;
- foam rubber, the thickness of which should be five centimeters;
- a spool of strong rope;
- knife;
- needle and thread;
- artificial fur.
Step-by-step instructions for making a trestle bed
- A link is created from three bottles. To do this, the upper part of two bottles is cut off and thrown away, and the lower parts on both sides are put on the whole bottle. Twenty-four such links should be assembled.
- The three links are folded together and tightly wrapped with tape. There should be eight sections in total.
- All sections are connected and secured with tape on all sides.
- According to the size of the upper plane of the resulting plastic structure, rectangles are cut out of cardboard and foam rubber.
- Cardboard is glued to the top base with special glue and secured with tape.
- Double-sided tape is applied to the sides of the structure, along which the rope is subsequently stretched. It should be laid in dense rows along the entire side of the product. The winding should start from the bottom and end before reaching a little (about five centimeters) to the top.
- Strips of fur fabric are glued onto the walls that are left without winding. The width of such stripes should be six centimeters. To secure the winding, strips of fur are glued along the side edges of the wound rope.
- A flap is cut out of fur fabric, the size of which should be seven centimeters larger than the cardboard base on each side.
- The corners of the fabric are sewn up and the fabric is put on foam rubber.
- A few drops of glue are dripped onto the cardboard and the fur seat is glued. The simplest and most budget-friendly trestle bed for a summer cottage is ready.
Living room trestle bed with drawers for baskets
Step-by-step manufacturing instructions:
- first of all, you should make a drawing of the future sofa, focusing on the existing baskets that will be inserted into the plywood drawers of the sofa;
- to create such a trestle bed from materials you only need plywood, the thickness of which must be at least twelve centimeters;
- Three boxes are made from plywood according to individual scales;
- plywood boxes are painted in a color suitable for the interior of the living room and fastened together;
- Baskets are inserted into the boxes, a mattress and pillows are placed on top. The trestle bed is ready, you can go to rest.
We make trestle beds with our own hands
Since the trestle bed has a very simple design, you don’t need any special materials or tools to make it. Here is a list of what you need to prepare to create a lounger with your own hands:
- Wood - you will need both bars and boards. It is possible to use plywood or chipboard;
- Protective primers and wood compositions, varnish or paint, depending on your preference;
- Saw or jigsaw;
- Drill, screwdriver;
- Fastening elements (screws, self-tapping screws, corners, etc.);
- Tape measure, level, construction angle;
- Sandpaper or sander.
But it is important to remember that the primary condition for obtaining a high-quality result is the presence of at least basic skills in using all of the listed tools and working with materials.
So, the stages of making a trestle bed with your own hands:
- Estimate the size of the trestle bed and its location in the room or in the free space where you plan to place it. After this, you need to take measurements using a tape measure.
- Prepare a sketch of the future product.
To do this, you don’t need to have artistic skills - just sketch out the shape and approximate aspect ratio and details of the trestle bed. After this, it is important to note the exact dimensions of all parts.
- Prepare bars, boards and other materials for work.
Firstly, they need to be cut exactly to the dimensions that you indicated in the sketch. Maintaining accuracy is perhaps one of the main conditions for creating a smooth and comfortable trestle bed. In addition, if you cut several bars to a size smaller than required, you will simply throw material and money down the drain.
Secondly, wooden elements should be treated with protective agents against fungi, mold and insects already at this stage. This will allow you not to be afraid that a problem will arise at the points of connection and placement of fasteners.
- Assemble the frame of the trestle bed.
The simplest option is a rectangular shape, but when assembling the seat frame it is important to use the angle for comparison. Next, the legs are attached to the frame - they must be strong enough to support the entire structure with the people on it. It is best to play it safe and make them wider and thicker than to restore a broken structure later.
- Assemble the seat.
The base of the structure is connected and strengthened with the help of bars, boards, and slats. A seat is knocked together on top - it is advisable to use solid sheets of chipboard or plywood for this if the trestle bed is planned to be small.
- Install the side on three sides.
The side elements are also attached to the base - vertical bars are connected by horizontal slats along the perimeter of the trestle bed on three sides (alternatively, you can cover all four sides with a side and leave only a small passage to the platform).
In general, after installing the seat, the trestle bed can already be considered complete. Now you can paint it, put a mattress and pillows on it, or leave it as is. But such a piece of furniture will not be comfortable or beautiful enough, so it’s worth thinking about “upgrading” it:
- In addition to the side, you can also install a base for a canopy or canopy. It is best that the vertical columns from the beams turn into legs - then the structure will be the most durable;
- One of the sides can be covered with something like a wall (in this case, chipboard or plywood are also great), and then you can organize niches or shelves in it. If the trestle bed is spacious enough, you can place small potted flowers, decorative elements such as figurines or dishes for tea parties on the shelves;
- In small trestle beds on verandas or loggias, it is advisable to install drawers for storing various small items or things. They are included in the design at the sketch stage, and are knocked together along with the base;
- If the trestle bed is planned to be used as a place for relaxing and dining in the fresh air, it is worth installing seats along the perimeter sides. They should be slightly higher than the level of the trestle bed itself. Usually the platform in this case is upholstered with soft material and covered with a beautiful fabric, while leaving space for installing a table;
- For the same purpose, you can make a table in the center of the trestle bed. An alternative is to install it in a small recess, having thought through this element at the sketch stage. But a removable and folding table will be much more practical, because then the trestle bed can easily be used for sleeping;
- To make it easier to climb onto a high platform, install a small ladder. This element of the trestle bed looks especially good with solid sides and a canopy.
You can come up with any additional elements for the trestle bed yourself. This is especially true in cases where the site is being built spacious enough to use all the owner’s imagination.
If you are too lazy to invent a trestle bed yourself, you can make it from pallets.