Repair and decoration
05/17/2018 Anastasia Prozheva
The hanging bed is a favorite Asian bed. When Russians hear this phrase, they imagine either a luxurious terrace overlooking the ocean, or a garden with a hammock hanging in it. In any case, such a bed means relaxation, pleasure, the light sound of the wind, the whisper of gentle waves.
The hanging bed combines style and comfort. It makes the interior original, and sleeping on it is a pleasure.
But who is stopping you from decorating the interior of your home by hanging a light, elegant bed in the room that sways with the slightest movement?
Types of hanging beds
Creative pendants are becoming more and more popular in our latitudes. So far, most often parents try to make a hanging bed in the children's room. Boys like a rocking bed in the shape of a ship, girls prefer a bed in the shape of a fairy flower. Resourceful parents with many children build bunk hanging beds for their children. One side of such structures is usually attached to the wall, the other is suspended on steel cables or strong ropes.
Round hanging beds combined with a light cape look good on the terrace.
On the terrace or in the girl's bedroom, round hanging beds are quite appropriate. Decorated with canopies and properly selected lighting, they become the center of the interior, demonstrating either the creativity of the owner or the sophistication of the hostess.
Rectangular hanging models can be light and airy. Even beginners can do this. More complex designs with a back and sides require some carpentry skills, but with hard work and patience you can make even such models yourself.
Today it is considered fashionable to decorate the interior of a country house with hammocks. A hammock in Mexican, Brazilian or Mediterranean style is both a fashionable interior solution and a comfortable bed.
Related article: How to hang curtains with your own hands efficiently and quickly
Return to contents
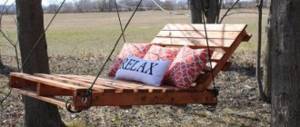
Swing bed for a summer house
Summer, warm sun, light breeze - this is the best time to soak up the fresh air. If it is not possible to buy a ready-made swing bed for the street or build a solid structure from good wood, make a hanging product from pallets. After all, these are almost ready-made elements of a wooden bed. In addition, such material will not cost you anything.
Craftsmen and designers offer many ways to make a hanging bed from pallets. We propose to build the most convenient and simplest one.
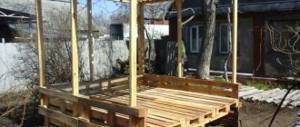
Materials and tools
Our bed will be large enough to accommodate a full mattress. This will significantly increase her comfort. Prepare the materials necessary for work:
- 2-3 wooden pallets.
- 3 boards with parameters 20x40 mm or timber 40x40 mm.
- Drill with drills.
- Screws.
- Pliers.
- Sandpaper or a sander with attachments of different grain sizes.
- Tape measure and pencil.
- A strong rope (or cord) that can withstand high loads.
- Metal fittings for fastening.
- Mattress with zippered cover.
- Putty.
It is very important to choose pallets for work that are in good condition, always made from dry wood. Before assembly, the wooden pieces should be put in order: remove excess nails, fill the holes with putty. After the filler has dried, sand the surface of the pallet.
Description of work
- Measure the length of your finished mattress to determine what size hanging bed you need to assemble.
- To hold two pallets together, use an additional 3 boards or 3 pieces of lumber. Place them at the bottom of the pallets along the inside edges and the middle rail. Use glue and screws. Attach the pallets so that the length of the structure matches the length of the mattress.
- Detach the strips from the third pallet and add them with screws to the middle part of the structure, filling the gap.
- Cut off the protruding parts of the boards or bars.
- Use a thick drill to prepare through holes along the edges of the structure.
- Pull a rope (or cord) through the holes. Attach hanging rings to the ends.
At this stage, you can cover the base with a mattress, hang the product on a special device or on a thick branch to enjoy relaxing in nature. But if you want to extend the use of the swing bed, coat the wood with stain. This will protect it from the harmful effects of moisture.
Hanging beds are a piece of furniture that leaves no one indifferent. They are comfortable, unusual and can make any interior exclusive. Hanging beds are also versatile because they can be used not only at home, but also outdoors.
The simplest DIY hanging bed
The simplest design is a hammock made of a panel of bright fabric. You will need 2 pieces of very durable fabric, approximately 1.5 x 3.5 m. The panels are placed on top of each other and sewn along the long side. So that you can put a rug inside the panels that supports the shape of the hammock, you don’t have to stitch it all the way. The narrow side is folded over and hemmed to create a tunnel for the cord. The cord must be very strong. It is better to weave it from nylon ropes. The cord is tightened to collect the fabric, and the assembly area is wrapped several times with the same cord. The fashionable hammock is ready, all that remains is to securely attach it to a tree or special stands. A bright hammock will help create a light resort atmosphere of Asia or the Mediterranean.
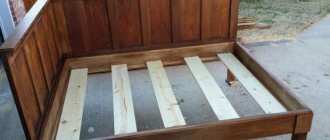
Hammocks have one drawback: it’s not very comfortable for two people. Therefore, for those who like to relax together, a rectangular hanging bed is suitable. It’s very easy to make it with your own hands. Required:
To hold the hanging bed you will need a very thick rope.
- Massive and very durable board. You can use a countertop. You should not take fiberboard: the material may break. If there is no large board, you can assemble a bed from floorboards, fastening them in 2 layers, perpendicular to each other.
- Dye.
- Drill.
- Very thick rope or steel cable.
- Hooks for hanging.
First, the base board is given a marketable appearance. It is sanded, primed, painted or varnished. Using a drill with a crown, holes are made in the corners into which the edging or cable will pass. It’s good if they are located 15-20 cm from the edge. Ropes are passed through the holes and secured with a knot from below. To prevent the knots from coming undone, they can be treated with varnish or glue. It is better if both ends of the rope are lowered into the hole: the fastening will be more reliable, and the resulting loop will be easier to place hooks for hanging. The hooks are hooked onto the rope, each side of the bed is alternately attached to loops pre-fixed on the ceiling. All that remains is to put on the mattress and, if desired, secure the canopy. The romantic bed is ready.
Related article: What colors of curtains will go with beige wallpaper?
Return to contents
Making a ladder for a bunk bed
Making a stepped structure with your own hands has its own characteristics. Therefore, to ensure everything works out correctly, follow these step-by-step instructions:
- Prepare material and equipment.
- Make a drawing.
- Make two bowstrings.
- Install the steps.
- Sand and paint the system.
Even such a magnificent design can be made with your own hands if you have certain skills and the necessary equipment
Material and equipment
In order to make a staircase for a two-tier structure, you need to prepare:
- wood boards measuring 5*15 and 5*10;
- bars with a section of 5 * 5;
- 6 cm screws;
- glue;
- roulette;
- drill;
- jigsaw;
- sandpaper.
The structure of ash is the most suitable wood for making a structure for a bunk bed
Drawing
Before starting the installation of the staircase, it is necessary to make a sketch of it. Such a drawing is drawn quite simply, taking into account all the above requirements for the system.
Knowing the basic requirements for such a design, you can easily draw a sketch of a ladder for a bunk bed
Bowstrings
The strings of the system are cut from 5*15 boards, their ends are sawed off at an angle of 45 degrees - this is the angle of inclination of the stairs. Marks are placed on the strings at the places where the steps are attached.
Bowstrings are two support beams to which the steps are attached
steps
Wooden steps of the required dimensions are laid and fixed with screws. Their edges are rounded, and all fastenings are reinforced with glue. The finished structure is screwed to the floor with reliable anchor bolts.
The finished structure should be securely attached to the floor to increase the safety of the system
Sanding and painting
The surface of the steps and platform is sanded, painted and varnished.
You can paint such a staircase in any color, the main thing is that it harmonizes with the interior of your room
Round hanging bed
It looks great on a garden veranda or in a children's room. The main thing is to hang it away from the walls. When swinging, it should not touch the walls.
Diagram of a round hanging bed.
Very strong boards are selected for the base. If the bed is constructed from fiberboard, then 2 sheets should be fastened together: this will be more reliable. The required diameter of the future bed is calculated, a circle is cut out from the assembled wooden panel or fiberboard. Holes are drilled at a distance of approximately 20-25 cm from the edge. They must be located at the same distance, and their diameter must correspond to the ropes, ropes or chains on which the structure will be suspended. Chains are passed through the holes, which are securely fastened from below. These are the most reliable, but not the most aesthetic mounts. Nylon cords look more aesthetically pleasing, but they are less reliable. When choosing what the structure will be suspended on, you should take into account the weight of vacationers and the load that will fall on the base and fastenings. If children will jump on the bed, you should choose the most durable materials. Chains or ropes are passed through the holes and collected into a bundle, which is fixed to the ceiling. It turns out to be a beautiful cone. It is very important to correctly calculate the length of the cords: the base should hang evenly. For fastening you will need the most powerful anchor bolts.
Return to contents
Types of stairs
Staircases for beds can have very different designs:
- The vertical one consists of two ladder strings (longitudinal guides) connected by crossbars. The advantages and disadvantages of the design are obvious: the price of the material and the space occupied in this case are minimal, but we are not talking about any ease of use.
- A marching staircase differs from a vertical staircase in that it has a slope and steps instead of rungs. It is much more convenient than the vertical one, but it takes up at least half a square meter of space near the bed. However, even here comfort is still far away: the typical slope of such a staircase is at least 70 degrees to the horizon. For comparison: the most convenient is a staircase with a slope of 30-35 degrees.
Little subtleties
- For older people or children, classic options with headboards and sides will be more suitable models. To make these, you will first need to make drawings.
- Suspended structures can be attached to the wall on one side: this way they will not sway with every movement.
- Hanging models require special design. It’s good if it is possible to make original lighting: under the bed, along its perimeter, or to illuminate the cords on which the structure hangs.
- The floor under the hanging structure must be of excellent quality. To draw attention to an unusual sleeping area, you can zone the floors using colored tiles or laminate.
Related article: DIY high chair: step-by-step instructions
A hanging bed is a wonderful solution that can decorate any interior space.
The best posts
- How to make a plasterboard ceiling in the kitchen with your own hands
- Painting drywall - step-by-step instructions
- How to join drywall in corners and the process of building a decorative niche
- Sealing drywall joints - recommendations from professionals
- Epoxy resin, application
- How to seal a doorway with plasterboard - installation diagram
- DIY plasterboard ceiling installation - video tutorials and installation instructions
- How and how to glue a foam plastic ceiling plinth
Fastening
Mounting methods vary depending on the shape of the bed itself and the ceiling. It can be attached to both the ceiling and the wall. You can also use a combined method. It is better to look at the mounting types in detail in the photo of hanging beds in order to determine the best option, depending on your conditions.
When choosing a ceiling mount, it is necessary to thoroughly calculate the load on the mounts. Static and dynamic loads are taken into account. Anchors mounted in the ceiling must be made of durable alloy that can withstand impressive weight. The bed can hang on ropes, cables and even chains - depending on its model and style.
If you cannot hang the bed from the ceiling, you can attach the headboard to any wall. She will seem to be floating in the air. For these purposes, you need to choose a suitable model. This bed greatly changes the interior of the bedroom.
If you want to achieve greater security, then it is safer to use the so-called combined mount. This will ensure the immobility of your structure, which is why it is recommended to use it when installing children's beds.