A kitchen bench with a drawer for a small kitchen is a good alternative to chairs. It is multifunctional, has a wide range and attractive appearance. And all this combined with comfort and practicality. Modern benches are produced in different modifications and sizes. Before purchasing, it is advisable to study all the pros and cons of this type of furniture.
In a small kitchen, chairs can be replaced with a miniature bench with drawers.
Characteristics of kitchen benches with drawer for a small kitchen
A kitchen bench is a piece of furniture made with a backrest of different heights and a fairly narrow seat. Placed near the dining table. The seat is made of small thickness in both hard and soft forms.
The design is mostly simplified. Consists of a seat, back and four legs. However, manufacturers offer more complex modifications in the form of a frame base instead of legs.
Most models are not complex in design.
The kitchen bench must meet certain requirements:
- be resistant to moisture;
- do not release harmful substances;
- not be of low quality;
- withstand cleaning with detergents.
Choose a bench for the kitchen based on several criteria.
The main condition of the bench is its small size, which is important for small kitchens. This is the main criterion when choosing this type of furniture.
Preparation
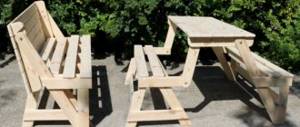
The advantages of self-construction are that you can make an original and exclusive product. You can not only ride and relax on the swing bench, it stylistically successfully complements the area. The atmosphere of comfort is immediately felt.
Before any task, it is important to properly prepare for it. First of all, you need to decide on a place for the structure, draw up a project, and resolve the issue with the material.
If you have at least minimal carpentry skills, we recommend using hardwood, oak, beech, hornbeam. A bench made of such material is not afraid of precipitation and is durable. The main disadvantage is the difficulty of processing hard wood, so you will need proper tools and experience in carpentry.
Wood processing has its own nuances
A simpler option is dried pine. The tree should not contain large knots that significantly reduce the strength of the structure. You can do the jointing of the material yourself, or it is better to buy already made blanks.
It is advisable to choose a place for a swing bench away from the road, drainage pits, and enclosures. Peace and tranquility are a priority. It will be nice if the bench offers a good view of the entire area. And of course, there must be enough space so that the structure can be used without obstacles.
Measurements and calculations
The critical phase is the preparation of the design design. This stage cannot be skipped; the correctness of future construction depends on it. Based on the drawing, you will determine how much material is needed and roughly transfer the image of the structure onto paper.
Measurements and calculations are carried out taking into account individual requirements. Creating a project on your own is quite difficult, especially if we are talking about a complex and detailed plan.
The best option is to use the Internet, where there are dozens of ready-made sketches. All you have to do is choose what you like and adjust it to your conditions.
Advantages and disadvantages of kitchen benches
Like any category of kitchen furniture, a bench has advantages and disadvantages that need to be taken into account when choosing. Advantages:
- rational use of space;
- comfortable accommodation;
- multifunctionality (drawer, folding seat with storage compartment);
- the presence of a back makes the design comfortable;
- some models have soft upholstery;
- the transformer provides an additional sleeping place;
- light weight compared to a kitchen sofa;
- combination with almost any style of kitchen.
A mini bench for the kitchen has a set of positive qualities.
Along with the obvious advantages, the bench still has several disadvantages. The main ones:
- a non-compact model takes up a lot of space in a small kitchen;
- inconvenience during cleaning (difficult to move);
- a bench with a drawer creates a gap above the floor (dust and dirt easily accumulate);
- Soft upholstery needs constant cleaning.
Such furniture also has its disadvantages.
Another disadvantage is the inconvenience when a neighbor leaves the table.
Final finishing
Your DIY chest bed is almost ready, but you don't really like the way it looks? No problem, you can decorate it. Wooden parts will look much more interesting if they are covered with stain, fortunately, in construction stores you will probably be offered stain in a variety of colors, including walnut or ebony. In addition, the walls can be painted, covered with fabric, burned or cut into patterns.
Important! The joints can be sealed with decorative glazing bead. But nothing prevents you from making forged overlays or their plywood imitation.
Types of benches
Modern stores offer a catalog with a huge selection of different models. On sale you can find products with different purposes and levels of comfort.
The most common design options:
- A straight bench with a hard back and seat (inexpensive, fits perfectly into Scandinavian and country style).
- A straight-shaped bench made of wood with soft upholstery (a variety of upholstery materials and colors allows it to harmonize with any interior).
- Design with a drawer (an advantageous option for small-sized kitchens and studio apartments, where the sleeping and dining areas are combined, and the presence of a drawer allows you to store food and small items).
- Corner model (saves space, often the model is multi-modular, for example, by moving the corner module, you can get a linear bench design).
Note! The modern kitchen corner bench comes with additional elements in the form of stools, made in the same style as the bench.
- Semicircular bench (legs are adjustable in height, have soft upholstery and chrome elements as decor).
- Transformable bench (the model is equipped with a folding design and can easily be transformed into a bed).
Note! Sometimes such benches are equipped with soft pillows that can be easily untied and form a sleeping place.
Possibility and result
The possibilities of wood are limited only by your skills and the availability of tools. If you only have a saw and an ax at hand, plus a few chisels and a hammer, and you master them at the school level, then miracles will not happen.
Collect simple benches, especially since their main function is to rest in a comfortable position.
But let’s look at the main types of assembled benches:
- Three logs fastened together make a bench. To assemble this elementary structure, you do not need drawings of a bench made of logs - you brought three logs with your own hands: two short ones and one longer one, the short logs serve as supports, the long one serves as a seat.
Having driven in a few nails for fixation, or pieces of reinforcement, you get an elementary structure suitable for use. This is a technology for making simple benches.
For your information! Despite the described simplicity, the design can always be made heavier. You can add side restraints and backrests. Although these weights will automatically move the product to the next category.
- Combined wooden structures. We take into account not only the combination of materials, for example, logs + boards, or logs + beams, but also combinations of execution techniques. This is a special and substantive conversation.
- Combined designs using other materials. An example would be log seats on a stone base. Logs on a metal base, for example, made of wrought iron, can be used and actively used.
Having the basic skills of a wood carver, you can decorate any wooden base with simple three-dimensional designs, which will enliven the appearance of the product.
The photo is a complete work of art
As easy as pie
Although the bench made of logs, assembled with our own hands, has already been described by us, some additional nuances require lighting.
The following points are interesting:
- Connection technique, there are three of them:
- You can, of course, simply strengthen the log to the supports with nails. Here the log-seat is nailed with nails with an angle of entry of 45 degrees to the base;
- You can make cup-shaped recesses and, as they say, cover the supports. The notches are made using a similar technology as when joining logs when building walls. Final fastening involves nails or self-tapping screws;
Three logs are already a bench.
We remind you! There are metal staples in the connection of wooden parts. The hardware itself has a somewhat rough appearance; it is not used in the construction of shops, given that the aesthetic indicator is far from the last in the evaluation of these products.
- Wooden or metal cylindrical stakes. This type of joining in the construction of huts has been used since ancient times. The technology has not changed at all. The first log is drilled to half the diameter, the subsequent ones - all the way through. The holes are located strictly one above the other. Metal and wooden choppers are driven into the finished recess.
- Additional techniques. Agree, sitting on the sloping surface of a log is not very comfortable. Therefore, a more acceptable sitting option would be a flat, smooth surface.
This can be achieved in two ways:
- Using a circular saw or other electric or chainsaws. This process takes a short period of time. The result is a flat bed suitable for comfortable sitting;
- The second option is manual processing. A saw and a plane are excellent helpers. Your task is to remove excess material and achieve the above result. In both cases, the grinding process can be carried out either manually or using a grinding machine.
It's not easy to do this manually.
- Impregnation and painting. We've figured out how to make a bench out of logs with your own hands. Let's think about an equally important question: how to preserve it for a long time?
Wood is a material subject to deterioration, it needs and can be protected. Impregnation with an antiseptic is a truism and is mandatory. Then you can cover the product with stain and varnish, you can use only varnish so that the primary texture of the wood does not change, or you can paint the structure.
Lots of wood - lots of possibilities
Anything can come into play.
After the grandiose construction, the materials remain. Wood can always be used to make something useful. Mailboxes, bird feeders, summer residences for children.
But today we are solving another problem - how to make a bench from a log. Therefore, for now we will limit our imagination to benches.
Here we are interested:
- Manufacturing of backrests and other restraints;
- Additional design techniques.
Backrests and side restraints. These details were originally invented for relaxation. The back is slightly thrown back, the hands rest on special supports.
However, soon the ergonomic laws were written off into the archives, and naked practice appeared before us, which offers the following:
- Seat backs are prepared in two main variations:
- At an angle of 90 degrees or perpendicular to the seat;
- Angled up to 15 degrees for comfortable, comfortable sitting.
The first option is considered simpler and stricter. No great skill is required here. The bars on which are attached parallel to the base of the board are fixed perpendicular to the seat.
The design can be simplified even further by replacing the stacked back with “pancakes” sawn off from a log.
The second option is more problematic and requires the manufacture of corner holders, which are absolutely identical. This will require a vice, a wood saw and your time. But in the end you will get a backrest on which you can comfortably lean back.
Back mounting options.
Practical note! If you use a log or half of it as a base, then to fix the backrest supports at an angle you do not have to resort to complex structures or make recesses. The first point of fixation of the support is selected as close as possible to the surface of the bench.
Then the support is tilted to the required angle, and a wedge of the required size is inserted between it and the slope of the log.
- Design motives. To be honest, this is a large and separate topic, but it is unacceptable to ignore it. To decorate your homemade items, use not only wooden scraps, but also unusual tree branches, various inserts and remnants of other materials, for example, double-glazed windows, stone, brick, tiles.
The original design will decorate the site.
And now let's move smoothly to the third act of our play - a combination of materials.
Combine with logs
The technology for using logs has already been described. It is allowed to use other materials for the manufacture of benches.
For the construction of supports the following can be used:
- Stone and brick. The bases themselves are built like low columns; a bed for a log can be provided in them;
- Metal. Metal legs can be forged or welded. The option of placing logs on channels is not excluded;
Both the bench and the bed.
- Glass or ceramics. Considering the fragility of the products, they are not used independently, but given their decorative appeal, they can be used for cladding stone bases, or, for example, for decorative inserts or forming mini stained glass windows.
Using your imagination, you can turn an ordinary bench into a work of art.
Separate column
Fantasy and wood can turn into something interesting.
Our instructions would not be complete if we did not recommend a few tips for working specifically with logs.
| Question | Answer |
| Is it necessary to impregnate a log if it has already been impregnated industrially? | The log is impregnated only to a small depth; if you subject it to additional impacts, sawing, planing, then the tree will have to be impregnated again. |
| The bark looks very attractive. Does it need to be removed? | The bark is a home for various bark beetles; leaving it, you risk finding out about the insects when they begin to eat the bark. In addition, you do not know the condition of the wood under the bark. It's better to remove it anyway. |
Types of upholstery material
A kitchen bench is considered frame furniture and is often available with soft upholstery. Material used for decorative coating:
- Artificial leather (impurities are removed well, is not afraid of moisture. Good quality material has been used for more than 5 years. It is distinguished by its low price and a variety of colors).
- Leatherette (inexpensive option is highly hygienic and practical to use).
- Genuine leather (prestigious material, more often found on models with a frame made of natural wood. Environmentally friendly, but requires constant care, especially in white colors).
- Textiles (treated with moisture-resistant impregnation. It is preferable to choose synthetic materials, they are not resistant to dirt, moisture and wear).
The most popular materials: flock, jacquard, tapestry, microfiber, velor.
Preparing tools and material
What would be the best material to make a swing bench from? Of course, if possible, it is better to purchase blanks made from hard wood - oak, beech, hornbeam.
Such wood is most resistant to external weather influences; parts made from it will have a high margin of safety. True, processing such materials is quite labor-intensive and requires good carpentry skills and high-quality professional tools.
You can opt for high-quality, well-dried pine that does not have large knots that can reduce the strength of load-bearing structures. It is better to purchase ready-made profile blanks - timber and boards, so as not to waste time on jointing the wood to the required size yourself.
Tools you will need are hacksaws, chisels, a hammer, a drill with a set of drills, a screwdriver, a grinder for cutting off the protruding ends of metal parts, and clamps. It’s great if you have a manual milling machine - this will greatly simplify some of the processes of selecting grooves.
A sufficient supply of self-tapping screws with anti-corrosion coating, M10 bolts with round furniture heads, wood glue, sandpaper (even better - a hand sander), and varnish for finishing the bench should be prepared.
You can choose any place to work, the main thing is good lighting, ventilation, and the presence of a comfortable workbench.
This work does not tolerate haste and negligence - a low-quality, unstable bench will not only not decorate the garden interior, but can also cause injury. Therefore, all processes must be performed sequentially, with the necessary delay for the wood glue to dry at the joints.
Why you need a windmill and how to make one from a plastic bottle, find out here.
And in this article you will find step-by-step instructions on how to make a fountain in your country house with your own hands.
How to make a bench
It’s not difficult to build a kitchen bench in your home with your own hands; you just need the desire and the necessary tools. The dimensions of the table and bench must match.
The length is calculated to seat 2-4 people. In this case, a size of 1.5-2 meters is sufficient. The height of the backrest should be equal to the depth of the seat or slightly exceed it.
Foam rubber, synthetic padding or polyurethane can be used as filler for the seat.
Some recommendations:
- it is advisable to choose bars without cracks and knots;
- the required material thickness for the frame is 40 mm, the body is 16 mm;
- The upholstery fabric should be dense;
- You cannot fasten upholstery with a stapler; it is better to sew removable covers;
- so that the seat is not narrow, its depth should be at least 40 cm;
- in relation to the seat, the backrest is attached at an angle, with a height of at least 35 cm.
For reference! A bench with a drawer must be equipped with a slide. The seat of stationary furniture is designed with a lifting mechanism.
Support frame - swing base
After the bench is ready, you can move on to making the frame - the base of the swing, its basic, stationary part.
For this, first of all, the side racks having an A-shaped structure are prepared. The two main blanks are beams with a length of 2000 and a cross section of 100 x 120 mm. The point of their intersection is 300 mm from the top, the optimal angle formed is 40 degrees. From these calculations, marking and selection of half-tree grooves are carried out.
Prepare bars for the supporting structure
The lower horizontal lintel will connect the structure at a distance of 300 mm from the ground level, it is made from timber of the same cross-section, and is attached “half a tree”. After carefully gluing and strengthening the joints with bolts, the structure acquires the necessary rigidity.
Even at the stage of marking and preparing the beams for the side posts, you can provide grooves for securely fastening two crossbars. One of them is a powerful upper beam to which the suspension elements will be attached. The material for it should not be inferior in size to the bars of the racks.
The second jumper is located at the bottom at the rear of the structure. It does not carry such a significant load - it is simply an additional connecting element that gives additional stability to the entire frame structure. A timber or board 40–50 mm thick will be sufficient for it. It is attached to the half-wood side posts with self-tapping screws.
Assemble and secure the bars into an A-frame structure
The upper beam is rigidly attached to the finished A-frame posts using metal corners. In the same place, powerful fastening elements with a ring are installed, to which chains are suspended through a carabiner.
Decorate the pond on your property with a water lily from a plastic bottle. Read how to do it here.
We plant and care for variegated dogwood in this article.
How to care for your kitchen bench
Careful care and proper use will allow the bench to last for many years. It is enough to follow simple rules:
- Do not install a bench with soft upholstery next to damp walls or heating appliances;
- prevent steam from entering the structural parts;
- protect from mechanical damage (avoid falling sharp objects);
- avoid prolonged exposure to sunlight on structures made of natural wood;
- regularly remove dirt and dust;
- do not use a stiff brush with aggressive cleaning agents (it is advisable to remove stains with water and soapy water);
- caring for wood allows the use of wet wipes, as well as alcohol-based detergents.
The rules for caring for a bench are quite simple.
Regular care will also preserve the impeccable appearance of the bench for a long time.
Upholstery
The quality of the upholstery is one of the main criteria for choosing a sofa for the kitchen . Its durability depends on this indicator. The main types of upholstery for kitchen furniture are artificial leather and flock. Genuine leather, suede and velor look great, but are not practical in the kitchen. Cheaper materials (matting, tapestry, jacquard, etc.) absorb water, grease and odors.
Faux leather
Faux leather has many advantages : it is durable and hygienic, does not fade in the sun for a long time and goes well with kitchen sets. It is easy to care for, it is not afraid of greasy stains and wet cleaning.
Artificial leather is made on the basis of various polymers : polyurethane, polyvinyl chloride, polyacetate, etc. The basis is fabric or various non-woven materials. The disadvantage of this upholstery is the significant difference in quality and wear resistance of its varieties.
Most furniture manufacturers do not indicate the specific type of artificial leather used . Finding information about this in a store is even more difficult. As a result, the term “eco-leather” can refer to either a high-tech, high-quality material or its cheap analogue, the top layer of which will become unusable after just a few months of use. It is not easy for a non-professional to distinguish them by appearance.
Advice! Buy furniture from manufacturers who provide a selection of faux leather upholstery in different price categories. For example, domestic artificial leather, artificial leather dpcv, premium, etc. The higher the price, the better the quality and the higher the wear resistance.
Flock
Flock is produced by applying tiny nylon fibers onto a thin fabric base . It is also considered a strong and durable material. Flock repels water and is easy to clean; it is not afraid of pets' claws. In terms of tactile sensations, it is more pleasant than artificial leather, but loses in appearance.
Both types of upholstery are afraid of hard brushes; dirt can only be wiped off with a soft sponge and neutral detergents . After completing cleaning, the surface must be wiped dry.
Useful tips from designers and craftsmen
When choosing a kitchen bench, you need to adhere to some criteria:
- for a small kitchen, a folding or linear bench model with a spacious drawer is suitable;
- take into account functionality (it is better to purchase a transforming bench consisting of several pieces of furniture);
- If there are animals or small children in the house, then you should choose leatherette as upholstery.
For a small kitchen, a straight model with a large drawer is suitable.
The bench should support the overall style of the kitchen. A wooden bench will be a good addition to a corner bench. Furniture made from natural wood looks elegant and luxurious.
The interior in a modern style is complemented by silver upholstery and chrome legs. For a country house, a bench made of black oak with genuine leather upholstery is suitable.
Silver upholstery fits perfectly into a modern style.
A bench with a drawer, straight or corner, for the kitchen is a real find. It fits into any interior and provides a cozy atmosphere.
Today this is an excellent alternative to stools and chairs. Its dimensions and variations allow the bench to be placed in rooms of different sizes.
Preparatory work
To begin with, the location of the bench is selected and its drawing is drawn up. These steps will help determine:
- Dimensions of the future bench. They can be individual, but some generally accepted parameters will have to be taken into account: the height of the backrest (if necessary) is 350-500 mm, the distance from the balcony floor to the seat should not exceed 600 mm. Regarding the length of the seat, it can be equal to the width of the balcony, so the bench will fit well between its two long sides. This option provides for the absence of armrests. The width of the bench is optional.
- The method of placing the bench on the balcony, as well as its appearance.
- Calculation of required materials.
To make a bench for a balcony with a drawer, you can purchase chipboard sheets at any hardware store. But this issue can be solved in a more practical way. You can get the necessary material from old unnecessary furniture. To make the frame you will need 40x40 mm bars.
Necessary tool
- metal ruler and square;
- roulette;
- pencil;
- sandpaper;
- plane;
- jigsaw;
- self-tapping screws, nails, screws;
- drill;
- drill;
- Grinder;
- hammer;
- building level;
- paint brush.