Species and diversity
For the normal and correct functioning of a mobile phone, it is necessary to use various means of protection. Due to constant use, not only scratches, but also cracks may appear on the screen of phones. They spoil their appearance, can cause deformation of various parts, and in some cases completely disrupt the functionality of the devices.
Varieties
covers:
- Tight-fitting cases made of plastic and leather.
- Soft types of fabric-based covers.
- Protective products with decorative trim, such as handbags, pouches, mini backpacks, hollow toys for children's options.
Whatever type of cover a person chooses, it is important that it fully performs its main function. Children usually prefer bright colors with cheerful designs. Men like a business style with elements of plastic and leather, while women choose delicate and soft colors with various flowers, rhinestones and beads.
Crochet technique
You can find a lot of information on the Internet or on the YouTube channel for making protective cases yourself. For beginner needlewomen, there are very simple crochet phone cases models. The diagrams with descriptions are quite clear and do not cause any difficulties during their manufacture.
Handicraft Basics
To make any product yourself, you need to learn the technique of craftsmanship. To make a knitted phone case with your own hands, just learn the simplest techniques.
Technologies:
If a novice craftswoman knows only these technologies, then she will be able to crochet a handbag for a phone or another version of the simplest case.
Merry Owl
You can make very simple and original protective cases for mobile devices with your own hands. One of the interesting ways for beginners is to crochet a phone case. An owl, a bear or another cheerful face will not only lift your spirits, but also fulfill its intended purpose.
There are several options
for this type of mobile case:
- you can knit an owl entirely from threads using a hook;
- embroider it on a ready-made and pre-knitted cover to create a decoration;
- make an Owl applique on the product.
The easiest and simplest way is to simply tie it and then apply decor. The case will turn out to be very funny and will be able to please the little owner of a mobile device or a young girl.
Owl knitting technology:
Convenient handbag
For beginner needlewomen, a crocheting pattern for a phone case in the form of a handbag is suitable. This option is so simple that any beginner can do it. First you need to choose a color scheme for the future case. Depending on the desired decor, you can choose bright or delicate shades. The main thing is that they are combined with each other.
A crochet hook is such a versatile and convenient tool that you can use to crochet anything. For example, contrasting stripes are perfect for extravagant variations, and delicate pastel colors can be decorated with translucent rhinestones.
After this, you need to choose the quality of the thread and the size of the hook.
Handbag knitting technology:
- Make a pattern for the future product.
- Using a sewing centimeter or soft ruler, take measurements from the phone.
- Add 2-3 cm depending on the thickness of the threads.
- You need to start knitting with a set of air loops, which should correspond to the size of your mobile device and have a small margin.
- Then you need to knit a connecting loop and start knitting with a single crochet in a circle. As a result, a pipe will form. A mobile device in this model can be placed both vertically and horizontally. Therefore, it is necessary to adjust its length and width.
- At the final stage of knitting, you need to sew up the bottom of the bag and make handles, ties or straps for it. It can also be additionally decorated with various decorative elements.
Decorative design
A phone case should not only perform its direct protective function, but also provide aesthetic pleasure to its owner. Absolutely any model can be decorated independently using almost improvised means.
Decorative ornaments can be bought ready-made in specialized stores or made by yourself. If you apply a little imagination and ingenuity, the result will be a unique and original case that no one else will have.
Materials for decorations
A wide variety of decor can be used to decorate cases. Embroidery, rhinestones and ribbons are used in delicate themes. For extravagant and bright options, craftswomen select decorative stones, leather, beads and other materials.
List of elements for decorative decorations:
- ribbons, braid, border, nylon, bows, lace;
- beads, rhinestones, beads;
- decorative stones, elements made of natural and artificial leather, buttons.
The material is very diverse and its choice depends on the imagination and model of the product. Craftswomen do not always buy decorative jewelry in stores and very often they make it themselves. For example, you can use finely ground glass Christmas tree decorations. These grains are added to transparent nail polish and coated with it on dense surfaces, resulting in decorative glitter.
Or another option. You can make beautiful stones yourself. To do this, you need to add gypsum to the water and knead it into a dense mass. If multi-colored elements are needed, then dyes are immediately poured during mixing. You can also make them white and then paint them with nail polish.
While the plaster is soft, a large needle or awl is used to poke a hole for future fastening, if required. And then you need to wait for the stones to dry and treat them with transparent or colored varnish. You can use homemade decorative glitter.
Clasps and straps
The decoration for the case can be not only bows, ribbons, rhinestones and stones, but also clasps, straps and handles of the product. Depending on how exactly you intend to wear the case, you can make straps with fasteners on a belt for a belt or add them to a bag, backpack or briefcase.
The case may have one or more handles, additional straps or ties. When using decorative material, it is necessary to ensure that all elements are harmoniously combined with each other and match each other in color.
Fasteners can be in the form of buttons, clasps, hooks or Velcro. The latter option is not very convenient, since they can catch thread fiber and, over time, become clogged and lose their stickiness.
For children, the ideal fastening option would be lacing, which can be decorated with multi-colored tassels. They are more durable, do not break and can be used frequently, that is, opening and closing a mobile phone case.
You can make a stylish, original, delicate or extravagant case for your mobile device yourself using available materials. Crocheted cases have undeniable advantages over store-bought options, since they are original work. Craftswomen make them convenient and unique for a specific phone model.
Important Tips:
A phone case is a very convenient invention that you can make yourself.
The crochet technique is very simple and suitable for even the most inexperienced craftswomen.
Brutal case with a scythe for your beloved guy
If a girl has a small ball left after knitting a sweater or jumper for her beloved guy, then as a nice bonus you can knit him the same phone case.
To work you will need:
- Yarn – 30-50 g (100% acrylic);
- Circular knitting needles – No. 3-3.5;
- Large button;
- Hook and needle.
Advice! With circular knitting needles you can knit 2 pieces at once, for example, two socks with a seam or the front and back of a children's sweater!
Progress:
- For one half of the cover you need to dial 12P. Knit 2P stitches and add 2P on each side for rounding, 16P in total.
- Knit the back half to the required height and move to the front part with a cute flagellum.
- The weave is performed using an additional knitting needle or pin: 4 knits P are removed for work, the next 4 knits are knitted, then 4 knits from an additional knitting needle. Repeated 3 times.
- Using a hook or needle, two pieces are connected, a button is sewn on and a loop is added.
An unusual knitted cover creates a good mood and conveys individual style.
Perhaps such a thing will not only protect the needlewoman’s phone, but will also allow her to start her own small business selling original clothing for her favorite gadgets.
Advantages of knitted covers
Knitted phone cases have a number of advantages. They are made from natural materials, which means they are much more pleasant to hold in your hands. Their design is unique, because you make them yourself, choosing any pattern you like.
You are probably insured against an allergic reaction to low-quality materials, from which modern cases and bags for mobile phones are usually made, because yarn is most often made from high-quality natural materials. In addition, few materials are as pleasant to the touch as wool.
Case for your phone
Your handbag will be the perfect size for your phone, even if you have an extremely rare model, because you yourself adjust the size of the product. In cold weather, a mobile phone in such a case will freeze less, because knitted phone cases are made of wool, which perfectly protects from the cold. And, in the end, knitting a phone case itself brings pleasure, because when you knit, you take a break from the hustle and bustle and worries.
Knitting equipment
What do you need to make a case with your own hands? And you will need very little:
- Yarn.
The choice of color is left to your discretion, it all depends on your taste. - A set of spokes.
Their number may vary depending on the knitting method. - A large needle, with which you may have to assemble individual parts.
The advantages of knitted phone cases and their advantages
The main advantage and advantage of knitted phone cases is that they are made from natural fibers, wool or cotton, which is why they are so pleasant to the touch. In addition, homemade samples give the phones an exclusive appearance, because they are knitted in a single copy.
A knitted cover has another undeniable advantage. It is made to the measurements of a specific phone, so it fits perfectly with any model, even the rarest one. Homemade specimens also have the advantage that they better protect the model from low temperatures, whereas plastic does not have this ability.
Methods of knitting a cover with knitting needles
- Knit two identical fabrics with knitting needles and sew them together with your own hands.
- Knit the case in the round, using the same principle as knitting socks.
Let's look briefly at each of the two methods.
- With the first method everything is extremely simple.
Choose any pattern, any thickness and color of thread. Then you simply start casting on stitches, focusing on the width (or length, if you want the phone to sit horizontally in the case) of your cell phone. Once the width of the product is sufficient, you simply knit the fabric lengthwise, again focusing on the length of your phone. You need to make two such fabrics, and then simply sew them together. Congratulations, you have made your own case! - The second method is a little more complicated.
But it seems so only at first glance. After all, perhaps every needlewoman who does something with her own hands has tried to knit socks with knitting needles at least once in her life. The principle is exactly the same here, only you do not need to knit the entire sock, but only the part that is located on the foot. In short, first you need to cast on a number of loops that is twice the width of your phone. Then divide them into four knitting needles. Then knit in accordance with the chosen pattern. Only knit stitches are used, without purl or edge stitches. We work diligently with knitting needles until the length of the product is equal to the length of the phone. As soon as the lengths of the case and the mobile are equal, we begin to rejoice, because we have just made a handbag with our own hands using the second method.
Knitting methods that you will find on our website
Of course, this is a very brief description of how to make a case with your own hands, but for experienced craftswomen these modest instructions will be enough. And if you are just a beginner needlewoman, then you will find a more detailed description of knitting straight fabric or socks with knitting needles on the pages of our website. In addition, here you will find a huge number of ideas for fashion accessories and stylish wardrobe items. Instructions, diagrams, useful tips - you can find all this on our website. And if you don’t find what you were looking for, you can always contact the administration of our resource with questions, and we will certainly try to help you. We hope that our article was useful to you.
It is worth saying that knitted phone cases are a truly beautiful and fashionable accessory. By owning such a case, you not only enjoy its beautiful appearance and excellent protective qualities, but also demonstrate to others your ability to make beautiful things with your own hands, and also emphasize your impeccable taste. Let us add that you can make such a cover not only with knitting needles, but also with crochet.
You can find out how to do this on the pages of our website. You just need to find a description of how to make straight crochet fabric on our resource, and then proceed according to the first method of making a handbag. Come visit us more often, and you will always know how to make your wardrobe irresistible and your collection of accessories unique. We will be glad to see you!
Today, everyone has a mobile phone or smartphone, even very young children; it is an integral attribute of modern life. The functionality of the device matters at the stage of its selection, but the aesthetic side of the issue shows itself already during operation. Phones get scratched and damaged, and to keep them safe you just need a convenient case. You can always buy a ready-made accessory in a store, but it will be much more pleasant to use something that you have made yourself, for example, a knitted cover.
How to knit a phone case
You need to start working on the case by studying the diagram and taking measurements. So, there are two ways to make the product:
- tie the pipe, and at the end connect one of its edges with single crochets;
- start knitting from the bottom of the cover and continue it in a circle.
With the first method, the thickness of the phone will not be taken into account at the bottom of the case, and when put on, the corners will be sharp and not stick out very attractively. Therefore, it is better to resort to the second way and start knitting from the bottom.
To knit a phone case, you only need to know chain stitches and single crochets.
According to the presented diagram, knitting should proceed according to the following algorithm:
- You need to make a chain of air loops. The length of the chain will depend on the width of the phone, to which you need to add approximately 0.5 cm for ease of use of the case.
- Next, you need to tie the resulting chain in a circle with single crochets, adding one at a time at turns.
The cover is knitted with single crochets in the round. - The 3rd circle is knitted in a similar way, but on the turn you need to make not one single crochet, but 4. At this stage, be careful and focus on the thickness of the phone - if it is small, then 2-3 stitches on the turn may be enough.
The cover is knitted in the round without decreasing or adding until the desired length is achieved. - Further knitting in the round involves repeating the 3rd round until the desired length of the product is obtained.
You can use threads of different colors, changing them while knitting - this will create a striped fabric. Using threads of different colors, you can get a striped cover
When the case is ready, you need to think about the clasp. It may not exist at all, but you can use a button or button. If desired, you can tie a strip of single crochet on the back side of the cover, which would overlap the top and go to the front of the cover, and put a button on it. For a button, a chain of air loops secured with a loop will be sufficient.
To close the cover with a button, you need to tie a loop
A friend of mine knits items for sale, but she does not create clothes. In our city, unusual knitted covers made it popular and in demand. Her tables on the inserts were full of the most original accessories - a case in the shape of a minion, with a pug, an owl case, etc. I myself became the proud owner of a case in the shape of my favorite cartoon character - Homer Simpson.
Pink case for a dreamy person
For girls aged 10 to 20 who know how to handle knitting needles, a pink phone case made of pleasant acrylic yarn is ideal. You can knit such an accessory in 1 hour, without stopping from listening to your favorite music.
To work you will need:
- Yarn – 20 g (100% acrylic);
- Knitting needles – No. 2 (3 pieces);
- Button and needle.
Abbreviations in the description:
- P – loop;
- R – row;
- N – yarn over;
- Persons – facial;
- Purl - purl.
Progress:
- We cast on with knitting needles 22+2 P and knit 10 P with an elastic band 2*2.
- Next, we knit the sleeves, front and back according to the pattern: k3, N, k1, N, k3, N, k1, N, k8, N, k1, N, k3, N, k1, N , 3 persons.
- In purl P, all H's are crossed to prevent holes from forming in the product.
- Having knitted several P, P sleeves in this way, you can close them. It turns out to be a nice detail, and the phone case has hangers and a stand-up collar.
- The finished product will be seamless, so the work is done with 3 knitting needles. 2P faces are knitted in satin stitch, and then a plait in the center and 2 braids in the form of eights are marked on the front part.
- Weaves are made by crossing 1 knit and 1 purl, and the flagellum is 2 knits*2 knits. As you work, you can try on the phone case and knit the necessary string.
- The lower part of the product should be closed from the inside out using a needle and working thread. Sew on a button for decoration, put the finished item on the gadget and enjoy a perfectly done job.
Case decoration options
When the base is ready, you can start decorating. Here you don’t have to limit your imagination, using different techniques:
- Tie on additional elements and sew them onto the base. This way you can create a cover in the shape of an animal’s face or simply with colored knitted circles. The decor may well go beyond the cover itself, for example, you can make paws or ears.
- Sew decorative elements from felt. This material does not crumble along the edges and is easy to cut, so you can create an excellent applique from it.
- Make bead embroidery, attach beads, spikes, etc. Here it is worth using small-sized elements to make the case convenient to use.
- Make tassels from bundles of thread.
Photo gallery: ideas for knitted phone cases
Knitted elements can be sewn to the cover, creating a variety of characters. To complete the picture, you can add tassels from bundles of thread. By tying ears, paws and eyes, you can make a cover in the shape of an animal. Decorative elements can be cut out of felt and sewn onto the cover.
A yarn cover is a comfortable, cozy little thing through which you can express your individuality. This product will be a pleasure to wear yourself, and it will also make an excellent gift. To create a cover, you only need yarn and a hook, and the pattern itself is so simple that even a beginner can handle it.
Today everyone has a mobile phone. To prevent the phone from being scratched or clogged, a case was invented. Today we will teach you how to crochet a stylish mobile phone storage case yourself. It will be distinguished by originality and quality. So, we present to you our master class with photos and descriptions.
We crochet a simple case for an adult’s mobile phone
We will need: yarn of the desired color and hook No. 2.5.
Step-by-step master class with job description
Knitting a phone case begins with a set of air loops, their number should be three. Usually nine loops are enough (one more loop is cast for lifting). Next, the hook is inserted into the second loop and three single crochets are knitted. In subsequent loops, one single crochet is knitted, and in the last loop, 3 single crochets are knitted for turning.
Next, knitting continues on the reverse side of the product; one single crochet is again knitted into each loop. The row is closed using a connecting post. The result should be 20 single crochets. This way we tie the bottom.
We knit one loop for lifting and we knit one single crochet into the next loop of the base. We knit three air loops, skip one loop and knit one single crochet, repeat the combination with three air loops and one single crochet. Repeat until the end of the row. The row is closed using a connecting post.
Next, three air loops + one air loop are knitted according to the pattern. We knit a double crochet into the base loop, then into the next single crochet of the previous row we knit one double crochet, one chain loop, one double crochet. We repeat this combination to the end of the row and close with a connecting post.
We start the next row with one chain stitch and one single crochet, knitted into an arch from the chain stitches of the previous row. We knit a combination: three chain stitches, one single crochet in the next arch. The row of loops for the cover is closed by a connecting post.
When the desired length is reached, cut the thread and hide it in the inner part.
A phone case knitted in this way should look like this:
For decoration, you can knit a headband and decorate it with a flower, beads or something else, as your imagination dictates.
Watch the video for more details:
Knitted cover with embossed tracks
The next mobile phone case is knitted from wool yarn (one hundred meters per fifty grams). Also for work you will need several types of knitting needles: number 3.75 and stocking needles with the same number, as well as one button.
The knitting density is thirty-five loops and thirty-eight r. persons satin stitch = ten by ten centimeters. In this case, persons. The satin stitch is knitted as follows: knit. All rows will be knit stitches, and purl rows will be purl stitches.
Cast on thirty-seven stitches in total and continue knitting the phone case according to the following pattern: There is one knit in the first row. loop (LP), * purl one (IP), repeat from *. Knit the elastic band one by one for three r.
On the fifth day (persons): two IP, * remove one loop, one LP, yarn over, one LP, pull the resulting buttonholes through the removed one, two IP, repeat from *.
In the sixth: two LP, * three PI, two LP, repeat from *.
In the seventh: two IP, * three LP, two IP, repeat from *.
In the eighth: two LPJ * three P, two LP, repeat from *.
Then you need to repeat the last four rows. until the height of the phone case becomes fourteen centimeters from the inlaid edge. Finish knitting with the eighth row and bind off all the loops.
To assemble and finish the phone case, use a mattress stitch to join the back edges. Next, the seam is placed in the center of the second side of the product and the base seam is made. The ends of the threads are tucked in, and the cover itself is steamed.
You can also tie a cord to this phone accessory. To do this, take double needles and cast on three buttonholes. First r. Knitted with knit stitches, these three stitches are moved to the second tip of the knitting needle without turning the work. Now repeat the first r. and pull the thread at the back of the lace every time you start a new row. In this way, knit a lace eighteen centimeters long. Having completed the knitting, the lace is attached to the back of the case with both ends to the arc in the middle along the inside. The resulting loop turns to the outside. All that remains is to sew the button on the outer part of the cover (stepping back about five centimeters from the cast-on edge).
We create a mouse case for a children's gadget with our own hands
To knit a children's mouse case for a phone we will need: yarn of different colors, a hook No. 2.5 and threads for connecting the parts.
First you need to knit a chain of 13 chain stitches. Next, we tie the chain on both sides: in the first loop we knit a stitch with five crochets, in subsequent loops we knit the first stitch with a double crochet, and in the last loop we also knit a stitch with five crochets. After this, 7 rows are knitted in single crochets. Start each row with 3 chain stitches and end with a connecting stitch. Next, another 6 rows are knitted with threads of a different color using single crochets.
We create all components of our product
Lid.
Break the thread and start knitting over the last row. 6 columns are counted from the beginning. We start knitting with 3 chain stitches and 11 double crochets. Next, knit in descending double crochet order. Tie the finished product with the 1st row of single crochets. It turns out as in the photo.
Muzzle.
We knit 3 chain stitches, then 7 single crochets into the first loop.
Knit in a spiral, evenly adding 1 stitch in each row. Thus, 17 rows are knitted. When finished, the fabric is folded in half and stitched. Eyes.
Knit in circular loops to desired size.
After this, you should fill it with filler. Nose.
The nose on the mouse cover is knitted similarly to the eyes.
If you are knitting a phone case for your daughter, give her a surprise - it will be a wonderful addition to her image and a stylish set for the case.
Ears.
They are knitted similarly to the eyes and nose, but are not clogged with filler.
Upper paws. A chain of 3 air loops is made. Then 5 single crochets are knitted into the first loop. The 2nd and 3rd loops are considered the first stitch. Next, 2 single crochets are knitted into each column of the previous row. 3 r. In every 2nd column, 2 single crochets are knitted (that makes 18 stitches). Rows 4-7. 18 single crochets. 8 rub. Every 2nd and 3rd stitches are knitted together (12 stitches) 9 r. Similar to the 8th row (6 columns). Rows 10-16. No increases or decreases. Lower legs.
Knitted in the same way as the upper legs. For decoration, you can knit a handbag and decorate the “body” of the mouse with an openwork skirt.
The mouse case looks like in the photo.
After studying the detailed diagrams, you can create your own, unique and original phone case. We also hope that our master class gave you all the useful information you needed! Good luck to you!
Watch the video to see how you can make an original case with flowers.
Our master class on making a phone case is finished. We hope you gained a lot of new useful knowledge! Improve, learn and practice!
Is the old case for your favorite gadget pretty worn out? Or just tired of it? It doesn't matter what happened to the old one if you sincerely want change. But modern cases do not always fit all smartphone models, and those that do are poorly made and not at all beautiful. What to do? Make the case yourself. It will be beautiful, of high quality, made of the right material, and most importantly, it will fit perfectly with your phone! In the article you will find everything you need to make a case for a mobile phone using a hook, and simple diagrams, master classes and a detailed description of the work process are included, as always.
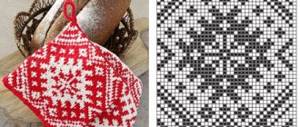
We weave a handbag for a mobile phone
I want to share with you the process of weaving this handbag. I took a lot of photographs, I will rely on photos during my story.
To the point...
In photo 1, the search results for a pattern for ribbon thread. Not all samples were implemented in this work, but they gave rise to new ideas, I’m talking about the first pattern in the photo.
As you look through the article, you will see a detailed layout of the knots of the main pattern.
The design of the handbag can be called an envelope. In photo 2, there is a ready-made woven fabric, which I conventionally divided into three parts and called: overlap with beads, back or back, front part, which goes under the overlap.
Detailed photo shoot of weaving a pattern from a corner for a gray handbag.
The pattern is not dense, we measure the threads at the rate of 1 to 6. At the beginning of the work, I made a calculation for myself in a notebook, which I will share with you.
The weaving involves 9 threads folded in half. The length of the envelope, as planned, was 12 cm + 12 cm + 12 cm. In total, the envelope should have been 36 cm. That's pretty much what happened.
Cut 9 threads 4.32 m long
36 cm * 6 * 2 = 4.32 m
This is an approximate calculation of the length, in fact, I have tails from 5 cm to 1 m. I try to cut the threads according to the first centimeter measured, but during the cutting process, constrictions or thread defects arise. And it turns out that some one is shorter or longer. This thread is flat and can be easily extended or sewn on.
Fold all the threads in half and pin them at the centers, wind the long ends or wrap them around something. Weaving starts from a Swarovski bead, thread a thread into it and secure it to the pillow, as in photo 1.
We take the second thread attached next to the bead and tie a rep knot on it with the thread from the bead, photo 4.
On the other side of the bead we repeat the rep knot symmetrically, photo 5.
Using the basics from the previous knots, we tie the left tatting knot, photos 6, 7, 8. The uniqueness of the whole pattern is that only the left tatting knot is involved in weaving. The knot takes on an unusual appearance; it unfolds, its side thread moves upward. A bead is placed in this place, which will not harm the surface of the mobile phone case.
In photos 9, 10, 11 I tie a chain of three loop knots. The chain weaves to the right. In photo 12, we symmetrically tie a chain of three loop knots.
On the four central threads we tie two rep knots opposite to each other, photo 13. For the warps we take the threads with which the tatting knot was tied. At this moment the node makes its transformation - a turn.
In photo 14 I show the introduction of two new threads into the pattern on the sides. Using the central threads we weave a chain of three loop knots.
In photo 15, we tie grosgrain knots symmetrically on both sides.
In photo 16, two tatting pieces are added to the pattern.
Photo 17 is the same as photo 16, I didn’t notice the repetition at the time of layout of the article.
In photo 18, chains of three loop knots are woven symmetrically on the sides. We close the central diamond with rep knots and tatting.
Photo 19, we string beads onto the working threads of the left tatting. String 4 beads at once.
The tatting knot consists of two loop knots. Tie the first knot, pull up the bead, tie the second knot, thereby securing the bead in the pattern, photo 20.
Following the example above, we weave all the other threads into the work and weave the pattern further.
We weave beads in a checkerboard pattern into the design; we do not put them on every tatting. I only managed to weave 15 beads, photo 23.
Photo 24, the pattern smoothly transitions to the back wall of the case. The photo is clear, you can calculate the number of cells. The next stage, out of four brids, I called the bottom of the handbag.
To be continued….
We crochet a model of a phone case with a diagram and description
We offer you this crocheted phone case with diagrams and descriptions, because you don’t need a lot of thread to make it: you can use leftovers from another product. First you need to make the bottom of the future cover.
First, we cast on a chain of air loops equal to the width of the phone. Then we knit another lifting loop and insert the hook into the second loop from the hook, knitting three single crochets there. Next we knit with double crochets, excluding the last loop. In it we perform three single crochets for reversal. Next, we knit in the other direction with the same single crochets, closing the row with a connecting stitch into the first single crochet. Then this scheme is performed in a circle.
So, according to the pattern, we knit one instep loop and a single crochet into the next base loop. Then we perform three air loops, skip one and knit a single crochet again. We do this until the end of the row, closing the row with a connecting column. Then we perform 3 air loops and one lifting loop, after which we knit a double crochet into the same base loop. Next, alternate double crochet and chain stitch. At the end of the row, as always, there is a connecting column.
Then we knit in this way, alternating the described rows. We periodically try on a phone case.
As soon as the length of the case becomes equal to the length of the phone, we knit the edge according to the following pattern.
We start with 4 air loops. Then double crochet into the middle loop of the arch of the previous row. Next, we simply alternate a chain loop and a double crochet until the end of the row. We close the row into the third air loop of the previously connected chain.
Next row: chain 3 and double crochet in the same base loop. Then 2 chain stitches and two more double crochets in the same base loop, 1 single crochet. In the next loop we knit 2 double crochets, 2 chain stitches and again 2 double crochets. We repeat the steps from a single crochet to the end of the row, knit a single crochet into the last loop, fasten the row and cut off the loop.
Then we switch to a thread of a different color and do the pattern again. Then we make a chain of 100 air loops and thread them through the holes in the pattern. It turned out to be a pretty cute and interesting case.
Knitting a cover followed by stitching
For needlework you will need knitting needles, thin yarn, a thick needle and a crochet hook. Knitting is done in two threads to make the pattern dense and voluminous.
On the front side, tie a braid, the repeat of which is 6 P in width and 10 rows in height (P).
Repeat vertical repeat of 10 rows three times.
After this, start making P decreases to form the desired shape of the canvas. First, make decreases on the first 10 P. At the same time, in the front P, decrease by 1 P, knitting 2 facial loops (RL) together. Carry out the decrease until there are 3 P left that need to be closed. The second part of the front is performed symmetrically, that is, on the remaining 10 loops with the same decreases. The result of this technique should be the following workpiece.
To knit the back of the cover, you need to pull out 20 stitches from the lower edges of the front part, then knit 30 rows with a stockinette stitch pattern, and you will get a whole workpiece like this.
From the thirty-first R, 1 P is decreased from both edges of the canvas. Decrements are made by knitting 2 Ps together, but only in knit R. Reduce the number of Ps until 6 Ps remain in the work. Then close the P of the last P, and try to try on the part for the phone.
Read
Original knitting pattern for women's bolero with an openwork pattern
All that remains is to knit the sleeves for the cover. To do this, pull out 1 p from the top of the front part, and dial on 3 more air p.
Then also pull 1 st from one edge of the back, resulting in 5 sts on the needle.
After this, knitting is performed using the following technique. At the end of all rows we increase 1 P, pulling it out from the next top side P.
Additions are made until the moment when 18 P are in the work.
Then you need to form the second sleeve using a similar technique.
When finishing the needlework, you need to turn the product inside out and sew it on the sides.
Tie the neck of the product using a hook with single crochets. A simple chain of chain stitches can act as a lace, which must be tied with 1 P single crochet stitches.
This is how the finished product looks visually.
We create a cute model for a girl with our own hands
To complete it you will need yarn of two colors and a hook number 2.5.
We start, as always, with a chain of air loops equal to the width of the phone. You can make it a little smaller, thanks to the voluminous pattern the case will be spacious. The pattern used to make this product is very simple. The diagram is attached below.
So, the first row: chain stitch, single crochet, skip one loop, 5 double crochets in one loop, skip one base loop, single crochet. One shell is ready. In this way we knit until the end of the row.
We turn the work over and knit the same shells on the other side. We finish the row with a connecting loop in the first single crochet.
The second row is knitted with a different thread and in the round as follows: 3 lifting loops, 2 double crochets in one base loop, skip a loop, single crochet. Next we carry out the pattern to the end of the row. At the end of the row we make 2 double crochets into the base of a chain of three loops and a connecting loop.
The third row is knitted similarly to the first. Accordingly, the fourth row is knitted similarly to the second. Thus, we crochet a phone case, alternating the first and second rows.
Using connecting loops, we bring the thread to the top of the right outer “shell”. Change the color of the thread. We perform a single crochet and 4 “shells”.
Then, alternating the thread, we knit first three shells in a row, then two, then one. Also, after completing the last shell, we make a chain of air loops - this will be a loop. We sew on a small button and decorate the case with rhinestones, sequins, beads or a beautiful flower knitted according to this pattern.