Having visited a good housewife, we usually notice how cozy and beautiful it is in her kitchen. Textiles, hand-made decorative items, knitted or crocheted potholders give this coziness to the kitchen, and to the whole house. It’s not at all difficult to become known as a good housewife by creating coziness in the kitchen. You just need to add beautiful curtains, knitted potholders and knitted hot coasters made by yourself, and a fabric tablecloth to the interior.
Knitting potholders according to the pattern with knitting needles or crochet from leftover threads is not at all difficult and even beginner craftswomen can do it. But when you decorate the kitchen with new knitted elements, the atmosphere there will immediately become homely.
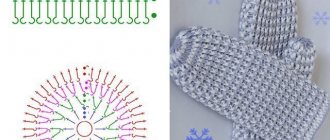
Crochet a simple round potholder
It is better to make such a model wide and dense. It is knitted from the center in a spiral. The pattern is simple and understandable even for beginners, anyone who knows how to use a crochet hook.
Recommendations for work
When knitting, do not forget to make increases according to the pattern so that the knitted potholder does not bend, there are no ties, and it is even.
It is best to use different colors for each row of the product. So, we will get a bright and beautiful thing without much effort, and we can also use up the threads left over from knitting something else.
You can make a funny animal from a round knitted potholder - a cat, a hedgehog or a baby elephant. You just need to choose the appropriate color, think about the location of the eyes, ears, nose, or find a ready-made diagram.
You can also make lace potholders by crocheting or knitting. They are not knitted with double crochets, but with an openwork pattern according to the pattern. These models cannot be used for manipulating hot dishes; they serve a purely decorative role.
If you are going to use your products with crochet or knitting for their intended purpose, choose thick enough threads and the appropriate tool. Then, when working with hot dishes, you will be more comfortable using them, and you will not get burned.
At the end of your crochet or knitting, don't forget to make a loop to hang your pot holder. Simply make a chain of chain stitches in the shape of a loop and knit it with one row of stitches.
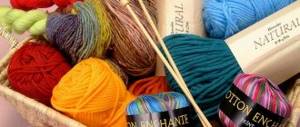
Tools and materials for knitting beautiful and high-quality potholders
If we want to knit high-quality and beautiful potholders, we need to use natural types of yarn, such as wool, cotton and acrylic:
As for silk and viscose threads, they are not very suitable in this case, because the product will slide and shine, and this is not at all necessary in our case:
In addition, viscose and silk thread do not have qualities that protect hands from hot surfaces. Any kitchen item should be knitted from the same type of yarn, because combining threads of different quality (wool and cotton) leads to deformation and shrinkage of the product during use. There is no need to knit with a very thin thread, because it will be inconspicuous. These kitchen utensils look great if they are made from medium-thick yarn. In this case, all patterns look extremely voluminous and relief.
Read
First lessons on knitting warm mittens
If you use a very thick thread, or textured yarn with thickenings and knots, you will get an unusual result that attracts attention. But in this case, the product should be knitted with a simple purl stitch or garter stitch, and the patterns and ornaments according to the patterns will be completely invisible and will be lost inside the fabric.
As for knitting needles, their size must be selected depending on the thickness of the thread. In this craft, the rule always applies when thick yarn is knitted with large diameter knitting needles (5-6 mm), and vice versa. If you like kitchen accessories with a raised and expressive pattern, then knit them with medium or thick knitting needles.
Crochet a simple square potholder
The square model is also basic. It is knitted from the corner with double crochets. There is nothing complicated about this, and no diagram is required.
Option 1
Procedure:
- We collect 3 air loops and close them into a ring.
- We knit one stitch in the 1st loop, three stitches in the 2nd loop, and one stitch in the 3rd loop. We get the angle.
- In each row, 3 posts are knitted from a loop in the middle of the product.
Option 2
This option is much simpler than the first.
Procedure:
- We assemble a chain of air loops along the length of the future product. We knit rows with an elastic band, sometimes on the front side, sometimes on the wrong side.
- It is important to count the stitches in each row so that the fabric does not expand or contract during knitting.
- The edges of the product are decorated with shell knitting, thread, contrasting in color. We make the loop at the same time as tying the edge.
Patterns and ornaments for knitting potholders
To make the potholder visually original and attractive, it is important to choose the appropriate pattern and color. These kitchen accessories can be knitted with voluminous and relief patterns, multi-colored patterns or colored stripes. For beginners, we recommend using the last color stripe technique because it is the simplest. In this case, you need to knit with the simplest purl stitch, a regular elastic band, or an English elastic band:
When knitting a pattern with an ornament, several shades of yarn and purl stitch are used:
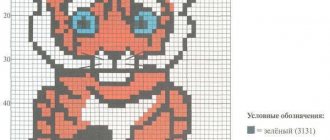
Jacquard
In this case, other drawings cannot be used, because it will turn out to be in bad taste. If you like jacquard patterns, we suggest you make a potholder like this for the New Year:
This kitchen attribute is made according to the following Jacquard pattern:
Here is another version of the jacquard potholder pattern for the New Year theme:
The canvas in this case should be double. It is knitted with circular needles and starts with a double cast on. After the cast-on row, both sides, front and back, are knitted according to the pattern using a jacquard pattern. The knitting technique for double-sided jacquard is the same as for a hollow elastic band. We invite you to master this handicraft using a video lesson.
Read
We study large knitting on hands and objects
Video: How to knit double-sided jacquard
Such a thing looks most attractive if it is knitted with an ornament using 2 or 3 shades of thread, no more. Otherwise, it will look too colorful.
Square or patchcork pattern
As for patterns, for such needlework on kitchen accessories, checkerboard patterns, voluminous braids, and images based on crossed loops are perfect. Those patterns that look great are those that are created by simply alternating knit stitches (KLs) and purl loops (PLs):
In this type of knitting, you can show your imagination and create a pattern yourself. Thanks to the simple alternation of LP and IP, you can get an expressive and relief pattern:
Video: Knitting potholders in the shape of squares
Shadow drawing
Products knitted with “shadow patterns” look great, which are also obtained as a result of alternating LP and IP in an ordered sequence:
This product can not only be used in the kitchen, but also given to friends. Shadow drawings in the form of zodiac signs are especially suitable as gifts:
When making shadow images, stockinette stitch and garter stitch are used, as well as threads of the same shade. They are so simple that you can create a pattern for knitting them yourself, or adapt a monochrome embroidery pattern. In such schemes there are only two types of loops:
The canvas made using this technique is double-sided, that is, the pattern is clearly visible from the face and the back of the canvas. This video tutorial will help you understand how shadow drawing is done.
Video: Shadow pattern for potholders
We crochet potholders in the shape of kittens
Prepare for work:
- Acrylic yarn 300 m / 100 g - 50 g black and a small skein of white
- Hook No. 4
- Ready-made eyes for toys or buttons - 4 pcs.
- Pink nose buttons - 2 pcs.
Description of work:
- With black thread we collect 30 air stitches. loops and close into a ring.
- We knit in a circle st. without crochets 20 rows.
- In the 21st row we knit a hole for the thumb. To do this, we skip 8 loops, and instead we knit a chain of 8 air loops. We knit the 9th loop. without nac.
- We knit another 20 rows in the round.
- We begin to remove 4 loops in each next row until 8 stitches remain in the row.
- Cut the thread and tighten the top of the product.
- We knit the finger. The thumb row in the circle consists of 18 stitches. without nac.
- We knit 11 rows of 18 stitches.
- In three rows we decrease 3 loops.
- Cut the thread and tighten the top of the finger.
- For the ears, we cast on 3 air loops and close them with a ring.
- In the 1st row we knit 6 tbsp. without nac.
- In the 2nd row we knit st. without nak., knitting every second loop with three tbsp.
- For the cat's face, use white threads to cast on 6 air loops.
- We knit 3 rows of stitches around the resulting chain. without nak., adding 3 tbsp at each turn.
- Sew the muzzle and ears to the mitten. We glue or sew on the eyes and nose, and embroider the mustache.
- We make a loop at the bottom of the potholder with a chain of air loops.
We knit the second mitten in the same way.
Knitting a potholder in the shape of a rooster
Required materials and tools:
- Threads yellow, orange, green, red, blue
- Hook No. 3
- Toy eye or button
Stages of work:
We knit 5 air loops with yellow threads.
From the 1st to the 3rd rows we will knit st. without nak., adding 1 column at the beginning and end of the rows.
In the 4th row add one post. at the beginning of the row.
Knit another similar piece.
In the 5th row we connect the parts. We knit the loops of the first part, then 2 chain loops, and the loops of the second part. These will be the rooster's thighs.
We will tie the 6th and 8th rows together with a post. without nak., adding 1 tbsp. at the beginning and end of the rows.
We knit the 7th and 9th to 11th rows without adding a st.
In the 12th and from the 14th to the 21st rows we add 1 column. at the beginning of the row.
In the 13th and from the 22nd to the 27th rows we will knit st. without nac. no increases.
In the 28th and 30th rows we remove 1 column. at the beginning of the row
the 29th and 31st rows without decreasing .
In the 32nd row we remove 1 column. at the beginning of the row, knit 19 st. without nak., 5 half-columns, 9 tbsp. without nac. From these nine loops we will knit a tail.
We will tie the tail with a pole. without nak., decreasing 1 column. from the inside in every 2nd row.
In the 33rd row we remove 1 tbsp. at the beginning of the row. Let's knit 1 tbsp. without a crochet.
In the 34th row we remove 1 tbsp. at the beginning of the row.
In the 35th and 36th rows we will tie a post. without nac.
In the 37th row we will add 1 column. at the end of the row.
In the 38th and 42nd rows we will add 1 column. at the beginning of the row.
From the 39th to the 41st rows we will knit without additions.
In the 43rd row we remove 1 pillar. at the beginning of the row, and add 1 at the end of the row.
From the 44th to the 46th, 48th, 52nd rows we will knit without increases or decreases.
In the 47th and from the 49th to the 51st rows, decrease 1 column. at the beginning and end of the row.
We tie the finished part around the post. without nac. Let's make a loop.
We knit a wing from blue threads.
Let's tie the tail . There will be 5 stripes of green and blue. For the stripe, we cast on 15 air loops and knit them like this: half-column. without nak., 2 columns. without nak., 2 half-columns. with nak., 7 columns. with nak., 2 half-columns. with nak., 1 column. without nac.
Let's knit a scallop . We will tie a post on the rooster's head with a red thread. without nak., 3 air loops, 4 columns. with nak. in one loop, 3 air loops, post. without nac. Let's repeat 4 times.
Let's tie a beard . Using red thread we make a chain of 7 air loops. We knit 2 columns in the 1st row. without nak., 2 half-columns. with nak., 2 columns. with nak., in the last loop - 9 columns. with nak., 2 half-columns. with nak., 2 columns. without nac.
Let's tie the beak . We tie the 5th column with orange thread. without nac. on the rooster's head. We remove 1 column at the beginning of each row.
Let's tie the paws . Using orange threads, we tie 3 rows with 2 posts on the rooster’s hips. without nac. in everyone. In the 4th row we will knit 3 air loops and 3 half-columns. without nac. in them. Repeat 3 times to get 3 toes on each paw.
We sew all the details of the rooster to the yellow base, glue or sew on the eye.
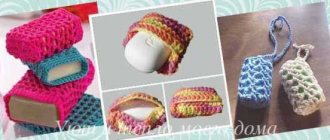
How to crochet potholders for the kitchen
Potholders are always necessary in the kitchen; they are not only a useful thing, but at the same time, potholders are part of the kitchen interior. After all, every housewife tries to select all the items in the kitchen taking into account the interior, the color of the walls or furniture. Even the simplest things, such as an oven mitt, napkin or towel, become the center of attention of everyone who enters the kitchen. In addition, potholders are an excellent gift for any occasion, especially handmade, and if the item is also knitted in an original way, then this is a special gift. We recommend tying potholders with your own hands using a hook. The first model of the potholder is made in the shape of a strawberry. This bright, original pot holder will serve its intended purpose and will refresh any kitchen. The second option is a potholder crocheted from motifs, this is also a bright exclusive thing that will fill the room with joy and warmth.
To knit potholders in the shape of berries, you will need red, green threads and a little white or yellow for finishing. A type of single crochet stitch, chain stitches for lifting and the ability to knit loops to expand and narrow the fabric so that the potholder takes on the shape of a strawberry. We start working with a chain of 7 chain stitches and continue to knit with single crochets. In our example, the potholder is about 20 cm in size; you can knit it in larger or smaller sizes; to do this, you need to start not with 7 loops, but with three or 9.
We knit a chain of 7 chain stitches, and continue to knit with single crochets, while simultaneously making increments on both sides through a row of one stitch at a time, not forgetting to perform turning lifting loops. So in the 2nd row there will be 9 loops, in the 4th row there will be 11 loops and so on. Starting from the 13th row, we make additions of 2 single crochets in one base in each odd row on each side of the potholder.
In rows 18, 21, 23, add 4 stitches on each side and knit 35 loops per row.
In the 27th row, add 1 stitch on each side of the row and knit 37 loops for all rows up to 33 inclusive.
From the 34th row we begin to decrease 1 loop on each side. In the 42nd row we decrease 2 loops, in the 43rd row 1 loop, we get the top of the strawberry from 21 loops. Now we will tie 11 columns with green thread and tie them with connecting columns. We will tie the entire potholder with red thread in “crawfish loops”.
To finish the potholder, you need to knit leaves from green threads; we knit the leaves using posts of different heights, this will allow you to get a leaf expanded in the center. To do this, we start knitting with a chain of an even number of chain stitches, for example 16. Then we knit 1 connecting stitch, 2 single crochets, 2 high stitches, 2 double crochets, 2 double crochets, and decreasing - 2 double crochets, 2 high stitches, 2 single crochets, connecting stitch. So we knit several leaves, and attaching them to the potholder near the loop, we sew them on. Using light thread we embroider dots on the strawberries. To knit a smaller leaf, knit it, starting with a chain of 10-12 loops.
Steam the finished potholder.
In order to crochet a potholder, you can use all the remnants of thread from balls of different colors. Each potholder is made of four motifs measuring approximately 8x8, but the size depends on the thickness of the yarn and the density of the knitting, so you can make them a little larger or a little smaller. We crochet potholders using one pattern, but you can make several options; by changing the color of the threads you can get completely different potholders in color.
We will connect the finished motifs with neat single crochet stitches on one of the corners of the potholder, tie a small loop and steam the entire product. On the reverse side you can sew a lining made of durable heat-resistant fabric, then you will get an excellent stand for a hot frying pan or pan.
A simple round potholder is crocheted with single crochets. To do this, knit a chain of 6 chain stitches and close it in a circle, knitting 10 single crochets in a circle in a ring. In the second row on each loop there are two single crochets. Third row on the 1st loop 1 single crochet for lifting and continue with two single crochets. To prevent the potholder from tightening, we continue to knit, making additions, increasing the number of stitches for the increase. We continue knitting until we knit the potholder up to 10cm from the beginning, now knit double crochets and chain stitches to get holes, then continue knitting with single crochets. To decorate the potholder, we tie it with single crochets and a picot of 3 loops, or with a narrow lace border using threads of a different color according to the pattern. On a knitted pot holder you can embroider berries and flowers with colored threads and be sure to knit a loop so that it can be hung in the kitchen.