Coffee table made from a stump
A strong stump of an old tree can itself serve as a small table, stand or stool. To create it, you will need an already prepared wooden blank, sandpaper, putty, primer, paint, and brush.
Carefully examine the stump, cleaned of dirt, bark, damage and dried.
- Fill small cracks in the wood. Some large ones can be left, this will give the table originality. If there is a large hole in the surface, it can be sanded or deepened to be used as a vase stand.
- Next, sand the wood.
- Cover with stain.
- Once dry, apply 2 coats of white paint.
Necessary materials:
- Pine board measuring 2.5 cm x 10 cm x 220 cm.
- Work gloves
- Circular Saw
- Drill
- Drill
- Wood glue
- Square screws
- Pencil
- Reciprocating saw (or regular saw)
- putty
- Sanding machine or just sandpaper
- A piece of flannel fabric
- Charcoal matte finish paint
- Brush
- The mount for which we will hang
- Latex gloves
- From 6 to 10 tree branches
Dining table base
Large driftwood is often used as a base for a dining or coffee table - it all depends on the dimensions of the workpiece. The tabletop can be made of wood, chipboard, plywood. But the best option would be glass. The transparent surface will reveal all the beauty of wood curves. Such a table will most harmoniously fit into an eco-friendly or minimalist design, diluting the restraint of style and strict lines.
You need to prepare:
- 3-4 large driftwood of approximately the same size,
- large screws, drill with drill bits,
- jigsaw,
- grinder,
- wood putty,
- wood glue,
- sandpaper,
- stain,
- brush,
Please order a round glass tabletop separately. When choosing a size, consider the support area - ¾ of the glass should be on a wooden base.
Get started:
- Arrange the relative position of the snags you have prepared - the structure will need to be fastened with large screws, it should be stable with a wide, even upper base. Mark locations for screw mounting.
- Drill holes, countersink them, apply glue, make connections by recessing the screw heads. Don’t skimp on screws; the more you use in different places, the more reliable the design will be.
- Fill some uneven areas and holes for fasteners.
- Sand the surface of the wood.
- Apply 1-3 coats of stain depending on how dark you want the piece.
- Install a wooden base and place the tabletop on it.
How to make benches from branches or driftwood?
This is the most creative activity. Having found beautiful driftwood and polished driftwood trunks in the forest or on the shore of a reservoir, you can make furniture of amazing beauty (Fig. 8). Each such bench is unique, because it is difficult to find 2 identical branches. Therefore, there can be many solutions for how to make a bench from driftwood.
The main thing for all such products is one thing - the parts are adjusted directly on the spot to fit the already finished legs, seats, and backs. The branches should intertwine harmoniously, forming a structure that will support the weight of an adult. To connect non-standard parts, you can use both self-tapping screws and nails. The most reliable connection is with dowels and glue. Where a tight fit of the pieces of the structure is desired, driftwood can be trimmed with an ax.
The most original benches can be made from branches and driftwood
Such decorative benches can even be used to decorate rooms in a chalet or rustic style. They go well with wild stone trim. They will look harmonious in the garden among flowering bushes or near a pond.
The variety of models of benches that you can make with your own hands from wood is limitless.
The main thing in making furniture from wood is the careful fit of parts.
Then the finished product will be neat, without distortions. Treated with moisture-proof impregnations and coated with varnish or paint, any garden seat will last for many years.
For most people, a dacha is associated with a place where you can relax, have a great rest and have fun. The design of most summer cottages provides a separate area for recreation. But what could a holiday in a country house be like without tables, benches, benches and other elements of garden furniture? The easiest way is to make your own garden furniture from the most available materials: wood, stumps, branches and various driftwood.
Wooden hanger
Decorate your home with a unique coat rack made from a piece of real wood. Driftwood and branches are useful for wall hangings. They must first be sanded and then covered with stain, paint or varnish. You can hang bags and clothes on the branches themselves and on specially attached hooks.
A small broken tree can serve you as a floor hanger. After the usual preparation (cleaning and drying), cut off the thin branches, leaving 15 to 25 cm long upward-pointing knots on the trunk. Sand the surface. Paint the wood. An important goal of this project is to ensure that the hanger is in a stable position. This will be helped by spacer branches attached to the bottom pointing downwards, or a heavy metal or wide wooden base with a hole in the middle for installing the trunk.
Crafts made of wood (driftwood) for the home - garden on the wall
This is a wonderful home decoration and another way to add a piece of nature to your interior. In order to make such a thing you will need a piece of driftwood, hooks, nails and some plants that do not need soil. First we need to clean the wood to get rid of possible bacteria and dirt, and attach hooks to hang our wood craft on the wall.
Add plants and it's done. Plants will need to be placed in water once or twice a week, or sprinkled with water from time to time.
Making a stool using fire
To make an original stool from a wooden block or stump, use fire. His work is as unique as nature itself. No one can exactly replicate your product.
- Using a jigsaw, make cross-shaped deep cuts on the stump.
- Pour some lighter fluid into the cracks. Set it on fire.
- When the middle has burned out, forming 4 legs, remove the coals, ash from the middle, and bark from the surface of the wood.
- Sand the outside.
- If desired, cover the finished stool with a layer of stain or varnish.
You can make furniture for your home/dacha yourself from what you have on hand. These are various snags, stumps, trees or branches.
Consider furniture made from branches.
With some imagination and a little effort (relatively little), you can make furniture like this:
To make such furniture, select branches with interesting shapes. You can take both live branches with green leaves and dry ones. Don’t let cracks scare you; on the contrary, they add additional individuality to such furniture. The main thing is not to weaken the branch.
Remove the bark from the branches and dry well. How to dry? In the shade for half a month or a month, then dry it indoors.
We use brushing. Brushing is the mechanical processing of products using metal brushes.
Don’t forget about safety and health precautions - wear a respirator and safety glasses. Processing should be carried out correctly along the fibers. When the main dirt and dust have been cleaned, we change the cartsovka to a fine one for more accurate processing. We repeat the procedure until the desired result is obtained, and we evaluate the degree of processing ourselves.
After processing, we dry the branches, treat them with antiseptic agents and assemble the product. The biggest difficulty when working with branches is caused by the connections of parts that are joined at an angle. Here, spikes and hand tools such as chisels will help you. After adjustment, the final joining is done with glue.
It is advisable to prepare a sketch - it will be easier for you to work with it.
It is desirable that furniture made from branches be light and mobile.
. After all, it is convenient and practical when pieces of furniture can be moved from place to place or put away for winter storage.
Branches can also be used to decorate large objects such as cabinets, chests of drawers, and imitations of living trees can be made on the walls.
Painted branches can be even more impressive. In modern style interiors they are used to enhance the color scheme or create contrasting elements. Both small branches and massive sculptural cuts are painted.
Photo of furniture made from branches, plus decor
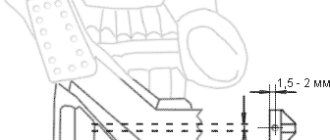
Joints such as the top cross-branch and chair legs use a closed dowel insert. And to ensure a tight fit of the parts, a crown cut is made at the end of the leg. The diameter of the crown should be approximately equal to the diameter of the branch. It is better to work with a crown on a drilling machine, where it is possible to securely secure the workpiece. If necessary, you can adjust the connections with a round or semicircular file.
It is even more convenient to do this with a sanding drum. In addition to the blind connection (tenon with socket), an open tenon with an eye or an assembly on screws are also used, the caps of which should be recessed and covered with plugs.
It is better to think in advance about what material is best to use for the seat, but you can also proceed from what is available.
Andrey made the seat for one of the chairs from an oak tree that fell in the spring. Having sawed the logs, he trimmed them with an axe, sharpened them with an electric planer, gave them a pattern with a milling cutter and lightly processed them with an eccentric sander, and then with a carving brush. After all the holes are drilled and the tenons are milled, the structure is assembled dry (without glue), and if there is no need to file anything, you can begin gluing. PUR 501 adhesive from Kleiberit is suitable for these purposes. After the glue has dried, remove any excess. Finished products need to be sanded. For grinding, it is most convenient to use abrasive sponges, which perfectly process surfaces with complex profiles.
Andrey's hand-made furniture in the photo was tinted with a water-based stain applied with a brush, and the final finishing was done with teak oil, rubbed in with a swab. This oil is well absorbed, does not leave streaks and gives the product a soft, without excessive gloss appearance. The finish depends on your taste. You can make the furniture dark, antique with traces of patina, or you can cover it with colorless oil or varnish, preserving the natural color of the wood. If there is no forest near the house, then you can use branches of fruit trees such as apple, pear, and cherry. Well, nature itself will suggest the shape of such furniture.
Based on materials from Woodmaster magazine. All the furniture in the photo was made by the excellent woodworker Andrei Sokolov.
Decorative benches made from natural materials
Untreated wood is an excellent material for garden furniture. The bench, similar to the throne of a forest king, fits perfectly into the landscape, imitating wild nature. Such seats are very appropriate near rockeries or old trees with a spreading crown in an overgrown corner of the garden. Rustic benches go well with picnic areas trimmed with wild stones or barbecues made of sandstone and boulders. Original shop in this video:
The simplest option for sitting from logs is a monastery bench. To make it, a raw log needs to be sawn in half lengthwise. Legs are made from short sections, laying them cut down on the ground. Long halves of logs are secured to dowels from above, cut side up. To prevent the bench from staining your clothes, it is better to choose hardwood logs and dry them well before assembling the furniture.
To remove splinters and burrs, the cut plane must be planed smoothly with a plane and treated with emery cloth.
A complicated version of such furniture is a bench made of logs, supplemented with a backrest with your own hands (Fig. 5). To attach the backrest, you need wooden or metal supports and a crossbar. These parts can be made from thick wood branches, timber, or steel strips. Fastening is carried out using self-tapping screws of sufficient length or nails.
Examples of original wooden benches
A log bench can be made in another way (Fig. 6). The photo clearly shows the grooves in the upper part of a thick log sawn in half. You need to insert a board at least 4 cm thick or a beautiful cut of a tree trunk into the grooves. If desired, an exclusive piece of furniture made by yourself can be supplemented with a backrest. The supports for it need to be attached to the inside of the legs on a flat surface. The crossbar can be a thick branch or the same cut of wood as for the seat.