TABLE HOCKEY PREPARATION
In this article you will learn:
1. 2. 3. 4. 5. 6. 7.
For any player, it is important that table hockey is smooth, the puck slides well on the ice, and nothing gets stuck anywhere. To do this, after purchasing the treasured Stig box in the store, you need to improve your hockey a little.
Firstly
, for professional tournaments, the plastic bottom of the Stiga hockey under the goal is removed and a special puck bag is attached. According to international rules, goals are counted if the puck remains in the goal area. In this way, we reduce the number of “flying pucks” and avoid unnecessary disputes.
REMOVAL OF THE PLASTIC BOTTOM UNDER THE GATE
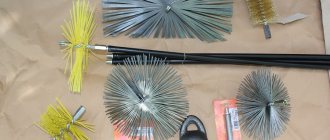
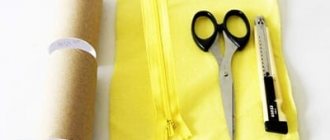
Let's prepare the necessary tools: a hacksaw blade for metal, fine sandpaper or a flat needle file. This is all the equipment we need.
The first two pictures show the process of preparing the site for bottom removal. We tear off a third of the “ice”, carefully so as not to tear it. The “ice” coating is held on a plastic frame with the help of point fixation with adhesive gel Velcro. So then you don’t have to re-glue anything, you just need to put the coating back in place, press it a little at the “attachment points” and smooth it out with your hands.
First you need to cut off the washer ejector mechanism, as shown in the picture above. First we saw off one support, then the other. It is advisable to first remove the plastic pusher rod itself so that it does not interfere or rattle during operation, but this does not matter as much as you like. We cut off the supports flush with the body (level with the parts of the body on which these supports were) so that later there will be no difficulties with gluing the bag. It is always easier and better to glue on a flat, treated surface than on bumps, folds and other irregularities.
This is what (pictured above) the bottom of the gate should look like after removing the ejector mechanism.
Now let's proceed to the main part of our process - directly cutting out the bottom. The picture below shows how the first cut is made from the edge of the bottom to the top corner. This cut must be done very carefully so as not to touch the locking eyelet for attaching the gate (those “bumps” along the edges, to which the gate frame is then attached).
After this, we saw through the bottom diagonally to the front contour of the gate so that there is enough space for a cross cut for the hacksaw blade.
After the diagonal cut, by lightly pressing your fingers down, we simply break off the sawed part of the bottom so that it looks like in the picture on the left. Next, we make a longitudinal cut identical to the first one as in the picture on the right.
We saw through the remaining area and the remains of the bottom of the gate were removed. The second picture on the left shows the final result of our work. It would be quite acceptable to go over the entire contour of the gate with a file, or a velvet file, to remove burrs. Fine sandpaper will also work for this. In total, cutting takes from one and a half to two minutes of pure time, without haste or fanaticism.
Now all that remains is to sew the bag and glue it in place of the bottom of the gate.
MAKING A BAG FOR WASHERS
The material you need to use is simple cotton fabric, for example calico. This is not a strict requirement, but a recommendation, but you should not experiment too much. Attention: do not use knitted stretch fabrics or thin gauze. To glue the bag, I use regular Moment Crystal glue, it’s just transparent and doesn’t give a caustic rusty tint when it dries. For reasons of aesthetics.
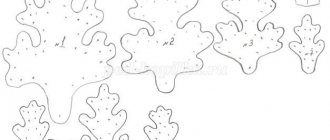
Initially, we prepare a pattern from thick paper or cardboard. Below you can see a schematic drawing-pattern of the future bag. As you can see, it looks a bit like an inverted open shirt.
Let's talk about sizes.
- CD piece - 10 cm (we will glue this side of the bag along the goal line)
- Sections BC, DE, AB and EF - 9 cm
- Section AF - 26 cm (this side of the bag is glued to the back and sides of the gate)
- The height from point B to segment AF is 4.5-5 cm (this is the “depth” of the bag)
Note that points A and F are not exactly points, but rather small segments.
There is no mistake, these are “allowances” of 5-7 mm, which will go away when joining sides AB with BC and DE with EF to the seam. Actually, it’s already clear what to sew with what: we sew the diagonal edges of the sleeves of our “open shirt” to the side edges of the shirt itself. Just two seams and the bag is ready. But that's later. First we cut out the pattern. Then, we place the pattern on the pre-smoothed fabric and draw the outline of the future bag on it. All this for accuracy and precision.
What seam to use and how to sew it is up to you, whether by hand or by machine. The main thing is that as a result you should get a bag for catching pucks, the design is more similar to a protruding pocket.
There is no need to turn it inside out with the seams, because... over time, dust and dirt will begin to collect in them, in general it’s not very nice.
ALTERNATIVE PATTERN OPTION:
This pattern (in the picture below) will save a little on the amount of wasted fabric and, more importantly, your work on sewing seams. The dimensions are similar to the previous pattern, only we will give a little more depth: after all, according to the rules, 20 washers should fit into the bag. For playing at home and training, a shallow bag is more convenient, but for an official tournament the clearing may not be suitable. So, the dimensions (in centimeters):
- AB=GH=10-10.5
- BC=CD=0.5-0.7
- EF=FG=5.5-6.0
- CF=9.0
You need to stitch EF and FG; The BC and CD will "seize" during gluing.
GLUING THE BAG INTO THE TABLE HOCKEY:
We glue the bag along the contour of the gate, but pay ATTENTION how!
- We lift the plastic covering, as we did when removing the bottom of the gate, and remove the poles of the figures from the gluing area.
- Apply glue immediately along the entire perimeter of the gate frame. We apply it to the frame, and not to the edges of the bag.
- First we glue the CD side directly to the front wall of the gate, where the goal line runs.
- Next, glue the bag to the back wall of the gate frame.
- Finally, we glue the sidewalls to the inner area of the frame.*
* - The side walls of the gate frame follow the rolled “corner” profile, so you need to glue it to the inside of this “corner” and be sure, before the glue sets firmly, try to evenly stretch the bag fabric along the entire perimeter of the gate frame.
The glue hardens very quickly and after 15-20 minutes you no longer have to worry about the bag coming off. The main load on the bag always falls when removing the washer from the bag by hand, mainly on the corners, and the bag glued along the entire perimeter receives an even load and serves for a very long time without the risk of being accidentally torn off.
The entire gluing process will take you no more than 5 minutes for both bags.
For reference: previously the bag was sewn with a strong nylon thread at the corners to the gate frame. To do this, cuts were made on the sides of the frame and so on... The sewing process took about 15 minutes for each bag. Gluing is much more reliable and faster.
Secondly
, the Stig board game must be lubricated with a special silicone grease for longer service. But this must be done carefully, following the recommendations of experienced players, which we publish in this section:
HOCKEY CARE
Hockey STIGA PLAY OFF, produced by the Swedish concern Stiga, is the most successful among table hockey products produced by various companies in different countries of the world, and most importantly, it is very reliable.
And if you follow all the points of proper use, it will serve you for a very long time, even if you play it every day, and will give you a lot of pleasure and exciting moments.
HOCKEY LUBRICANT Stiga:
When buying a new hockey game, be sure to lubricate it with silicone grease; this will extend the life of the Stig board game several times, and it will be much more enjoyable to play on it. It is necessary to lubricate: player rotation gears, player movement guides and player control rods (Fig. 1). You need to spray the lubricant from a distance of 10-15 cm. Avoid getting the lubricant on: rubber handles, the playing field, and also on the rubber hockey feet. A little silicone lubricant gets through the slots onto the field, which improves the sliding of the puck. There is no need to specifically apply lubricant to the field. Silicone lubricant is produced in the form of an aerosol, and can be purchased at auto stores.
OPERATION OF TABLE HOCKEY:
1. Very important: avoid hitting players in extreme positions, especially the center forward. This will cut through the field and jam the player in the edge position. 2. Try not to bend the player control rods, and if they are bent, try to straighten them carefully. 3. Wipe off dust from the rubber hockey feet, this will make it more stable. For this purpose, you can stick pieces of double-sided tape under each leg. 4. Over time, the puck's glide across the field gets worse. To restore gliding, you simply need to “clean” the ice surface, wipe it gently with a damp cloth to remove dirt and dust from the surface, and then also carefully wipe it dry. Sliding can also worsen due to wear of the washer, the appearance of nicks and microcracks on it. In this case, you just need to replace the washer. If you follow these simple rules, your hockey will serve you for many years.
STIGA HOCKEY REPAIR
This is not to say that table hockey is an extremely fragile thing. The Swedish company Stiga carefully monitors the quality of its products. However, breakdowns do happen from time to time. For professional players, any defect in the site or miniature, even a minor one, is very important.
Many years of experience in operating sites allows us to identify a number of typical faults. Of course, in some cases it is already difficult to repair a hockey “box” and it is easier to buy a new table hockey. But there is no need to despair ahead of time; there are very few such hopeless cases. This section contains articles from leading table hockey experts who will help you repair the Stiga board game yourself:
Despite the fact that the plastic hockey players of the Stiga board game are very “steadfast soldiers,” injuries, as in any sport, do occur. The most common of them* is a fracture of the right leg in the area of the knee joint (it sounds scary, you must admit). And without this “right leg” it becomes impossible to perform the “skate-stick” technique, and in defense the player becomes more “punchable”. You can, of course, just buy a new miniature of a hockey player. Or the whole team. But there is another way - to restore the player and give him a second life!
In general, a broken player can and should be “healed.” The simplest method (gluing a piece of a leg onto SUPERGLUE type cyanoacrylate) has one drawback - fragility. Very soon, after several touches and hits of the puck, the hockey player’s leg will break off again.
A more reliable “cure” might look like this. In both fragments, 2 blind holes with a diameter of 1-2.5 mm and a length of about 4-6 mm each are drilled strictly towards each other (Fig. 1).
From a metal wire (or nail) of the appropriate diameter, cut a piece from 8 to 12 mm long (but not more than the total depth of the holes) and apply shallow marks on its entire surface with a needle file (Fig. 2).
And now our old friend is entering the arena - cyanoacrylate glue like SUPERGLUE (the more expensive, the better). Carefully pour glue into the drilled hole (Fig. 3).
We insert a metal pin with a notch into one of them, and then glue the leg of the miniature (Fig. 4).
In this case, the metal rod will reliably reinforce the “knee” even with more serious blows from the puck than before the “fracture”.
* Breakage of the right leg of a miniature hockey player was one of the most common at the time of writing in 2002-2005. Later, Stiga eliminated this defect, and miniatures began to break much less often.
Many people have encountered the problem of one of the teeth on the protective side breaking. Well, if this tooth was in the middle, then you don’t have to do anything, the side is supported by the adjacent teeth. Alas, much more often this part of the board fastening breaks at the edge when the miniature of the hockey player was frantically corrected with an awkward movement of the hand. Usually they try to solve this problem by inserting a match or tightly rolled paper into the gap, but in this case the plastic side is practically very weak. This design is thrown out of balance by one strong blow, or by shaking the clearing. And it doesn't look very attractive.
The easiest way out of the situation is to buy a set of sides in any of the stores that sell Stiga table hockey. In principle, now you can buy any spare parts for Stiga hockey and the necessary accessories for the Swedish board game. But there is a way to get out of the situation without additional expenses. And this method of attaching the protective side is quite good. To repair the table hockey rim we need: 1. Plastic bottle. 2. Scissors. 3. Scotch tape, preferably transparent.
To begin, take a simple plastic bottle and find a flat spot on it. From the flattest part of the bottle you need to cut a strip of 14x60 mm (Fig. 1) and bend it lengthwise (Fig. 2). There is no need to squeeze the edge too much, you will still need to straighten it later, and the fold should not attract attention, we need it for rigidity.
Approximately a centimeter from the middle, you need to make a small cut diagonally with scissors (Fig. 3). Next, unfold the strip and bend the resulting burr. Then bend the strip in half, but across it (Fig. 4). Glue a strip of tape on the side of the hangnail (Fig. 5) and you will have a prosthesis for the lost tooth.
Now you need to secure the protective side with it. To begin, place the board on the clearing and insert all the “working” teeth into their mounting grooves. Of course, you can’t insert a broken tooth into the gap, so the edge of the side will stick out to the side (it is assumed that we are repairing the outermost tooth). Now you need to insert the “prosthesis” into the gap with the burr facing out (Fig. 6). When the bent “burr” clicks inside, try to pull it towards you. If you did everything correctly, then he will resist with all his might, which is what we need. Table hockey repairs are entering their final stages. Now bend the plate with the tape towards you (it should be on the outside) and put the piece of the side in place (Fig. 7). Pull the adhesive tape up until it stops and stick the tape to the plastic side (Fig. 8), preferably with tension upwards. First you need to thoroughly wipe the part of the side on which the tape will be glued.
Everything should now hold. Of course, it will fly out, but not with the frequency that fastening with a match provided. Yes, it is noticeable that the protective board has been repaired, but for some, this may be the fastest way to continue the game and not waste time and money on buying new spare parts. This method of repairing the side was tested in a “combat” situation at the Moscow table hockey championship according to Stiga at the beginning of the development of official tournaments. And then many nachokers adopted this method of repairing sides.
The most common breakdown for a “keeper” is a fracture of the blade of his stick. It usually occurs where the outer edge of the left “shield” ends (Fig. 1).
rice. 1
As always, there are several ways to solve the problem. You can just buy a new table hockey table, you can go to the store and buy a set of new players, or any other parts for Stig's hockey. But there is another solution, much more economical. Today I will tell you and show you how to repair a Stiga table hockey goalie.
If the broken goalkeeper hook is not lost, then this is what I do:
1. I drill a 1 mm hole in the stick in the direction of the supporting leg. The hole is through (Fig. 2), at a distance of 1.5-2 mm from the surface of the stick and exactly along the stiffening rib of the stick.
rice. 2 2. Then I place the fragment of the hook at the fracture site and through the hole made with the same drill (its length for this should be >= 30 mm) at low speeds of the drill or drill I make a counter hole in the fragment of the hook. Its depth is 8-12 mm (Fig. 3). It is very important to keep the hole parallel to all the edges of the hook, but this is a matter of attention, accuracy, and, subsequently, simply experience. rice. 3 3. Now we take a straight piece of steel wire (you can buy a coil of “clamping” wire at a dental store) 1 mm long and ~20-30 mm long. Using a needle file, I make a series of shallow notches on it.
4. I glue this rod into a fragment of the hook (Fig. 4) using Supermoment glue or any other cyanoacrylate. At the same time, I smear the rod with glue half its length and, holding the other half with good pliers, I quickly insert a piece of the hook into the hole until it stops. rice. 4 5. Now, having dripped glue onto the surface of the fracture and onto the free half of the steel rod, you need to quickly push the piece of the hook into the hole that was originally drilled in the stick that the goalkeeper is holding. Make sure that the fracture surfaces are accurately aligned, as the glue “sets” very quickly, sometimes leaving no time for repeated attempts.
rice. 5 All that remains is to cut off the excess wire rod in the area of the goalkeeper’s support leg. You can also glue a strip of plastic (or plexiglass) no more than 1 mm thick onto the surface of an already glued stick, cutting it, for example, from a broken CD box.
The whole procedure takes me (with all the tools and materials) 10-12 minutes, and the result is an almost eternal goalkeeper instead of a candidate for the ballot box.
* Goalie stick failure was one of the most common problems from 2001-2006. Then STIGA tried to eliminate this shortcoming, and goalkeepers began to break down much less often.
7 124
I propose to make table hockey with your own hands. The idea of such table hockey will be inflated not only by the simplicity of its implementation, although this is important, but by something completely different. Just imagine the delight of a small child, because this toy will not only have field markings and goals, but also real ice, which, you see, is quite rare for a children’s toy.
For table hockey we will need:
1
.Large but not deep aluminum foil container. 2.Water. 3. Two disposable pipe cleaners. 4. Two wooden spoons (optional, can be replaced). 5. Black button. 6. Thin red ribbon. 7. Blue sticker or blue tape. 8. Scissors. 9. A sheet of white paper or thin cardboard.
We bend the paper, adjusted to the size of the container, in the middle parallel to the smaller edge. Then we bend the paper again, at a distance of two and a half centimeters from the edge. We unfold the sheet with the resulting folds, marking lines on which we glue red tape and blue semicircles.
Now place the paper at the bottom of the container and fill it with water until the paper is completely covered. Then add a little more water to add thickness to the ice. Place the container in the freezer for several hours. As soon as the water has frozen, the skating rink is ready.
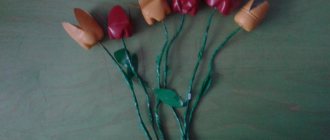
All that remains is to make the gate. We tie the ends of the pipe cleaner together, and then form a square from the pipe cleaner. We bend the square in the middle at an angle of 90 degrees and we have a gate. Let's make another gate.
We make clubs from wooden spoons, our button is a puck.
Competitions can be held. After the game, the skating rink needs to be put back in the freezer so that it is ready for tomorrow's match.
A very good idea for making a hockey puck from scrap materials.
For this we need:
Materials: 1. Black plastic 2. Coffee can
Tools: 1. Pliers 2. Scissors First, we need to chop the plastic, in the same way as in the photo. Plastic from remote controls, cassette recorders, etc. works well. Grind about 300 grams. Next, take a jar (with coffee, peas, condensed milk, etc.) and measure 2.5 cm from the bottom to the top. And cut it off. This can be done with ordinary scissors, but it is best to use metal scissors. Next we need to melt the plastic. This should be done over a fire (outside), or on an electric stove. We place pieces of plastic into our form. And we can see that it melts. There is no need to make the fire too high, so as not to ignite the plastic, and if this happens, you need to remove it from the fire and cover with a lid. Gradually add plastic, it is better not to pour in large portions. As a result, we got this consistency that needs to be removed from the heat. When we removed the can, we immediately need to cover it with some kind of plane, in my case it is a piece of board. We press the boards tightly with bricks on top. We wait 10-15 minutes. Then we extract our workpiece. We take a file or sandpaper and start processing the almost finished puck, after processing we get a finished hockey puck, it is very strong and glides well on the ice.
WHAT IS THE ARTICLE ABOUT?
Homemade plastic washers. Easy, fast, simple.
If you need to make plastic washers of a non-standard size, and you do not have a lathe, then the method I want to show may be useful.
Its distinctive feature is that there is no need to make additional equipment. ]("Plastic washers - easy and fast.")
An old trick. But you can’t forget about it.. Steel washers can also be cut like this - only instead of a chisel, use a bastard file..
The people are suffering. I just cut it out when necessary. =)))
rumb; wise, but you can’t make a hole exactly in the middle of the washer with a second cut.
Or you can take a crown with a centering drill. And you will be happy.
4eh wrote: you can’t make a hole exactly in the middle of the washer with a second cut.
There are different notches, I had a double one lying around somewhere, it immediately cuts a hole in the middle, and for the washer, IMHO, a deviation from the center of 0.5-1 mm is not critical, it’s not a gasket. With perforation, of course, it is limited in size, and the above (well-known
) this way you can make any size.
Victorych wrote: and in the above (well-known) way
What could have been written in 5 lines of text took 12.. minutes. I liked the haste - the acceleration of playback. just like Charlie Chaplin
Victorych wrote: With a perforation, of course, limited in size,
My maximum cut is 60mm, which immediately creates a washer for release. I did it a long time ago, in the 90s there were no gaskets for sinks, and there was a lot of sheet rubber. All the cuts I made were for a drill or drilling machine - this way the edges are neater, without bevels. For vehicle washers, the cutter that comes with parking sensors would be suitable.
Bachelor wrote: My maximum cut is 60mm
I didn’t mean the maximum dimensions, a notch can be made from a 1420 mm pipe
, but about the fact that for each size you need to have your own notch (although how many of these sizes are really needed?) But the method described above is not suitable for soft materials such as rubber, cardboard, paronite, etc.
Viktorich wrote: a notch can be made from 1420 mm pipes
Viktorich wrote: But about the fact that for each size you need to have your own notch (although how many of these sizes are really needed?
For faucet axle boxes: Czech, Soviet, 1/2″. For hoses 22.1/2″, for faucet 3/4, for Soviet herringbone (external) - 2 crescents are made with an additional notch. For release from the sink, and rings for siphon. Here is my entire arsenal. I haven’t used half of it for a long time, even more
Viktorich wrote: But the method described above is not suitable for soft materials such as rubber, cardboard, paronite, etc.
When I need to make non-standard rubber heads, I use a drill and sandpaper.
The bachelor wrote: For faucet axle boxes: Czech, Soviet, 1/2″. For hoses 22.1/2″, for faucet 3/4, for Soviet herringbone (external) - 2 crescents are made with an additional notch. For release from the sink Well, and rings for the siphon. Here is my entire arsenal. I haven’t used half of it for a long time, even more
So plumbing gaskets of any kind are a dime a dozen now, no need to bother
Mikael wrote: so plumbing gaskets of any kind are a dime a dozen now, no need to bother
The bachelor wrote: I did it a long time ago, in the 90s you couldn’t get gaskets
Bachelor; and I think I wrote it now
History of creation
Initially, hockey pucks were made from wood by the Dutch. It was they who first came up with the idea of tying blades to their boots and chasing wooden balls across the ice. Then the initiative was seized in Canada, where they gave impetus to the development of hockey in England. The Canadians cut the wooden ball at the top and bottom for better glide. But this form greatly traumatized people and also caused damage to everything around them. The British, on the other hand, thought of replacing wood with rubber. This projectile was much lighter and was superior to its wooden counterpart in terms of elasticity and ease of stick control. In the entire history of the game, rubber has become the best material.
Types of washers
Now there are several types of hockey pucks. According to modern standards, the puck should be of the following dimensions: two and a half centimeters in height, 7.5 centimeters in diameter, and must also be black. But other colors are also used, which vary in weight. For example, an orange puck is necessary for throwing practice, as it has more weight and low flight speed. The blue puck, on the contrary, is light in weight and is intended for training by children. The white puck is used for goalkeeper training only. Apart from the color, it is no different from the standard one and is designed to develop tracking skills, because it is almost invisible on white ice and the box.
Make your own puck
Good health to everyone. Sorry I'm talking about cars again :))
I came across such garbage... It was necessary to remove the rack, it turned out that the tie rod lock washer was missing at all. The other one can be removed and thrown away. Everything is arranged there simply.
The washer rests against the slots of the rack with two antennae. After tightening the nut on the rod, its edges are bent over the nut in order to lock it so that the rod does not get unscrewed along the way and the wheels do not start moving in different directions.
It looks like this on a Honda. Actually, almost the same as on all cars.
But a new one takes at least 2 weeks and costs $6 apiece)) and this is not funny. As I understand it, no one buys them and there is no demand for them) There is not a single replacement for the chord... only the original...
I walked around the central Kiev car market... all the sellers (including VAZ, GAZ, IZH and ZAZ) just shrugged their shoulders))
I thought for a couple of days how and what to make it from. Well, I don’t have time to wait 2 weeks for her. The shape is a grommet, the middle part of which can simply be ground off. But I couldn’t find any durable eyelets... I settled on this technology. The original thickness is approximately 1.2-1.3 mm. In the garage I found a piece of soft Soviet steel 1.15mm.
the size of the original is almost 1 in 1 one Ukrainian hryvnia)
we cut it with a grinder, you can do it right on a coin)
There is still a thick washer between the washer and the rack and we mark the workpiece on it.
Then we draw the honda logo, the letter H in the center.
We draw it with something sharp.
We sharpen a screwdriver or a small chisel and carefully cut out the letter H. First on one side, then on the other.
Place the washer and cut it)
Then we find in the garage some kind of heration with a diameter of 12 mm or whatever is needed according to the diameter of the rod, preferably a cone shape. And we break through.
What are they made of?
Let's try to figure out what hockey pucks are made of. To make a rubber washer, 11 ingredients are used. Consider the main ones:
- Natural rubber is the basis;
- Oil additives. Two different compounds are added to give the rubber wear resistance;
- Mineral supplements. They are necessary to prevent the aging process, as well as to vulcanize the rubber itself;
- Carbon black. Material required for filling.
DIY puck bracelet
In this article I will show you how to make a very simple but wonderful bracelet with your own hands from washers and strips of leather, the whole process will not take much time, but the finished bracelet will look stylish and perhaps you will make it for your friends who will want the same for themselves.
DIY puck bracelet
What you need to make this bracelet:
- A piece of leather or a finished leather strip, you can also use paracord or a polyester strap;
- Washers (internal diameter 12 mm);
- Stationery knife;
- Glue;
- Spring clamps (clothespin).
How do they do it?
To understand how hockey pucks are made, let’s look at the technological process, it has been worked out for years. First of all, rubber enters the kneader, since it is the basis for creating rubber. Next, special antioxidants are used to reduce rubber wear and extend their service life. The next step is to add the first oil for easier mixing of the composition, and then the second one, to add rigidity. In order for the mass to harden faster, calcium carbonate and sulfur are added. And carbon black completes the kneading process.
The second stage can be divided into pre-kneading, which lasts about 15 minutes, and re-kneading. When re-mixing, the mixed raw materials pass through special rollers, between which another layer of natural rubber is placed. On the second pass, hard rubber is added to give the puck a round shape. It is this technology for preparing raw materials that allows you to create washers that are not afraid of repeated impacts.
After each mixing, a control sample is sent to the laboratory for measurements with a rheometer. There, the stiffness curve of the material is analyzed and compared with the standard. If the tests are successful, the material can be used.
At this stage, the rubber can be molded, because it is not vulcanized, which means it can be easily deformed. To form a puck of the required size, a special apparatus with a diameter of 7.5 centimeters squeezes out the composition, and horizontal knives cut it at a height of 2.8 centimeters. But the product is not ready yet. Next, it is sent to a special press, which carries out vulcanization.
In order for the rubber to harden, a special machine heats the blanks to 149 degrees and compresses them under pressure. After 18 minutes of “hardening”, an almost finished product is obtained, which cools for 24 hours. To complete the process completely, it is necessary to cut off the excess mass that has adhered during the vulcanization process, which is done manually by workers (the excess is used to prepare new raw materials). Also, a special press makes notches on the edge and makes a logo.
This is how you get a real hockey puck. The process is not too complicated, but technologically advanced. This allows you to enjoy a quality product on ice!
Table hockey how to make a hockey player. Hockey puck made of plastic. What are they made from?
A very good idea for making a hockey puck from scrap materials.
For this we need:
Materials: 1. Black plastic 2. Coffee can
Tools: 1. Pliers 2. Scissors First, we need to chop the plastic, in the same way as in the photo. Plastic from remote controls, cassette recorders, etc. works well. Grind about 300 grams. Next, take a jar (with coffee, peas, condensed milk, etc.) and measure 2.5 cm from the bottom to the top. And cut it off. This can be done with ordinary scissors, but it is best to use metal scissors. Next we need to melt the plastic. This should be done over a fire (outside), or on an electric stove. We place pieces of plastic into our form. And we can see that it melts. There is no need to make the fire too high, so as not to ignite the plastic, and if this happens, you need to remove it from the fire and cover with a lid. Gradually add plastic, it is better not to pour in large portions. As a result, we got this consistency that needs to be removed from the heat. When we removed the can, we immediately need to cover it with some kind of plane, in my case it is a piece of board. We press the boards tightly with bricks on top. We wait 10-15 minutes. Then we extract our workpiece. We take a file or sandpaper and start processing the almost finished puck, after processing we get a finished hockey puck, it is very strong and glides well on the ice.
7 124
I propose to make table hockey with your own hands. The idea of such table hockey will be inflated not only by the simplicity of its implementation, although this is important, but by something completely different. Just imagine the delight of a small child, because this toy will not only have field markings and goals, but also real ice, which, you see, is quite rare for a children’s toy.
For table hockey we will need:
1
.Large but not deep aluminum foil container. 2.Water. 3. Two disposable pipe cleaners. 4. Two wooden spoons (optional, can be replaced). 5. Black button. 6. Thin red ribbon. 7. Blue sticker or blue tape. 8. Scissors. 9. A sheet of white paper or thin cardboard.
We bend the paper, adjusted to the size of the container, in the middle parallel to the smaller edge. Then we bend the paper again, at a distance of two and a half centimeters from the edge. We unfold the sheet with the resulting folds, marking lines on which we glue red tape and blue semicircles.
Now place the paper at the bottom of the container and fill it with water until the paper is completely covered. Then add a little more water to add thickness to the ice. Place the container in the freezer for several hours. As soon as the water has frozen, the skating rink is ready.
All that remains is to make the gate. We tie the ends of the pipe cleaner together, and then form a square from the pipe cleaner. We bend the square in the middle at an angle of 90 degrees and we have a gate. Let's make another gate.
We make clubs from wooden spoons, our button is a puck.
Competitions can be held. After the game, the skating rink needs to be put back in the freezer so that it is ready for tomorrow's match.
All fans of the popular game air hockey should like this post. One craftsman decided to please his son, who loves active board games. He made an air hockey table with his own hands. Let's take a look at his creation.
1. Air box. For the bottom of the air box we need 9 mm plywood, and for the top 4 strips of laminate flooring. The size of the box will be 1210x770 mm. Cut the required piece of plywood slightly larger than the size of the laminate (2-3 mm).
2. We connect the laminate strips together “into a rigid hook” provided by the plates. By the way, the laminate was not chosen by chance. Before this, there were thoughts of making a base from plywood, boards, furniture board, chipboard/fibreboard/MDF. But all were rejected due to low strength, softness of the material and suspicion of damage during drilling (the holes must be small and even!).
3. Mark the grid for drilling holes. We retreat 30 mm from each edge (this is the size of each side) and another 10 mm in order not to make extra holes at the side. The pitch between the holes was 20 mm.
4. Take a drill and drill about 2200 holes. The diameter of each hole is 1.5 mm. This is the most time-consuming and tedious operation when building a table. She ate about 4 hours of my life and four drills. I used 7 drills in total (they quickly became dull). I did everything in the bathroom, because it’s a huge mess (because I’m too lazy to clean it up later). Then I used an awl to widen all the holes on the back of the laminate.
5. I bought two 45x15 3m slats and sawed them into 4 parts (strictly according to the size of the plywood). These will be the sides of the air box.
6. We drill holes in the plywood (it is necessary, otherwise it will crack) and slats and place it all on the bottom with screws (you can nail it without drilling, but then you need to bite off the sharp end of the nails with wire cutters). In general, you will have to drill a lot here, so you will dream about the drill for a very long time. An anecdote on the topic: Today a neighbor knocked on my door at 3 am... Out of fear, the hammer drill almost fell out of my hands...
7. Electronics. We rummage through various computer junk and find 6 fans of varying power and a power button.
8. We also take the power supply from the old scanner. PSU characteristics: 12V 1.25A.
9. We sum up the consumption of all fans 0.25+0.22+0.22+0.12+0.12+0.12=1.05A. Yeah, there’s still room for lighting the gates with LEDs – that’s good!
10. Mark the fan holes and places for the mounting screws. We drill holes for fans and holes for mounting these fans.
11. Kote’s youngest son came to help.
12. File the edges of the holes and attach the fans. Long stripes on the plywood indicate the joints of the laminate sheets.
13. Since the structure is heavy and there must be space at the bottom of the table for air suction, I bought 5 rubber feet (door stops). They are made of very durable rubber and will help keep the table stable. The photo shows a leg with a screw threaded through it.
14. Attach the switch and connect the wires from the power supply to it.
15. Place the fan wires on the terminals.
16. We bring out the wires to the gate and glue the LED strip. We solder and check. Fill the solder with a glue gun.
17. We saw the remaining part of the 45x15mm plank into 9 pieces and fasten it from below with screws along the seams of the laminate. We also place the rubber feet on the screws from below and secure them from the inside with a nut and a locknut. This is the picture we get. The power supply wire enters the table in the lower right corner.
18. Take regular sealant (I use transparent plumbing sealant) and coat all the cracks along the edges, as well as the fans along the edge. We also glue the dangling wires and the power supply wire to the plywood with a glue gun. “Have you sealed the wheel? - Yeah, I glued it all night. The owner of the glue will come in the morning. ©Boomer"
19. It turns out like this.
20. We buy a side rail 30x15 mm 2mx2 pcs. and cut it into the required parts (strictly to the size of the plywood) and leave space for the gate. We connect the laminate and place it on the table, having previously coated the slats attached to the plywood with sealant on top (we also coat all 9 supports under the seams of the laminate). We drill holes through this whole hamburger and fasten it with screws.
21. For the beauty and strength of the side, I took two mirror-polished aluminum corners 30x15 mm, 2 meters long. We saw it.
22. Let's try it on. By the way, on the left in the photo is an excellent device for the knees - I recommend it.
23. Senior mate.
25. And glue it around the perimeter. There is a margin of 1.5 cm at the bottom, 0.5-1 cm at the top.
26. It turns out like this.
27. The plank and film will be on top with double-sided tape (it doesn’t really stick to plywood and wood, but a corner will hold it in place).
28. And we seal it from below with a furniture bracket.
29. That's it.
30. General view from below.
31. Attach the metal strips to the sides.
32. The children said ready, took the table away, and demanded bats and a puck. Let me play a little.
33. Gate. We cut the plywood into several parts.
34. Connect with a clamp, drill holes and screw in screws.
35. Assembling the gate. Let's try it on the table.
36. General view with the gate.
37. Illumination of the gate from the inside in the dark.
38. A closer look at the gate design.
39. When checking the goal, when the disc hit the goal hard, it bounced off the soft wood (plank) and flew back onto the table. To eliminate the defect, use double-sided tape to glue the remaining aluminum strip to the inclined rail immediately behind the gate.
Dedicated to all hockey fans! There are a great variety of bottle openers in stores, reflecting any of the hobbies. What do you think about the idea of creating your own hockey opener? The base of the opener will be a real hockey puck!
Materials
So, to make a bottle opener from a hockey puck, in addition to the puck itself, prepare:
- a piece of solid wood larger than the washer;
- syringe;
- glue;
- a simple opener with a diameter of 3 inches;
- ring drills of different diameters (3, 3.4 and 1.8 inches);
- wood drills;
- drilling machine;
- hex bolt;
- hexagon socket wrench;
- hacksaw for metal;
- pencil;
- ruler;
- a rag;
- acetone;
- tools for working wood and metal.
Step 1. Making the washer holder
You will need to drill several holes in the washer. For accuracy, this will need to be done on a professional drilling machine. In such a situation, you won’t be able to hold the puck securely with your hands. It is for this reason that before starting to make the opener, you need to make a washer holder. To do this, take a solid piece of wood. Use a 3.4-inch hole saw to cut a hole in it. Its depth should be the same as the height of the washer.
It is necessary to drill two holes on the sides of the wooden holder so that they extend into the sawn circle. Insert hex bolts into these holes. Later, by inserting a washer into the wooden holder, you can fix it by adjusting the bolts.
Step 2. Marking the washer
Remove the washer from the package. Take a ruler and pencil and draw a few lines to determine the center of the washer. Set the washer aside.
Step 3. Trimming the handle of the opener
In this case, the opener had a handle and needed to be cut off. To do this, you need to take a hacksaw and a file. After sawing off the handle, file the edges of the opener.
Step 4. Making holes in the washer
First, you need to make a hole with a diameter of 3 inches in the washer. To do this, insert the washer into a wooden holder and securely fix it with bolts. Make the depth of the large hole according to the dimensions of the metal opener. After the hole is cut, make another one with a smaller diameter hole drill. The depth of the second hole should also not be large.