I haven’t been able to get these tulips for a whole year, when I already come up with an idea and it turns out - it seems that everything is very simple... but while you’re coming up with it, you’ll cry.
Cut out squares. You sand on one side with No. 0 sandpaper, you sand first, and then there will be a shaped cutting, otherwise the plastic will tear during sanding. Paint the OUTSIDE with stained glass paint. Cut out as in the picture.
Bend the sharp ends to the middle with the fold outward. Then fold the petals with their sharp ends together, so that the petals overlap each other clockwise, and twist them a little more clockwise, holding the ends. After folding, you will get a pyramid with a square base. Holding the sharp tips and not allowing the pyramid to unfold, bring the corner of the bottom to the flame of the candle, so that the flame does not touch the plastic and is from below - from the side of the bottom, when the sharp corner of the bottom is rounded from heating, move the flame slightly upward along the edge of the petal, so that the very edge of the petal is bent inward. Do this with all four corners of the bottom.
Then turn the bud over and bring the sharp tip to the flame - the tips will bend inside the bud.
The tulip is light, so no wires are needed in the stem. Take a strip of green plastic (or colored colorless one), pinch the end with pliers or tweezers (so as not to burn your fingers, and bend it into a spiral so that the rings of the spiral lie closely and form a rigid tube.
Melt the tip of the resulting tube and turn the tube so that the drop begins to flow down it and so forms a round head and freezes. Cut the other end of the tube at an acute angle.
In the bottom of the tulip, use an awl to make a hole no thicker than your tube and insert the tube FROM THE SIDE OF THE TOP of the tulip. If you cut the hole correctly, the tube will pass through with great difficulty - remember that it is a spiral and when pushing through, turn it like a screw. Their holes won't fall out because you have a thick drop at the end there, but the tulip will dangle very unsightly. Take one of the UNSUCCESSFUL tubes, melt it over a flame and holding the tulip vertically, head down at the tip of the stem, drip the melted plastic onto the base of the bud at the junction with the stem. The bud will be fixed.
The leaf is carefully burned along the edges, folded in the middle, then you wind the tail with a spiral onto a disposable kebab skewer (the most suitable diameter, besides, it burns poorly, which is important) - and carefully burn your spiral next to the flame so that it does not unwind, then You can simply place the leaf on the tulip stem in the place you like.
That's pretty much how it's done.
I don’t post this in general master classes, because many here believe that it’s impossible without photographs, but oh well, whoever needs it will find it and understand.
Olga Osmanova
. DIY bottle crafts
.
Tulips from plastic bottles
will decorate your site and give it a special atmosphere and beauty.
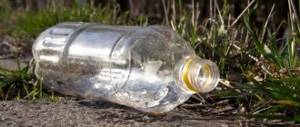
Before you throw away plastic bottles
, think about all the interesting things you can do with them.
After all, all you need is a little imagination and you can create many interesting crafts from bottles for your garden
or plot.
Today we will make cute tulips from plastic bottles
.
, you can make many beautiful and interesting
crafts for your site
from plastic bottles .
Tulips from plastic bottles
It’s as easy as shelling pears to make, and we don’t need much to make them.
All you need is empty plastic bottles
, wire and paint.
Let's make a bouquet of beautiful tulips
that can be placed in a flowerbed and then spring will come in your garden much earlier than everyone else's.
Especially when there is no greenery yet, tulips
will delight your eyes and attract attention.
Just imagine that there is still snow in places on the site, and your tulips
. I think that your neighbors in the area will definitely come to you to learn about the secrets of growing. Well, let's start making and learn how to create beauty around us.
To make tulips we need
:
Plastic bottles of the desired color
.
Plastic bottles
green for making leaves.
Wire.
Method for making tulips from bottles
:
Take a plastic bottle of the desired color
, the color
of the bottle affects the color of the tulips
and cut out blanks from it.
If you don't have colored bottles,
you can use clear
plastic bottles
, but then you'll have to paint them the color you want.
a blank in the form of 4 petals from the bottle You need to make a hole in the middle of the workpiece; you can pierce it, for example, with a hot awl.
We melt the blanks over the candle, giving them the shape of a bud. If you make open tulips
, then we don’t compress the workpieces too much.
We take a thick wire and put the workpiece on it.
Now we make it from a plastic bottle
green rope and wrap the wire around it.
Lightly heat the plastic
and wrap it completely around the entire barrel.
We also make a leaf out of a green bottle
and melt it slightly over a candle to give it a more natural shape.
We fix the finished leaf on the stem. If you did not have colored bottles
, then you will have to
the tulips
in the desired color.
You can paint with acrylic paint or enamel, or use spray paint in cans. If your tulips are open
, then the middle of them also needs to be painted in the desired color.
You can also glue the leaves and flowers themselves with a hot-melt gun, just be careful, the plastic
can curl up a lot.
We drip a little glue and glue our tulips
.
That's it, tulips from plastic bottles are ready
.
Let's make a whole bouquet of tulips
and decorate your area with them.
Publications on the topic:
I have been doing decoupage for a long time, decorating glass bottles, glasses, various jars and boxes, in general, everything that needs to be thrown away.
Didactic game made from plastic bottle caps. The game is suitable for sensory development for children of primary preschool age. With her.
Ideas for making crafts from plastic bottles and bags. Joint creativity between parents and child is always interesting and useful.
Plastic bottles are made of a very practical material: it is convenient, flexible, comes in different colors and is harmless. That's why there are many.
Most often, plastic bottles can be reused for various purposes, for example, to create various crafts or for decoration.
Good afternoon, dear colleagues. I invite you to play with my kids an interesting educational educational game that I myself created.
Tulips are flowers loved by many. But their fragility is depressing. Just admire it for a week, and then wait a whole year for next spring to see the bright blooms?
Garden crafts made from plastic bottles can solve this problem: tulips in your flower garden can bloom all year round without interruption. Unless they hide under the snow for the winter or you bring them into the house. These flowers are the simplest crafts. There is no need to cut out complex parts, come up with particularly ingenious fasteners, etc. Plastic bottles, scissors, wire, a little paint - that’s the whole kit for creating ever-blooming tulips.
Orchids
Everlasting orchids are something out of science fiction. But making flowers from plastic bottles will allow us to defeat the laws of nature. To begin, prepare the necessary materials: several multi-colored soda flasks (milk, beer, etc.), plastic paints (acrylic, aerosol in bottles), glue for polymers, a candle or alcohol burner (a soldering iron or burner is also useful), scissors . All is ready? Then let's get to work! We will follow the step-by-step instructions:
- Based on Fig. 1, cut off the bottom of the bottle. This is an excellent planting base for an orchid - the upper petals are already there. All that remains is to adjust the shape of the 4 petals with scissors and slightly melt their edges with a candle flame;
- We continue to “grow” flowers from plastic bottles with our own hands: cut out a “false” flower from the body into 4 (6-8 - optional) petals. It can be glued to the base. Or, having made through holes in the details with a burner, assemble the orchid bowl on a decorative carnation;
- Make several inflorescences and plant them on an improvised stem - a woody twig painted green. This way you can collect large flowers from seemingly garbage. And if you work with your soul, artificial flowers will not be inferior in appearance to living orchids.
Surely you already have a decent vase for a luxurious orchid branch. No? Then make it all from the same familiar material!
Unusual containers
To create original art objects with orchids, you can use other materials at hand.
Made from natural bottle caps
Miniature orchids look original in bottle caps made of natural material. To do this, remove a little porous material from the end of the cork with a narrow knife, place the roots of the orchid inside, and secure the plant with soft thin wire or fishing line.
Using a heat gun, a magnet is attached to one side of the cork, and the composition is attached to a metal surface.
From pieces of tree bark
More often, the bark is used to make blocks on which epiphytes are planted.
If desired, you can plant the orchid in any other container. Cover it tightly with thin pieces of bark, tie it tightly with wire, which is decorated with moss or jute.
From a vinyl record
When heated, vinyl records become plastic, they make nice stylish planters, they can be given any fancy shape.
Daisies
Rice. 2 clearly shows how to make daisies from plastic bottles. As you can see, the main difficulty here is the formation of the stem, stem petals and receptacle on the burner flame. However, as soon as you start working on the flower, the plastic daisy will begin to appear as if by itself - everything will be so simple. So, let's proceed step by step:
- Using a stencil or by eye, cut out the basic detail - a chamomile inflorescence with petals. At first it will be a rough blank, but then you will correct it with scissors and give it a natural look;
- Cut out various stem petals from scraps of green plastic and melt them slightly in an alcohol lamp. Thanks to this, each chamomile will become unique;
- Make a flower core from a piece of yellow (brown) plastic. Prepare the stem by carefully melting a thin strip of plastic - a twisted or straight piece of bottle - on an alcohol lamp;
- Put your craft together using the technique of soldering parts to each other. However, somewhere you can use glue.
The peduncle can be made even simpler: cut a wide strip of plastic along the entire height of the bottle and fold it lengthwise, pressing tightly. Cut off the excess planes with scissors, leaving only a thin corner - the leg is ready. Now it’s no secret to you how daisies are made from plastic bottles. Shall we move on?
Roses
Making roses yourself from plastic bottles is not only simple, but also surprisingly interesting. Each flower will be different from the others. Diagram 3 will tell you in detail how to make a garden queen. In a short time, large flowers from waste materials will bloom in your hands. Will your loved ones be able to guess what all this beauty is made of? Hardly. Let's get started soon? So:
- Look at what preparations the homemade plastic rose in Fig. requires. 3 and make 2-4 similar parts of different sizes. You can first make a stencil or cut out the components of the flower by eye, which will be better if you want to get exclusively unique crafts from plastic bottles;
- Similar to the methods described earlier, make a rose stem by slightly melting a strip of transparent plastic over an open flame. Cut out various petals from the scraps of the bottle and also slightly deform them with a candle light;
- When you finish collecting luxurious flowers with your own hands, connect all the fragments of the rose together by soldering the parts heated over the fire. Or use glue. Assemble the flower cap according to the matryoshka principle - insert smaller pieces of petals into large bowls.
The resulting craft can be used to decorate an empty shelf or window sill. Or use it for the garden. Your rose will easily take root there! From a distance, the buds are indistinguishable from real ones.
Animal world
Crafts made from bottles in the form of animal figures are popular in children's playgrounds and in the garden of equally exotic palm trees. There are countless ways to decorate crafts; for example, we will describe the procedure for making a cute cat.
Comment! Using brown plastic bottles as a basis, you don’t have to resort to subsequent coloring of the craft, you only need to apply decorative elements.
Step-by-step instruction:
- A frame is being prepared for the figure, on which all the elements of the garden craft will be strung.
- The head is formed from 2 bottle bottoms. A muzzle is drawn in front, and neat ears are inserted on the top of the head.
- If there are a lot of bottles, then the body of the craft can be made exclusively from the bottoms, which are strung on the base. It is much easier to connect two 2 liter bottles with their necks removed.
- The paws are made from smaller bottles. To give the crafts stability in the garden, the container is filled with sand completely or halfway.
- The tail is formed from the necks of bottles without corks. For fluffiness, notches are made along the edges.
The proposed option for making garden crafts can be improved by making your own adjustments to the design itself and decorative elements.
According to a similar scheme, only selecting other volumes and the number of bottles, various representatives of the animal world are decorated. A giraffe with long legs and the same neck looks extremely impressive; it’s enough to just make a donkey, which can also serve as a flower stand at the same time. A cow or a zebra - it all depends on the imagination of the master.
Lilies
In summer there are countless water lilies on the river, but now it will be difficult to find Red Book lilies. But we can make artificial water lilies from plastic bottles in winter, and we don’t necessarily need to look for the graceful queen of ponds. Let's make lilies right now and don't forget about water lilies:
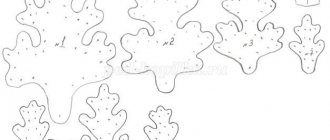
- Taking rice for help. 4, cut out several identical blanks from the plane of a white plastic bottle (milk) with the pointed petals characteristic of lilies. Provide a hole inside the part large enough for the bottle neck to pass through;
- For another bottle (for example, yellow), cut off the neck with a margin - it will go to the core of the lily from bottles with stamens (cut the “bunch” into strips and deform them by heating). Place the white blanks with petals on the bottom onto the neck thread, and secure the assembled products with a stopper.
And water lilies made from plastic bottles are a smaller version of the same lily. Make them yellow by significantly reducing the size of the petals and rounding them rather than pointing them. You can handle this easily. Now you can even make a sunflower from plastic bottles, not like the simplest river swimsuits.
poppies
Let's not forget to mention bright poppies in our master class. In general, homemade products made from plastic bottles are easily played up by the color of the materials and the size of the blanks. Much is done in the image and likeness. Likewise, poppies made from bottles are similar in their execution method to roses made from similar materials. Rice. 5 will not allow you to get confused if you want to make several poppies for the garden or for a combined bouquet. And our rice. 6 will teach you how to make tulips. Here you can use various techniques, the main trick of each of which is the use of sections of the bottle that have already been given a convex shape, allowing you to cut out voluminous petals. Plastic tulips are assembled arbitrarily: with glue, by soldering melted parts, with a decorative carnation, etc. You now know how to make flowers from recycled materials. Feel free to realize your creative ideas, inspired by our visual aids. And finally, a couple of useful tricks: to prevent plastic from catching fire and becoming treacherously smoky when heated over an open fire, use lower flame levels to warm up the part. And if you can’t solder the flower parts to each other, take regular superglue and everything will work out. And don’t forget about aerosol paints in cans if you need a specific color for your craft, but you simply don’t have a plastic bottle of the right color.
Can artificial orchids be more beautiful than living dendrobiums or phalaenopsis? Quite if the inflorescences are carefully made by hand. By creating this beauty, like living nature, the master puts his soul into it, filling it with energy, albeit inanimate, but still beautiful bouquets for decorating a home or a very special gift. Apart from the makings of decorative talent, nothing special is needed for this. Today we will “grow” bright orchids and many other flowers from plastic bottles. Surprised? Then we will immediately begin our exciting master class.
For bird lovers
The garden will sparkle with new colors if you decorate it with crafts in the shape of birds. The range of creative ideas is unimaginably wide. Garden crafts in the shape of birds are distinguished by their complexity of manufacture and size. Here are common solutions using bottles and plastic containers:
- Colorful peacocks will help create a festive atmosphere in the garden.
- A craft in the form of a flamingo is quite simple to design. A pink bird will give the garden an Asian or African theme.
- A motley parrot is another practical solution. Some crafts are suitable for beginners; there are also complex models for the garden, which are best tackled by those who are creative with bottles.
- Swans are extremely popular in the garden. Car tires are not the only craft option; bottles are also used as a base material.
- A colorful rooster will attract the attention of not only children, but also adults in the garden.
- As in the case of a parrot, there are different approaches when designing an owl or eagle owl craft. There is work for both beginners and seasoned craftsmen.
Comment! The high decorative quality of some crafts is achieved by bright colors. For others, the jewelry work of making numerous feathers from bottles is important.
Let's describe an example of how to decorate a garden with a bottle craft using the example of a peacock:
- On prepared bottles, remove the base and neck.
- The resulting cylinder is cut into 3 parts, a rounded edge is formed on one side and cut with fringe. These elements will serve as the tail for a colorful craft in the garden.
- For the “peacock eye” pattern, you will need a circle of blue polyethylene and foil, which are secured with a stapler at the end of the tail. If desired, the desired contour is applied with acrylic paints.
- When the tail feathers are ready, they are connected together with a fan.
- The function of the body in the garden craft will be performed by a 5 liter container, and a 2 liter bottle will be useful for the neck. The container is firmly fixed to each other.
- The neck of the bottle can be used as a head. Bird crafts where the head is cut out of foam plastic look much more impressive in the garden.
- At the final stage, the garden craft is coated with paint and decorative elements are applied. Eyes, beak, crest - various techniques are used for details. In some cases, beads or buttons are attached, in others they are simply drawn.
Bird legs are often made from wire and plastic pipes, it all depends on the size of the craft. To make the bottle garden figure stable, the body is filled with sand. This applies to small crafts. It is better to secure flamingos in the garden at the base.
Photo examples will give you an idea of the variety of forms of birds in the garden:
Orchids
Everlasting orchids are something out of science fiction. But making flowers from plastic bottles will allow us to defeat the laws of nature. To begin, prepare the necessary materials: several multi-colored soda flasks (milk, beer, etc.), plastic paints (acrylic, aerosol in bottles), glue for polymers, a candle or alcohol burner (a soldering iron or burner is also useful), scissors . All is ready? Then let's get to work! We will follow the step-by-step instructions:
- Based on Fig. 1, cut off the bottom of the bottle. This is an excellent planting base for an orchid - the upper petals are already there. All that remains is to adjust the shape of the 4 petals with scissors and slightly melt their edges with a candle flame;
- We continue to “grow” flowers from plastic bottles with our own hands: cut out a “false” flower from the body into 4 (6-8 - optional) petals. It can be glued to the base. Or, having made through holes in the details with a burner, assemble the orchid bowl on a decorative carnation;
- Make several inflorescences and plant them on an improvised stem - a woody twig painted green. This way you can collect large flowers from seemingly garbage. And if you work with your soul, artificial flowers will not be inferior in appearance to living orchids.
Surely you already have a decent vase for a luxurious orchid branch. No? Then make it all from the same familiar material!
Daisies
Rice. 2 clearly shows how to make daisies from plastic bottles. As you can see, the main difficulty here is the formation of the stem, stem petals and receptacle on the burner flame. However, as soon as you start working on the flower, the plastic daisy will begin to appear as if by itself - everything will be so simple. So, let's proceed step by step:
- Using a stencil or by eye, cut out the basic detail - a chamomile inflorescence with petals. At first it will be a rough blank, but then you will correct it with scissors and give it a natural look;
- Cut out various stem petals from scraps of green plastic and melt them slightly in an alcohol lamp. Thanks to this, each chamomile will become unique;
- Make a flower core from a piece of yellow (brown) plastic. Prepare the stem by carefully melting a thin strip of plastic - a twisted or straight piece of bottle - on an alcohol lamp;
- Put your craft together using the technique of soldering parts to each other. However, somewhere you can use glue.
The peduncle can be made even simpler: cut a wide strip of plastic along the entire height of the bottle and fold it lengthwise, pressing tightly. Cut off the excess planes with scissors, leaving only a thin corner - the leg is ready. Now it’s no secret to you how daisies are made from plastic bottles. Shall we move on?
Palm
The palm tree is considered the leader in landscape design using plastic. It is quite simple and quick to assemble. To work, you will need bottles of green and brown shades of the same volume, and a metal rod of the required length. Algorithm of actions:
- Reliable fixation of the base is the key to the safety of a large craft. It is better to concrete the rod in the ground.
- For a palm tree trunk you will need about 15 brown bottles, it all depends on the required height of the craft.
- The neck is cut off, small notches are made along the edges and the corners are turned away to give the trunk of the craft a resemblance to the original.
- Holes are prepared on the bottoms of the bottles that correspond to the diameter of the rod.
- Thread the container onto a rod, tightly connecting the bottles together.
- Palm branches are prepared in different ways, it all depends on the size of the garden craft. Sometimes two sheets are made from one 2-liter bottle, or even four. Terry edges look extremely impressive.
- At the final stage, when the leaves have crowned the rod with the trunk, they need to be properly fixed.
A striking example of a successful garden craft is shown in the photo:
Roses
Making roses yourself from plastic bottles is not only simple, but also surprisingly interesting. Each flower will be different from the others. Diagram 3 will tell you in detail how to make a garden queen. In a short time, large flowers from waste materials will bloom in your hands. Will your loved ones be able to guess what all this beauty is made of? Hardly. Let's get started soon? So:
- Look at what preparations the homemade plastic rose in Fig. requires. 3 and make 2-4 similar parts of different sizes. You can first make a stencil or cut out the components of the flower by eye, which will be better if you want to get exclusively unique crafts from plastic bottles;
- Similar to the methods described earlier, make a rose stem by slightly melting a strip of transparent plastic over an open flame. Cut out various petals from the scraps of the bottle and also slightly deform them with a candle light;
- When you finish collecting luxurious flowers with your own hands, connect all the fragments of the rose together by soldering the parts heated over the fire. Or use glue. Assemble the flower cap according to the matryoshka principle - insert smaller pieces of petals into large bowls.
The resulting craft can be used to decorate an empty shelf or window sill. Or use it for the garden. Your rose will easily take root there! From a distance, the buds are indistinguishable from real ones.
Other decor options
The garden is a good place for creative ideas. With a little imagination and free time, you can create an interesting composition using plastic bottles. The main thing is to carefully consider the concept of landscape design.
If there is no opportunity to arrange a real pond in the garden, painted pebbles or the bottoms of inverted bottles can perfectly imitate water ripples. It is appropriate to place a graceful swan nearby; the craft is also formed from bottles. A mischievous frog is another garden decoration that you can quickly make with your own hands. Crafts in the form of gnomes will also amuse those present in the garden. Of course, you will need a little artist's skill, but with the proper zeal, everything will definitely work out.
Plastic bottles are not only an excellent basis for decorative figures in the garden, but also an opportunity to create a practical craft. Some craftsmen make chairs and sofas from a large number of plastic containers, connecting the objects together with tape. For the convenience of using furniture made from bottles in the garden, it is complemented with soft pillows that can be easily removed in case of bad weather.
Feeders for birds and pets are another use for containers. The simplest craft option is to cut a couple of holes in a 5 liter bottle and hang it on a branch. But it is better to improve the product and make the bottom heavier so that the bottle feeder does not sway in the wind. There are original examples of garden feeders, supplemented with spoons, as in the photo below:
Bottles can become the basis for a wasp trap. The principle of operation is simple - sweet water is poured at the bottom of a double plastic container. Insects fly in, but are no longer able to get out.
Lilies
In summer there are countless water lilies on the river, but now it will be difficult to find Red Book lilies. But we can make artificial water lilies from plastic bottles in winter, and we don’t necessarily need to look for the graceful queen of ponds. Let's make lilies right now and don't forget about water lilies:
- Taking rice for help. 4, cut out several identical blanks from the plane of a white plastic bottle (milk) with the pointed petals characteristic of lilies. Provide a hole inside the part large enough for the bottle neck to pass through;
- For another bottle (for example, yellow), cut off the neck with a margin - it will go to the core of the lily from bottles with stamens (cut the “bunch” into strips and deform them by heating). Place the white blanks with petals on the bottom onto the neck thread, and secure the assembled products with a stopper.
And water lilies made from plastic bottles are a smaller version of the same lily. Make them yellow by significantly reducing the size of the petals and rounding them rather than pointing them. You can handle this easily. Now you can even make a sunflower from plastic bottles, not like the simplest river swimsuits.
poppies
Let's not forget to mention bright poppies in our master class. In general, homemade products made from plastic bottles are easily played up by the color of the materials and the size of the blanks. Much is done in the image and likeness. Likewise, poppies made from bottles are similar in their execution method to roses made from similar materials. Rice. 5 will not allow you to get confused if you want to make several poppies for the garden or for a combined bouquet.
And our rice. 6 will teach you how to make tulips. Here you can use various techniques, the main trick of each of which is the use of sections of the bottle that have already been given a convex shape, allowing you to cut out voluminous petals. Plastic tulips are assembled arbitrarily: with glue, by soldering melted parts, with a decorative nail, etc.
You now know how to make flowers from recycled materials. Feel free to realize your creative ideas, inspired by our visual aids. And finally, a couple of useful tricks: to prevent plastic from catching fire and becoming treacherously smoky when heated over an open fire, use lower flame levels to warm up the part. And if you can’t solder the flower parts to each other, take regular superglue and everything will work out. And don’t forget about aerosol paints in cans if you need a specific color for your craft, but you simply don’t have a plastic bottle of the right color.
Tulips are flowers loved by many. But their fragility is depressing. Just admire it for a week, and then wait a whole year for next spring to see the bright blooms?
Garden crafts made from plastic bottles can solve this problem: tulips in your flower garden can bloom all year round without interruption. Unless they hide under the snow for the winter or you bring them into the house. These flowers are the simplest crafts. There is no need to cut out complex parts, come up with particularly ingenious fasteners, etc. Plastic bottles, scissors, wire, a little paint - that’s the whole kit for creating ever-blooming tulips.
Decoration of flower beds
Bottles in the garden are actively involved in the improvement of flower beds. Most often they serve as a fence. The solution has a lot of positive aspects:
- Wooden borders quickly deteriorate when exposed to moisture. Using natural stone is a costly endeavor. Craft bottles are free and have a virtually unlimited lifespan.
- If defects appear, replacing one element in the curb is not difficult.
- Arranging a flower bed in the garden using bottles does not require special skills and even a teenager can do it.
Making a fencing for a flower bed in the garden is easy - just cut off the top part of the container, fill it with sand or earth and install it close to each other in a prepared trench. Sometimes the neck is not cut off so that it is possible to screw the lid on the container and prevent the filling from spilling out. But then the procedure for landscaping a flower bed in the garden will take more time. Then the base of the mini-fence is covered with soil and compacted.
Advice! Pre-painting the bottles with bright colors will help add aesthetics to your landscape design.
It is not much more difficult to create a multi-tiered flower bed in a bottle garden. The only difference is that after preparing the first tier, it is filled with fertile soil and proceeds to arranging the second circle.
Tulips from plastic bottles - almost like real ones
1. Cut off the part with the bottom from the bottle. The height of the cut part should be approximately equal to the height of the flower. 2. It is very fortunate that the bottoms of most plastic bottles have a relief. Focusing on it, we cut out tulip petals in a circle and get flower cups. 3. It's time to paint our garden crafts. We use bright paint, as close as possible to the color of real tulips. Based on the type of paint, it is advisable to choose acrylic paint - it will stick well and will last for a long time without renewal. The best choice would be paint in aerosol cans (everyone who makes garden crafts claims this) - it’s convenient, quick, doesn’t get dirty, dries - couldn’t be faster. 4. We “invent” the center of the flowers from large buttons, beads (it’s good to collect several on fishing line or wire), or even just caps from plastic bottles. 5. Flower stems can be made from thin metal rods (rebar), fusing plastic from a bottle onto them. You can also use stiff wire or suitable dry branches. The ideal option is floral wire for stems (the so-called gerberna wire), which is sold in any self-respecting store for florists or just crafters. You can buy a pack of this wire - enough for flowers for the whole garden.
Making flowers
At the end of the warm season, when living vegetation withers, the garden will be decorated with flower arrangements made from plastic containers. They will delight the eye even in early spring before nature awakens. Daisies made from plastic bottles for the garden are a popular solution for garden design. To work you will need:
- white milk containers;
- yellow caps;
- green containers;
- scissors;
- candle or gas burner for processing sharp edges;
- awl;
- rigid wire for the stem;
- liquid Nails.
The flowers turn out to be quite large, it all depends on the volume of the milk container. The algorithm of actions is not difficult:
- White bottles are cut into 4 parts.
- The edges are given the desired shape and processed over fire to avoid cuts.
- A rigid wire or metal rod is wrapped in a narrow strip cut from a green bottle.
- The stem is heated over a flame to cause the material to shrink.
- Green bottles are also needed for cutting out leaves, which are then attached to the craft using wire.
- At the final stage, the stem with leaves and chamomile petals are connected and secured with a yellow cap.
Comment! In order for the craft to last a long time in the garden, it should be carefully fixed in the ground.
The size of daisies may vary depending on the size of the garden, the availability of free space and the wishes of the owner of the site. It is not at all necessary to make giant flowers; you can limit yourself to crafts from a miniature composition for the garden.
It’s quite simple to make garden crafts from bottles in the form of bells and lilies of the valley. The main difference between the composition is the color scheme. A fairly popular garden decoration is chrysanthemums from bottles; tulips are less common. To achieve resemblance to the original, painting plastic containers in the desired shade using moisture-resistant acrylic paints helps. Examples of original crafts in the shape of flowers are in the photo below.
Fantasy tulips
These tulips are more difficult to make, but they are also very elegant. To make them, on the contrary, they use the upper parts of plastic bottles - with “necks”. 1. Cut off the top part of the bottle by about 1/3. 2. Using scissors, cut round petals along the cut. 3. We paint the blank - the cup of the flower - as written in the first version. 4. After drying, put it on the stem (you can also see the stem options above). 5. Now the most interesting part: the middle of the flower will also serve as a fastener. To make it, we take the top of a small green plastic bottle (or paint it). We make a hole in the cork and pass a reinforcing rod or wire through it. 6. The calyx of the flower turns out to be large. Well, let's take this as a fantasy tulip. But for such a cup you also need a stem of the appropriate size. You can cut strips of brown plastic bottles, use scissors to make a fringe on them from one edge and wrap the stem. It’s easy to secure the strips if you melt one (on the cut edge) and press it to the stem - it will simply “weld.” You can “plant” these garden crafts on a flowerbed with irises: while the foliage of tulips dries out, the foliage of irises remains green until the cold weather.
MORE CRAFTS FOR THE GARDEN
Flowers with perfect petals
Pots, stands and flowerpots
Bottles are an excellent container for flowers. There are plenty of options for making practical crafts. Here are popular solutions.
Vertical gardening of a fence. The essence of the process:
- Bottles with a volume of 1.5 or 2 liters are placed horizontally, the top part is cut out and small holes are made at the bottom to drain excess moisture.
- Along the edges (near the neck and bottom), holes are pierced with an awl to pass the wire through.
- Fill the container with fertile soil and sow seeds, or plant already sprouted flowers.
- Hang the bottles on mounts prepared in the garden fence.
A simple solution will give excellent results in decorating the garden with crafts made from plastic containers.
The design of the terrace with hanging pots with hanging plants is slightly different. Depending on the size of the flowers, take 2 or 5 liter bottles. For greater decorativeness, the container is wrapped in a fabric cover or painted with a suitable shade of paint. A wire or chain is attached to the sides. The practical craft is ready in no time.
Compositions on the ground look original in the garden when flowers are planted in bottle containers. The most common two types of crafts are when a 5-liter container imitates a train with carriages or a company of cute pink piglets. As in the case of vertical gardening, to get a practical craft, the bottle is placed horizontally, the top is cut out, holes are prepared for drainage and covered with soil suitable for flowers.
Photo examples of functional crafts in the garden are presented below:
Sometimes bottles are used to decorate a flower bed from a different angle. An area in which a ladybug or butterfly is laid out from painted bottoms looks impressive in landscape design. The craft is left in its original form or diluted with low bushes of plants.