Doll made from plastic bottles So, how to make such a cute craft from plastic bottles? We will need the following materials: - two transparent five-liter plastic bottles (bottles) with caps, - leftover colored yarn, - marker, - paints and brushes (or spray paint), - red felt (or a small piece of other thick red fabric), - knife (office, for paper), - scissors, - awl, - glue. From the optional: - a heat gun (optional), - an electric drill or soldering iron (optional, for making large holes in plastic bottles). We make a doll from plastic bottles. 1. Making the shoulders. Using the photos as a guide, cut off the top of one of the bottles (cutting roughly down the middle of the bottle). Then we also cut off the neck and lid from this upper part. We get a blank that will be the “body” of the doll. We will then insert the neck of the second bottle into the hole of the first bottle, so we need to make sure that the hole is made to be the right size. 2. Making the head. Now let's start creating the doll's head. To do this we need to take a second plastic bottle and make it shorter. You will need the top (it should be cut large, since this will be the doll's face) and the bottom (it should be small, like a hat, since it will have the doll's hair on it) parts of the bottle, that is, you need to take and remove the middle part, as shown in drawing. The cover is removed from the top. You can, of course, leave the second bottle entirely, but most likely it will be too huge for your head. Check if the two parts fit together well. Connect them together and make sure they will hold tight. 3. Color and create the face. Now we need to color our craft blanks. You need to paint from the inside. There is no need to be afraid of painting unevenly; on the contrary, distinct brush strokes create a unique image of the doll. It is best to paint plastic bottles with acrylic paint, but you can also use aerosol paints, which are convenient to use. The color chosen for the doll's body is blue (you can choose another), and for the head a calm yellow-sand color is chosen. Please note that the paints must dry thoroughly before we proceed to the next step. When the blanks have dried, you will need to glue together the body (shoulders) of the doll and part of the head (face). Next, we begin to create the doll’s face. First we need to take the two covers we have and glue them where the doll will have eyes. Then you need to color them as in the photo, adding eyelashes above the eyes with a marker. The nose (circle) and smiling mouth are cut out of red felt (or any other dense fabric) and also glued to the face with glue. However, you can simply draw them on with a marker or red nail polish. 4. Add hair. The doll's hair will be positioned as shown in the photo. First, attach the hair to the back of the doll’s “face.” We mark the head from the inside with a marker and pierce holes with a sharp awl. You can heat the awl over a candle or gas burner to make piercing easier and the holes more accurate. You can also make holes with a thin electric drill or a small soldering iron. The closer the holes are to each other, the thicker the doll's hair will be, and the wider the holes are, the more threads can be placed in each of them. However, it is better to stick to the golden mean. Now begins the most interesting and time-consuming part of the work - creating hair from yarn! Cut three strands of yarn to the required length. We thread them through a needle, tying a knot on the other side and fasten them to the doll’s head, starting from the bottom of the head. Each hole is filled with several tufts of hair. For the doll from this master class, 5-6 bunches were needed for each hole. You can also thread the doll's hair in large bunches through wide holes using tape. We do not fill the junction of the two parts of the head with hair (that is, we retreat from the upper border by about one centimeter). 5. Top of the head and bangs. Once the main part of the doll's head is completed, the face is drawn, and the beautiful colored hair is already attached to the back, you can begin to move on to the top part. There are two nuances here. Firstly, it is better to make smaller holes more often (they look better), and secondly, you need to mark with a marker where you will need to make bangs. The bangs are made from shorter threads. The remaining threads are long. You should start attaching the hair from the edges of the upper part of the workpiece to the center. 6. Finishing the doll. After all the hair is secured, we connect both parts of the doll’s head, putting the upper part on the lower part like a cap. Of course, if you see that the head is not holding well, then you can fasten the parts with glue, however, then you will no longer be able to disassemble the doll and adjust the length of its hair.
Called the DIY Craft project, this amazing idea comes from Barcelona-based blogger and doll designer Eva Monleon (Misako Mimoko). Not only is the plastic bottle doll itself a very beautiful and unusual toy, it also has another unique feature: you can adjust the length of her hair yourself. The stylish doll can be given any hairstyle, braided and decorated, which will certainly delight your children. In the humble opinion of the author of this article, at the moment this is the most outstanding craft that we were lucky enough to find and post on our website.
“I remember playing with one of these dolls myself (along with my little toy Pony!). I loved them so much that I thought it would be great to have the doll have a stylish hairstyle with hair in all the colors of the rainbow and especially a lot of fashionable pink. The other children loved to comb her long colored hair, adjusting it, making it longer or shorter, using bobby pins and elastic bands to create different fashionable hairstyles.
I hope you will be as happy as I was when creating and playing with this little sweetheart doll!”
— from Eva Monleon's blog
So, how to make such a cute craft from plastic bottles?
We will need the following materials:
Two transparent five-liter plastic bottles (bottles) with caps,
Remains of colored yarn,
Paints and brushes (or spray paint),
Red felt (or a small piece of other thick red fabric),
Knife (office, for paper),
Scissors,
From the optional:
Thermal gun (optional),
Electric drill or soldering iron (optional, for making large holes in plastic bottles).
We make a doll from plastic bottles.
1. Making the shoulders.
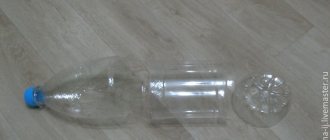
Using the photos as a guide, cut off the top of one of the bottles (cutting roughly down the middle of the bottle). Then we also cut off the neck and lid from this upper part. We get a blank that will be the “body” of the doll. We will then insert the neck of the second bottle into the hole of the first bottle, so we need to make sure that the hole is made to be the right size.
2. Making the head.
Now let's start creating the doll's head. To do this we need to take a second plastic bottle and make it shorter. You will need the top (it should be cut large, since this will be the doll's face) and the bottom (it should be small, like a hat, since it will have the doll's hair on it) parts of the bottle, that is, you need to take and remove the middle part, as shown in drawing. The cover is removed from the top. You can, of course, leave the second bottle entirely, but most likely it will be too huge for your head.
Check if the two parts fit together well. Connect them together and make sure they will hold tight.
3. Color and create the face.
Now we need to color our craft blanks. You need to paint from the inside. There is no need to be afraid of painting unevenly; on the contrary, distinct brush strokes create a unique image of the doll. It is best to paint plastic bottles with acrylic paint, but you can also use aerosol paints, which are convenient to use.
The color chosen for the doll's body is blue (you can choose another), and for the head a calm yellow-sand color is chosen.
Please note that the paints must dry thoroughly before we proceed to the next step.
When the blanks have dried, you will need to glue together the body (shoulders) of the doll and part of the head (face).
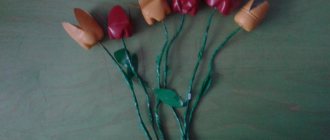
Next, we begin to create the doll’s face. First we need to take the two covers we have and glue them where the doll will have eyes. Then you need to color them as in the photo, adding eyelashes above the eyes with a marker. The nose (circle) and smiling mouth are cut out of red felt (or any other dense fabric) and also glued to the face with glue. However, you can simply draw them on with a marker or red nail polish.
4. Add hair.
The doll's hair will be positioned as shown in the photo. First, attach the hair to the back of the doll’s “face.” We mark the head from the inside with a marker and pierce holes with a sharp awl. You can heat the awl over a candle or gas burner to make piercing easier and the holes more accurate. You can also make holes with a thin electric drill or a small soldering iron. The closer the holes are to each other, the thicker the doll's hair will be, and the wider the holes are, the more threads can be placed in each of them. However, it is better to stick to the golden mean.
Now begins the most interesting and time-consuming part of the work - creating hair from yarn!
Cut three strands of yarn to the required length. We thread them through a needle, tying a knot on the other side and fasten them to the doll’s head, starting from the bottom of the head. Each hole is filled with several tufts of hair. For the doll from this master class, 5-6 bunches were needed for each hole. You can also thread the doll's hair in large bunches through wide holes using tape. We do not fill the junction of the two parts of the head with hair (that is, we retreat from the upper border by about one centimeter).
5. Top of the head and bangs.
Once the main part of the doll's head is completed, the face is drawn, and the beautiful colored hair is already attached to the back, you can begin to move on to the top part. There are two nuances here. Firstly, it is better to make smaller holes more often (they look better), and secondly, you need to mark with a marker where you will need to make bangs. The bangs are made from shorter threads. The remaining threads are long. You should start attaching the hair from the edges of the upper part of the workpiece to the center.
Making interesting and useful crafts with your own hands is a great hobby and a way to calm your nerves. Painstaking work improves fine motor skills, develops attentiveness and perseverance.
In addition, this is a great way to spend time with your child: a common cause unites, opens up additional opportunities for communication, and the resulting result puts you in a positive mood and instills confidence in your own strengths and capabilities.
Products made from plastic bottles are good because the materials can be found in abundance in every home; durable and unpretentious crafts can decorate a garden or balcony; they can be presented as a gift to family and friends. Today we will make a doll from a plastic bottle.
A doll is one of the most popular motifs for handmade items. A smaller copy of a person is capable of conveying various emotions, if you are making a gift doll, then give it the features of a friend, he or she will certainly be pleased and amused by such a resemblance. The master class is not difficult, so we suggest you get started.
Lamb
This is one of the simple DIY plasticine crafts. Even a child can make a sheep. There is nothing complicated here. Step-by-step instructions in pictures are presented above. The first step is to roll up the animal's face. It should be an oval. The body is also an oval, but larger. The legs are four sausages. We glue the parts together and lightly tap the workpiece on the table so that the lower surface of the toy becomes flatter and therefore more stable. Now you can start making wool. It is done in two ways. The first is that you roll the balls and then make a depression in each of them. The second method is to roll thin sausages and twist them like a snail. We make wool and cover the sheep with it. Only the front part of the muzzle and paws need to be left untouched. You need to mold hooves from black plasticine. These will be four ovals, in which a deep depression has been made in a stack, dividing the geometric figure into almost two parts. We glue the hooves to the legs. We make teardrop ears from white plasticine, and roll eyeballs from black plasticine. The sheep is ready.
Let's look at a master class on creating a doll from a plastic bottle with your own hands
A detailed master class will help you master the process of creating a doll.
To make a doll, you will need the following materials:
- 2 transparent five-liter plastic bottles (bottles) with lids;
- some leftover colored yarn;
- markers;
- paints and brushes (or aerosol paints in cans);
- red felt (or a small piece of other dense red material);
- knife (stationery, for paper);
- regular scissors;
- awl;
- glue.
May be useful at work:
- heat gun;
- electric drill, possibly a soldering iron (can be useful for making large holes in plastic bottles).
Step by step instructions.
The neck of one of the bottles is cut off approximately in the middle of the bottle, and then the neck with the spiral for the cork is cut off from the same part. A second one will be inserted into the hole of the bottle later; at this stage you need to make sure that the holes are of the appropriate size.
To create the doll's head, take a second bottle and cut it off. You will need the upper part for work. It should be cut out large enough to create a doll's face. A cap with hair will be made from the bottom one, so it should be smaller. To do this, you need to remove the middle part.
After this, the lid is removed from the top. These two parts should fit together well and hold tightly.
Now they begin to decorate the blanks. It is necessary to paint only from the inside so as not to get stained with paint. The next stage is started only after the paint has completely dried.
After the blanks have dried, the body and shoulders of the doll are connected to each other.
Plastic caps are used to make the doll's face. They are glued to where the eyes will be. Using a marker, eyelashes, eyelashes, and eyebrows are drawn in. The nose and mouth are also drawn. You can outline the mouth with a marker after gluing a piece of red felt in the shape of a smile.
The most labor-intensive process is attaching the hair to the doll.
The inside of the head is marked with a marker, and then holes are pierced with a sharp awl. You can pre-heat the awl. This way it will be easier to work - the hot metal will melt the plastic, and there will be no sharp, torn edges in the workpiece. The more holes there are and the closer they are to each other, the thicker the doll’s hair will be and the more interesting her appearance will be. In addition, the size (diameter) of the hole itself will determine which bundle can be inserted inside.
Yarn is used for the hair itself. It is best to opt for the one that best retains its appearance over time - containing acrylic and nylon. The length is chosen at the discretion of the master.
Using a needle, the bundle is removed from the middle of the head, and a knot is tied from below, inside, which will prevent the threads from falling out. Having densely filled the entire surface, leave an empty area about one centimeter below the upper border of the junction of the two parts of the head.
It is better to make holes in the upper part of the head more often than in the lower part, so the hair will turn out much fluffier and more interesting. In addition, with a marker you need to mark the place where the bangs will begin. For the bangs, the threads must be cut shorter than for the rest of the head.
Attach the hair from the top to the center.
To put the doll together, you need to put the upper part of the head on the lower one, like a hat. You can attach the parts together using glue.
This doll model is interesting because the hair length can be adjusted. To do this, the “cap” of the upper part of the head is removed and the threads are pulled inward a little, secured with an elastic band or a hairpin, and then the upper part of the head is put back in place.
If the length of the hair needs to be adjusted, then you cannot glue one part to the other, as this will prevent you from removing the top.
To return your hair to its original length, you need to pull the ends of the threads or, taking your head apart again, untie the knot inside. You can comb the doll with a wide-toothed comb. Hair threads can be used to braid any hairstyle - from a simple ponytail or bun to braids of varying degrees of complexity.
A simple bottle doll.
You can make a simple bottle doll using a 1.5 liter bottle and thread. Holes are poked in the cork with an awl. Also, using an awl, holes are made on the back of the bottle, however, you can limit yourself to just the cork. Then threads are threaded through the holes and tied with a knot from the inside.
Use a marker to draw a nose, mouth and eyes on the bottle. You can glue parts of the face by cutting them out of paper or any other material of your choice.
Large holes are made in the middle of the bottle on the sides, into which braids of thread are threaded. Knots are tied at the ends of the braids. To keep the handles tight, thread the braids through the neck, pulling them into the hole using a crochet hook.
It turns out to be a wonderful, cheerful doll.
Princess
These cute plasticine figures are made according to the same principle. Princesses differ only in hairstyle and accessories. We will make such figures on a shell. It will become the basis, and at the same time the underskirt. Let's start manufacturing from the head. Roll out a ball from beige plasticine. In the places where the eyes will be, indentations should be made. Now you need to make a hairstyle out of sausages. You should alternate short and long strands. You can leave your hair down or tie it in a braid or ponytail. Now let's start making the skirt. We fashion five identical leaves from plasticine. We attach them to the top of the shell. Now you should roll three thin sausages - this will be a sleeve. We make a hand, and in order not to sculpt a brush, we hide it in the hair. What remains is the decor. You can make a bouquet of flowers for the princess or simply beautifully decorate the leaves-skirt. Lastly, we work on the face.
Plasticine doll
Little girls have always played with dolls. This was the most long-awaited gift for the baby. Previously, fabric and cotton wool, wood, and clay were used. Modern toys are made of plastic and papier-mâché. A toy made with your own hands will be dear to your heart. The parents' task is to help with the chosen task. A suitable option for creating a doll would be a plastic mass of various colors.
You can fashion any doll or cartoon character from plasticine. It is better to sculpt the first heroine together with the child - he must understand the principles of creating the body, head, and outfit. You should start with simple figures. Modeling can be turned into a fairytale journey, where there will be a whole kingdom with a princess and a prince, ladies in chic dresses, etc.
For the body, choose the color of clothing. It is better to sculpt the head, arms, and legs in light shades. Often new dolls' heads don't hold up well, so a frame is created - a small part of a match or toothpick. Children get very upset if their favorite toys break.
Girls will definitely want to fashion a lot of accessories for their new friend. To work, you may need stacks, which are often sold in sets with plasticine. Flowers, sweets, cups and plates for plasticine friends are mandatory attributes of a fairy-tale life.
Learning to combine
In any home there are many little things that can be used to complement a doll, showing ingenuity and imagination. These will be chestnuts, acorns, shells, twigs, pebbles, buttons, threads, ribbons, etc. In the kitchen you can look for interestingly shaped pasta and make a brooch or snail friend out of it. Use your imagination and be surprised at the many interesting solutions that come to mind.
Complicating the task
It is believed that plasticine is a children's toy. However, it is not. Many adults sculpt with it and spend hours modeling or sculpting. Their dolls are complex and made in various techniques; they are interior decoration and the pride of the creator.
Children should start making dolls with simple “baby dolls” in order to master the parts of the human body. Further, the task can become more complicated - an outfit, hairstyle, and accessories are added.
We sculpt a person
Plasticine is a plastic mass that allows you to create any shapes. However, this causes difficulties. To better maintain its shape, it is recommended to use a wire frame, a kind of “skeleton” for the future doll.
It is not recommended to make complex products entirely from plasticine, as it is quite dense and heavy. To reduce the load, lighter materials are chosen, which will be the “body” and “skull”. Styrofoam or paper secured with tape works well.
Plasticine is used only for pasting the finished frame. They think over clothes and shoes: suit, shirt, boots. All folds, seams, pockets are drawn in a stack. Much attention is paid to the body. They sculpt their fingers, face and hair well.
How to make a doll
To make a doll you will need:
- plasticine of different colors;
- stationery knife or stacks;
- matches, toothpicks;
- well-lit workplace;
- fantasy.
The doll is sculpted in stages:
- You should start from the head
. A round or oval-shaped ball is formed from light-colored plasticine (yellow, brown). Create a mouth and nose, eye sockets. You can use colored beads for the eyes. For hair, you can use knitting threads - attach them evenly. - Torso.
It can be any color. Invite your child to choose his own “dress” for his fake. The plasticine block should be kneaded well in your hands and the mass should be given the desired shape. To make the dress more elegant and brighter, a pattern is applied to it using stacks or a knife. You can also use “sausages” of a different color, laying them out in beautiful patterns on clothes. - Arms and legs.
For the arms and legs, use plasticine of the same color as for the head. To attach to the body, use toothpicks or lists. The fingers are formed with a stack or a knife.
Original dolls
It is worth trying to make the first doll beautiful and neat. It will be a standard for the child’s future creativity. The child will use it to navigate when creating dolls.
It is important that the girl actively participates in the creation, shows imagination, and helps choose colors and shades. Talk and work out all the details with her - hairstyle, shoes, dress style, jewelry, handbag, etc.
Don't limit your child's imagination. Collaborative work will bring people closer together, develop creativity, imagination and encourage them to search for non-standard solutions.
Devil doll
You will need plasticine of different colors, wire and pliers, and stacks. Before sculpting, a wire frame is made - loops are formed for the head, arms and legs. They sculpt a man from red plasticine on a frame. Don't forget about the long ponytail with a tassel at the end in the shape of a triangle.
Horns, eyes, hooves and bangs are made from black. The ears and snout are made from pink. They form a stack of fingers and a navel on the stomach, and draw a mischievous smile on the face.
Luxurious lady
You will need:
- plasticine of different colors;
- cotton pads, cotton wool;
- stapler;
- wire;
It is recommended to use copper wire, as it bends easily and does not corrode. To cut it, use pliers. Round-nose pliers will help you bend a wire frame-base for a future doll.
- stacks;
- thick paper;
- scissors.
- The base is made from wire: a loop for the head, legs, arms, body.
- The head is formed, and the places of the eyes, nose and mouth are marked with stacks.
- Make two identical sausages for the hands. At their ends, cakes are formed - the basis for the fingers. Using stacks you can shape your fingers.
- They sculpt the body, highlighting the thin waist and curvy hips. To add charm, one arm is bent at 90 degrees.
- They are preparing an outfit for the doll. A circle is cut out of paper the size of a cotton pad. Holes are made in the center, slightly smaller than the head. Several cotton pads are fastened with a stapler and glued to a paper base. The edges of the discs are straightened, forming a peony flower. Hair is made from cotton wool.
- For dressing, cotton pads are also used, but without cotton. A corset is made from one circle, and a skirt is made by placing many circles on top of each other. The bottom of the dress, bodice and sleeves are trimmed with cotton wool.
- A handbag made from a folded cotton pad is hung on the bent arm.
Plasticine doll for little ones
A simple method is used for sculpting. By changing the “finishing” of the doll, you can get many beautiful girlfriends.
- For the face and hands use a beige-pink color. If this is not the case, then take the closest shade to the color of the person’s skin. For hair, black, brown and yellow colors are used, depending on the wishes of the child. Bright colors are ready for an outfit.
- Make a ball for the head from pink plasticine.
- Eyes, eyebrows, mouth, and convex nose are applied to the front part.
- Create a magnificent outfit. It is convenient to use a small jar of cream or medicine. Two bright colors are used to make bundles that are wound around the base.
- The lower tourniquet is kneaded with your fingers, making “skirts”. They do the same with the second tourniquet. A skirt is formed from several layers.
- The skirt is completely formed and transferred to the body. A skewer is inserted into it to secure the parts.
- A bow and a belt are made from plasticine, different from the colors for skirts. Two small balls are attached to the place of the chest.
- A little pink plasticine is placed on the top of the stick - the head. Hands of the same color are added to the sides.
- Attach the head to the neck on a skewer and smooth the joint with your fingers.
- Hair is added from thin flagella of selected colors.
Now the child can play with a new girlfriend.
Snail
A DIY plasticine craft can be cute. In real life, snails evoke tenderness in few people, but their decorative figures look great. This animal has an interesting shape, it is easy and pleasant to decorate. Making a snail should start with the body. Roll out gray plasticine on some rough fabric. This is necessary so that the relief is imprinted on the material. Now we cut out the outline of the body. Then you should roll an uneven sausage from white plasticine. It should be thicker on one end and thinner on the other. Now you need to roll it into a shell and glue it to the base. All that remains is to decorate the snail. We make petals from red, yellow and white plasticine, and then assemble them into flowers. We complement the pattern with green material. Lay out the leaves and twigs. Use black flagella to draw the snail's face.
Collectible doll
If the previous version of the craft had a practical purpose, now we propose to create a doll with your own hands, which can become a worthy exhibit of any home collection. In the design of the costume and face painting, all your imagination is manifested, a creative approach is realized not only to this toy, but also to life in general.
You will need a minimum of materials: a plastic bottle of any shape (it is better to use small ones), ribbons, lace ribbons and other fabrics as desired, yarn and fur, as well as a wooden spoon and paints.
We create a doll outfit by wrapping the bottle with ribbons and ribbons. Let it be a small fashion masterpiece. The spoon will serve as the face for our craft; paint it with acrylic paints and add individuality. Making hair is also not difficult: glue yarn or fur of the desired color to a spoon. All that remains is to insert the spoon into the bottle neck and secure it well.
Pistachio tree. Miracle tree Pig from a plastic bottle with your own hands - photo, how to make Figures from plastic bottles with your own hands - photo, video master class Penguin from a plastic bottle with your own hands - photo, video how to make
Some people, having finished drinking juice or water, prefer to immediately get rid of plastic bottles as if they were garbage, while others keep them at home in the hope that they will come in handy someday.
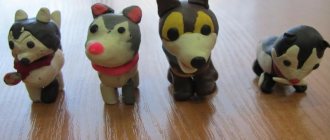
Husky
Even a child can create such a dog from plasticine. The step-by-step process is given above. You should focus on it when making a toy. Let's get started. Let's start making a dog from plasticine with its muzzle. We roll a gray ball and then add white parts to it. These will be triangles, an oval for the muzzle and another oval for the nose. You should also sculpt the mouth separately. Now let's move on to the body. We roll a white oval, and then glue gray overlays onto it. One of them will decorate the back, and the other four will decorate the paws. Now you should roll the front and hind limbs out of sausages. All that remains is to detail the dog. We glue her a black nose and eyes, and then a pink tongue.
Hedgehog
Plasticine figures do not have to be complex. You can make a cute hedgehog from a large but easy-to-make number of parts. Where to start? The first step is to roll the ball. It will become the basis of the hedgehog. Now you need to make a triangular muzzle. It needs to be attached well to the body so that the gluing border is not visible. Now we make the lower legs. These will be two flattened ovals. The front legs are two balls, on which two cuts are made. Ears can be made from flattened ovals, one side of which is trimmed with a stack. Now it's time to make the pink overlays. You can mold them by hand, or you can cut them out of a layer of thinly rolled plasticine. Decorate the face with three balls. Two of them will be eyes, and the third will be a nose. All that remains is to make the needles. We take brown plasticine, heat it in our hands and begin to make cones. They can be glued not one at a time, but in whole batches.
Angels
Plasticine dolls come in different varieties. In this case, there will not be a whole figure, but only the face of an angel and his hands. But such a craft still looks very impressive. How to create it? Take beige plasticine and roll it into an oval. Now you should make the relief of the face. We make hollows under the eyes, give relief to the cheeks and “open” the angel’s mouth. Now you need to glue in the nose and ears. Moreover, you need to do this in such a way that the transition remains smooth. Using droplets we sculpt two handles. Now you should make a hairstyle from brown or any other plasticine. You can form it from sausage curls, and also cut it from a layer. All that remains is to make surprised eyes. We stick two black dots, and in them we glue two white highlights. Now use very thin sausages to outline the eyelashes and eyebrows. Wings should be cut out of white plasticine. If desired, you can apply feather relief on them.
Panda
One of the most exciting activities for children is modeling from plasticine. This may not be just a hobby. In the future, it can develop into a profession. For example, a child can become a ceramicist or arts and crafts artist.
How to make a craft from plasticine with your own hands? We will collect a panda figurine. It can be made in literally half an hour. The first step is to roll a white ball - this will be the head. Now we make eye sockets, and then insert black balls into them. Now you should make white eyeballs, and then black pupils. We form a pug from a white oval. And now you should complement the animal’s face made of plasticine with ears and nose. Let's start making the body. The white oval will be the belly. Now you should glue two black balls and one thick sausage to it. We place the head on top, and our panda is ready.
Mermaid
Plasticine dolls can be very funny. Especially if you sculpt them on some kind of base, for example, on a shell. Let's look at how to make a mermaid. First you should roll the ball - the head. Then we form a hairstyle from thin sausages. To make the mermaid more realistic, she should add purchased eyes. Now you need to draw a mouth and eyelashes with a thin marker. We form the arms and body from thin strands. These will all be sausages, one thicker and two thinner. Now you need to make the tail. We make a thin cone and spread it over the shell. All that remains is to make the fins on the tail. They are made in the same way as tree leaves. You can use a stack to depict scales on the tail.
How to make a doll-box: master class
DIY box doll made from a plastic bottle step by step
Before you begin, make sure you have all the necessary materials
.
Such a small chest for small items
Not only will your child like it, for example, the Snow Maiden doll box will be an excellent gift for her friends for the New Year. To do this, you just need to decorate it in the appropriate style.
For the base of the box, not only plastic bottles are suitable, but also mayonnaise buckets, plastic bowls, tape reels, and unnecessary round boxes. You can also make the base yourself from thick cardboard.
Making a box doll, the master class of which you have just read, is very quick and simple, but if you do not have a suitable doll, we suggest making it from a plastic bottle
.
Gallery: do-it-yourself box doll (25 photos)
DIY master class on dolls made from a plastic bottle
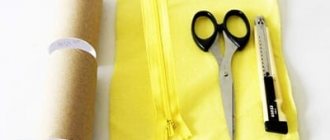
You will need:
- plastic bottle;
- plasticine;
- flour;
- gouache.
Manufacturing stages:
It will take you no more than half an hour to make the next toy from a bottle. Her master class is very simple.
You will need:
- the smallest bottle;
- textile;
- rope 15-20 cm long;
- padding polyester;
- two black beads;
- yarn.
Manufacturing stages:
A chic box for trinkets can be made from ribbons using the kanzashi technique. It’s very easy to master; any novice craftswoman can handle it. The basis can be the same materials
, as for the box doll, only we will decorate it differently.
Master class on boxes using kanzashi technique
You will need:
- base for the box;
- textile;
- ribbons of different colors and widths;
- tweezers;
- heat gun;
- beads.
Stages of work:
- First, cover the base of the box and its lid with lining fabric. From previous master classes you already know how to do this.
- Cut the ribbons into squares and make petals out of them. To do this, fold the square in half, and fold the resulting triangle again. Bring the edges of the folded triangle to the center and glue them together with a heat gun. Cut off the excess part of the petal at a 45 degree angle and scorch the edges with a candle. It will be more convenient to carry out these steps using tweezers. In this way, make enough petals of different colors to fill the entire box.
- When all the petals are ready, start gluing them to the lid in rows, forming a flower. Do the same with the base of the box.
- If desired, decorate the box with beads.
With the help of our box master classes you can decorate the interior of your room
or child, and also put things in order. Now all the small trinkets will be in their places. Please also your loved ones with such a wonderful handmade gift.