You can make various crafts for the garden from tin cans. Tin can is a very suitable material for this kind of decor. It is light in weight, easy to cut, paint, and attaching the elements of the craft is simple. In addition, the shape of the jars themselves often helps with the task.
Tin flowers are the most common garden decorations. Moreover, with a little effort, ever-blooming, bright tin flowers of various shapes appear on your flowerbed. Some of them are fantasy, in others you can recognize certain flowers: daisies, poppies, daffodils, tulips, etc. However, if the tin is large enough or you managed to get several suitable jars, you can make a large flower that can decorate not only the flowerbed, but also , for example, a fence , a gazebo, a wall of any building, a barrel, etc.
Recommendations for working with tin cans
Simple three rules will help you avoid health problems, avoid cutting yourself and get a beautiful result after all your efforts:
- Hand gloves will save you from small and large cuts.
- The container must be thoroughly washed, dried, in other words, prepared for use so that the smell of food is not heard from them.
- It is recommended to use spray cans to apply paint evenly on the surface of the can.
The preparatory work is done and work can begin. Of course, the simplest thing that comes to mind is to make cheerful colorful flower pots for your winter garden. Let the brightness of the colors give you a cheerful mood.
Crafts from tin cans
What to eat at the dacha in the summer? Of course, you can constantly prepare various dishes and salads, but for a quick and satisfying snack, for example, stewed meat is perfect. Have you eaten deliciously and are going to throw away the jar? Take your time - you can make many exciting and useful crafts from it. To make a night light from a tin can,
you will need, in addition to the can itself, sharp metal scissors, needle-nose pliers and a drill.
First, you should thoroughly wash the base for the night light (jar). Then carefully remove all the sharp edges that remain from the lid, for this you can use needle-nose pliers or tin scissors. Using a drill, small holes are made in the jar through which light will penetrate. One hole of a larger diameter is made at the base of the jar - a wire is threaded through it, onto which the light bulbs are attached. This night light can be used in any room. However, you should make sure that the power of the light bulb is small, then it will not heat up the body of the tin can night light too much. Summer is vacation time for all children. It's time to prepare designer crafts for the new school year. Making a pencil holder from a tin can
is quite possible for anyone who has the desire.
A dry, clean tin can must be coated with primer. Then we take a piece of foam and cut it into small rectangles. You can also cut out letters or various patterns. Using acrylic paints, we transform white pieces of foam into multi-colored tiles and wait for them to dry completely. Using glue, we attach the colored pieces to the tin can, leaving gaps between them. After this, all empty spaces between the tiles and the edges of the can are covered with putty. Excess solution should be removed with a damp sponge. The designer craft from a tin can is ready.
Most housewives who love a variety of flowers often face this problem - the lack of small pots in the ground. If you have old tin cans lying around at home, it’s time to put them to use.
To make a beautiful flower pot from a tin can
You will need a sheet of pretty paper, glue and scissors. The tin can must first be thoroughly washed and dried. A thin layer of PVA glue should be applied to the tin walls. It is needed to fix a sheet of paper on the surface of the jar. A rectangle is cut out of a sheet of paper, the size of which coincides with the surface of the jar. The paper blank is wrapped around a tin base. The finished product can be decorated with ribbons and additional decorations.
A tin can, a piece of fabric, colored paper and foam rubber - that’s all you need to make a designer pincushion from a tin can
. First you need to decide on the height and diameter of the required craft. Then select a tin can and use metal scissors or needle-nose pliers to trim off the excess part of the workpiece. The outer walls of the jar should be decorated with patterned colored paper, gluing it to the tin with PVA glue. A piece of foam rubber is wrapped in fabric and placed in the space of the future needle bed. You need to choose its size so that it does not fall out of the jar. You can also use super glue to secure the fabric with foam inside the tin blank.
Now that you can already make a large number of crafts from tin cans, you should proceed to the “aerobatics”.
A chandelier made from tin cans
will not only fulfill its intended purpose, but will also decorate your garage or cellar.
To do this, to make this craft with your own hands, you will have to try to apply simple knowledge and skills. Assembly of the frame is the main stage of work on the manufacture of a chandelier. The cans are welded together to form a star. (You can choose any shape for the future craft). A hole is made in the top tin can, and a hook is fixed in it, which will hold the designer chandelier in a suspended state. Then the entire structure is painted in any rainbow color you desire. Painting can be done either with a brush or with a spray can. Then, through the pre-drilled holes, the wires feeding the light bulbs are threaded. The number of light bulbs is selected based on the required level of illumination of the room. When performing electrical installation work to connect a finished chandelier made from tin cans to the network, it is necessary to comply with all safety requirements in order to avoid electrical damage.
A pencil pencil, a chandelier, a night light and a flower pot are not a complete list of crafts that you can make with your own hands from old tin cans. By putting useful tips into practice, you can decorate your home or apartment with designer items that will cost you almost nothing.
Become the author of the site, publish your own articles, descriptions of homemade products and pay for the text. Read more here.
Lamp made from beer cans
Tin cans of beer and lemonade can be turned into openwork lamp shades. To do this, use a bottle opener, scissors or a stationery knife to cut off the top part. Then outline the pattern and make holes using nails of different diameters, screwdrivers and other sharp objects that will leave shaped holes.
To prevent the jar from becoming wrinkled, you can stuff the paper very tightly inside. If desired, the jar can be painted both outside and inside. All that remains is to attach the socket with a light bulb - and the original lamp made from beer cans is ready.
The second option for creating crafts from beer cans in the form of a table lamp is to use only the reeds from aluminum cans for the lampshade, and the can itself will serve as the lamp’s leg. To connect the tabs into one sheet, make a cut on the top of each tab, intertwine them together and bend the cut with pliers. You can also use thin wire or thread.
Making organizers from cans
In order to make such an organizer, we will need:
1. Cans of different heights and diameters. If your cans were opened using a key on the lid, then you need to use a can opener (which has a screw) to remove the protruding rim.
2. The base on which we will place them (you can take a kitchen board or a watch blank).
3. Scraps of fabric . It is better to take fabrics with stretch thread and not very dense, so that there are no unsightly humps when folding. Jeans are perfect in every way
4. Fleece.
5. Trimmings of ribbons, braids.
6. Glue (I usually use three in my work: Amos, PVA and Moment Crystal).
7. Sewing machine (optional).
8. Self-tapping screws according to the number of cans and a screwdriver.
Since the cans have thickening at the top and bottom and often ribbed walls, the first thing we need to do is smooth out the relief. First, we apply fleece from bottom to top, without catching the thickening. We connect the fabric end-to-end.
Then we apply the canvas so that it covers the jar completely. I made the joint in a different place.
After this, it is necessary to level the bottom. Firstly, it will be easier to glue the fabric, and secondly, when screwing the can to the base there is no risk of breaking it. For leveling, you can take some kind of bulk cardboard: beer or thin corrugated cardboard (thin and dense, this is important). The main thing is that it can be cut with scissors, because a knife will take ten times longer. I glued two layers.
Now we give free rein to our imagination.
The strips for covering must be cut with allowances of 1.5 cm on the long sides and 1 cm on the short sides. The fabric should sit on the can very tightly, with tension. But there is one caveat. When you stitch the braid, the fabric in this place will not stretch anywhere. But when trying it on, you will be guided by the place where there is no braid and it may turn out that in the area of the braid the cover will not fit on the can. Therefore, I recommend bevelling the stitching slightly at the beginning and end to prevent the fabric from flapping and the tape from getting stuck.
Now a little trick. To put on the fabric, tuck the can into a regular bag. But be sure to do it like in the picture, so that the top of the bag goes inside all the way to the bottom.
Then the fabric will fit like clockwork. The bag is then torn and pulled out, and the cover sits as if glued due to the rough fleece. But don’t rush to pull it out until you are sure that the fabric has sat the way you want it.
We fold the top seam allowance and glue it inward, constantly pulling the fabric down. Then we will be able to avoid creases. To ensure that the fold lies evenly in the seam area, cut the seam allowance along the seam to 1 mm and glue this mm, straightening and pressing it.
We cut the bottom allowance, not reaching the bottom of the jar 2-3 mm (depending on the flowability and density of the fabric), and then cut off the corners.
When gluing, it is important to take your time and pull each “petal” one by one towards the center, pressing and simultaneously smoothing out all the irregularities and folds.
Now it’s time to try on the interior trim. I took cardboard for her. Its density will be lower, the smaller the diameter of the can. Be sure to ensure that the cardboard cut line runs strictly perpendicular to the bottom. Otherwise, when twisting, there will be unsightly creases that cannot be corrected.
It is important to leave a small gap between the edges. Its size will depend on the thickness of the cardboard and fabric.
Now one more subtlety. Pull the cardboard over the edge of the table until it begins to curl. This will make it easier for us to glue the fabric to avoid wrinkles when putting it in the jar. Since the can has a thickening at the top, the length of the top and bottom of the liner will be different. To avoid confusion when applying the sticker, write “bottom” and “top” on the reverse side.
Now we need to cut out the fabric for the interior decoration. Since I planned to line the bottom with voluminous felt, I did not make a bottom allowance. If you decide to make it, then immediately cut it as shown above and prepare tweezers - if any petal gets wrinkled, it will be easy for you to get it out.
When sticking, constantly pull the fabric slightly so that the cardboard curls, but make sure there are no bubbles.
On the upper part of the allowance you also need to make several notches, not reaching the edge of 2 mm. One allowance on the short side must be glued, but on the other side I recommend not gluing the fabric until the allowance begins by about 0.5 mm. First try on the liner for the can. It may happen that your blank will be too big and then you can safely cut off the extra millimeters of cardboard and glue everything to the end.
Place the cardboard into the cup carefully so as not to stain the top edge. Before doing this, think about how it will stand so that the joint is hidden by the front wall.
It is better to press with clothespins from the place opposite the joint and always through something, so as not to leave marks from the clamps.
If you have a round base, then we tighten it in the same way as we covered the jar. If the base is rectangular, then add allowances differently. That is, for example, the top one first along the short sides, and then along the long sides, and the bottom one vice versa.
After this, we arrange our jars so that the joint is covered by the adjacent jar. We fasten the cans with self-tapping screws - it’s more reliable than glue.
Now you need to cut out the inner bottom. To do this, we measure the jar not along the upper circle, but precisely along the bottom. The difference between the upper and lower diameter is quite strong. It is very convenient to use calipers.
The bottom is made of thick felt.
Here you can see that the seam of the fabric rests on the adjacent can.
Well, my daughters couldn’t wait for me to finish work and quickly filled the organizers with everything they could
I hope my experience was useful and interesting to you.
I plan to make a couple more of these organizers, but in a completely different style and with a different finish. I liked it
Alcohol burner made from tin cans
In the tourist community, using a camp spirit lamp instead of a gas burner is becoming quite popular. In addition, the weight of the alcohol burner is very small - about 10 grams! Do-it-yourself alcohol lamps are made from beer cans.
Read a detailed master class with photographs and advice from an experienced tourist here.
Rose from a beer can. Mk flowers from beer cans with your own hands for the garden
I'm not an artist, and I don't do these things professionally, but my grandmother was turning 80 years old, and I wanted to give her a special gift! I looked online for ideas and came across instructions for similar colors. I adapted the instructions to suit myself, and this is what happened!
Step 1: Cut the leaf!
I took a new, clean sheet of aluminum, but you can use some scrap pieces or scraps of aluminum. I had to buy a whole square meter, since they didn’t sell less. But I was not upset, since I will need aluminum in other projects. This is a sheet 1 mm thick.
You can try with a thinner sheet, but I think you shouldn’t take sheets thinner than 0.5 mm, since in this case the edges will be very sharp and not as strong as needed. You shouldn't take thicker aluminum either! You simply won't be able to bend it.
You need to have scissors for cutting metal. For each rose you will need 3 squares 75 x 75 mm and one rectangle 37 x 75 mm (half a square).
You need to drill a 4.5mm hole in the center of each piece. I did not measure the exact center, this is an artistic work that does not require surgical precision. Moreover, if you cut squares that are slightly different in size or are not the perfect shape, the rose will look more natural.
Step 2: Cut the petals!
Using the same scissors, you need to cut the squares into petals. Each square will be cut into 4 petals. Rectangle - by two. Each rose will have 14 petals. Of course, a real rose has many more petals, but in our case this will be enough.
For 4-petal squares:
- Cut 4 sides down the middle to the center - Cut 4 outer corners - Cut 4 inner corners
For 2-petal rectangles:
- Cut the two long sides down the center - Cut the 4 outer corners.
Step 3: Burning the Petals
The petals need to be burned, otherwise they will not be able to bend easily. Most aluminum sheets are made by cold rolling with excessive deformation, which greatly strengthens the metal. Even if you think you're strong enough to handle it, don't skip this step. It will help soften the aluminum and save time on subsequent processing of the petals. After firing, aluminum can be stretched much more without the risk of cracks and creases.
In general, the firing process involves heating the metal to 300 - 400ºC and then cooling it in air.
This step gave me some difficulty as I didn't have a burner and didn't want to purchase one. In general, the stove seemed to me the most suitable source of heat in our house!
Carefully! I recommend (even though I haven't used them) to wear leather gloves when working with fire and hot metal! Do it, don't follow my example!
You will need the following on hand:
- Stove (obviously!!) - Aluminum blanks - A place for cooling the metal after firing - Pliers - A container of water (for cooling the pliers) - A piece of cloth for drying the pliers
Take a piece of aluminum with pliers and place it over the fire, moving it slowly to distribute the heat evenly. Turn the aluminum plate over once or twice. Everything will take a minute or so (depending on the power of the stove) to reach the desired temperature. If you leave it for too long, the aluminum will begin to become cloudy and develop bumps. The next step will be melting! So be careful, filling up a burner with aluminum drops is a real pleasure...
Place the heated piece on a wooden surface (or better yet, on a stone) to cool. In less than 15 minutes the metal will cool down and you can continue. Place the pliers in water to cool them too before heating the next piece of metal.
Step 4: Cutting the Stems
At this stage I had to get creative as it was hard to find the right size rods in stores. I used 3/16" metal rod. Yes, you read that right, it is often used in concrete structures...
It doesn't matter what you use. You need a rod with a diameter of 4 mm, since in the next step we will cut an M4 thread. The length of each segment is about 35 cm.
I sanded the edge down from 4.75mm to 4mm.
Step 5: Threading
For this step you will need:
— Vise — M4 screw thread cutting tool — Lubricant — 2 M4 nuts — Patience
You need to cut a thread for about 20 mm of the rod. I think everything is clear from the photo.
Step 6: Assembly
Assembling the petals is quite simple: screw the first nut onto the rod until it stops, then put on 3 aluminum squares and one rectangle, and tighten it all with the second nut.
Now the fun begins. You will have to bend the rectangular petals first. Be careful! You need to bend them so that they take up as little space as possible in the core of the flower. Then you need to bend the next layer of petals. You should try to model the petals closer to each other in the middle so that the flowers do not turn out too open.
When bending the metal, be sure to add an “artistic” effect: Using a pair of pliers, bend the edge toward the outside. You will get small “notches” on the petals. Do this with all the petals. It takes time, but the appearance of your roses will improve greatly!
Step 7: Painting
Metal flowers are made by blacksmiths and artists, but we are not talking about such serious work. You can make beautiful and almost eternal roses with your own hands from used aluminum cans. There is nothing particularly difficult here; such work is accessible to almost everyone.
To work, you will need aluminum cans, a piece of copper wire, a steel washer, sandpaper, and epoxy glue. Glue is needed to fix the parts, but other fastening options can be used. Tools you need are pliers, strong scissors, an awl or a nail punch.
It is better to use jars of different colors, this will give contrast to the petals and volume to the entire bud.
First, cut off the top and bottom of the can with a can opener and cut the cylinder with scissors to get flat sheets of material.
On some flat, durable surface, beat the edges with a hammer and level the sheets. Next, mark the contours of the parts, then cut out five main petals and one central one. There is no need to strive to make all the fragments the same; in nature, petals are different from each other.
Use a punch to make holes in the middle of each petal. Place the petals on a thick copper wire, turning each subsequent fragment by half the sheet of the previous one. The petals need to cover the gaps of the bottom row. Still close to the topic, but from different materials.
The largest one is at the bottom, the smallest piece is put on last.
A steel washer is placed below, at the base of the bud. Now you need to fix the set using epoxy putty, or cold welding.
When the glue and welding have set, we begin to bend the petals starting from the center. Then we go in a circle, lifting and bending each petal. For this we use narrow nose pliers or round nose pliers.
Pictures home-dzine.co.za Try to make the bud more realistic, do not strive to create rigid symmetry of the fragments. This is where you will need a creative approach, work more boldly, what you don’t like can be slightly corrected later. And don’t give up if something doesn’t work out the first time and the roses don’t look like the photo. Ultimately, every creative work has its own meaning.
I continue publishing on my favorite topic of using waste material. Today I would like to invite you to view a photo master class on creating roses from aluminum beer or soda cans. Look how cool this aluminum flower looks in the interior, and you won’t be able to tell what kind of garbage it’s made from)
A little usefulness for everyone who wants to get rid of extra pounds and gain a slim figure) At your service is an individual weight loss program, a free program from Nikita Anatolyevich Richter, developed personally for you, with a scientifically based approach. This program will help you get rid of excess weight, plan your daily diet correctly and train properly by performing special exercises for weight loss. Read all the details on the website sportiwno.ru.
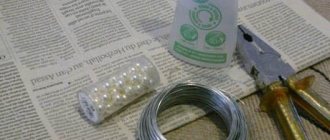
For work we will need:
aluminum soda or beer cans (one green can for rose leaves), epoxy or hot glue gun, scissors, aluminum foil, wire, pliers, wire cutters and pink car spray paint
Cut the jar, cut off the top and bottom
Cutting out the petals
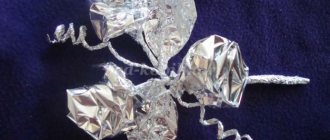
We collect a rose from the petals
For the leaves we will use a green jar
For the stem, take a wire or twig and wrap it with a strip of aluminum foil
Glue the leaves and stem to the bud with hot glue or epoxy
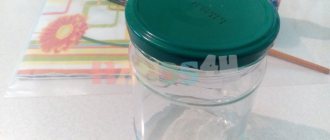
Now we paint our rose with pink car spray paint
Based on materials from the site instructables.com/id/Roses-From-Soft-Drink-Cans
It's spring again. And again spring worries and troubles in the yard. And no matter how good the spring mood may be with the first warm days, it is not yet cozy in the courtyards and gardens. Dirt and debris accumulated over the winter melt from under the snow, and old grass also melts here. Shady areas are especially unsightly; there, even in summer, it is a big problem to grow something beautiful and original. And shadow areas require a lot of care. So I suggest you decorate all the dark places with amazing flowers that will never fade and will delight you all year round with their magical flowers from aluminum beer cans. I believe that this is the only way to improve dark places and create coziness in your area, as long as you have a sufficient number of colored cans. You can, of course, make garden decorations from other materials, but today we will tell you about flowers made from aluminum beer cans.
Description of the master class
- First of all, to create bright and unique colors, you need to select a large assortment of beer cans.
Then use scissors to cut off the top of each can.
We also cut off the lower part of the jar, leaving 5-6 centimeters from the wall at the base of the jar (this depends on how big we want our flower to be) and cut this remaining part into small strips along the entire perimeter of the base.
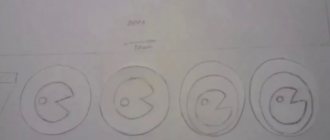
Well, now let’s start making blanks for forming a three-dimensional flower, for which we cut the remaining part of the jar in half, unfold it and get a flat surface from which we cut out a round disk, but it can be not very round, we crumple it, giving the disk the shape of a buttercup, as shown on the image.
We cut out another round disk, divide it into 6 parts with scissors, leaving the center of the disk untouched.
We divide each resulting part in half with our hands, wrap the edges so that each part turns into a triangle.
The sharp parts of the resulting workpiece need to be rounded off with scissors, as a result of which the workpiece will also turn into a beautiful flower.
There are many such blanks that can be made in different colors and sizes. And you can also cut out leaves from green jars, bending them in half and unfolding them again so that a fold remains on the leaf, like the core of a real leaf.
All preparations are ready. Let's start forming the flower, for which we punch all the blanks in the center with a hammer and nail.
—
Now, in order to assemble a flower, you need to put several figures together, for which we take a wire, string a ball or a bright bead onto it, and fasten it to the edge by making a loop.
On the other end of the wire we string the prepared figures as they grow, and at the end (it turns out on the back side of the flower) we string another ball.
We unravel the wire from the flower to the length that we need and return it back, twisting it together to the place where the leaves should be. We screw the leaves and lift the wire up to the flower, continuing to twist it together. We fasten the wire to the base of the flower by wrapping it twice around the base and cutting off the excess wire.
See what you can get out of this.
Here's another unexpected use for flowers made from aluminum beer cans
Candlestick - a lantern made from a beer can
In order to make such a craft - a garden lantern from a beer can, make even cuts on the can with a stationery knife every 3-4 cm. For convenience, you can use a ruler. Then carefully press the top of the jar to create a lantern. If desired, you can paint the candle holder with spray paint.
Desk lamp
You can make an original table lamp from a beer can. The jar itself will be a stand, and the lampshade for the lamp is made of reeds with which we open the drink. Using wire cutters, open the tongue in one place and thus connect them together, like links in a chain.
A lot of such elements are needed for a lampshade. You need to “weave” a rectangular fabric measuring approximately 40x15 cm. Close the rectangle into a cylinder, place it on the base and install the light bulb socket. This lamp will decorate any apartment.
Candlesticks made from cans
Iron cans from canned vegetables are suitable for making a candlestick. It is enough just to cut out some pattern or design on them. You can simply make round holes in a chaotic manner and paint the jar any color. We put a candle inside and enjoy the romance.
Crafts for the garden - flowers from a tin can. Master Class
Here it is important to understand the very principle of creating floral decor from tin cans.
We cut off one edge of a drinks can - you get something like a cup.
Using scissors, cut petals from the walls of a tin cup. Here we listen to our imagination or look at the samples in the photo. Petals can be large or small, graceful.
We bend the cup into a plane - we get a flower detail. Perhaps this will be enough for you, or maybe you want to make a flower with many petals (double), then you will have to make several such blank parts. It's great if you have cans of different sizes. If not, some pieces will have to be reduced. Just cut the blank and remove a few petals.
We paint the blanks in the desired colors. Dry it.
We make a hole in the center of the blanks (punch it with a nail), fasten it with wire.
It is advisable to decorate the flower by choosing a beautiful center.
We fix the flower head on the rod using wire.
These are the beauties we got.
Shelves and original organizers
There are many ideas and instructions for making crafts from aluminum containers.
Read on the topic: Do-it-yourself tablecloth for the table - master class
In the hallway it is convenient to attach empty jars to the wall for storing small items: gloves, keys, small hats. You can hang long scarves on top.
You can create original packaging for towels in the bathroom. Rolled towels of different colors fit perfectly into separate compartments on the wall. The top of the container can be decorated to match the uniform tone of the bathroom walls.
Jars for craftswomen will be a real gift. You can place an organizer on the wall, where each cell contains 1-2 skeins of thread and yarn. It always takes a long time to search in a bag; the yarn can get tangled.
If you cut off the bottoms, the containers can be used in other ways. Bulk scarves, socks, mittens and other accessories can be conveniently stored inside jars.
An interesting option is several cans, for example, 7 pcs. connect with a wide ribbon and hang on the wall (cabinet). You can put women's silk scarves and scarves inside.
New opportunities in creating crafts
Even in the absence of experience and skills in making crafts at home, almost every person, if desired, can achieve positive results by reading this article.
It tells how, without significant labor costs and financial investments, you can make things at home that decorate your home and bring benefits.
Most people do not even try to start making crafts from waste materials and improvised means, citing the fact that they do not have the experience, time or desire to look for scarce tools in stores.
Despite popular prejudices about the inaccessibility of home handicrafts, everyone without exception manages to achieve a positive result.
Numerous photographs of handmade crafts posted on the world wide web can provide irreplaceable assistance in this type of needlework.
Tin stands
A small master class on making crafts from cans. To use a tin in the kitchen, you need to wash it thoroughly, then, if there are sharp edges, clean it well. The top can be painted, covered with colored paper, and decorated with bows (ribbons). Makes an excellent stand for storing forks and spoons.
A creative stand for stationery for schoolchildren and students can also be created from aluminum containers. A “pyramid” of 10 cans, fastened together and painted to match the overall design, will become a convenient stand for pens, felt-tip pens, mobile phones, pencils and other small items. Such a device must lie in a horizontal position.
For the kitchen, you can connect several tin containers without a bottom to accommodate bottles.
Making little helpers in the kitchen
Every housewife's recipe book contains some recipe where you need to cut out a figure from dough, cheese, or vegetables. Often an ordinary glass is used for these purposes. Then you won’t be able to cut anything except the circle. Various molds made from aluminum cans will come to the rescue.
Cans of beer and cola will be used. Smooth strips are cut from the can. Mold templates are prepared and various figures in the form of hearts, stars, and diamonds are assembled from them. Be sure to leave the ends overlapping so you can use super glue to join them together.
Fun flower pots
The most enterprising housewives have long thought of using tin cans for growing seedlings. But this is not the limit of imagination. If you choose jars of different heights and sizes and paint them gold, then reflections of sunbeams will appear in your winter garden clearing. Such flower pots will shine like the sun even on a cloudy day. The option of multi-colored jars will create a cheerful mood in the interior of the room.
Recommendations for work:
- Like any material with which decorating work begins, jars must be wiped with alcohol or, more simply put, their surface must be degreased.
- The best medium for painting is spray paint, but acrylic paints are also suitable. It is convenient to apply them with a nylon brush.
- For a flower pot, you must make holes in the bottom. To do this, a clove and a hammer will be enough.
Read on the topic: Geranium care at home, types, growing from seeds and propagation
If you don’t like plain pots, you can use construction tape to paint stripes, zigzags, and different shapes on the surface. First, the surface of the can is covered with the main background color. After it has completely dried, tape is applied and the intended design is painted in a different color.
Tip: small colorful jars are suitable for planting cacti. Create a clearing of cacti with your own hands. For tall flowers, you can decorate them with aluminum cans (from paint).
DIY aluminum pendant
In this master class we will make a simple pendant with runes from aluminum. The technology that will be used to apply the image is aluminum etching.
Materials
To make an aluminum pendant with your own hands, prepare:
- piece of aluminum;
- saw or hacksaw for metal;
- paint;
- a nail or wire to scratch the paint;
- salt;
- water;
- copper sulfate;
- small bowl;
- drill.
Step 1
. Mark the desired dimensions of the pendant and, focusing on them, cut a piece of aluminum, giving it the desired shape. Having not worked with such material before, do not come up with complex and elaborate shapes; in this case, it is better to give preference to a rectangle. Round off the sharp corners of the pendant, and sand the surface itself and the cut areas.
Step 2
. Cover the resulting base of the pendant with paint. In this case, car paint was used. The reason for this choice is that this type of paint dries faster than others. You can use any one you have.
The paint should be applied in two to three layers. Be sure to read the manufacturer's instructions and paint using only them as a guide. As a result, it can take up to three days from the start of painting until it dries completely.
Step 3
. Now you need to apply an image to the pendant. In this case, it was runes. You can apply any design you like. Now, according to the drawing, the paint needs to be removed. To do this, you can use a nail, a piece of strong wire, a thin point of a knife, etc. The main thing is to remove the paint exactly according to the drawing.
Step 4
. At this stage the aluminum suspension will be etched. Mix half a glass of copper sulfate, table salt and water in a container with a tightly closed lid. Mix this solution well and pour into a flat container. A properly mixed solution should have a bluish-green hue.
Be sure to wear protective equipment, after all, it is chemicals.
Dip the pendant itself into the solution and wait for the desired result. This solution will react with the unprotected surface of the aluminum, making indentations in it. If suddenly the solution begins to become paler, add a little more copper sulfate.
Once you have achieved the desired engraving depth, remove your pendant from the solution and rinse it thoroughly with soap and running water to stop the etching reaction.
For the result shown in this master class, the etching time for the aluminum pendant was just over 8 hours.
Step 5
. Remove the remaining paint from the aluminum hanger. To do this, you can use any available tool, for example, a wire brush or professional metal grinding devices.
Step 6
. In order for the pendant to be hung on a rope, a hole must be drilled in it. Be sure to sand the edges.
A special composition for aluminum will help give the pendant a touch of antiquity; it darkens all products made from this material. In this case, it is better to rub the edges a little using sandpaper.
DIY aluminum pendant
4.3/5 — Ratings: 38
Similar articles:
- DIY rotating pendant made of wire and beads
- DIY soap – Blue windows
- DIY papier-mâché maracas
- DIY funny children's backpack "Minion"
Decoration for a summer cottage
A musical pendant made from tin cans can be an unusual decoration for your dacha. Making such a tool is not difficult:
To work, you will need jars of different sizes. 8 pieces will be enough. A circle of metal, ordinary rope, nails and a hammer are prepared.
- Cover each jar individually with acrylic paint. You can make everything monochromatic; multi-colored ones will look more interesting. Make one hole in the bottom of all jars.
- A rope is threaded through this hole into each jar, the same length for everyone. The end that ends up inside the jar is tied into a knot, departing from the edge about 10 cm.
- Bells or nails or keys are tied to this free tip.
- The prepared musical instruments are tied to a metal circle.
- An unusual decoration can be hung on a tree in the garden or on the veranda near the door.
Decoupage tin can
Don’t rush to throw away baby food containers. She has wonderful airtight plastic craft lids. Tin can decoupage, a master class of which we will now look at, will undoubtedly decorate your kitchen.
Technological nuances
For the kitchen, jars are decorated from various materials:
- tin cans, they make excellent lightweight jars for cutlery and herbs;
- iron containers for tea or cookies, they are convenient because they close tightly with lids;
- plastic, they are distinguished by a variety of shapes, volumes, and are well equipped;
- glass, they come in a wide variety of shapes, with and without lids (metal or plastic screw-on);
- cylindrical cardboard chips, they are convenient for storing small items that are rarely used (pastry syringe, cookie cutters, muffin tins);
- For jars with lids, before painting, the edge where the lid goes is covered with masking tape for ease of use.
Preparation for decoupage
A master class on creating an original coffee product is simple. You will need any glass container that is easy to find. You can also decoupage coffee cans. Although glass jars are usually more affordable, it is better to use them for work. You will also need acrylic paint; it is non-toxic and ideal for this type of operation. The paint can be taken in several colors, for example, brown, white and yellow. You will also need:
- brushes (wide and thin);
- napkins with your favorite images;
- scissors;
- knife, blades;
- cotton swabs;
- acetone or paint thinner (to remove old glue);
- coffee beans;
- supercement glue “Second”;
- glue gun;
- rope;
- figures cut out of plywood (heart, coat of arms of your favorite city, ideas may vary);
- cotton rag.
The process should begin by removing the label. This can be done simply: put the jar in a pan of boiling water, “boil” it there for about 10 minutes. After this, the label can be easily scraped off with a knife or blade, and the remaining glue can be removed using a rag soaked in acetone or solvent. After completing the operation, it is recommended to wipe and dry the jar.
Read on the topic: Skirting to the countertop in the kitchen - how to choose and attach
After the preparatory manipulations, white paint is prepared, brown is added to it, this will be more in harmony with the coffee theme.
After painting, the treated item dries for 10-12 hours.
Materials and tools
To work we will need:
- alcohol or alcohol wipe;
- acrylic primer and paint;
- PVA glue;
- beautiful napkin;
- decoupage varnish;
- brushes, sponge or piece of foam rubber;
- and, most importantly, a good mood!
Pasting methods
Experts recommend several methods of applying napkins:
With a damp brush: the molten design is fixed in the corners with droplets of water. Then wet the entire wet brush and stretch it over the surface. After this, glue is applied.
Pre-varnishing: apply aerosol hairspray to the dry fragment and allow it to dry. Such a drawing does not break due to the movement of the brush.
Into a puddle: a puddle of glue is poured onto a dry fragment spread over the surface, and the adhesive composition is distributed over the entire surface. Excess is removed with a soft cloth.
From a file: place the napkin with the pattern down on the file, moisten it generously, and straighten it out. Excess water is drained and the design is transferred to a jar.
By hand: use your fingertips instead of a brush. The glue is driven in from the middle of the fragment to the edges.
Features of decorating jars
The jar is decorated along with the lid. The relief pattern looks original. For example, antennae are added to a grapevine, and leaves are added to a flower. For relief, use white acrylic paint mixed 1:1 with PVA glue. The relief is shaded with dark paint: it is applied with a brush and then wiped over with a cloth. The paint slides to the base of the relief, creating a clear outline.
When decorating the jars with classic black and white pictures in the style of the 18th century, the lids are decorated with twine: it is wound with glue. The main background of the napkins is changed with decoctions of green tea, hibiscus, rooibos, and cafe solution.
The paper is moistened, allowed to dry, and smoothed with an iron. It is better to pluck the design with your fingers, then the edge will not be noticeable when varnishing. Windows are made in transparent jars for bulk products: they are sealed with masking tape, then tape is glued along the edge.
Master Class
Operating procedure:
- Degrease the surface of the jar with alcohol or an alcohol wipe.
- Apply acrylic primer in a thin layer. Let's dry it.
- Use a sponge to cover the surface of the container with white acrylic paint.
- Let's cut out a fragment of the picture, for example, a bouquet of roses. Separate the 2 bottom layers of the napkin from the colored one.
- Carefully place the drawing and cover the surface of the napkin with PVA glue (from the center to the edges). Try to smooth out all bubbles and wrinkles. Let the layer dry.
- Let's paint the product with a second layer of acrylic paint. You can take pink, gray or beige. It's better to work with a sponge. Around the drawing we make the color deeper and more intense. This will add depth and volume to the bouquet. Let the paint dry.
- Cover the entire jar with 2-3 layers of varnish.
- You can glue thin lace along the top edge.
Voila! Your beauty is ready. You can put hairpins, small items for a sewing machine, combs and even candies there.
Tin jars
They remain after the house runs out of coffee, tea, honey, and baby formula. The containers are quite durable and it’s a shame to throw them away. If you put a little effort into them and decorate them further, you can reuse them for a variety of purposes. From these we get:
- pots and vases;
- storage organizers;
- candlesticks and lanterns;
- cookie cutters.
To create them, you don’t need much: cut off the top lid, remove sharp edges with pliers, make drainage holes in the bottom with a nail, clean the factory paint with sandpaper, degrease the surface with white alcohol, apply a new paint coat and buy plastic plates for the jar at the store. You can grow indoor plants and seedlings for your garden in pots and vases.
Flower pots made from tins Source brzempreendimentos.com
Painting is the easiest way to decorate. You get beautiful jars if you use a brush and stencils to create a multi-colored pattern or a geometric pattern on them. The paint containers themselves are well suited for growing large plants. You can grow cacti and succulents in a small container. Wrap them in birch bark and you will have some very interesting decorative items. They will fit well into an interior decorated in country style or eco-style.
If you have dry tree branches on hand, you can make beautiful jars by cutting them to the same length and placing each one on the surface of the container. For fixing, ordinary twine is most suitable. Each branch is tied with it, neighboring elements are tied into knots, and only then the finished tape is applied to the container. It is useful to first tie it with a canvas napkin. This way the paint of the can will not bleed through the flagstone.
Beautiful silver vase Source izdoski.com
See also: Catalog of projects of houses with a second light and a garage
Many of us have old leather jackets stored on the mezzanine. You can rip them apart, cut the canvas into narrow straps, and then wrap them around the body of the can. The leather is attached to the metal base with a glue gun. You need to work with it very carefully, as the device produces hot glue.
When you don’t want to tinker for a long time, a method that allows you to quickly make decorative jars will do. To do this, you just need to wrap them with colored paper or lace ribbon and tie them with a rope. Paint them, attach artificial flowers to them, you will get very beautiful accessories that can be used to decorate a wedding or any other special event.
Look at the photo, you can see how beautiful the decoration of jars for the kitchen with burlap and lace looks. Metal containers are well suited for storing a variety of small items, for storing cutlery or office supplies. Inside them you can hide balls of yarn, neatly folded light handkerchiefs or spring scarves. Attach a few jars to a board and nail it to the wall, and you will have a storage system for buttons or spools of thread in your house. The jars can be wrapped with a strip of fabric on which pockets were previously sewn. Experimentation in this direction is allowed ad infinitum. The main thing is to turn on your imagination and think about what materials will be easier to implement it in practice.
Burlap and lace can significantly transform the appearance of any utilitarian item Source 3.bp.blogspot.com
Knowing how to decorate a jar helps you create beautiful lanterns and candlesticks. Objects that have holes made in the walls with a nail or drill are effective. Using them, a simple drawing is formed. Its contours begin to be clearly visible in the dark when a burning candle is placed inside the jar.
The decoupage technique helps to decorate the tin. Its essence is extremely simple: using PVA glue, a paper napkin with a pattern is glued to a previously degreased surface. After it is completely dry, two layers of acrylic varnish are applied over the sticker. Art stores sell ready-made decoupage kits. They have everything you need for such work. If metal handles are attached to such a jar, a flashlight or lamp can be hung from the ceiling.
Photos of crafts made from tin cans
Sources
- https://podelki.guru/podelki-iz-banok
- https://handmadeidea.com.ua/podelki-iz-pivnyh-banok/
- https://tvojdizajn.ru/podelki-iz-zhestjanyh-banok
- https://rukodelieinfo.ru/podelki-iz-zhestyanyx-banok/
- https://vdome.club/podelki/raznoe/dekupazh-steklyannyh-banok.html
- https://podelki.guru/dekupazh-banok
- https://vplate.ru/dekupazh/banok-kofe/