How to create various crafts from seeds and various cereals
Our kids have so much energy and curiosity! This can and should be used: let the child make something on his own, create his own naive children's masterpieces. Of course, with your help and active participation, small touching gifts may appear for parents or grandparents - for a holiday or for absolutely no reason, just to say: “I love you.”
Magical transformation of ordinary objects
When a picture emerges from several types of cereals and seeds, it is akin to a miracle. After all, it is traditionally believed that we cook porridge from buckwheat and rice, and throw away melon and watermelon seeds without a second thought if we are not going to plant them. But it won’t be difficult to look at it differently and try to use non-traditional materials to create crafts.
Then cereals, legumes, seeds will magically turn into paints, and your imagination can suggest very unexpected solutions, and your little one will receive the first lessons in craftsmanship... But before you start mastering crafts from cereals, give your children a short drawing lesson on... semolina. Pour it into the tray and show how your finger can create a picture: a sun, a Christmas tree, a mushroom... The baby will be delighted!
What may be useful
Just imagine: creativity doesn’t require any special devices or materials. You most likely already have everything you need in your home:
- thick paper, cardboard;
- glue, brush, pencil;
- gouache, alcohol, food coloring;
- plasticine;
- seeds of various plants;
- regular cereals.
When creating crafts from cereals for children with your own hands, you can use the natural colors of the inhabitants of the kitchen cabinet:
- brown - buckwheat, tea leaves;
- shades of white - rice, semolina, pumpkin seeds, zucchini;
- yellow - peas, millet;
- shortbread - wheat groats;
- black, gray - seeds.
You can create a whole picture from beans of various colors!
DIY rainbow
But if you want brighter colors, such as red or blue, the solution is simple: change the color of white raw materials with food coloring. Even if a young creator suddenly dares to taste a grain or a seed for inspiration, you will have nothing to fear.
- Add a few drops of vinegar to the prepared solution of the desired color. Color saturation can be adjusted by adding water.
- Place rice in a ziplock bag and add coloring.
- Close the bag and shake the contents periodically to ensure uniform coloring.
- The cereal has acquired the desired color, now you need to pour it onto a linen napkin in one layer to dry.
However, if you need to color semolina, you need to use a different technology. To dissolve gouache, you need to mix equal volumes of water and alcohol. In a glass or plastic plate, add the resulting liquid to the paint to achieve the desired shade.
- Pour 5 ml of dissolved paint into a saucer.
- Add enough cereal to form a moist mixture without excess liquid.
- Mix thoroughly so that there are no lumps left: first with a spoon, then with your fingers.
- Pour onto the canvas in one layer to dry. If in doubt, first sift through a strainer to avoid lumps.
Advice. The most convenient option is to paint a larger amount of cereal: not for one application, but with a reserve. Then you will always have a multi-colored palette ready in jars.
Craft base
You can draw a sketch of the future picture yourself or select an image on the Internet and print it. This is a good solution for adults who are not artists at all.
To begin with, you should try your hand at creating small applications from pumpkin seeds, sunflowers, beans and peas. In this case, plasticine applied to the base inside the contours of the figure can act as glue. For legumes, the retaining layer is needed thicker than for light seeds.
Of course, nothing will work on thin paper; it simply won’t withstand the load. To still use a printed stencil, it is better to stick it on cardboard and then wait until the glue dries.
Fantasy and creativity
What kind of materials do passionate people create their works from: scraps of fabric, pieces of paper, small stone chips... The list can be continued for a long time. And to name all the varieties of crafts is almost unrealistic, there are so many of them!
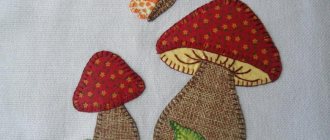
Hedgehog made from seeds
You can simply make a portrait of a cute animal with a prickly back, or, to complicate the task, draw another path along which the animal goes to its house.
The “Hedgehog” craft from seeds is not very difficult to make together with your child. Of course, you have already prepared a stencil on cardboard in advance, kneaded the plasticine until soft and poured seeds, buckwheat and rice into the bowls.
After completing each fragment filled with cereal, the excess should be shaken off onto a dish or tray. If you do everything step by step, carefully, the result will definitely please both you and the baby.
- Apply black plasticine to the entire outline of the animal’s back. On the pants - a layer of brown, on the shirt - white plasticine. Do not go beyond the contours!
- Back. Each seed should be placed in one direction and close to neighboring “needles” and pressed into plasticine.
- Shirt. Spread rice in one layer onto white plasticine. Now you need to press it onto the drawing with your palm. Your assistant can easily handle this if he is three or only two years old.
- Pants. In the same way, sprinkle all the brown plasticine with buckwheat and press the grain down.
Is your hedgehog ready to stock up for the winter? Then make several plasticine mushrooms and apples and attach them to the needle seeds.
The works “Chicken” and “Mushroom Family” are performed similarly..
Craft “Flowers in a Vase”
And now it’s time for men (in this case, age is not the main thing, it’s about the state of mind) to get down to business. To make women smile and feel happier, there is one recipe: give them flowers more often. Having received your bouquet, your mother and grandmother will be touched, and your sister or friend will reward you with a radiant smile.
Making crafts from seeds and cereals with your own hands is not at all as difficult as it might seem at first glance. And if plasticine was needed for the hedgehog, then this time you will need PVA glue.
As you work, you need to do all the elements of the design one at a time and do not apply glue to several fragments at once: it may dry out while you work on one flower .
To ensure that each flower turns out neat, shake off excess grains - this way you will see where they did not stick and correct the situation in time.
- Pumpkin and melon seeds, crushed yellow peas, and ash wings will be used to create a wide variety of garden and wild flowers. You can try to depict roses or daisies, but you have every right to create your own fantastic, wonderful flower. By the way, later it will be possible to “revive” them with colors so that the bouquet becomes brighter.
- Grape “seeds” are quite suitable for this work: if you stick them inside the outline, and then paint them with yellow gouache to make them more similar to the original, you will get a sunny mimosa.
- To decorate a vase, you can take painted semolina and stick it in strips. Or make an applique of peas and get a fancy yellow-green ornament.
- Draw the stems with paints or felt-tip pens.
- A frame made from peas, pumpkin seeds, or a combination of both will give the piece a more finished, finished look.
To make the applique look like a painting , you can create a background for a bouquet in a vase. This is not difficult: just apply glue to the free areas of the paper and sprinkle with semolina or dried tea bags. If at the same time the color of the background changes and becomes lighter from the perimeter to the center, the picture will “come to life.”
Panel “Cats on the night roof”
If you wish, the drawing can be done schematically and made with silhouettes of purrs on both sides of the pipe against the background of the moon and starry sky. Or you can try to create more detailed images - only you can decide how difficult the work will be.
To make it, you can use colored semolina and rice. Using something more massive is not entirely justified, since the panel is made on canvas. It is known that overloaded fabric can sag, become deformed and completely ruin the whole job.
If for some reason it is difficult to draw a plot picture yourself, you can print several templates from the Internet, and then transfer the contours to the prepared base.
A panel is characterized by two features : canvas and frame. Whether your work will be enclosed in a finished wooden structure, or whether it will be made from seeds, pasta, or strips of cereal, is up to you to decide. After all, you are the author and have every right to your own idea of beauty.
If you decide to make a picture from colored beans, it is better to take cardboard and plasticine (hot glue). Just keep in mind: in this case, the process of creating a man-made masterpiece will be more like making a mosaic. Or perhaps it will remind your child of putting together puzzles... Either way, it will be a fun activity. This picture can also have a frame made of beans in a contrasting color.
It is quite possible that you will want to create new works with other characters: “Geese and Swans”, “Lisa Patrikeevna and Kolobok”... You never know the plots!
Crafts made from various cereals and plant seeds are always original and can be used not only as exhibition objects, but also as full-fledged bright accents in the decor of the kitchen or on the desktop. Well, if you are “dragged” into the creative process, then, probably, a variety of ideas may soon arise and come to life: from topiary and napkin clips to decorated tabletops. Why not?
Necessary tools
To carry out the work, you will need various grains, for example, peas, corn, coffee, lentils. In addition, you will need live leaves, beads, fabric scraps and other attributes that will further decorate your creations. Get the following tools:
- tweezers;
- gouache;
- PVA glue;
- pencil;
- needle;
- aerosol varnish.
The basis will be cardboard from packaging boxes, plywood or a board. The main thing is that it should be distinguished by density. The finished panel will need a frame; you can take a photo frame or use plastic or wood.
Technological process
At the beginning of their creative journey, beginners practice simple drawings in the form of squares or ornaments. Over time, the plots become more complex. The desired picture with neat contours should be applied to the base. We choose the grain, decide on its volume and color palette. Adjacent areas cannot be the same color.
During the steps, we fill individual pieces of the image with the selected material, placing it on glue. This is done in parts to ensure complete drying and not get dirty. The sketch is drawn up using tweezers, and evenness is achieved with a needle. When the exhibit is ready, it is given time to dry completely and is treated with varnish for shine.
Carrying out painting
Pour 2-3 handfuls of a certain composition into a strong bag, add three tablespoons of vinegar or alcohol and a trickle of food coloring. For complete coloring, shake the container thoroughly. Place the prepared samples on a cloth or plate and dry them.
DIY souvenirs – Hedgehog made from walnut shells
Details Author: Super User
In this children's master class we will learn how to make a hedgehog with our own hands from a walnut shell. Two hedgehogs, two crafts, two methods.
What we need to make hedgehogs:
|
First we will make a hedgehog using plasticine and matches. Spread plasticine on the shell, leaving space under the face
Now we attach the nose and eyes
Cut the matches into pieces of approximately 5 mm
And the last thing - we stick the needles into the plasticine, the hedgehog is ready.
The second hedgehog will be made from buckwheat. Take the shell and spread PVA glue on it, also leaving a space under the face
Almost immediately roll the shells with buckwheat
And then we sculpt the nose and eyes by ourselves
These are the two hedgehogs we got) Quick and easy, just for the little ones
Options for ideas
Such crafts are practiced in kindergartens and schools. Precise movements have a great effect on the fine motor skills of children's hands. With pasta and cereals you can create:
- Animals - a cat, a cockerel, a swan, a wise owl.
- Vegetables and fruits, mushrooms.
- Sea stars.
- New Year's toys, wreaths.
Grains are used to replenish empty containers into which artificial plants, candles, dried flowers and even knives are placed. Bottles in which contrasting fillers are poured in layers look charming. For this, a funnel or a sheet of paper folded in its likeness will be useful.
Seeds, beans, and cereals will transform a photo frame or mirror beyond recognition, enhancing it with expressive relief.
Flowerpot with flowers
Take buckwheat, millet, rice, regular and puffed corn. Step-by-step instruction:
- draw the contour lines of the vase and individual buds;
- Apply a layer of glue to the vase, trying not to go beyond the edges. Add buckwheat and shake it off after drying;
- peas go to the neck and bottom;
- At the bottom we make a glue mesh, which will also be used for peas. One by one, fill the resulting cells with rice;
- the background wallpaper will be millet and corn flour;
- the flower stem is grains of rice, and the flowers themselves are pop corn;
- add greenery in the form of real twigs or green-colored vermicelli and birch bark in elongated strips.
Having framed our work, we hang it on the wall.
Easter eggs and other nice little things
To make your holiday table unique, you don’t have to spend money; use pasta stars, dried herbs, and a cereal mixture. After smearing with glue, roll the egg, for example, in spices or apply any pattern. Single point accents are not prohibited.
Napkins can be placed in non-trivial rings. When the toilet paper or foil runs out, a tube remains, cutting it into several parts, we get rings that can be decorated as desired.
Styrofoam balls covered with a variety of seeds will make your coffee table exclusive. The composition is complemented by candles, dry branches, and pine cones.
Master class on making a decorative pea tree for Easter:
- We paint the foam ball in a greenish tint.
- We make a hole with an awl for the trunk.
- After applying glue, sprinkle with peas.
- The next day, if there are gaps, we eliminate them.
- We insert the stem into the pasted hole.
- The soil in the pot will be foam; it is important to achieve stability.
- We decorate the top of the imaginary soil with anything, it can be moss or sisal.
Such an original thing in the kitchen will delight the eyes of household members for a long time with its non-standard appearance.
Bird feeder
Cute figures will help feed the birds during the winter. Even a baby can cope with the task. Bring half a glass of water to a boil in a saucepan, add a packet of gelatin and stir for 5 minutes. Once cool, stir in birdseed and fill different cookie cutter shapes.
Deepen the two ends of the rope into the corners and, adding the mass to the top, compact it. Place in the freezer for 30 minutes and leave until the next day. Remove from the molds and hang on the trees. We just have to wait for the arrival of satisfied guests!
As you can see, such creative activity is not distinguished by jewelry finesse, physical and material costs. But there will probably be no place left for depression and bad mood. By calling on your imagination to help you, you will reveal your personal individuality and become an example for children, cultivating in them good taste and style.
We use cardboard egg boxes
Using this item, which everyone can find in their home after buying a dozen eggs, you can create wonderful New Year's dogs.
For them you need:
- a cardboard box of a dozen eggs;
- paints. Both acrylic and gouache are suitable for this option;
- colored paper (white and any other shades);
- buttons or blanks for eyes;
- braid or lace for the tail;
- glue;
- scissors.
We make dogs like this:
- We cut the box (its lower part) into cells. We try to make a neat edge. Turn it upside down. This is the preparation of the dog itself.
- We paint each cell black or brown. Let it dry. If we want Dalmatians, then we paint the cells white, and after the white paint has dried, we apply black paint spots all over the workpiece.
- Cut out half an oval from white paper and stick it on the cell on one side. This is the belly of a dog.
- Then cut out triangles for the ears and a pair of legs from colored paper. Glue to the cell.
- Cut off the tail from the braid or lace and glue it to the back.
- Glue the blank eyelets or buttons into place on top of the white belly.
Make several of these dogs and glue them onto a white base. Dalmatians or any spotted dogs will look interesting. For the base, you can use a disposable plate. A wonderful DIY craft for the New Year 2020 in the form of a symbol of the year for kindergarten is ready! It looks interesting and is easy to make; you can make it with your child.
Disposable dishes as a basis for the dog
A disposable plate can become the basis for a dog's face. You can draw eyes and a nose in the middle of the plate, glue a spot of colored paper and cut out ears on the sides.
DIY plate in the shape of a dog
Yogurt cups are an excellent material for making crafts. A dog made from cups is simply a sight for sore eyes. For a kindergarten, a better craft for the symbol of 2020 cannot be imagined. For such a dog we need:
- two cups of yogurt;
- glue;
- colored paper;
- acrylic paints;
- blanks for eyes.
We do it as follows:
- Place 1 glass upside down. This is the body of a dog.
2. Glue the second cup from top to bottom, bottom first. This is the face of a dog.
3. Cut out triangles of ears and 4 legs from colored paper. Glue it to the dog.
4. Draw the face: nose, antennae, mouth.
5. Glue on the eyes.
The dog is ready.
? Photo ideas of saucer dogs:
You can also make a dog from a plastic bottle for the kindergarten. This material can make a great dachshund piggy bank!
To work you need:
- plastic bottle with cap. If it is made of dark brown plastic, then this is the best option;
- colored paper;
- rope for leash.
We do this:
- The plastic bottle itself is the dog’s body. The lid is its spout.
- If the bottle is brown, then we leave it that way, but if the bottle is light, then we will paint it brown and the cork black. Let's dry.
- Cut out eyes, ears, paws and a tail from colored paper. Glue it in the right places.
- We tie a rope around the neck of our dachshund, as if it were a leash.
The dachshund from the bottle is ready. This is a good craft option for kindergarten.
? Step-by-step progress:
Rice. 1
Rice. 2
Rice. 3
Rice. 4
Rice. 5
Rice. 6
Rice. 7
Rice. 8
Rice. 9
Rice. 10
Step-by-step photos of making dogs in saw crafts for kindergarten:
Watermelon seeds
Small watermelon seeds are more suitable for laying out various applications. For example, using such natural material you can make the following crafts:
Cheburashka is drawn on a white sheet of cardboard. Its body and ears are sealed with watermelon seeds. You can use black peppercorns as eyes or make eyes from black plasticine.
A peacock is drawn on a white sheet of cardboard. The stripes dividing its tail into feathers are lined with watermelon seeds. You can stick pine cone scales or beans on the ends. The remaining “empty” elements of the picture are simply painted.
Funny figures made of plasticine (salt dough)
So that you can play with hedgehogs, make funny figures from plasticine and sunflower seeds. You can choose the color of the seeds to suit your taste (black, white, striped). The main condition is that the achenes are dry. You can even use packaged preparations (but without the salt!).
The photo shows all the necessary materials and tools (sunflower seeds, plasticine, stacks).
Detailed job description (with recommendations)
- Choose suitable plasticine. This can be a regular set of plastic material for manual child labor or wax plasticine. Select all material options for modeling individually.
- Take a block of plasticine in your hands, use a stack to separate the required piece and heat it between your palms. When the plasticine becomes soft and pliable, roll it into a ball.
- “Pull out” a small part (the hedgehog’s nose) from the ball with your fingers. The body can be left round or slightly flattened at the bottom.
- Glue a small black ball onto the very tip of the nose and 2 eyes on the sides.
- The next stage of work is the most painstaking and requires accuracy and concentration. You need to start inserting the seeds from the beginning of the body. Choose for yourself the appropriate option for their location - with a sharp or thick edge inward. Continue inserting the achenes all the way to the end of the back, trying to insert each circle as close to each other as possible.
The snorting hedgehog is ready! This figurine can be decorated on top with plasticine apples or mushrooms.
You can create an equally interesting and funny little animal from plasticine if you replace sunflower seeds with pasta (spaghetti) broken into small pieces. You can choose the most unexpected color for your hedgehog. This will only make the craft more fun and brighter!