This article presents a master class on how to sew letters with your own hands. Don't be afraid to start making felt products. After all, this material is very docile. Creating with it is quite easy and simple, and a novice needlewoman can cope with any crafts.
Felt is a rectangular piece of non-woven material made from felt. It comes in different thicknesses and compositions. Pure wool felt or synthetic - it doesn’t matter, it still won’t let you down in the job. And simple letter patterns will allow you to create them in a matter of minutes. A huge advantage of felt, especially when creating products for children, is its very wide color palette. The colors are bright and saturated. The felt products themselves are soft and cozy.
Using felt letters
Letters sewn from felt can have different purposes. If this is the alphabet, then with the help of it it is very interesting to learn letters with your child in a game. You can make different words or names from the letters and decorate the children's room by adding additional felt products to the letters, such as flowers or hanging toys.
You can also use felt letters to decorate a room for a party. Use them creatively in a photo shoot, composing words based on its theme. You can decorate any room with garlands of felt letters, be it an apartment or an office.
Using the felt alphabet
An alphabet made from felt with animals is just what you need for educational activities with your child.
Felt alphabet for a child
Bright letters will attract attention and will be remembered quickly and for a long time. And fun games with felt alphabet, which can be played at home in the classroom, will help you consolidate your knowledge:
- “Soft landing” - lay out the alphabet on the floor, circle a toy plane over it: “The plane was flying, flying - what letter did it land on?” The child must answer as quickly as possible.
- “Who lives in the house?” — invite the girl or boy to put a suitable toy animal in the signed pocket.
The work of creating a felt alphabet is painstaking and long work. But every minute invested in the development of a child will become the basis for the formation of a happy and successful person.
Select a template
The choice of template for letters is not that great. These can be block letters or capital letters. English or Russian. You can use ready-made templates from the Internet, or you can try to draw the letters yourself on paper. Here is the standard alphabet of Russian letters, which may be useful in your work.
About the alphabet (alphabet) made of felt
A felt alphabet with animals is a multifunctional toy that develops a child's thinking and imagination.
An example of an alphabet made from felt. Author - Alena (Children's stories)
Here are some animal alphabet game options:
- Learning letters
- Adding the syllables
- We sort the letters into vowels, consonants, etc.
- We select an animal for each letter
- Putting the alphabet in order
- Introducing your child to animals
This is not a complete list of the uses of the alphabet. In the future, animals can be used for puppet theater, farm games, zoo games, and games on the carpet machine.
Master class on felt letters
Before sewing felt letters, the pattern must be determined and printed or drawn. Now it is transferred to felt. This can be done in two ways:
If you take thick paper or cardboard (for reusable use), then the pattern is placed on top of the felt and outlined with a pencil, marker or pen. Next, the drawn letter is cut out;
If thin tracing paper or similar material is used as paper, then the letter pattern must be attached to the felt with pins and cut out with scissors, without the need to draw on the fabric.
When cutting out a letter template, the felt must be folded in half to create two identical pieces.
The next step is to sew these two pieces together. They are sewn together using a simple “over the edge” method using threads to match the letter or in a contrasting color.
At the same time, as you sew, you need to fill in the letter so that it becomes voluminous.
When filling it with padding polyester (or another type of filler), you need to compact it well in the middle so that the filler is distributed evenly. Now one letter is ready!
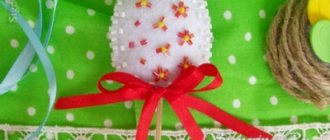
As you can see, this is completely easy. Now the letter can be decorated to your taste. You can use beads or ready-made decorative elements, or you can come up with various small flowers from leftover felt and decorate the letters with them. Now you can form words from letters and use them as you wish. The felt stencil used in this mk of letters is presented above. Here are a few more interesting ones:
In recent years, educational letters made of felt have become very popular due to the availability of the material and ease of execution. You can make an entire textile alphabet with your own hands in a couple of evenings.
We make products with letters from felt with our own hands with photos
Don't let your imagination be limited by such an inconspicuous word as the alphabet. Of course, if you make all the letters three-dimensional and in several color options, this is great and the child already has useful fun. But everything is made of felt, and felt, as you know, is an excellent ornamental material. You can make large letter pillows in the shape of the child’s name and place them on the sofa or baby’s bed. If you collect the phrase “happy birthday” and make it like an educational garland, then you won’t need to take it out every time, because the child won’t want to hide it. Perhaps, except that you will need to complete missing letters or find them in the most unexpected places. If you cut out letters from thin felt, you can make an applique on his things for school or kindergarten, on notebooks, book covers, pens, pencil cases, in the form of his initials. How about just names above the cribs, what's the idea?
To begin with, it is important to determine that felt does not like sharp corners, especially when sewing parts together. Therefore, it is important to smooth out any clear shape. If you don’t want to bother with creating a template for each letter, you can use the stencil shown below.
You can make it even simpler and choose your favorite font, for example “cooper”, type the words you want to create and cut out the templates. In this case, you can roughly imagine what the garland or just the letters will look like if you are planning a complete alphabet.
So, after a little fiddling with the stencil and scissors, we have a pattern. Next, it is important to prepare the material involved.
- felt - 4 or more multi-colored sheets;
- scissors;
- needle with a large eye;
- floss threads of different colors, combined with the color of felt;
- textile fastener (or Velcro tape).
For each letter there will be two identical parts. Velcro is sewn onto one part and only then it is necessary to sew both parts together along the contour. The desired seam can be chosen as a simple stitch or overcast, it all depends on your imagination. In this case, the Velcro fastening seam will not be visible from the front side. Two fasteners can be attached if the letter is wide, like “Ш” or “М”.
Now you can take a stiffer sheet of felt and put it in a frame without glass and you will get a tablet for folding words.
Felt alphabet
You will need the following materials:
- multi-colored felt;
- scissors;
- floss threads for sewing;
- needle;
- synthetic winterizer or holofiber for stuffing;
- buttons, beads for decoration;
- patterns;
- chalk, pencil or marker;
- pieces of Velcro;
- a rectangular piece of trimmed fabric.
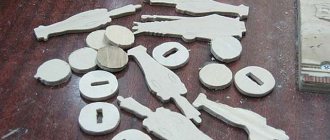
To begin, print out the patterns large and trace them on cardboard so as to round off all the turns. Don't forget to leave seam allowances. Each letter needs to be cut out one piece in each direction and the resulting parts should be folded with the wrong side.
You can prepare decorations for the toy in advance from bright felt: bows, flowers, butterflies, multi-colored circles of different sizes. Choose the color of the threads with which you will sew the toys. Contrasting threads (for example, a combination of lilac threads with orange fabric) and threads of the same tone are equally suitable. In order for the letters to be voluminous, it is worth taking thin material 1 mm thick.
Stages of work:
- Let's start stitching the parts from the inner holes of the letters and the inner bends. This way, you can better monitor your sewing and it won't move in the wrong direction. Since the product is sheathed on the outside, we will carefully hide the knot at the beginning of the work (do not make it too large so that it does not show through the fabric). You need to sew the parts using a buttonhole stitch, and you should do it very carefully, since it is both the main decoration and must hold the parts of the product tightly together.
- To start making a buttonhole stitch, insert the thread from the back side at a distance of half a centimeter from the edge of the letter. Then we move the needle back, over the edge, and again insert it from the back into the first hole. We tighten the thread and stick the needle into the formed loop. We have secured the loop and to continue we will insert the needle from the front about half a centimeter from the edge and from the first stitch. Pull it out in front of the thread and tighten a new loop. All stitches should be the same, and the distance between them should be equal to the height of the loop, that is, half a centimeter.
- Without sewing the parts together completely, we begin to fill the letter with padding polyester or holofiber. We compact the filler tightly into the toy and make sure that there is not too much of it and that it does not bleed through the sewing. We finish sewing the product, hide it and cut the thread.
- Now we trim the toy with pre-prepared circles, flowers or other textile decorations. You can make a face for the letter by sewing eyes from felt or gluing them on from paper. To diversify the game with your baby, we sew Velcro on the back of the product.
As you can see, sewing soft toys from felt is easy and interesting. The main thing is to carefully and carefully sew the buttonhole stitch without tightening it. Use a pre-prepared, trimmed piece of fabric so that your child can form words on it and arrange the letters correctly in alphabetical order.
Also, you can sew a pattern on them with beads, so it will be more interesting for the baby to touch them (but take into account the age of the child so that he does not swallow the torn parts).
Flat felt elements
If you don’t want to bother with a voluminous alphabet, you can make flat letters. There are 2 ways. The first option is the easiest to work with. The template is pinned to the felt, outlined and cut out.
Note!
You can make several identical products. They will come in handy when it comes to adding syllables and words, and letters can be repeated in them.
The second option for manufacturing flat parts looks more interesting. Dense material is used for the base, soft fabric is used for the upper part. When preparing patterns, you need to make one blank of the font of the desired size, and the second font is the same, but 2 sizes smaller.
Flat letters
The main letters will be multi-colored, and those that are smaller will be in one color. Next, using a silicone gun, you need to glue the smaller letters onto the larger ones. You need to leave an equal distance along the edges.
On a note!
In elements such as “A”, “O”, the inner parts of the upper and lower letters are compared.
3 simple method of making the alphabet is considered the most original. Using patterns, you can quickly make a whole set with duplicates. The finished figures cut out of fabric are glued onto a sheet of dense material with silicone glue and cut out, leaving 2-3 mm at the edges. Contrasting colors will look good in this design.
Letters on a soft base
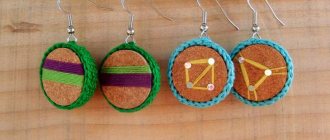
To diversify and complicate the task for your baby, sew letters onto a textile base. It can be any shape you like: round, square, triangular, star-shaped or heart-shaped. A very beautiful version of this base is made from two round parts with a wavy line cut out along the edge. Also, flat letters are prepared in advance from thin felt, one for each base, and circles are 6-7 mm smaller than the figured parts.
First we sew a small circle to one of the large parts. Then we sew stitches of the same length around the central part (necessarily at equal intervals). Then we sew the two curly parts together. We fill the base with filler, finish and hide the tip of the thread. To make the game interactive, you can sew Velcro or a hook to the back of the three-dimensional base, or sew a magnet under the fabric.
Another way to up the game is to sew a loop on one side of the base and a fancy button on the other. It is most convenient to do this with bases in the shape of a heart, star or inverted triangle. The button is sewn at the end of sewing the textile toy, and the loop is sewn while sewing the figured parts to each other. So, the baby will be able to collect his name or leave a small message for his parents, securing it to the loops.
Wall alphabet
To accustom your child to order and learn as many new words and animal names as possible, we will make a three-dimensional wall alphabet. It is an oblong rectangle of fabric with small pockets in the shape of semicircles.
We already have a ready-made soft alphabet with Velcro, so we cut out 33 semicircles or rectangles with rounded bottom corners according to the size of the letters. Based on the size of the pockets, we calculate the required width and length of the piece of fabric on which they will be attached. We trim the base around the edges and sew braid on top to hang our textile alphabet. Also, it can be strengthened with a sheet of cardboard. Finally, we sew the felt pockets with a buttonhole stitch and carefully sew them to the prepared fabric.
Using the same principle as letters, you can sew small animals, vegetables and fruits for pockets. They can be made from a minimum of details, only outlining the outline of the animal or food.
Felt is a bright, comfortable, durable material for crafts. Handicraftsmen love to work with him. It is easy to cut, sew, glue . Felt crafts can be combined with fabric, decorated with beads, rhinestones, beads, embroidered with floss
. It is used to make toys, panels, personalized garlands, decorations, and flowers. It is light, soft, does not tear, pleasant to the touch. Children love to play with such toys. Some even sleep with toys made from it.
And during the day, such letters are fun to play with and fun to learn - you can make up various inscriptions and words, draw such letters, use them as a template for cutting out appliqué, in general, you can find many useful uses for such toys and learn the alphabet at the same time. To begin with, you can not use the entire font, and not make all the felt letters, but start with the initials - if the child’s name is, for example, Misha, or Masha, then his first felt letter can be the letter M. By the way, the letters can be made together with the child - he may like the process of creation itself, he can take part as much as possible; if he has reached preschool age, he can already draw or trace a ready-made stencil for cutting, or help fill the blank with filler. A master class for making felt letters will help you navigate the process.
It’s easy to make your own alphabet out of felt. This does not require special knowledge or skills.
. You need to prepare:
- Felt of different colors;
- Templates for letters;
- Scissors, threads, needles;
- Filling (sintepon, padding polyester, holofiber).
And here is MK: we begin work by making the alphabet from felt; you can prepare the patterns yourself. The letters can be drawn and printed in the desired size. You can find templates on the Internet. Then print it out.
We advise you to choose a simple felt alphabet, a pattern, without curls or decorations, if you are going to learn letters with your child and teach him to read. The intricate outlines of the letters will not be clear to the baby and will be remembered for a long time.
When the templates are ready, lay them out on a piece and trace them with chalk, soap, or a craft pencil. Felt is a non-woven material, it does not contain any threads, so we lay it out randomly, saving it. For each letter you need to cut out two patterns. Don't forget small seam allowances.
We sew the cut out letters together. You can sew it with threads to match the color of the letter or, conversely, with contrasting threads for a decorative effect. Any thread, but floss is better, they are soft and come in a variety of colors. You need to take 2-3 threads of floss for strength. Stitch in any way you wish
. Usually a buttonhole stitch is chosen as it is more decorative and simple.
The letter is not completely sewn up, but at the same time it is filled with padding polyester. We compact it well so that the filler lies evenly and does not stick out from the seam. If the first letter turns out neat and beautiful, we continue until we make the alphabet from felt. At the first stage this is enough. But as you play and learn, you may need additional letters to form words and phrases. A child can lose a letter, get it dirty, or tear it. It's not easy, but the children manage to ruin the letters. Therefore, be prepared that after some time you will need to make more patterns, diagrams and templates for letters and numbers from felt.
The finished letters need to be washed, dried and given to the child. In the same way, you can make numbers for teaching counting.
.
Gallery: felt letters (25 photos)
Letters for teaching literacy and reading
To enhance learning to read and make it attractive for a child, you need to make a device on which children can play with the alphabet. This could be a table, a frame on the wall, a stand in the shape of the letter P, where a letter is tied to the top crossbar with a ribbon.
The alphabet screen can be made from a large piece, inserted into a frame without glass and hung on the wall. Over time, the child will learn to make phrases and names from felt.
. It will be possible to play the game “Communicate without words”, taking turns composing words for questions and answers.
You can sew small animal figures and objects for all the letters of the alphabet. Put them in a box and teach the child to attach each toy to its letter: Z - bunny, G - mushroom, S - sun. If you haven’t figured out how to attach it, you can just show it when mom asks: “Whose letter is this?”
Let's try to create a funny felt alphabet with our own hands
A boring paper book, nothing interesting. An ABC book where the letters come to life and you can stroke them - this friend will quickly teach your child letters and words. And besides, a felt alphabet book is a wonderful toy from birth. Therefore, one book can serve more than one generation. You can use the example of the letter “I” to see how this might look.
We have this sketch
Divided into components, we have the following details:
The author of the idea uses backing material to secure the location of the parts so that the parts do not move from their position in the picture during sheathing. But they can be basted or glued in one drop - it is not necessary completely, since it will be processed with a seam.
The iguana can be decorated with beads or other beads, and you can also embroider a mouth, paws and a pattern on the back, this will add tactile sensations to the picture and it will be easier for the child to remember the associations if as many senses as possible are involved. The sheet of felt on which the applique is made is sewn with an overcast stitch to the previous page of the book.
Below are templates for the Latin alphabet.
But if you want to create a Cyrillic primer, then you can make animal patterns yourself from the already familiar stencils for letters and finger toys.
Good luck to you and your kids!
Festive and personalized garlands
Felt can be used to make festive decor for New Year's Eve, children's parties, weddings and anniversary celebrations. Garlands and wreaths made from it do not fade, do not wrinkle, and can be used many times. They are light and easy to attach anywhere, the decor scheme can be changed.
Garland of flags
To make a personalized birthday garland, you need to cut and sew flags of any shape, and glue or sew the desired letter or number onto each flag. Attach the flags, distributing them evenly, to a cord or braid to create a name or congratulation and attach to the wall. Felt birthday numbers should be made multi-colored so that everyone can see
.
For the New Year, you can hang New Year's symbols and numbers from felt between the flags. You can make toys for the Christmas tree from felt. Letters embroidered and decorated with beads can also be used as Christmas decorations. Happy New Year greetings can be written on the wall using individual letters and numbers. Decorate it with snowflakes. Do-it-yourself felt garlands for the New Year should also be made with snowflakes and icicles.
You can make a mobile (a pendant above the crib) as a gift for your baby.
. From felt, cut out the details of four small tit birds and one larger owl. Do not sew all the way through with any seam. Using a pencil, fill the birds with padding polyester through the remaining hole and sew them up until the end. Sew a ribbon or ribbon to each bird.
For the holder we use a large hoop and attach it to the stand. In the middle of the circle we tie an owl and colorful birds around it. The movements of the birds attract the baby's attention and have a calming effect on him.
To decorate a nursery, make personalized panels on the wall or on the door of the children's room. There are a lot of options. What they have in common is that according to the pattern, the main part is made of felt. The simplest panel consists of a circle, toys are mounted on it, and on half the circle the child’s name is written in letters. Everything is made of felt.
When making the alphabet, the letters should be simple, without curls and without decorations in the form of beads and beads. The child can bite off the bead and swallow it. When making personalized garlands and panels, you can diversify the shapes of the letters and decorate them with felt flowers and any decorations.
You can decorate personalized felt garlands to your liking. From the remaining pieces you can make flowers, leaves, berries, ladybugs, butterflies and place them in a circle. You can also decorate letters with them.
Educational books and toys
Felt is a multifaceted material; it is difficult to list everything that is made from it. Educational books and toys can be made from it.
You can make a book for the little ones. They turn pages, touch objects attached to them, and develop tactile abilities. After a year, you can make a book with pages on which objects are attached for the development of fine motor skills, for the development of the ability to tie and fasten. Drawing of a boot with real laces, fabric closure with buttons, ribbon with stringed beads.
For children over three years old, you can make books where on each page a room and accessories for it are decorated. Bathroom with bath, washing machine, doll linen. Bedroom with bed, wardrobe, mirror. Living room with upholstered furniture, TV. Kitchen with all the attributes for cooking. A felt doll, a resident of this “apartment.”
Preschool girls play with these books all day long. Some mothers make this game not in the form of a book, but in the form of a handbag or suitcase. You can take them on a trip to visit friends or for a walk.
Educational books with cars are made for boys. On every page there are city streets, gas stations, repairs, construction. Boys fantasize about any situation with cars. The cars are also different: ambulance, police, crane, excavator.
Theater games
You can use felt to make characters and decorations for puppet shows.
Finger Theater. Dolls for him are made of felt, voluminous or flat. The theme of the performances is fairy-tale, well-known Russian fairy tales. The size of the dolls corresponds to the size of a child’s finger.
Theater in the form of a book. Each spread represents the scenery for a fairy tale. Felt dolls are characters from Russian folk tales: grandfather, woman, bear, wolf, fox, hare. You can dramatize fairy tales: “Kolobok”, “Turnip”, “Teremok”, “The Fox and the Hare”.
Tabletop theater. All attributes of the theater are made of felt, from the stage to the artists. You can play any performances. If necessary, it is easy to complete the missing dolls and accessories. You can make doll patterns yourself.
You can make masks from felt for performances in kindergarten and for New Year's masquerades. They are comfortable and do not interfere with children's play. Patterns can be found on the Internet
Felt is a popular material for needlework; it is a rectangular piece of non-woven material made from felt. May be of different thickness and composition. A significant advantage of felt is its wide range of color palettes, which allows it to be used in many types of crafts. Felt products are original and cozy. Names written in felt letters have become very popular recently. Such crafts can be used on holidays, such as a child’s birthday, New Year or wedding. The master class “How to sew letters from felt with your own hands” will help beginning needlewomen learn how to make wonderful gifts for family and friends for a long memory.
Basic work on letters
- Sew pieces from the inside holes of the letters and the inside curves. Since the products are sheathed on the outside, carefully hide the knot at the beginning of work. Sew the pieces together using a buttonhole stitch. He must hold the letter parts tightly together;
- To work with a buttonhole stitch, you need to insert the thread from the back side at a distance of 0.5 cm from the edge of the letter. Move the needle back over the edge and insert it again from the back into the first hole. Tighten the thread and insert the needle into the loop. All stitches should be the same size, with a distance of 0.5 centimeters between each other;
- Then start filling the letter with holofiber. Pack the filling tightly into the toy. There should not be too much of it so that it does not bleed through the sewing. Finish sewing the product, hide and cut the thread;
- Decorate the toy with bows, flowers, buttons or other textile decorations. The work is ready!
Sewing letters from felt is easy and simple. The main thing is to follow the directions and carefully sew the buttonhole stitch without over-tightening it.