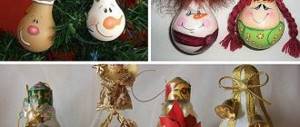
Kanzashi daisies for headband
The master class will help Kanzashi craftswomen - experienced and just beginning - to recreate an elegant hairband that will suit a little girl and an adult girl. Chamomiles will add a touch of romance to the image, so they will perfectly complement a summer outfit. We suggest making a bouquet of three flowers of different shades to make the product look more expressive.
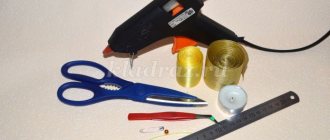
In order to make such a hair decoration yourself, you need to have such
Materials for working in the kanzashi technique
To create accessories you will need satin and brocade ribbons of various widths and colors or cotton fabrics, as well as blanks of the desired shape. Fabric bases for headbands are available at craft stores, but are easy to make yourself if you know how to crochet. Blanks for headbands can be plastic or metal; they are usually purchased together with satin ribbons. Flower petals using the kanzashi technique are sharp and round. They are often made double, combining different materials, and curved differently.
The inflorescences themselves can consist of several levels, but even the simplest flowers with rounded petals look unusual and attractive. In addition, they are very easy to manufacture. Additionally, to work with the kanzashi technique, you need to prepare tweezers and a lighter or candle to singe the edges of the satin ribbons and fix the shape of the petals. Collect buds using a glue gun.
Master class on making a kanzashi headband with a luxurious flower
Making flowers from ribbons is easier than it seems. Try this simple headband, it will decorate your hair and lift your spirits!
Simple and affordable satin ribbons can turn into elegant clothing and decor decorations if you put in just a little effort and imagination. This ancient Japanese art has captured the hearts of women all over the world; today, ribbon flowers are hidden on almost all continents. We invite you to keep up with fashionistas and try your hand at making a kanzashi-style headband. If you are completely new to this skill, first take a look at the training material on our website. And if you know the basics, get started right away!
- What you need for creativity
- The magical transformation of ribbons into flowers
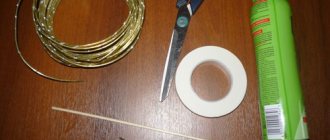
What you need for creativity
To create the kanzashi headband shown in the photo, you need to prepare the following items:
- candle;
- matches;
- scissors;
- glue gun;
- glue cartridge;
- the base is a black bandage;
- pink satin ribbon 4 cm wide and 56 cm long;
- purple satin ribbon 4 cm wide and 56 cm long;
- beads for decoration.
Of course, you can take ribbons in other shades that are more suitable for your hair color and outfit.
The magical transformation of ribbons into flowers
The kanzashi headband will consist of identical sharp-angled petals of two colors, they are made according to a certain pattern.
The first step is to prepare all the items for making the headband.
Plug in the glue gun to warm up. Don't light the candle yet. Cut squares of pink satin ribbon - 4 cm x 4 cm. A total of 14 pieces of identical fragments are needed. Beginners can make one extra square for practice.
Take the pink square. Fold it in half. You will get a triangle.
Fold it again.
Now, gently helping with your hand, take the edge of the petal with tweezers. All actions can be performed without tweezers, by hand.
Use scissors to cut the bottom at a 45-degree angle. Discard the rest.
Now light the candle. Bring the cut petal to the fire for a couple of seconds with the bottom part (where the cut was made with scissors). Burn the edges to remove excess threads. Remember to be careful when working with fire. Set it aside.
Thus, you have a finished acute-angled petal. You need to make 13 more pieces according to the indicated pattern.
Once the pink parts of the flower are done, cut 14 purple squares.
Do the same with them as with the pink squares. You should have a total of 28 pink and purple petals. They need to be connected into a shape, as in the photo. The petals are all the same size, try to maintain the proportion so that you get an inflorescence, as in the photo. In some places, push out the petal, in other places, on the contrary, hide it a little. To do this, alternating colors, apply a drop of glue to the side of the petals with a pistol.
Now you need to decorate the resulting flower. Decoration can be chosen at your discretion. If you happen to have glue peeking out onto the surface of the flower, you can disguise it with beads.
Take a flower with decorations and coat the bottom with glue. Now bring it to the bandage and glue it.
The bandage is ready. Wear it with pleasure! We recommend adding a kanzashi-style headband and elastic bands to your collection. On our website you will find many more interesting master classes and ideas in the Handicraft section, as well as a huge list of women’s hobbies, in which you can choose a new exciting hobby for yourself.
Bookmark the site and join us on social networks so as not to miss interesting news.
Headband or headband design options
Flowers are suitable for any size and are often combined with each other. Large single buds collected from several levels of sharp double petals look impressive. The buds can be complemented with beads and rhinestones. The headbands are first decorated with ribbon or fabric, and then decorated with several types of inflorescences, collecting them in a bouquet on one side of the product. Several buds are most often attached to a felt piece, which is threaded through a hoop. Sometimes identical small flowers are used, attaching them to the base one after the other.
Kanzashi headbands for babies are especially popular now. They are made from a fabric base 7 cm wide and one flower attached to the side or in the center. Wide lace can be used as a blank for such a bandage. The shape of the buds for the kanzashi headband or headband depends on the taste and skills of the needlewoman. For beginners, it is best to start with simple patterns to practice and then learn to assemble more complex patterns.
Wedding boutonnieres: the best options
An indispensable accessory for your hand is the finishing point of a festive look; it complements the picture with stylish notes and attracts the attention of others. You can create the attribute yourself or convey the vision of the ideal composition to a professional. A huge selection of materials, shades and shapes does not limit the flight of imagination, allowing you to create a unique boutonniere taking into account all your wishes.
Whatever her friends, colleagues, sisters, cousins or even the bride's in-law, the bridesmaid must still have in mind some ground rules before the altar to accompany her best friend. How many bridesmaids should there be? As per etiquette, you should never choose more than eight people because a higher number is only indicated in bridal weddings where there can be up to twelve bridesmaids. But there are also those who exaggerate, for example Kate Moss: at her wedding she even wanted sixteen!
Although Pippa Middleton just rocked her sister Kate's marriage to Prince William, attracting a lot of attention, it's best not to imitate her! White is given only to the bride, she is the only main character of the day. Who chooses the bridesmaid dress?
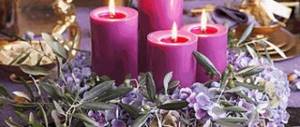
Accessory made of fresh flowers
Over the past few years, fashion houses from all over the world have been revering naturalness in every detail. Fresh flowers envelop the wedding image with natural chords, turning a woman into a real queen of forests and fields.
Sometimes it happens that the bride gives the wedding dress to her bridesmaids or perhaps participates in the purchase, in which case the choice of color and style should be entirely her own. If bridesmaids are paying for their own dress, the bride should try to be more flexible. It's okay to point out the color, but it's best not to force them into buying something they didn't choose, especially if you don't have stratospheric budgets.
Color I don't like: what should I do? Given the relationship between bridesmaids and the bride, etiquette advises not to discuss color, but to limit it to accepting it in good faith. Of course, you can still try to pull it off, but there are brides who dream of the parade life dressed entirely in lemon yellow. It's unnecessary to try to force them to change ideas!
Favorite flowers, ribbons and greenery - a colorful composition will delight the eye with its natural sound. There is no need to worry that the plants will quickly wither; professional florists have tools in their arsenal to preserve the original appearance of flowers throughout the ceremony.
If there is freedom of choice at least in the design, it is best to indicate something that can be worn again, perhaps at another wedding. According to the galaxy, even then, the bride should be flexible enough to allow her bridesmaids to wear the shoes they already own to avoid unnecessary expenses. Especially if you choose, no one will notice that the bridesmaid is wearing gold list sandals and the other one chose suede boots.
Even the bridesmaids have their own bouquet? Yes, the bride may decide to make small floral arrangements for her bridesmaids, which will then be kept as a gift as a small thank you for accepting. But be careful, they should remember the bride's bouquet, but be more minimalistic and, above all, in the same shades. No, completely white, especially if it was chosen by the bride.
The material is actively used to create charming compositions that are very similar to natural creations. Plastic polymer clay allows you to create delightful flowers, juicy berries, and accurately reproduce small details. The veins on the leaves, the curves of the buds and the closest possible shades - real professionals are able to create a unique masterpiece that will remain a memorable accessory on the shelves of the family nest.
How do you enter the church or together? If there are few bridesmaids, no more than three, they should enter the church or common room before the bride and into the Indian line. If they are larger and in odd numbers, this is normal even in pairs. During the ceremony, they may stand next to the witnesses or sit with other guests.
What are bridesmaids? Before the wedding, the bridesmaids were responsible for organizing the bachelor's vacation. Their main job, however, is to assist the bride during her big day, helping her with the veil, the tramp, and possibly an emergency kit. And don’t forget about the main “job”: always smile to give a positive image for the whole day.
Attribute made of fabric and ribbons
A flower arrangement made from artificial materials is not inferior in beauty to living accessories, and also has a practical side. Such boutonnieres will not wither or lose their ideal appearance and will withstand the event with dignity. In addition, the fabric version is a unique specimen that you will not see on any other bride. After a few training sessions, you can create a worthy accessory yourself, putting love and a piece of your soul into it.
One of the most exciting moments during a wedding is certainly the entrance of the bride, the most anticipated protagonist: as soon as he leaves the car, he moves to the altar at his father's, on the notes of the wedding procession, where he will be waiting for his companion to say "yes" to life.
To make it even more solemn and unforgettable, for some time now many couples have chosen the "American" entry, that is, the bride is preceded by a parade of bridesmaids and bridesmaids chosen by the children of relatives and friends. A very important role, adding emotion to emotion in a very visceral moment.
A wide selection of shades allows you to create a flower that does not exist in nature, and rhinestones will add a charming shine to the element. Beads, feathers or lace - the list of materials is unlimited, you just need to use your imagination.
How to choose them? A key criterion for the selection of these little protagonists should be age: they should be at least 2 years old to ensure that they are autonomous in crossing the central nave and fully understand the importance of their role. If you decide to retain the curtain or trawl, then you should have at least four years to prepare them for the responsibility of the role they will be required to cover.
How much?: The number is at the discretion of the couple, it all depends on the stage effect you want to create. In general, you go from 2 - men and women - to eight. Below are some basic rules: both children walk together in front of the bride; Two bridesmaids walk in their heads and then a door carrying faith; Brides and dresses walk two-two, opening and closing the wedding procession.
Hand accessory made of artificial flowers
Modern craftsmen are able to create artificial flowers that are completely indistinguishable from living plants. Precise adherence to shapes, shades and curves force brides to choose just such elements. At the same time, you don’t need to worry about their safety during the celebration; you can just relax and enjoy the magical moments. After the wedding, the history of creating a family will be replenished with another unique specimen.
Above all, try not to go against their tastes or their way of being, or rather exalt your personality with clothes that can express them for the better. If you've already thought about small prints of the bride and groom, add a touch to differentiate them by using extravagant accessories such as a papillon or bra straps for the pages and large flowers in the hair, or why not, a jeweled tiara for the bridesmaids.
As for the flowers, however, since they are children, you can enjoy them without forgetting that they should be in harmony with the rest of the decorations you have chosen and the style of the wedding. Let's look at some examples of looks that can show off your little helpers on your wedding day.
Which plants to choose: the language of flowers will help
- Most often at weddings there are roses - the queens of the flower world. Royal beauties symbolize love and passion and are a classic option for any celebration.
- Astra personifies sophistication and sublime feelings. A sensual flower will suit spiritual personalities, elegant ladies with an impeccable sense of taste.
- White hyacinth is a symbol of tenderness and conquest, fidelity and recognition.
- Calla is an elegant flower that has absorbed feminine tenderness and beauty. A similar symbol on the bride's hand shows her as a person who is equally beautiful inside and out.
- Forget-me-not is a symbol of fidelity and devotion.
- Peony concluded a happy marriage and many years of marriage.
- Lilac is a declaration of love and constancy.
- Chrysanthemum is a pure symbol of love, without omissions or deceptions.
- Mistletoe is the personification of the eternal connection between two hearts, which will not be destroyed by routine worries and problems.
- Jasmine – youth, modesty and shyness.
A traditional and classic look with a long white dress for her in tulle or chiffon and a crown between her hair and trousers and a shirt for him, usually in a dark color. An attractive idea to finish off a bridesmaid's dress is to have her cut off with a small reproduction of the wedding bouquet in her hands.
For a pastel wedding, you could choose a pretty rose for the bridesmaid dresses and a full white for the dresses, shabby chic is perfect for these colors. A fashion that has been a huge success among adults and that can attract even the youngest, hipster fashion! Plaid shirts and colored daddy's for him and short dresses or stripes for her.
Kanzashi flowers for a headband for a girl: master class
Have you decided to make such a hair decoration yourself? Try making a simple kanzashi headband for a girl with three strawberry-like flowers. Additionally, you can use artificial berries and ladybugs to decorate the finished product. For work, prepare:
- white ribbon 4 cm wide;
- green ribbon 5 cm wide;
- blank for dressing;
- lighter or candle;
- igloo;
- yellow artificial stamens;
- glue gun;
- a piece of white felt;
- butter knife;
- an unnecessary rag;
- scissors;
- tweezers;
- artificial berries or insects.
Start with a white satin ribbon. You need to make three strawberry flowers. To create one bud, cut 6 squares measuring 4x4 cm. Burn the edges of each of them over a candle or lighter. To prevent black stripes from appearing on the petal blanks, use a low or medium flame level.
Then start forming the petals:
- Fold a piece of ribbon in half to form a triangle and turn it over with the top facing down.
- Then press the edges of the triangle to the top, grab them with tweezers and trim the edge.
- Scorch the cut over the candle.
- Cut off the lower part of the petal and also scorch the workpiece over the flame.
- Repeat until you have completed 18 petals.
Now you need to collect the flowers using a glue gun. Consistently glue the petals to each other, connect them into a flower. Make 2 more pieces. Then take the stamens and pull them through the hole in the center of each bud. Adjust their height, glue them with a gun and spread them to the sides to give a natural look. The stamens can be replaced with a bead or button in the shape of a berry.
Beautiful wedding accessories: sewing a bandage for the bridesmaid's arm
On such an exciting and important day as Wedding Day, you want everything to be perfect. Of course, the key stage of preparation is undoubtedly the image of the bride, but I also want to bring other little things, such as wedding invitations, the groom’s boutonniere, the bride’s bouquet, car decoration, etc. closer to the ideal.
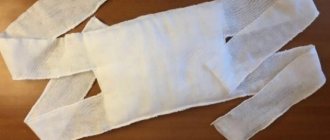
Today it is very fashionable to create wedding accessories with your own hands. One of these accessories is a bandage on the bridesmaid's arm, instead of the usual ribbon that always gets in the way. In wedding stores, although there is a wide variety of products, you can’t always find exactly what you want.
“Cross” invites you to create this fashionable part of your girlfriend’s image yourself. Firstly, it will be much cheaper, and secondly, you can always boast that you are the designer of your wedding.
What we need:
- Satin ribbon 2.5 centimeters wide, 80 cm long.
- Scissors.
- Needle and thread to match the color of the ribbon.
- Candle or lighter.
- Toothpicks.
- Beads.
- Openwork ribbon 15 centimeters long.
- Organza ribbon as long as your arm.
- Hot glue.
First, let's prepare a ribbon, thread with a needle and scissors.
We measure a segment of 8 centimeters from the tape.
We bend the ends of the segment to the center on both sides and secure it with pins for convenience, as shown in the figure.
Along the bottom of the element we will go through the usual “forward needle” stitch from start to finish. We tighten the ribbon with an accordion, secure it and only now cut the thread.
Now we need to process the petal with fire. To do this, bend it inward with the front side so that its ends are connected in the center, and walk them along the candle flame. This must be done carefully so as not to scorch the tape (otherwise it will turn black).
Now the petal is ready.
The number of petals depends on the splendor of the flower you want to see on your wedding accessory. We made 10 pieces.
Next you need to make the stamens. For this we will use available material. Toothpicks work great. Break each toothpick in half and place beads on the ends. You can secure them with glue if they do not stick well without it.
Let's do this with three toothpicks and glue the resulting stamens together using hot glue.
Toothpicks are the simplest option that every housewife will find at home. They can be replaced with thin wire wrapped in papyrus paper.
Get to know other ways to create stamens in our master class How to make stamens for flowers: 4 different ways
Now you can use glue to collect the petals themselves.
One by one we glue them to each other.
This is the rose we got from 10 petals.
For finishing, cut a piece of openwork ribbon 15 centimeters long.
Sew it to the rose using simple stitches in the circle.
We will also sew the resulting rose onto an organza ribbon or place it on glue for strength.
The armband for your girlfriend is ready!
By creating your own wedding accessories, you add personality to this magical day!
SHARE! "Cross" will not give bad advice! 
How to make strawberry leaves?
Take the green ribbon and cut it into pieces of 5-6 cm. Cut out a rounded leaf so that it roughly resembles the strawberry one. A total of 6 leaves are needed. Then start scorching the edges above the candle, pulling them out until they are ribbed. Having processed all the workpieces, heat a butter knife over a candle and, if it becomes smoked, wipe it with a cloth, and then quickly apply longitudinal and transverse veins to the sheet.
Product assembly
Kanzashi flowers are attached to the headband using an oval felt piece. Cut it in such a size that the entire composition fits and looks neat, but is not wider than the base. First, glue on the leaves, arranging them like a fan, and then the three strawberry buds. Add berries or insects to the design, and then apply glue to the back of the felt blank and connect it to the base. The kanzashi headband for the girl is ready! Try other ways to create flowers using this technique to please yourself and your loved ones with beautiful and practical hair accessories.
Stage 1
First you need to mark the place where you will need to sew the flower. This may not necessarily be exactly in the middle of the tape, but preferably closer to the middle. In order to determine that very center, take the blue ribbon and fold it in half.
Then we throw the ribbon over the wrist so that a loop hangs on one side of the hand, and the free ends of the ribbon hang on the other.
Now we pull the ends through the loop and tighten the entire structure on the hand.
In principle, there are easier ways to tie such a ribbon, but a decoration tied in this way looks much more interesting and elegant. Using a piece of soap, chalk or a needle, you need to mark the place where we will sew the flower.