IRK.ru is launching a new project dedicated to interesting and rare professions and hobbies. Here we will talk about such professions or hobbies as, for example, a blacksmith, restorer, watchmaker or jeweler, as well as many others.
The first participant in our project was a potter
. Potters and potters appeared before our era. These craftsmen processed clay and turned it into dishes and other household items.
Clay products were then a necessary element of life for many peoples. Now it is no longer so much a craft as an entire art. After all, from clay you can create both ordinary flower pots and all kinds of interior items.
The process of creating pottery is quite complex and consists of several stages. First you need to prepare the clay
. It is crushed, flattened, adding a little water to soften it, collected into a round lump and kneaded again. As a result, there should be no hard lumps left in the clay.
Now you can continue working with the material. A piece of clay is placed on the potter's wheel and pressed tightly with your hands on all sides.
In this case, the position of the future product must be centered
. If the master feels that his hands are moving unevenly in a circle, shaking, it means that the clay is not in the center of the circle, and the product will not turn out.
Afterwards molding
. Gradually, the potter levels the clay mass and gives it the shape of a cylinder.
Then he can narrow it towards the top or in other places, and in some places, on the contrary, expand it - depending on what the master wants to get in the end.
If the cylinder turns out to be smooth, then further stretching it and shaping it into a pot shape will be simple - any shape can be created from the cylinder
.
It happens that the product simply collapses during operation. There may be various reasons for this. This often happens if the clay is too liquid. Then you need to dry it out and start all over again.
.
When the master has achieved the desired shape, he removes excess clay using a string or wire
, the product is also leveled using a knife or wooden spatulas.
Several methods are used to decorate finished products. This is embossing (pressing parts of objects), engraving (applying designs with sharpened sticks), glazing (coating with glaze).
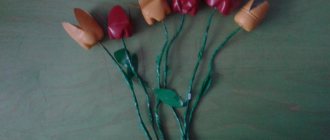
From clay you can create, for example, pots like these, covered with glaze and complemented with voluminous fantasy elements, as well as vases and crafts, for example, for decorating aquariums.
Clay can be purchased ready-made or in powder form in specialty stores or art salons. But as a last resort, you can make it yourself, or, easier to say, dig it in your garden or quarry. But usually it contains all sorts of unnecessary impurities, from which it needs to be cleaned.
Place the clay in a basin and fill it with water. When the clay has turned into slurry, put it in nylon tights and strain into another basin.
Wait until the clay thickens, do not forget to stir it.
Place the clay on a gypsum board. When one side of the clay is dry, transfer it to the other. But if you don’t have plaster, put the clay on oilcloth and leave it to dry in the sun. After the clay has thickened, squeeze the air out of it and place it in a plastic bag.
For modeling, take out the clay and store it under a damp towel.
We sculpt clay in the same way as plasticine, only the problem with it is that the individual parts do not mold well with each other. To do this, they make a so-called slip - this is clay in the form of a liquid-like mass. To connect parts, it is simply applied to it with a brush.
It is impossible to imagine a Ukrainian village without pottery - these are krinkas, pots, jugs, glaciers, bowls, cups, makitras and so on. Our dacha neighbors have collected so many of these wonderful items for us that it makes our eyes wide open.
When a real fence appeared at our dacha in the fall, the area was immediately transformed. Divided into zones, it became not just more comfortable, but acquired a kind of completeness, which determined our perception and attitude towards every corner of it.
The traditional decision to decorate the fence with pots and sunflowers arose naturally. And if the issue with sunflowers was easily resolved, then the pots turned out to be a problem. Abandoned huts are not uncommon in our village, and therefore the first trophies consisted mainly of shards. Over time, a lot of shards were collected, some had the bottom broken off, others had the neck, and despite the fact that even in this form they still brought warmth and color, I really wanted to restore at least one of them.
There is enough clay in our area. After preparing it for work (cleaning it from impurities, kneading it), I decided to decorate a wine bottle as a test, the peculiar shape of which did not allow it to be thrown away. According to my plan, the upper part should have been coated with clay, and the lower part should have been decorated with reeds. When I started working with clay, I encountered a problem - every time the clay dried, it began to crack and fall off the bottle. Then I read on the Internet: “You can’t stick any hard objects into wet clay, because when the clay dries, it shrinks, but hard objects (wire, sticks) don’t shrink, so they interfere with the clay’s compression and it cracks.” Therefore, we had to introduce burlap into the decorative elements. As a result, although it turned out well, it took longer to tinker than I expected.
The first experience with clay brought the understanding that it would not be possible to restore the shard by adding clay to the missing fragments. Therefore, I had to abandon the idea, although I still restored one jar, albeit in a different way.
And now, when there are more than enough whole pots of various shapes and sizes, I still don’t want to part with the shards, I think that at our dacha there is a place for everyone. I still beat Clay. I made a small salt shaker out of it, burned it at the fire and painted it.
Of course, on a pottery wheel it would have been evenly equal, but the result was pleasing even in this form, and communication with clay also brought a lot of positive emotions.
Turns out…..
Clay has a considerable list of healing properties and can literally absorb diseases. It is an excellent absorbent that removes poisonous and toxic substances from the body. Another very important property of clay is radioactivity. Radium is the main radioactive element found in clay. This is a very rare element with great power. It is noted that the longer the clay is kept in the sun, the more it will contain the radium obtained from it, which expels from our body everything that rots, decomposes and leads to cellular disorganization (tumors, etc.). Due to its radioactivity, clay is the best natural sterilizer. Clay has an antibacterial effect. Carry out an experiment: put a spoonful of clay in a liter of milk - as a result, even in the heat without a refrigerator, the milk will not sour for several days. The Egyptians used clay for embalming. Unlike chemical antiseptics, which kill not only microbes, but also destroy healthy cells, clay, by eliminating microbes and their toxins, creates immunity in the body against new microbial infections.
Exclusive and stylish decoration of flower pots plays an important role in interior design and creating a certain mood in the entire room. But purchasing colorful and attractive pots in a store is not a cheap pleasure, and affordable products do not look as presentable.
Therefore, it is worth decorating unsightly pots yourself and improving their appearance according to your taste and desire, and then you will be able to show off to your friends the original flower pots you created with your own hands.
The beginning of the transformation
There are many different ways to transform old or tatty pots. To do this, you can use completely different materials found in the house. The main thing is to give free rein to your imagination and apply a little diligence, and your mini-garden inside the house will acquire new shades.
Before starting the creative process, you should prepare well, study the relevant materials and photos of hand-made flower pots. It is also worth considering whether you need to spend money on buying cheap and unsightly pots, or whether it is better to make them yourself.
Nowadays, handmade products, the so-called hand-made, are highly valued. In addition, you will receive the required volume of the pot and an exclusive option for shape and finish.
Decorating a pot
You can decorate not only new pots, but also change the design of old ones:
Color painting with acrylic paints on a clay pot, varnished on top. If you entrust this creative work to a child, the result may pleasantly surprise you. Children's creativity is always distinguished by spontaneity.
For plastic pots, you can use the decoupage technique: cut out small multi-colored scraps of fabric and paste them over the sides of the pot.
Crocheted potty clothes add a cozy atmosphere to your home.
A pot wrapped in colorful woolen threads, lace, and braid will become a bright decoration.
Shells, beads, pebbles, coffee beans, and grains are used as decoration.
If you mix nail polish with water and lower a pot into this liquid, a floating pattern will remain on the walls. Coat the top surface with varnish.
If an allergy sufferer lives in the house, then you can put artificial flowers in a pot made by yourself. This will be a lifesaver for flower lovers and people who love to do creative work.
Polymer clay pots
Ideas on how to make a flower pot yourself can be found on the relevant websites. Polymer clay is the most commonly used material for creating flower pots. To make small pots, you will need: a dessert spoon, polymer clay and a stove.
First, the clay needs to be thoroughly kneaded to a soft plastic consistency. After which a ball is formed and placed in the freezer for 10 minutes. This is necessary so that the clay is slightly hardened, and it is easy to form the desired shape of the pot and decorative elements from it.
The next stage of work is to create a recess inside the pot. Using a spoon, scoop out any unnecessary clay from inside the ball and return it to the cold.
From the outside of the ball, give the desired shape to the pot. For example, round or oval in the form of a flowerpot. Using a knife, you can make the shape square. A very interesting option is the unusual shape of the pot: abstraction or figurative modeling.
The formed product must be hardened (fired) in the oven. In the instructions for using clay, specify the recommended temperature conditions and production features.
Next comes the most enjoyable part of the job - decorating the surface of the pot. For interiors in the style of minimalism, you don’t need to apply decorations to the pots, but other styles can get along perfectly with painted and colorful elements.
Various decorative techniques are used to decorate the surface of the pot. Decoupage would also be appropriate.
Mosaic on a pot
Mosaics on pots are always interesting and can decorate any surface. A flower pot with mosaic looks original. To create a mosaic design, you can use shells, pieces of mirrors, ceramics, pebbles, and glass.
The bases for forming the shape of the pot are prepared for work. Tin cans and tin paint buckets are suitable for this.
Bottle decor: master class on making a stylish and original decorative element (85 photos)- Cake decor - master class on original design and decoration methods (75 photos and videos)
Do-it-yourself decoupage - manufacturing technique, master class and step-by-step instructions for drawing (105 photos)
It is necessary to select additional materials: plaster, mounting mesh, tiled grout. The selected base for the pot is covered with a layer of plaster.
The mounting mesh on the sides is tightly applied to the plaster. The side surface is decorated with mosaics, the bottom remains free. In this state, leave the pot to dry completely.
The spaces between the mosaic pieces are filled with tiled grout. This will remove all roughness and sharp corners. The surface of the pot becomes smooth. Excess pieces of grout are removed with a cloth.
Cement pots
Based on the name of the material used, it already becomes clear to everyone that the product will be highly durable and original. Such products will perfectly decorate outdoor garden areas, public gardens and home mini-gardens.
A detailed master class on flower pots will help you understand in detail all stages of the process. So, to create a large container, you will need to create formwork. But today, we will talk about the production of a medium-sized pot.
First, you need to cut off the top of a 5 liter plastic bottle so that you get a square bowl. The inside needs to be lubricated with oil and filled with a cement solution prepared in advance.
Lubricate the outside of a 2 liter bottle with oil and place it in the center of the bottle filled with cement. Please note that the larger the internal container, the thinner the walls of the pot will be, and the lighter the product will be.
After two days, the cement will harden and the plastic core and outer shell can be removed. In the end, all that remains is to decorate the outer surface using acrylic paints, varnish and decorations, if desired.
Wicker pots
Fans of rustic interiors in ethno-style using environmentally friendly materials will like this method of creating a pot, because it requires wooden rods. It’s not at all easy to build a completely wicker pot, but the result will undoubtedly please you.
But, if you can’t do this, then this method can be used to decorate flower pots with your own hands. Take a couple of dozen wooden rods of a certain length, twine, rough cloth, a cylindrical tin can and glue.
Measure the required length of the twig (just above the edge of the pot) and cut off the excess; do the same with the rest. Place the twigs under the ruler on the table surface and tie them with strong thread according to the principle of weaving a mat.
The outside of the jar is covered with burlap, dried and wrapped in the resulting wicker fabric, which is tied with twine on top.
Photos of DIY flower pots
Then you can start with something simpler - for example, by sculpting a flower pot.
To make a pot you will need clay and water. Mix the clay with water until a homogeneous mass is obtained in the form of a thick dough. The resulting mass should be free of bubbles, for this you need to knead thoroughly. Adjust the consistency of the clay with water to prevent it from drying out. As a result of kneading, you should get a lump that does not stick to your hands.
We begin the work of sculpting pots by making the bottom. Separate a small lump from the total mass. Roll out a pancake from it, then cut out a circle. You can use improvised objects to achieve the perfect circle shape (mug, plate, etc.) If you want to see various examples of clay pots, go to the website.
To make the walls of a homemade pot, you need to make clay “sausages” with a diameter of no more than half a centimeter. Do not forget to moisten the bottom and walls of the pot with water so that the product does not dry out. “Sausages” (bundles) of clay can be made in advance, or they can be rolled as needed.
We carefully sculpt the clay strands one at a time to the bottom of the pot, laying them out around the circumference. Try not to go over the edges. When building up the walls, do not forget to moisten the clay with water. After completing one bundle, take the next one and continue the manufacturing procedure. Be careful to ensure that the pot is even and symmetrical.
If you want to make the pot “pot-bellied,” apply tourniquets, leading them out. If your pot should end up with the parameters “90x60x90”, follow the same steps, but inward. Do this until your product reaches the desired shape.
Once you have finished sculpting the pot, slowly wrap it in a rag or newspaper, then set it upside down. It will take at least 2 days for it to dry completely. Once the pot is well and thoroughly dry, you can start firing it.
Watch the clay modeling lessons on video, they show many nuances.
Firing is the last stage of the work, which takes place in two stages. When you fire a pot for the first time, excess moisture evaporates from it, and only with repeated firing will it become durable.
During the initial firing, the temperature should be controlled: it should not exceed 300 degrees. Continue heating the product at this temperature for 2 - 3 hours. Be careful: sudden changes in temperature will only ruin your work. Do everything carefully and in a hurry. When firing the pot again, we will increase the temperature to 580 degrees, but we will reduce the time to only 15 minutes. And in the end, we heat the product to 900 degrees for the same duration. At the end of the heating process, do not rush to remove the product from the oven, let it cool to room temperature. The pot is ready!
Any gardener knows that there are never too many flower pots. In this article we will tell you how to make a very simple decorative clay flower pot. To make such a flower pot you do not need virtually any skills. Even a beginner or a child can handle the project.
Decorating flower pots - step by step instructions
Step 1: Place the cacti in pots
Place a Styrofoam ball in each ceramic pot. If your foam is too big, squeeze it with your hands and push it inside the pot.
Remove the Styrofoam balls from the pots, apply a little hot glue to the bottom of the balls, and reinsert them into the pots.
Apply some hot glue to the top of the foam and press the lichen/moss into it. Then place the cacti on the lichen.
Step 2: Make the Horns
Take the golden clay and roll it out until smooth. If you feel your clay is hard, knead it in your hands for a few minutes to warm it up.
Make a unicorn horn-shaped figure about 8 cm long from softened clay. Insert a toothpick into the lower part of this figure.
Repeat the process of making antlers as many times as you have pots available. Bake the products together with toothpicks in the oven, according to the recommendations on the package with clay. Once baking is complete, remove the finished products from the oven and let them cool.
You can also add swirls to your horns and then paint them with metallic gold paint after baking, like we did for the biggest horn!
Step 3: Draw sleepy faces on the pots
Using black paint, paint U-shaped eyelids with three lashes on the pots. Also draw pink cheeks.
Step 4: Make Felt Flowers and Leaves
Cut a spiral about 3 centimeters wide from colored felt.
Roll the spiral from the outside to the center, securing it along the way with hot glue.
After rolling, apply glue to the base of the flower, then cover it with the free end of the felt.
Repeat the above steps for all the other flowers you want to decorate the pots with.
Also cut out several small leaves from green felt.
Step 5: Make the Ears
Also cut out some ears from white felt if you don't have them on the sides of your pots. For example, our large pot does not have ears, unlike the small ones, which have small protrusions on the sides. Therefore, there is no need to make ears for these pots.
Use hot glue to attach the ears to the sides of the pots.
Step 6: Finish the composition
Insert the Golden Unicorn Horn directly into the foam, front and center.
Using hot glue, attach felt roses and leaves to the sides of the horn.
Repeat above steps for small pots.
Insert the horns into the foam at the front and center.
Using hot glue, attach one small flower and 1-2 leaves to the moss next to the horn.
The decor of flower pots in the form of sleepy unicorns is ready! It's so simple and cute! We only added one flower per small pot, but you can go ahead and add as many as you like. Plus, if you use artificial cacti (like we do), you can even add flowers to the top of the plants.
Exclusive and stylish decoration of flower pots plays an important role in interior design and creating a certain mood in the entire room. But purchasing colorful and attractive pots in a store is not a cheap pleasure, and affordable products do not look as presentable.
Therefore, it is worth decorating unsightly pots yourself and improving their appearance according to your taste and desire, and then you will be able to show off to your friends the original flower pots you created with your own hands.