Wooden cargo pallets are a real gift for all craftsmen. You can use them to make almost anything that comes into your head, and the main thing is to realize your dreams as quickly as possible so as not to lose interest in them. Pallets will help in the implementation of any ideas, as they are easy to use. They are inexpensive, durable, and can be used to make furniture and benches, and any complex structural structures can be created from them without difficulty. There are a lot of ideas on how to create various useful elements for your garage from wood pallets.
Design features and benefits
Pallets (pallets) are simple devices for transporting and storing goods.
The transport structure is a rigid lattice rectangular platform made of wood or plastic. Metal pallets are very rare. Metal pallets are not suitable for making garden furniture due to their heavy weight and susceptibility to corrosion. Plastic ones are difficult to fasten, but wooden ones are very easy to use and can be easily converted into various objects. Even a novice master can handle this. Just watch the video or photo instructions to understand how to make furniture from pallets with your own hands.
The term “European pallet” is often used. This is a standard wooden structure with the following dimensions:
- length - 1200 mm;
- width - 800 mm;
- height - 144 mm.
The size of Euro pallets is not accidental; it correlates well with the internal dimensions of trucks and the grips of electric forklifts. There are also so-called Finnish pallets, made according to standards common in Finland:
- length - 1200 mm;
- width - 1000 mm;
- height - 144 mm.
Pallets can be:
- single-deck - the load can be placed on one side;
- double-layered - on both sides.
According to the placement of the side openings into which the loader grips pass, pallets are available in two-way and four-way types. Wooden pallets of any configuration and size are suitable for making furniture. Used pallets can be purchased. Organizations wishing to get rid of them post advertisements on free boards online.
Pallet sizes
You can make pallets from:
- garden kits;
- sofas;
- tables;
- coffee tables;
- podiums;
- beds;
- storage systems for equipment and clothing;
- bedside tables;
- cabinets.
Advantages of wooden pallets:
- suitable for creating furniture according to individual projects;
- available material;
- environmentally friendly;
- easy to use - no welding machine required;
- practical - you can paint it any color, change or update the top layer if necessary;
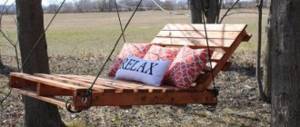
- save time - a full-fledged garden set for arranging a recreation area can be made in 1 day.
Garden kit
First of all, we will build the foundation for the barn
The craftsman decided to build a shed on the side of his yard where there was a slight slope. He was faced with the task of leveling the site. During the course of this work and preparing the excavation for the foundation, Nick accumulated a whole mountain of small stones. He hasn't figured out how to use them yet. But this is a matter of time.
The master decided to make the foundation from hollow concrete blocks, which he purchased on a free classifieds site. The estimated dimensions of the barn are 6x8x16 m. Quite large. After the work began, it turned out that there were not enough foundation blocks. We had to worry about purchasing an additional number of prefabricated structural elements.
For the foundation, we will take the most ordinary standard concrete blocks, first pour them at the same level and arrange them along the width of the pallet, this must be done so that the load is distributed evenly.
Preparation of materials
Before use, pallets must be cleaned of dirt and dust. All parts should then be sanded to remove rough edges and fibers that could become a splinter when the furniture is used. Using a sander, cleaning the tray will be quick and with a minimum of effort. If there is no electrical device, defects must be removed manually using abrasive paper.
Pallets are not always needed in their entirety. Then they need to be disassembled into planks and then sorted. Very old, dilapidated, broken boards will have to be thrown away. Those suitable for further use must be coated with a composition with a moisture-repellent effect:
- primer;
- paint;
- varnish.
If the material is not treated, furniture made from Euro pallets will not last long. Areas in contact with the soil will quickly rot. Parts located above the ground will take on an unsightly gray color and become covered with fungus and mold. You need to design furniture, take measurements, draw diagrams and drawings in advance. This will allow you to calculate the amount of material, purchase additional parts (handles, wheels, hinges, decor), and prepare the necessary tools.
Material for work
Shower tray in a bath: installation features
Types of trays for washing in a bathhouse
Instructions for installing a shower tray in a washing bath
Selection of materials for installing a tray in a bathhouse
Preparing the surface for installing a tray in the washing room
Filling the bottom for a tray in the washing room of a bathhouse
Technology for constructing the sides of a bath tray
Finishing the shower tray for the bath
It is better to use ceramic tiles or mosaics as a finishing coating. The main requirements for the material are moisture resistance and non-slip texture. We cover the shower tray in the bathhouse in the following sequence:
- We apply bitumen or rubber-bitumen mastic to the entire surface, and seal the joints of the pallet and the wall with waterproofing tape.
- Using a notched trowel, apply a special hydrophobic adhesive.
- We lay the tile and press it tightly, evenly, leaving minimal gaps between the individual elements. Tap the surface with a rubber hammer.
- To make the gaps even, we use special plastic crosses, which must be removed after installation.
- After complete installation, wait for it to dry and grout the seams using moisture-resistant grout and a rubber spatula.
- We fix special corners to the corners of the sides to avoid injuries.
- We treat all joints with the fence and walls with sealant.
- We wash the tiles, cleaning off any remaining adhesive, grout and sealing compound, and after drying, wipe the surface with a damp and then a dry cloth.
- We install the grate, cutting the sealing sleeve so that it is level with the tiles.
At this stage, you can proceed directly to the installation of the shower stall and install the water supply system. The structure can be used within a few days, when the grout and sealant are completely dry. Watch a video about a metal tray in a bathhouse: By observing all the rules of waterproofing, the evenness of the surface and the required slope to the drain, you will equip an original, reliable and durable tray for the shower stall in the wash compartment. Thus, you will significantly save money by not buying a ready-made structure. Author: editors of TutKnow.ru
Where to buy pallets?
In Russia, pallets are sold at timber trading centers and in organizations that sell lumber. Durable stands (pallets, Euro pallets) for refrigerators and other equipment are sold by companies through a network of free advertisements. Sometimes it's just junk material. The owners are giving it away for nothing. In general, depending on your luck. In any case, the cost of pallets is low. This is a profitable solution.
For several months, a man (let's call him Nick) had been saving up pallets. Finally, he decided that the collected amount was quite enough to bring the project to life. Indeed, a whole mountain of “wooden wealth” has grown in the yard. Domestic cats, seeing that their favorite place would soon become inaccessible for walks, probably became sad.
Where to Stay in Berlin: The Best Accommodation Options for Budget Travelers
Bright pictures for interior decoration: you only need torn paper and a couple of frames
Tasty and nutritious. I cook rice with beans, tofu and chili in no more than an hour.
To fasten the pallets we use bolts; you choose the size and length of each individually, taking into account the thickness of the pallet bars.
Tools
Furniture made from pallets is a kind of construction set made up of several pallets fastened together. The manufacturing process is not particularly difficult. It is enough to have the simplest devices.
Tools for working with pallets:
- A screwdriver is a power tool that allows you to quickly screw in and unscrew confirms from wood. The device can be battery or battery operated. In garden conditions, the latter option is more useful, since furniture from pallets is assembled in the open air, where it is not always possible to connect to the network. A drill-driver allows you to quickly and efficiently sand boards with special attachments.
- Grinder is an electric circular saw for cutting wood and metal.
- A wood hacksaw is a hand saw that replaces a grinder.
- An electric jigsaw can be used to cut boards or make shaped decorations.
- Screwdrivers, hammer, pliers are standard hand tools.
For painting you will need painting tools: brushes, a rubber spatula for filling cracks and small holes. A nail puller is indispensable when dismantling pallets. The tool allows you to remove old fasteners from boards. Pallets are nailed together with rough nails, which are much more resistant to tearing than regular nails. It will take twice as much effort to pull them out of the boards.
Screwdriver
Tree
Traditionally, bathhouses have been made of wood for centuries. Environmental friendliness, low thermal conductivity and aesthetics made this choice the most suitable for the construction of this building.
A bathhouse made of permanent formwork consists of polystyrene foam thermoblocks one meter long and a quarter of a meter wide and concrete poured between them.
This technology provides a lot of conveniences and benefits:
- Huge budget savings.
- Increase the speed of construction work tenfold.
- Simplicity of installation work, which does not require special qualifications.
- Service life is about one century.
- Ease of carrying out repair and restoration work. The instructions allow you to replace only deformed areas.
- Possibility of erecting a building even at sub-zero temperatures.
Polystyrene foam floors
- No need for fixing solutions.
- Amazing lightness of the entire structure. This also allows you to save significantly on the foundation.
- A wide range of building products, including rounded samples.
Oriented Strand Board
Sandwich panel building
The construction of a bathhouse from OSB is possible without “wet” work with concrete, as is the case with permanent formwork. However, installation work is very easy.
And what’s remarkable is that they allow you to use a variety of insulation for a bath at your discretion:
Roll of mineral wool
- felt;
- extruded polystyrene foam.
After erecting the bathhouse frame, you can also use different finishing materials:
Plywood bathhouse with veranda
- sandwich panels;
- chipboard.
Such a building is distinguished by its speed of construction and high thermal insulation properties, which will allow significant savings on fuel materials in the future.
Pallets
Bathhouse made of pallets before covering with siding
This is an incredibly cheap method of implementing a sauna. But it is very labor intensive. It will be necessary to demonstrate miracles of engineering to reliably connect all building elements and give them thermal insulation properties.
If you have the necessary knowledge and skills along with free time, but no free funds, then this method is just for you.
Manufacturing rules
The simplest structures for the garden are made from pallets. If you have the skills to work with wood, you can make furniture with your own hands from pallets no worse than designer furniture. Most often, craftsmen make bedside tables, small sofas, armchairs, and beds from pallets.
Nightstand
It’s easy to build a bedside table from pallets; it’s better to start making furniture with it. If you put a wooden structure on wheels, you get a coffee table. Necessary tools and consumables:
- nail puller;
- hammer;
- screwdriver;
- wheels;
- fasteners;
- 1–2 pallets;
- paints and varnishes.
Assembly sequence:
- clean pallets;
- sand the boards using a drill or sandpaper;
- disassemble the pallet, pulling out the fasteners with a nail puller;
- make a tabletop from tightly laid edge-to-edge boards, securing them to two transverse planks nailed on the inside;
- nail a few more boards from the inside of the tabletop to create a place to store magazines.
If you need a coffee table, you can screw on the wheels - you get a low, flat structure, inside which it is convenient to store books and magazines. By combining two such items, they form a bedside table. From the remaining boards you can make drawers.
Clean pallets and sand boards
Armchair
To make a four-legged chair with two armrests, you will need the same tools as for the bedside table. Assembly is performed in the following sequence:
- the pallet is sawn crosswise - one part will be the back, the other - the seat;
- connect the back and seat at an angle using boards removed from the second pallet;
- legs and handrails are made from planks;
- the structure is assembled with self-tapping screws;
- furniture is treated with sandpaper, varnished or painted.
Cut the pallet into pieces
Bed
It is very easy to make a single or double bed without legs from pallets. To do this, they are installed directly on the floor and fastened with self-tapping screws, metal corners and plates. To work you will need:
- four pallets;
- carpet flooring;
- block measuring 40 x 60 cm.
Manufacturing procedure step by step:
- a frame is assembled from timber in the form of a frame with crossbars corresponding to the size of the pallets;
- clean the pallets of dirt and treat them with sandpaper;
- assemble the structure with self-tapping screws;
- Pallets are installed inside the frame and screwed to the frame;
- the pallets are covered with carpet on top;
- a mattress is placed on the structure.
Clean the pallets from dirt and sand them with sandpaper.
Rack
The simplest shelving can be made by placing a pallet vertically with the wrong side out and fastening several boards transversely at the same distance from each other - they will be shelves. First you need to remove the middle support. This rack can be hung on the wall. If you attach two legs from an old table from the bottom, the structure will receive additional support and take on a vintage look.
Pallets are an excellent raw material for making multifunctional shelves. Racks are made as follows:
- saw the pallet in half;
- in one part, the boards that serve as supports for the pallet are removed;
- nail one separated support onto the front part horizontally;
- attach the second part of the pallet to the support.
The result will be a product 120 cm long and with a shelf width of 30 cm. The rack can be left outdoors and pots of flowers can be placed on it. In the house, such shelves are filled with books and interior decor.
Cut the pallet in half
Bathhouse made of pallets: construction technology
Features of a bath made of pallets
Preparing for the construction of a bathhouse from pallets
Construction of a foundation for a bathhouse from pallets
Installation of a floor from pallets for a bath
Installation of sauna walls from pallets
Construction of a roof for a bathhouse from pallets
External cladding of a bathhouse made from pallets
Interior decoration of a bathhouse made from pallets
For lining the inside of the steam room, lining made of hardwood is best suited. We start the finishing work from the floor, then we sheathe the ceiling and lastly we proceed to the walls. Before finishing, take care of the issue of connecting communications (electricity, water supply), install a drain and think about ventilation. In general, we adhere to this order:
- We cover the floor with pre-milled and sanded boards from a pallet. If desired, you can buy ready-made tongue and groove boards.
- We fix aluminum foil on the ceiling combined with the roof, overlapping it by 15-20 cm, making an approach to the walls. The material is easy to damage, so we work with it very carefully.
- We cover the walls with the same layer. Please note that the reflective surface must be turned inward.
- We carefully glue all joints and areas damaged during installation with metallized tape.
- We fill the lathing on the ceiling and walls in increments of 0.5 meters and a thickness of 2-3 cm.
- We install wooden lining on the ceiling, then on the walls.
- We install an electric heater, fencing the surfaces around it with a galvanized sheet of metal.
After finishing work, you can begin arranging furniture and arranging shelves. By the way, pallets can also be used to create furniture in a bathhouse. Watch a video about building a bathhouse from pallets: Instructions and photos of bathhouses from pallets will help you build a functional structure using available materials. This original steam room is designed for temporary use, but it will serve its service life effectively. Author: editors of TutKnow.ru
Decor options
Pallet furniture, even carefully constructed, will have a rustic appearance if it is not decorated. There are a lot of ways. For finishing you can use:
- coating with paint, stain;
- varnishing;
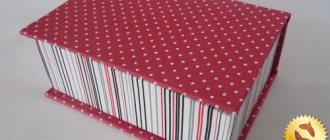
- pasting with self-adhesive film;
- finishing using decoupage technique;
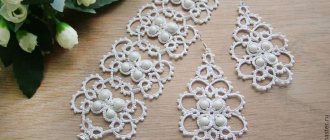
- decoration with fabric, lace.
It is recommended to choose the most expensive paint. It gives a noble and respectable look to the roughest boards. Drawings and ornaments can be applied using stencils. The striped pattern is made using masking tape.
Furniture varnish can be transparent or colored. The first will emphasize the texture of the wood and add a bright or matte shine. The second will help to tint the pallets to match the color of other interior items.
If furniture made from wooden pallets will be placed outside, the decor should not be “afraid” of moisture, wind, low temperatures, or heat. Products that will be in the house are decorated with fabric and pillows. The seats of sofas and armchairs can be upholstered with foam rubber, covered with leatherette or matting on top. Convenient removable covers. They are made from easily washable fabric to match other existing furniture in the house.
Typically, summer residents use old pallets to light a fire. But if the owners have a need for furniture, it is irrational to burn them - you can make practical things that will last for many seasons and cost almost nothing. Photos of step-by-step making of furniture from pallets with your own hands will help beginners decorate their cottage beautifully and comfortably.
Coloring
The nuances of making garage useful things from pallets
It is worth remembering that wooden pallets, which are used for transporting goods, can be easily processed with tools. They are easily connected together into a structure using screws and nails. Therefore, the process of assembling something will take a minimum amount of time.
You can easily make upholstered furniture from pallets. In this case, you can use such useful soft material as padding polyester. It does not absorb moisture and does not harbor bed mites. Make a bench out of pallets, and then cover it with padding polyester, you will get a full-fledged durable and comfortable sofa that can easily be used in the garage.
A staircase made from pallets can be assembled in a matter of minutes and in terms of strength it will not be inferior to either a metal or wooden one created in a factory. You don’t even need to use special boards to strengthen the structure. Everything can be supported on pallets held together with screws if they are placed correctly.
There are a great variety of tables made from pallets on the Internet. They come in a variety of shapes and sizes. For the garage you can make either a two-seater table or for a large number of friends. The main thing is to use pallets wisely, creating a structure in such a way that the pallet slabs lie perpendicular to each other. This principle is used in the production of the most durable material in our time - carbon fiber.
We build walls
We decorate our brainchild by covering it with chipboard or OSB.
In the end, everything was laid in trenches in even rows and filled with cement mortar. At the same time, Nick installed metal rods in the corners and in the center of each side of the perimeter to give the future structure the required degree of stability.
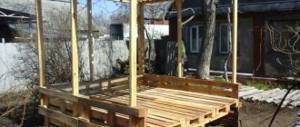
It's time to build the walls, that is, horizontally install the pallets one after another, bolting them together. For strength and stability, the lower part of the pallets was screwed to the foundation blocks. Once the corners were connected, the structure was even stronger and more stable than Nick had expected.
I wore my hair with a parting for many years: the hairdresser seriously warned me
How to survive infidelity and take only positive experiences from it
“Lost” acres will sparkle: how to design a narrow passage on a site (photo)
How to make a shed from pallets with your own hands
First of all, you need to choose the right place for construction. A wooden shed must be placed in a drafty, well-ventilated space, otherwise the wood will begin to rot and deform over time.
It is best to build a shed in a place sheltered from the wind
On the other hand, a pallet shed is often left open without siding on the walls. In such a room you can store equipment and crops, firewood and equipment without much damage. Therefore, the best solution would be a small space next to the house in a small draft.
Making the foundation and the first row
Initially, you will need to plan the site, level it and compact it with a hand tamper. Next, we draw the contours of the future foundation, dig a trench and lay a mixture of sand and crushed stone on the bottom. The width of the strip foundation is selected in accordance with the height of the barn; if you plan to build a box in three rows, this strip must be at least 30 cm deep and at least 25 cm wide.
We install the formwork boards, lay the film inside and fill the foundation with cement-sand mortar without any reinforcement. Next is the most difficult stage, until the concrete has set, you will need to trim the surface at the horizon level so that the supporting part of the tape is as smooth and flat as possible.
The next step is to cover the hardened concrete with plastic film and lay out the first row of pallets. We sew the pallets together in the corners with metal tape.
The barn must be built on a strip foundation
Assembling the box of walls
Before building the next row of pallets, you need to check how level the laid row is. To do this, we check the deviation of the edge using a plumb line and a building level. If something goes wrong, you need to unstitch the pallets, align them vertically and re-tighten them with steel strapping wire.
Important! You should try to build the bottom row as even as possible, otherwise, after the construction of the shed is completed, the walls may bend “barrel” under the weight of the cladding and roof.
Next, we install vertical beams; they will serve as a frame and support for the roof of the barn. We sew each beam with self-tapping screws to the pallets in several places.
All that remains is to build the second and third row of barn walls
Roof and exterior finishing
For this model of barn, a single-pitched roofing option is used, so we will do without complex building structures, but simply cut grooves on the ends of the beams for installation of the sheathing.
Cross beams will need to be built from knocked down boards; this design guarantees high strength and stability of the sheathing. Any material can be used for longitudinal slats; they do not particularly affect the strength of the roof.
Scheme for the roof
As a roofing covering, we use four sheets of corrugated board, nailed to the sheathing with ordinary nails. The fastening points will need to be painted over, otherwise in a couple of years the metal will rust and the roof may be torn off by the wind.
Adjusting the height
Since the weather was hot, a light awning appeared over the construction site to protect from direct sunlight.
The man didn't want the barn to be too tall, so he shortened the top pallets by half. In his case, this was also convenient because the neighbors would not unwittingly “look” into the storage room.
At first it was planned that the floor of the barn would be level with the ground, but given that rain is rare in this area and there is no fear of flooding, the decision was made to deepen the lower part of the room. Thus, the internal space has become more voluminous.
Couples where the woman is the breadwinner are more likely to experience difficulties: scientists
What does the collection of a girl who spends $5,000 a month on perfume look like?
I make buttermilk pancakes in the morning. Tender and tasty
Building a roof
Nick used the few remaining pallets to construct a simple barn roof that would not be in the way of the neighbors. Once the vault was formed, the craftsman disassembled the remaining pallets into slats and used them to make the sheathing.
After the structure was covered with inexpensive siding, the barn began to resemble a structure that had cost a lot of money to build. Small pieces of glass became windows, which provided the utility room with natural light.
Parts of the fence and the rear wall of the building form a single fence. Nick decided to stop there and returned to the façade. Here he organized a place to store firewood. To create a small wood-burning “terrace,” the owner installed a tin canopy and made a gutter to drain rainwater, which he directed into a barrel.
Cheap and cheerful
When the barn was completely ready, the man moved on to interior work - he made shelves from lumber. According to the owner himself, it took him about $500 to build the building. This money is basically a tax on the purchase of siding, shingles, mortar, and fasteners.
An amazing homemade pallet shed helped organize the yard space. The family budget spent 500 dollars on everything, while the cost of such work sometimes reaches several thousand! The labor costs definitely paid off with a decent result.
Interesting articles:
- Do-it-yourself corrugated shed step-by-step instructions
- Gazebo made of pallets (46 photos): how to make wooden buildings from pallets for a summer house with your own hands
- How to build a frame barn with your own hands
- Step-by-step making of furniture from pallets with your own hands, photos of products
READ MORE: Japanese mini-tractors features of the Iseki Mitsubishi and Hinomoto models How to choose spare parts and adjust the track width
What is the best way to make a bathhouse: a list of the most suitable materials
If you have your own plot, one of the first thoughts that comes to mind is building your own bathhouse. What then is it better to build it from? What material to choose for building walls?
We will try to answer these questions in this article.
Photo of a sauna made of rounded logs
Tree
Traditionally, bathhouses have been made of wood for centuries. Environmental friendliness, low thermal conductivity and aesthetics made this choice the most suitable for the construction of this building.
But there are also many tree species. So which wood is better to build a bathhouse from? Let's figure it out.
Poplar
Two-story poplar bathhouse
Poplar has a lot of unique advantages:
- High resistance to splitting process. Due to this property, this material is especially popular in the manufacture of shelves, trestle beds and other furniture.
- The absence of resin secretions, which are especially harmful to the human body in a steam room.
- Uniformity of structure.
- Optimal hardness when following the drying process. Therefore, it does not crack or warp.
The most common types of poplar are:
- sedge;
Pine
Bathhouse made from rounded logs of Lapland pine
Advantages of this material:
- Easy to process due to its softness. Even a person who is far from carpentry can, with due attention, carry out the installation work of such wood with his own hands.
- A pine bathhouse has virtually no shrinkage and is not subject to deformation during the drying process.
- Low price. This is one of the cheapest wood species.