How to make a holder for a navigator with your own hands?
Sometimes a commercially available mount is not suitable for a particular navigator. In this case, you can do it yourself.
For reference! You can make a holder from metal and wood, or from small items that you always have on hand.
Flip case holder
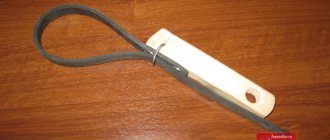
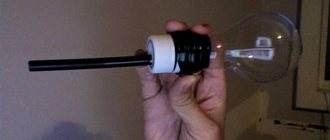
If you happen to have an unnecessary old flip case on hand, don’t throw it away. It makes an excellent holder for a navigator. In addition to the case, you will need one simple office paper clip and superglue:
- The first step is to cut off the front part of the cover.
- Then you need to take the second part and glue a clip to it from behind.
- The metal parts must be glued, and the clamp itself must be perpendicular to the case.
- Then you just need to attach this homemade holder to the deflector and insert the navigator.
It is necessary to look at the dimensions of the case and the navigator. If they do not match, then such a mount will not be able to properly hold the device.
Let's sum it up
Using a tablet in a car is far from a luxury, but a necessity. Many people use it to plot the desired route, and some use it as a video player. In both cases, you can use different options for securing the gadget in different parts of the car. Fortunately, today you can, if you don’t buy a mount, then come up with a rational replacement for it.
The best prices and conditions for the purchase of new cars
Credit 6.5% / Installments / Trade-in / 98% approval / Gifts in the salon
Mas Motors
A tablet is a device that is useful not only for the average user, but also for the car owner. With its help, a car enthusiast can connect to the Internet, read the news, find out the weather forecast, figure out navigation, assess the condition of the car, etc. There is only one problem with tablets: not every car has space to mount them. We’ll talk about how to make a tablet mount yourself in this article.
Where is the tablet attached?
- The first option: the device is mounted on the dashboard, to the right of the steering wheel (or to the left, if the steering wheel in the car is located on the right). There are many ways to mount a tablet in this place, some of which will be discussed below. Many car enthusiasts prefer to follow the path of least resistance and simply buy a tablet holder in a store. The problem is that it is not always possible to find holders in the store for a specific tablet model and a specific car brand. This is why car owners often have to make holders themselves.
- The second option is also possible: the tablet is mounted in the headrest of one of the front seats. It is clear that in this case it will be used mainly by passengers, and not by the driver. In this article we will talk about attaching “driver” tablets.
Things to remember
- When installing the holder (especially if it is installed on the dashboard on a bracket), we must not forget about safety precautions. The bracket should not be too long, the tablet should not be too close to the steering wheel, or at the same level with it, because this way the driver will certainly touch it when he next reaches for the gearshift lever. In the event of an emergency, this seemingly insignificant moment may well become the cause of an accident.
- A tablet built into the front seat headrest could cause injury to the rear passenger. If this person is not fastened, then in the event of sudden braking or an impact, he will be thrown forward, face-first directly onto the headrest. If there is a tablet in the headrest, its fragments will cause cuts to the passenger (this point is especially relevant for tablets whose display is covered with glass with a so-called oleophobic coating, rather than plastic).
Homemade holder for a 7-inch tablet in the Nissan Laurel console
Tools
- Drill with a drill bit with a diameter of 5 mm.
- 2 steel strips (width 15 mm, length 250 mm, thickness 1 mm).
Sequencing
Video on the topic
Installing a 10-inch tablet in a Volkswagen Tiguan
Tools
- Metal scissors.
- File.
- Pliers.
- Steel plate (thickness not less than 1.5 mm, length not less than 270 mm, width 200 mm).
Sequencing
10" tablet mounted in holder
Video on the topic
Quick installation of a 7-inch tablet in SKODA Octavia
It should be noted right away that using this mounting method makes sense only in camping conditions, when the car owner urgently needs to install the tablet on the panel, and there is nothing at hand except a roll of electrical tape.
Sequencing
It's simple: you open the lid of the glasses compartment (in the SKODA Octavia, when open, it stands at an angle of 45 degrees, so it can be used as a stand), the tablet is placed in front of the lid and glued to it with a piece of electrical tape.
The glove compartment lid is used as a stand
Video on the topic
There are many ways to mount tablets in a car. It is simply impossible to list them all in one article, since they depend on the brand of the car and the size of the tablet. However, the most popular methods come down to either using bent metal profiles or embedding the gadget directly into the dashboard. All that is required of the car owner in this situation is to be smart.
pol-z.ru
Types of mounts for the navigator
Many people have probably seen only a few types of navigator mounts. In fact, there are many places in the car where you could install this indispensable device. And there are no less varieties of holders for navigators.
With suction cup
Holders with a suction cup have always been popular, and remain the most common type of mounting navigators in a car. They are small and convenient. You just need to attach the suction cup in the middle of the windshield and insert the navigator into the holder. This location of the navigator does not distract the driver from the road and at the same time gives him an excellent overview of the route.
This mount can be removed from the glass at any time. If the suction cup was made of high-quality rubber, then no marks will remain. If the rubber was of low quality, then small marks will remain. Many of them can be easily washed with soapy water.
The price of such holders varies from 400 to 800 rubles. The cost depends on the material of the case, as well as the size of the suction cup.
Steering wheel mount for navigator
There are holders that attach to the steering wheel. The navigator screen is located inside the steering wheel. Such fastenings should only be used if the path is laid along a straight road, without sharp turns. The holder must always be on top. Such mounts cost in the range of 150 – 300 rubles.
In addition to the navigator, you can also install your phone in this holder.
Important! You should not skimp on the materials from which the stand is made. If the mount is made of low-quality rubber, then at high temperatures it can simply “float” and begin to thin out the unpleasant odor.
You can make such fasteners yourself. In the video you can see exactly how to make it.
Mount for navigator on torpedo
The torpedo is an excellent place to install a navigator. The holder is not an eyesore. You can look at the route at any time without losing control of the road. Many people choose this holder because they are tired of the suction cups on the glass and purchase a mat with a special place for the suction cup in the center. The mat itself is anti-slip and attaches perfectly to the dashboard. The holder for the navigator with a suction cup is attached directly to the center of the mat.
Among the advantages of such a holder is shock absorption, due to which the navigator does not shake from side to side in small potholes. It holds well even on not very smooth surfaces.