I came across an interesting article on the Internet about how to make a microscope out of a smartphone. The process was described in great detail and in an accessible way - the author really understood what he was writing about. I even wanted to read the rest of his notes. But what a disappointment I was when I discovered that the note was translated and borrowed from a German site.
Among the creative intelligentsia, borrowing ideas is not particularly condemned. So I wanted to repeat the foreign experience and write more detailed material. It is not difficult to repeat the design of a table for a smartphone. The table can be made in one evening if you stock up on everything you need.
EVERYTHING YOU NEED FOR THIS ARTICLE IS HERE >>>
Four M8 x 100 mm bolts, M8 nuts and a pair of wings were purchased at the nearest hardware store.
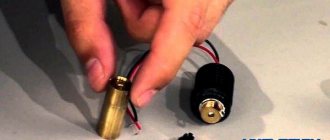
Turning your smartphone into a microscope is very simple: you just need to put a small lens on the camera lens. The lens can be removed from an old CD drive or from a laser pointer purchased at your local kiosk. But when you attach the lens to your smartphone. then you will encounter one problem: holding the smartphone level at a short distance from the subject is very difficult due to the small depth of field. This is where you need to start making a special table.
The base of the table is made from scrap boards 20 mm thick. Holes for bolts with a diameter of 8 mm are drilled in the corners. I got 3 mm thick plexiglass at work - I borrowed a stationery stand. From it I cut out a table cover on which there will be
lie smartphone. Just like in the base, holes for bolts are drilled in the cover. A subject table was cut out from the same stand to accommodate objects of study.
We secure the lid. It rests on four nuts and is secured with nuts from above.
Insert the bolts into the holes in the base. Their heads will be the legs of the table.
We fix the bolts with nuts.
Now we install the stage. The table rests on two wings, which also adjust its height.
A hole is drilled in the cover for the lens. Even two, since I managed to find two different lenses. The hole is drilled with a diameter smaller than the diameter of the lens, and then bored to the desired size with a round file. The location for the hole for the lens must be selected by placing the smartphone on the cover and marking the position of the camera lens with a felt-tip pen.
We make the hole conical (it tapers downwards) - then the lens fits into the hole and does not fall through. There is no need to secure the lens with anything.
Visually, the piece of glass for scrapbooking provides a very decent magnification.
Last year I ordered various pieces of glass for boxes from Ali. A bag of 20 transparent cabochons with a diameter of mm cost about a dollar. This cabochon was used as a lens.
Poppy flower, stamens. Shooting in the sun without a table, handheld. The magnification estimate is 30...40x.
The first object of study is a banknote. We fix the hundred-ruble note on the object table. We combine the lens with the lens, turn on the camera mode and place the smartphone on the cover. Next, using the thumbwheels, we adjust the position of the stage, trying to achieve maximum image sharpness.
Hundred ruble bill. The picture turned out to be quite clear, the image was slightly blurred only at the edges. The magnification estimate is 30...40x.
Dandelion under a microscope. Shooting without a table, handheld. Magnification estimate: 30,..40x.
Manufacturing
1) Disassembling the laser pointer and removing the lens.
For this we use the cheapest pointer, so do not buy expensive models for this. A total of 2 lenses will be needed. (You can skip this step if you buy the lens itself at the store.)
To disassemble the pointer, unscrew the back cover and remove the batteries. We extract all the insides using a simple pencil with an eraser. The lens is located in the lens, and to get it out you need to unscrew a piece of small black plastic.
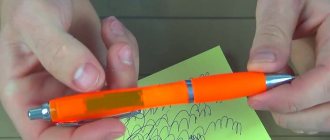
The lens itself consists of thin translucent glass, about 1 mm thick, you can attach it to the phone camera to experiment with an enlarged photograph, it is very difficult to take a high-quality photograph, so I decided to make a clamp for the microscope.
2) Making the base of the body.
The entrance was a piece of plywood measuring 7 x 7 cm, in which we drill 3 holes for racks (bolts). The places for drilling holes are shown in the photo with marks.
3) Preparation of plexiglass and lenses.
We cut out 2 pieces of plexiglass with dimensions: 7 x 7 cm and 3 x 7 cm. On the first piece of plexiglass we drill 3 holes according to the plywood template, this will be the upper part of the body. On the 2nd piece we drill 2 holes according to the plywood template, this will be the intermediate shelf of the microscope. When drilling plexiglass, do not press hard.
Now you will need to drill holes in the plexiglass for the lens and lens, this will require a D = D lens drill or slightly smaller. We make the final adjustment of the hole using round files or rasps. The lenses must be built into the drilled hole in both glasses.
4) Housing assembly.
When all the parts of the microscope are ready, you can begin the assembly itself, but before that there is still 1 point left: - you need to supply a light source from below, for this I drilled a hole in the lower part of the body for mounting a small diode lamp.
Let's start the final assembly. We tighten the bolts tightly to the base. The intermediate stand of the microscope with the o 2 lens must be placed up and down so that the size of the magnification can be adjusted with the optics.
To do this, tighten wing nuts and 2 washers onto 2 bolts and mount the glass with a 3*7 cm lens already glued in.
Then we install the top cover, here we already use ordinary nuts, but we place them on both the top and bottom.
Congratulations, you have just made a cheap digital microscope, here are some photographs taken with it.
DIY LENS FROM A LASER POINTER
Still, I wanted to improve the quality of the microworld images. “Perhaps if you used a real lens, the image would be better.” - I thought. On the way home from work, I bought a laser pointer at a newsstand for 150 rubles.
Microfont on a 500-ruble bill: the image was slightly blurred at the edges. The magnification estimate is 60...80x.
Fine river sand. It turned out to be a very beautiful photo!
I disassembled the device and got a small lens. The soft pad from the pointer also came in handy.
The lens with the gasket fit perfectly into the place of the cabochon. All that remains is to combine the camera lens with it. Surprisingly, the smartphone itself focuses the lens, taking into account another optical element. How he does this remains a mystery to me.
Experimenting with cabachon. I completely forgot that a good microscope should have a standard backlight. The better the subject is illuminated, the better the photo will be. This is where the powerful LED flashlight from the survival kit came in handy. By changing the angle of illumination of the subject, I achieved greater image sharpness.
Fragments of a mosquito that wanted to bite me. Shooting in reflected light, magnification rating - 60...80x.
Afterword
Make a microscope at the dacha - open a window into the microworld for children! Perhaps this experience will determine their future specialty.
© Author: Smirnov Yuri
What is the device used for?
In principle, the main purpose of any microscope is to magnify an object by several tens or hundreds of times. The presented devices are used not only in biology lessons at school, but also in medicine, electronics and other fields. For example, thanks to a digital microscope, it is possible to repair very small microcircuits, mobile and computer boards.
The most convenient is the electronic device, since it is capable of magnifying the object very much. It should be noted that building a microscope with your own hands is not difficult. You just need to know its structure and also collect the necessary materials.
What can the device be made from?
Naturally, you can construct a microscope with your own hands from scratch. However, often those people who understand electronics, computer technology and optics make the presented device based on other units: cameras, binoculars, web cameras.
Before starting to manufacture a structure, it is necessary to accurately determine its functions and select the necessary elements. It is also advisable to make a drawing of the device on paper. Naturally, all the necessary calculations are made.
We make the device from scratch: necessary materials and tools
In order to make a microscope with your own hands without ready-made instruments, you will need the following equipment:
Glass tube. Its length should be approximately 20 cm and its diameter up to 6 mm.
Several plates (preferably copper). The thickness of the metal should not be large (about 1 mm). As for the overall dimensions of the plates, they are 3*6 cm.
Several small pieces of glass.
Small diameter drill.
Gas-burner.
Hammer.
Screwdriver.
Nuts and screws.
If you do not have metal that will serve as a base for the structure, you can use thick cardboard. However, keep in mind that in this case the device will not be durable and will not last for a long time.
DIY microscope photo
The simplest electronic digital microscope can be made with your own hands using an old phone with a camera, although it is still better to use a smartphone (in our case, an iPhone) with a larger screen and a better camera.
The total magnifying power of the microscope can be up to 375 times, depending on the number and class of lenses used. By the way, when making microscopes we took the lenses themselves from an old laser pointer, but if you don’t have one, you can buy them cheaply in any Chinese online store.
The cost of a homemade microscope does not exceed 300 rubles, if we take into account the cost of materials:
Making a device: instructions
Before making a microscope, familiarize yourself with the sequence of work:
1. First of all, you need to make a small ball from a glass tube using a torch, which will serve as a lens for the device. Please note that this element should never be touched with your hands, as marks will remain on the surface, which will subsequently distort the image.
2. At this stage you need to make a housing for the lens. To do this you will need metal plates. To make the use of such a device convenient and safe, it is necessary to round the corners. Holes should be drilled in the “body”: 4 mounting holes and one inspection hole.
3. Now you can put the whole structure together. To do this, a “lens” is installed between the plates, and the body is bolted together. Next, on one side of the lens, using tape, you can glue the glass onto which the object will be placed.
This microscope design is manual and the simplest. The presented device can be used by adults and children at home. For professional work, you will need a more complex, digital device. Next you will learn how to build it.
Assembling the device
Quenching resistors with a nominal value of about 150 Ohms are placed in the breaks in the switching circuits of each of the lighting diodes.
To connect the supply wire, a mating part made in the form of a mini-connector is mounted on the ring.
The function of a moving mechanism that allows you to adjust the sharpness of the image can be performed by an old and unnecessary floppy disk reader.
You should take one shaft from the motor in the drive and then reinstall it on the moving part.
To make it more convenient to rotate such a shaft, a wheel from an old “mouse” is put on its end, located closer to the inside of the engine.
After the final assembly of the structure, a mechanism should be obtained that ensures the required smoothness and accuracy of movement of the optical part of the microscope. Its full stroke is approximately 17 millimeters, which is quite enough to sharpen the system under various soldering conditions.
At the next stage of assembling the microscope, a base (worktable) of suitable dimensions is cut out of plastic or wood, on which a metal rod selected in length and diameter is mounted. And only after that the bracket with the previously assembled optical mechanism is fixed on the stand.
How to make an electron microscope: necessary materials
To make the presented device, a webcam is usually used. Before making a microscope of this type, collect all the necessary material and tools:
Personal computer or laptop.
Webcam (preferably with manual focus). Please note that we will need a lens, so it should be easy to remove from the original device.
Several large and small corners, from which a stand will subsequently be built.
A steel tube of small diameter and a special mount that can move and be fixed on the metal surface.
A small mirror or flash from a mobile phone to create lighting.
Metal plate for making a platform.
Fasteners, as well as a hot glue gun.
Microscope from a webcam
Detailed instructions for making a USB microscope from a webcam. You can use the simplest and oldest model, but this will affect the image quality.
Additionally, you need optics from a sight from a children's weapon or other similar toy, a tube for the sleeve and other small items at hand. For backlighting, LEDs taken from the old laptop matrix will be used.
Making a microscope from a webcam with your own hands:
- Preparation. We disassemble the camera, leaving the pixel matrix. We remove the optics. Instead, we fix a bronze bushing in this place. It should match the size of the new optics; it can be turned from a tube on a lathe.
- The new optics from the sight must be secured in the manufactured sleeve. To do this, we drill two holes approximately 1.5 mm each and immediately make threads on them.
- We stick in the bolts, which should follow the threads and match in size. Thanks to screwing, you can adjust the focus distance. For convenience, you can put beads or balls on the bolts.
- Backlight. We use fiberglass. It's better to take double-sided. We make a ring of the appropriate size.
- For LEDs and resistors you need to cut small tracks. We solder it.
- Installing the backlight. To fix it, you need a threaded nut, the size is equal to the inside of the manufactured ring. Solder.
- We provide food. To do this, from the wire that will connect the former camera and the computer, we bring out two wires +5V and -5V. After which the optical part can be considered ready.
You can do it in a simpler way and make a stand-alone light from a gas lighter with a flashlight. But when it all works from different sources, the result is a cluttered design.
To improve your home microscope, you can build a moving mechanism. An old floppy drive will work just fine for this. This is a once used device for floppy disks. You need to disassemble it, remove the device that moved the read head.
If desired, we make a special work table from plastic, plexiglass or other available material. A tripod with a mount will be useful, which will facilitate the use of a homemade device. Here you can turn on your imagination.
There are also other instructions and diagrams on how to make a microscope. But most often the above methods are used. They may vary only slightly depending on the presence or absence of key parts. But, the need for invention is cunning, you can always come up with something of your own and show off your originality.
Instructions for making a digital microscope
Making a digital microscope with your own hands is very simple, you just need to follow a certain sequence of actions:
1. First you need to build a “skeleton” of the structure. To do this, you need to connect the metal plate to the corners. All elements can be bolted together. A small diameter metal pipe can be used as a tripod. It has certain advantages. For example, using special fasteners, you can screw another small piece of pipe to the vertical element, to which the lens will be attached. If necessary, you can raise or lower this element. In addition, to build a platform, you can also use a small cardboard box into which a tripod is inserted and filled with tile (or other) glue. Please note that the structure must be as stable as possible.
2. Next, you can make a focus adjustment knob. For this, a nylon thread (or elastic band), a movable sleeve, and an eyelet are used to fix the thread on a tripod. That is, you need to make a kind of gearbox, thanks to which the focusing accuracy of the lens increases.
3. Next, making an electron microscope with your own hands is simple. Now you need to unscrew the lens from the webcam. Do this carefully so as not to damage the element. Next you need to turn it over and put it in place. Use hot melt adhesive for fastening. The finished structure can be attached to the movable part of the tripod. Under it you should organize a subject table with lighting. For this, a regular LED is used.
4. Lastly, you need to process the webcam wire. That is, you should cut off its thick braid. In this case, it will become more flexible and will not interfere with the movement of the lens.
Now you know how to make a microscope with your own hands. Good luck!
Microscopes allow you to look at very small objects. With this portable microscope, you can see tiny things in great detail. You can explore plants, insects, even the ground can be impressive upon closer inspection!
Before this, I had already worked on projects for inexpensive devices, and a couple of months ago, as part of a scientific program, I began working on a homemade microscope at home.
The unique features of this microscope are:
- Free design that you can repeat
- Built-in illumination compartment - when you illuminate the microscope, many things become more visible
- It opens up a wide viewing angle so you can easily see the sample being examined.
A note about magnification: The mini microscope has two lenses: one approximately 0.6 cm in diameter (80x magnification), and the second approximately 0.24 cm in diameter (140x magnification). Despite the higher magnification of the second lens, I usually prefer to use the first, because the smaller the lens, the more light it needs, and focusing becomes more difficult and this leads to greater difficulties when studying samples. The large field of view of the larger lens makes it easy to use, and the 80x magnification is enough to see all the details invisible to the naked eye.
Read the article to the end and you will learn how to make a children's microscope with your own hands!
Alternative
If you don’t want to bother with assembling a microscope with your own hands, then you can buy a completely ready-made soldering device.
Pay attention to the distance between the lens and the stage. Optimally, it should be almost 2 cm, and a tripod with a reliable holder will help you change this distance. Zooming lenses may be required to inspect the entire board.
Advanced models of microscopes for soldering are equipped with an interface, which significantly relieves eye strain. Thanks to a digital camera, the microscope can be connected to a computer, record a picture of the microcircuit before and after soldering, and study defects in detail.
An alternative to a digital microscope is also special glasses or a magnifying glass, although a magnifying glass is not very convenient to work with.
For soldering and repairing circuits, you can use conventional optical microscopes or stereo. But such devices are quite expensive and do not always provide the desired viewing angle. In any case, digital microscopes will become more common and their prices will drop over time.
How to make a simple Leeuwenhoek microscope
First, we will learn how to make small lenses - glass balls with a diameter of 1.5 - 3 mm. Take a glass tube at least 15 - 20 cm long and 4 - 6 mm in diameter. Heat it in the middle over a fire until the glass softens, remembering to turn it around its axis all the time. Feeling that the tube has become plastic in the middle, sharply move its two ends apart. You will end up with two tubes with thin, long tips at one end.
Heat the tip over the flame of an alcohol lamp or gas burner so that surface tension forces form a glass ball at its end.
Place the glass ball into the recess using tweezers. Place the second plate on top and tighten them together using screws and nuts. (We specially made a collapsible design in order to experiment with balls of different diameters). The heads of the screws should be on the side of the protrusion of the viewing hole, because when viewing the microscope touches the skin of the face.
Now, using adhesive tape (tape), attach the cover glass from the school microscope along the contour to the copper plate opposite the viewing hole. (If you don't have one, a clear plastic piece cut from a plastic bottle will work). Place the object you want to view through the microscope opposite the viewing hole and cover it with a second cover slip. But you see in the photo that the object of observation is a simple thread.
The microscope needs to be brought to the eye itself and look through it at some light source. This could be a window on a bright sunny day or a table lamp. After this, an amazing microworld will open to you. A thread, for example, will look like a huge rope with broken cables sticking out. The leg of a common fly will most likely resemble the leg of an elephant, heavily covered with bristles. It is no less interesting to consider different liquids. If you look at watercolor paint very diluted in water, you can see the famous Brownian motion of paint particles in water. The milk will appear before you in the form of huge floating islands of fat droplets. Water from a nearby puddle hides an invisible world of microorganisms that do not even suspect that you are closely watching them. Frog blood looks absolutely stunning when viewed under a microscope.
We propose to create a medium-resolution electronic USB microscope at home for connecting to a computer via a USB cable. You may already have the parts needed to complete this project, otherwise you will have to buy them.
Necessary parts for assembling a homemade microscope with your own hands:
- One white LED.
- Wire with a cross section of 0.05 mm2.
- Heat shrink tubing or insulating tape.
- Glue gun (or any other suitable glue).
Phone platform
To get a clear picture of the sample, we need the entire setup to be stable. For this we use copper sheet to match the smartphone. The dimensions of the sheet will be only 2 mm larger than that of a smartphone in length and width
Now we have a platform that is suitable for our smartphone. The next step is to make holes for the lens and four screws. Before that, I should tell you something about the design. The phone holder requires a mechanism to allow the setup to be perfectly focused on the observed sample. To do this, I will use four screws that will allow me to change the distance between the lens and the sample. These screws will be placed at the four corners of the holder board. When drilling the hole for the camera, take a moment and mark the spot where the camera is located.
After drilling the holes, it's time to place the four bolt nuts in the corners. Use strong glue to place them perfectly aligned. Be careful not to spill glue onto the screw threads.
After installing the four nuts, it's time to place the lens. Before installing the lens, clean up the rough edges of the drilled hole. Then place the lens over the drilled hole. The 2mm hole fits the lens perfectly and does not fall off. Then glue the lens with a small amount of glue. This is the very difficult part. Be careful, any tiny offset can lead to a false result. The phone stand is ready!
How to make a homemade microscope
Ten centimeters long according to the diameter of the lenses. Then cut it in half to make two tubes five centimeters long. Insert lenses into them.
At one end of each tube, glue a cardboard ring or a ring glued from a narrow strip of paper with a hole ten millimeters in diameter. Place the lens on the inside of this ring and press it with a cardboard cylinder coated with glue. The inside of the tube and cylinder should be painted with black ink. (This must be done in advance)
Insert both tubes into the tube - the third tube is 20 centimeters long and has such a diameter that the eyepiece and lens tubes fit tightly into it, but can move. The inside of the tube should also be painted black.
Draw two concentric circles: one with a radius of 10 centimeters, the other with a radius of 6 centimeters. Cut out the resulting circle and cut it into two parts along the diameter. Using these semicircles, make a C-shaped microscope body. The semicircles are connected with three wooden blocks, each 3 centimeters thick.
The upper and lower blocks should be 6 centimeters long and 4 centimeters wide. They protrude 2 centimeters beyond the inner edge of the plywood semicircles. Attach the tube with tubes and the adjusting screw to the top block. For the tube, cut a groove in the block, and for the adjusting screw, drill a through hole and hollow out a square recess.
A – tube with lenses; B – tube; B – microscope body; G – connecting blocks; D – adjusting screw; E – stage; F – diaphragm; Z – mirror; And - stand.
The adjusting screw is a wooden rod onto which a cylinder cut from a pencil eraser or wound insulating tape is tightly seated. It is best to use a small piece of suitable rubber tubing for this purpose.
The screw is assembled like this. Cut the block in half lengthwise. We thread the screw rod into the hole in one half, place a rubber cylinder on it, then thread the other end into the hole in the second half of the block and glue both halves together. The rubber cylinder should fit in the square recess and rotate freely in it. We glue the block with the screw to the plywood semicircles, making cutouts at their ends for the screw core. At the ends of the rod we attach handles - halves of a spool of thread.
Now attach it to the block using a bracket bent from tin. First, make cutouts in the bracket for the screw and nail it or screw it to the block with screws.
The rubber cylinder of the adjusting screw should be pressed tightly against the tube; when the screw rotates, the tube will move slowly and smoothly up and down.
The microscope can be made without an adjusting screw. In this case, it is enough to glue the tube to the top block, and point the device at the object only by moving the tubes with lenses in the tube.
Nail or glue an object table on top of the bottom block - with a hole about 10 millimeters in diameter in the middle. On the sides of the hole, nail two curved strips of tin - clamps that will hold the glass with the drug in question.
Attach a diaphragm to the bottom of the object table - a wooden or plywood circle, in which four holes of different diameters are drilled around the circumference: for example, 10, 7, 5 and 2 millimeters. Secure the diaphragm with a nail so that it can be rotated and so that its holes coincide with the hole in the stage. Using the diaphragm, the illumination of the preparation is changed and the thickness of the light beam is adjusted.
The dimensions of the object stage can be, for example, 50x40 millimeters, the diaphragm size is 30 millimeters. But these sizes can either be increased or decreased.
Below the object table, attach a mirror measuring 50x40 or 40x40 millimeters to the same block. The mirror is glued to the board, two nails without heads (gramophone needles) are hammered into it on the sides. Using these nails, the board is inserted into the hole of a tin bracket screwed to the block with a screw. Thanks to this fastening, the mirror can be rotated and installed at different angles on the hole in the object stage.
Use the third connecting block to attach the microscope body to the stand. It can be cut from a thick board of any size. It is important that the microscope rests firmly on it and does not wobble. Cut a straight spike from the bottom of the block, and hollow out a nest for it in the stand. Lubricate the spike with glue and insert it into the socket.
The microscope is adjusted by turning the mirror, moving the tube and tubes with lenses in the tube with a screw, magnifying the image 100 times or more.
I came across an interesting article on the Internet about how to make a microscope out of a smartphone. The process was described in great detail and in an accessible way - the author really understood what he was writing about. I even wanted to read the rest of his notes. But what a disappointment I was when I discovered that the note was translated and borrowed from a German site.
Among the creative intelligentsia, borrowing ideas is not particularly condemned. So I wanted to repeat the foreign experience and write more detailed material. It is not difficult to repeat the design of a table for a smartphone. The table can be made in one evening if you stock up on everything you need.
Four M8 x 100 mm bolts, M8 nuts and a pair of wings were purchased at the nearest hardware store.
Turning your smartphone into a microscope is very simple: you just need to put a small lens on the camera lens. The lens can be removed from an old CD drive or from a laser pointer purchased at your local kiosk. But when you attach the lens to your smartphone. then you will encounter one problem: holding the smartphone level at a short distance from the subject is very difficult due to the small depth of field. This is where you need to start making a special table.
The base of the table is made from scrap boards 20 mm thick. Holes for bolts with a diameter of 8 mm are drilled in the corners. I got 3mm thick plexiglass at work and borrowed a stationery stand. From it I cut out a table cover on which there will be
lie smartphone. Just like in the base, holes for bolts are drilled in the cover. A subject table was cut out from the same stand to accommodate objects of study.
We secure the lid. It rests on four nuts and is secured with nuts from above.
Insert the bolts into the holes in the base. Their heads will be the legs of the table.
We fix the bolts with nuts.
Now we install the stage. The table rests on two wings, which also adjust its height.
A hole is drilled in the cover for the lens. Even two, since I managed to find two different lenses. The hole is drilled with a diameter smaller than the diameter of the lens, and then bored to the desired size with a round file. The location for the hole for the lens must be selected by placing the smartphone on the cover and marking the position of the camera lens with a felt-tip pen.
We make the hole conical (it tapers downwards) - then the lens fits into the hole and does not fall through. There is no need to secure the lens with anything.
Visually, the piece of glass for scrapbooking provides a very decent magnification.
Last year I ordered various pieces of glass for boxes from Ali. A bag of 20 transparent cabochons with a diameter of mm cost about a dollar. This cabochon was used as a lens.
Poppy flower, stamens. Shooting in the sun without a table, handheld. The magnification estimate is 30...40x.
The first object of study is a banknote. We fix the hundred-ruble note on the object table. We combine the lens with the lens, turn on the camera mode and place the smartphone on the cover. Next, using the thumbwheels, we adjust the position of the stage, trying to achieve maximum image sharpness.
Hundred ruble bill. The picture turned out to be quite clear, the image was slightly blurred only at the edges. The magnification estimate is 30...40x.
Dandelion under a microscope. Shooting without a table, handheld. Magnification estimate: 30,..40x.
Creating a microscope stand
Up to this point we have completed the holder. So now we need a sample podium. I chose a glass plate for this purpose. This allows the sample to be placed directly on the podium. While the smartphone can move freely and observe any part of the sample. It might be a little confusing for you, but it will be clear in the pictures.
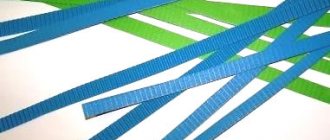
In order to see through this microscope, we need light. To make room for lighting, I raised the stage using four PVC pipes cut to equal lengths of about 5cm. We then install the lighting method under the glass stage. In my case I use the phone's flashlight. It's easy and perfect for this project. I tried many light sources, but a smartphone flashlight gave the best results.
Checking our homemade microscope
Now we have a finished microscope. Let's see how to work with this. First of all, we must balance the phone platform. To do this, by turning the four screws, you can change the height of the phone holder. Keep the height at about 2-3mm. Okay, now you have to place your phone's camera perfectly aligned with the lens on the phone's platform. This can be done by turning on the camera app and aligning it until you get the perfect image.
After that, we need a sample to observe. As you can see in the image, I placed 2 bulbous fabrics. Since we have enough space, it is possible to place more than one sample. Then turn on the flash. You can now slide the phone platform onto the glass until the camera image shows a focused image of the fabric. Focusing can be done using the two screws that are closest to the camera.
Results of experiments under a homemade microscope
You won't believe the results of this microscope. It's hard to believe that it is possible to get such results with this simple DIY microscope. The approximate magnification is around 200x. Below are the results under this homemade microscope.
Onion skin under a microscope
cell walls and nucleoli are clearly visible.