To quickly clean hard-to-reach areas of the workshop workplace, your son’s computer and other household appliances from dust, I made my own mini vacuum cleaner. To make it, you only needed two plastic containers, a small engine and one free evening. The design turned out to be not only useful, but also easy to use.
A protective casing made of sheet metal (photo 1) d 100 mm was attached to a 12 V DC motor on the axle side.
I made an impeller from plastic (photo 2) - I cut out a circle d 95 mm with a jigsaw and glued ribs measuring 30x15 mm to it on one side perpendicularly. The finished part was fixed on the motor axis with glue from a hot-melt gun.
EVERYTHING YOU NEED FOR THIS ARTICLE IS HERE >>>
I assembled a garbage container from a cut PET bottle and a plastic bucket. I installed a tube from a syringe into the upper part of the body to attach the hose.
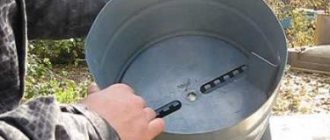
I made an air intake from a tin can of the required diameter (must match the diameter of the PET bottle) (photo 3). I drilled several 5 mm holes in the walls of the container, and fixed a cut-off tube from a syringe in the bottom in the center.
I secured the part to the engine protective casing with bolts so that the gap between the impeller and the bottom of the intake was approximately 7 mm.
I installed the finished unit (motor with intake) into the housing and drilled holes in the plastic at the level of the holes on the intake. The connection point was coated with superglue for reliability and rigidity of fastening.
To connect the device to the network, I soldered the 12 V power supply wires to the motor contacts. A hose was secured to the tube in the housing using a metal adapter.
The mini vacuum cleaner has proven itself well - it is in no way inferior to its large counterparts and easily copes with its task.
Construction vacuum cleaner from an old household one
If you constantly deal with technology, the design features and operating principles become clear.
And if necessary, you will no longer spend money on a branded construction vacuum cleaner, but in a couple of evenings you will make a device whose characteristics are not inferior to the popular “cleaner”.
This is what the author of the construction model, based on the failed Whirlwind vacuum cleaner, did. We invite you to get acquainted with the manufacturing process of a construction vacuum cleaner.
When making a homemade product, you should take into account the characteristics of the room and some nuances of the selection and fastening of individual structural elements. The following are useful guidelines for assembling a vacuum cleaner.
What will be needed for the remodel?
Literally all the products involved in the modernization have already been used and therefore do not require acquisition costs. If you don’t have any parts on hand, you can buy them for pennies on an online sales site or find them in a landfill.
True, it is still recommended to use a new filter - for high-quality operation of the vacuum cleaner, and also to buy some little things: a socket, parts for the electrical board, wires, fasteners.
The total cost of purchasing new parts was 800 rubles, and the most expensive element was the socket - 350 rubles. Parts for the board cost 250 rubles, the filter – 200 rubles.
In addition to the listed parts, you will need a socket, a piece of rubber car mat for laying, and a tool for the job:
- drill with a set of crowns and drills;
- screwdriver;
- jigsaw;
- pencil with ruler, compass.
The fastening elements will be not only self-tapping screws, but also bolts, so to tighten the nuts you will need wrenches of the required size. To connect individual elements - switch, electronic board and network cable - you need to draw a diagram in advance.
In order for the improvement of an old device to please you with a successful result, you need to know how a vacuum cleaner works. This way it will be clearer to the home craftsman what he is upgrading and for what purpose.
Step-by-step manufacturing instructions
When all the parts of the future unit and tools are prepared, you can begin assembly. But first you need to comply with safety standards - wear special clothing and work gloves.
- Step 1 - installation of the outlet . Using a bit with a diameter of 42 mm, we drill a hole in the upper part of the lid. Between the socket and the body we place a rubber gasket cut from a car mat. For fastening we use self-tapping screws.
- Step 2 - installation of the electrical circuit . On the lid we drill small holes for the toggle switch and for attaching the circuit. The board should not touch the body, so we install it on stands cut from a fountain pen.
- Step 3 – attaching the toggle switch . As a result, a switch and socket for power tools must be installed on the outside of the cover, and an electronic board on the inside.
- Step 4 – connecting the power cable . It is better to solder the cable, with two wires going to the switch, and the third grounding wire goes to a large mounting screw, to which the “ground” from the socket is already connected. This is necessary to ground the device.
- Step 5 – fixing the filter . We cut 95 mm holes in the bottom of the dust collector and in the lid of the tank, drill holes for screws around the circumference, cut out a plug from plywood, and tighten all the parts with screws. We fix the filter with a pin on the bar.
- Step 6 - installation of the suction pipe . Use a 57 mm bit to drill a hole in the top of the tank. We insert into it a pre-assembled pipe with a flange, which can be constructed from a piece of sewer pipe.
- Step 7 – assembling the vacuum cleaner . We install a waste collection tank and close it with a lid so that the filter is inside. Then we attach part of the old vacuum cleaner with the motor and tighten it with a metal clamp.
- Step 8 - connecting the hose . Instead of a hose, you can use a plumbing corrugated pipe. We insert it into the connecting pipe, then turn on the unit. Testing can be done by removing sand or sawdust.
How to connect the device?
Before connecting the vacuum cleaner, you must make sure that its housing is sealed and no water will enter it. To connect, you need to take a corrugated hose and secure it to the place of water intake .
The first way to connect a hose is to purchase a sewer adapter. But it must be the right size, otherwise there will be no tightness. The second method is to use a plunger (or bottle) in which a hole is made. You need to insert a small piece of PP pipe into it so that there is also a tightness.
You also need a handle from a vacuum cleaner or any other pipe 1-2 m long to make it convenient to pass along all the walls. The pipe plays the role of a handle in this case, and its dimensions depend on the height of the person, the diameter and height of the pool.
Manufacturing a complex cyclone
Assembling the cyclone is a little more difficult due to the larger number of parts. In addition to a smooth juice bottle, you will need disposable syringes, plastic jars, a motor and a DVD for the propeller.
Assembly of the cyclone consists of the following steps:
Leave 2-3 cm from the bottom of the bottle and draw a line around the circumference with a marker. Stepping back from the markings about 10 cm, draw another line. Using a sharp knife, cut the container to create a lower part with a bottom, a neck and a ring.
Two plastic jars with lids are selected according to the diameter of the bottle. The upper threaded part is cut off with a hacksaw.
The hot gun is heated until the rod begins to melt. Do not overheat to avoid melting the bottle. The cut thread from the jar is glued to the cut of the top of the bottle with the neck.
The pistons are pulled out from two disposable 20 ml syringes. Using a hacksaw, cut off the upper parts where the needle is put on. On one syringe, the back part with the handles is sawed off.
The syringe with both sides cut off is applied with its end to the side of the bottle near the glued thread from the jar. Make a mark with a marker and cut out an oval hole. The syringe is inserted at an angle, the inside of the bottle is marked with a marker where the protruding part is cut and the excess piece is sawed off. The resulting blank is glued with a hot gun.
For the compressor housing, take a ring cut from the bottle. On one side, glue the second thread from the jar. The lid is glued to the other side with the thread facing outward.
A hole is cut in the center of the glued lid, the second syringe is placed vertically and glued with a hot gun.
A hole is cut in the center of the second cover for the motor shaft. The electric motor is bolted. The shaft should go inside the cover from the thread side.
The DVD disc is split into two parts. The sawn-off part of the syringe with a protrusion for the needle is glued to one half. This will be the socket for mounting the impeller on the shaft. The diameter of the disk is adjusted to the compressor housing, cutting off the edges with scissors.
Rectangles are cut from the second half of the disk. These will be the fan blades. The surface of the disk is divided into 8 equal segments. Glue the cut rectangles strictly along the lines with superglue.
The finished impeller is mounted on the motor shaft. Ventilation holes are burned around the circumference of the compressor housing with a soldering iron.
For the dust collector, take a plastic round container. A hole is cut in the center of the lid. The top of the plastic bottle cap is cut off. The resulting threaded coupling is glued to the lid of the container where the hole is cut.
All details are ready. Now you need to assemble the cyclone. A dust collector is screwed to the top of the bottle with a neck. The compressor housing is screwed onto the free thread, and a cover with a motor is placed on top.
Connect a hose to the cyclone pipe and try to apply voltage to the motor. If the suction is weak, look for air leaks at the threaded connections. The problem is eliminated by installing gaskets or wrapping FUM tape around the thread. The power of a cyclone is superior to that of a simple bottle vacuum cleaner. The homemade product is capable of sucking up sawdust and other small grains along with dust.
When using a regular vacuum cleaner to collect sawdust, the bag fills up very quickly. I solved this problem for myself - I assembled a cyclone or separator for working with power tools. Assembled from affordable and cheap materials: - an empty 19-liter bottle; — fitting for sewerage 40 mm. (with a 90 degree bend); — coupling and clamp also 40 mm; — polypropylene pipe and fittings 20 mm; — an old hose from a vacuum cleaner; - plastic bag and elastic band.
How to make a centrifugal fan
From what has been said, the obvious way to achieve this is to remove the tangential fan from the hood, for example. Advantage: Silent operation is ensured. The manufacturer complies with the norms prescribed by the standards, so factory-made devices of the hood class are relatively quiet. We believe that for most readers this is not the best solution to the problem, let’s continue our consideration.
Vacuum cleaner
Inside the vacuum cleaner there is a ready-made centrifugal fan. A big plus is that there is already a ready-made housing that needs to be mounted in the channel on site. Additional benefits include:
The disadvantage of the vacuum cleaner engine is noise. In addition, the commutator motor sparks, which creates interference along the power supply. You will need to make a surge protector so as not to burn out your imported home equipment. The noise level is high. Exceeds 63 dB allowed to be produced in an apartment by law.
Washing machine
What else can you use to assemble a centrifugal fan? The image of a front-loading washing machine came to mind. If you remove the door and make channels in the housing so that the flow cools the motor windings, you will get a centrifugal fan. Plus - the working compartment of the washing machine is sealed. Simply remove the tank wall near the engine to create something like a centrifugal fan. The drum will have to be radically redesigned to capture air. The housing will need to be disassembled.
The main dilemma arises: is it worth dismantling the tank? Most models are specially designed so that the operation cannot be performed without damaging the fasteners. This helps service centers track the sly ones doing the repairs. In any case, the drum is cut in place to make blades in the walls. Bend the steel inward so that the structure does not touch the tank. Option: from the walls of a steel cylinder, and bend the blades of the desired shape in the image and likeness of factory industrial models of centrifugal fans.
The main thing seems to be the correct selection of speed. 1000 spin rotations is quite enough. The drum diameter is large. The vacuum cleaner produces 6000-16000 rpm, but the radius of the blades is much smaller. Therefore, it is necessary to estimate the linear speed. As you know, the circumference is directly proportional to the radius, therefore, if the diameter of the drum of a Samsung washing machine is 45 cm, it is at least three times larger than that of a vacuum cleaner - equivalent to a speed of 3000 revolutions per minute (minimum). But! In this case, the wheel area is much larger, therefore, the flow is enormous.
From the above, we conclude that a speed of 1000 rpm, especially 1500 rpm, is enough to independently make a centrifugal fan from a washing machine. The performance is approximately the same, but the specific flow pressure will be reduced. Much depends on the shape of the blades; we strongly recommend that you inquire on the forum of physicists and hydraulics. The simplest option is to borrow a blade from a floor fan. The plastic is welded using a set of plastic bags and a soldering iron, which will strengthen the flywheel on the shaft.
The main thing is to maintain tightness. It is recommended to seal the extra holes that abound in the drum. A homemade centrifugal fan from a washing machine is dangerous to operate (if there are safe tangential fans), it is recommended to close the hatch for loading laundry with a strong grille. For example, make a number of holes on the front side of the case for installing the element. The centrifugal fan device is complemented by a durable fence. Make the grate from a steel rod and fasten it with bolts.
Abstract of GCD for design in the senior group “Our assistant is a vacuum cleaner”
Tatyana Mityurina
Summary of GCD for design in the senior group “Our assistant is a vacuum cleaner”
— clarify the characteristic features of the vacuum cleaner (body, log, tube, brush, cord)
;
— consolidate skills of communicative behavior;
— expand and activate children’s vocabulary on the topic “Household Appliances”
;
-continue to strengthen the ability to use scissors;
— to cultivate interest in artistic creativity, independence, and artistic taste.
Looking at pictures of household appliances, watching the work assistant cleaning the group the vacuum cleaner itself , playing the game "Repair Shop"
,
“Collect an object”
,
“Guess what object”
,
“Every object has its time”
, guessing riddles….
Material for nodes: empty toilet paper tubes, circle stencils (4 pcs.)
vacuum cleaner wheels , circle stencils for the vacuum cleaner (2 pcs., a strip of colored paper (hose, a strip of colored cardboard (tube), a ready-made “brush”
made of cardboard, scissors, glue.
- Guys, Kuzya the brownie came to visit us. Say hello to him.
The children greet Kuzya and look at him.
The teacher draws the children's attention to the fact that Kuzya is sad and needs to find out why.
Children ask Kuza the brownie questions about his mood (for example: “What happened?”
,
"Why are you sad?"
and others).
- I heard from a magpie that soon all the brownies will disappear, because people have new helpers . helpers are these , I don’t even know?
- We, Kuzya, will help and tell and show you everything.
-Guys, let's show Kuza what objects make a person's work easier in everyday life, does everything quickly and efficiently? (children take turns showing pictures and briefly talking about the object - meat grinder, microwave oven, vacuum cleaner , washing machine).
-Now find the items that make our lives more convenient and comfortable? (radio, player, fan, lamp, sconce)
.
-What general word can be used to call these objects? (Household appliances, household appliances)
.
-Good helpers are smart and powerful . But my broom disappeared somewhere, and now I can’t even clean the house? What to do…. You'll have to go to Nathan...