- Pros and cons of making it yourself
- Safe materials
- Metal option
- Wooden option
- How to make a fireproof safe
- DIY safe: drawings and dimensions
- List of materials and tools
- Step-by-step instruction
- Step one - the main part
- Step two - door
- Step three - lock
- Step four - secret compartment
- Step five - finishing touches
- Advice from professionals
The main purpose of any safe is to protect valuable items and money savings, which is provided by durable materials and special locks that are resistant to burglars. Additional reliability is guaranteed by fastening to a stationary surface. Considering all these factors, hiding places are simply necessary for people who have large sums of money, weapons, and jewelry. Manufacturers offer a huge number of models that can satisfy the needs of even the most demanding customers. Fire-resistant, burglary-resistant, combined, of various sizes and designs - there are a lot of options. But often people who want to purchase a small structure for personal use are deterred by high prices. In this case, you can make a safe yourself. In this article we will analyze this process in detail, consider all the possible advantages and disadvantages of homemade products.
General requirements
The main legislative document regulating the standards for storage of this type is the Order of the Ministry of Internal Affairs of April 12, 1999, number 288. Its provisions establish that a gun box made by yourself or purchased must be 100% made of high-strength metal with a wall thickness of at least 0.3 see. It is mandatory to have 2 locks, keys or codes that only the owner has.
It is important to note the following nuance: if you plan to place only weapons inside, the wall thickness can be 0.2 cm; if additional ammunition will be placed inside - from 0.3 cm.
Structured Requirements
Article 166 establishes clear standards in accordance with which homemade safes for hunting rifles and other weapons must be made.
Gunpowder can only be stored if the walls are thicker than 3 mm.
Ammunition must be stored separately and quickly provided with an individual lock.
The structure can be installed on the floor and attached to the floor covering or mounted into a wall. The fastening system used for this purpose must be strong and durable so that intruders cannot remove the cabinet.
Additional compartments may be provided inside to place valuables or bladed weapons.
Advice from professionals
Experts advise choosing a safe that best suits the consumer’s needs. When creating generalized requests for safe characteristics, you need to pay attention to the following factors.
- Burglary resistance. Determine the reliability parameters of locks that can be installed in the cache and select the highest ones.
- Quantity and standards of locking elements. The more locking points of a non-standard device are introduced into the safe, the greater the likelihood of the safety of the contents.
- Combination of different types of locks. Keys with code or screw, electronic.
- Loop location. Hidden hinges are more reliable than external ones.
Standard sizes
How to make a safe for guns and weapons with your own hands using a video? This question must be answered before purchasing your own weapons. It is important to take into account that the dimensions of the structure are determined by the features of the purchased equipment, for which the cabinet is assembled. For a small pistol, a box with modest dimensions is quite enough, but if you plan to expand your personal collection in the future, it will be useful to immediately make a large metal cabinet.
Below are the most popular weapon models in Russia today and their lengths (all 12 gauge):
- IZH-27 – 116.5 cm.
- Remington (made in America) – 71 cm.
- Binelli (made in Italy) – 130 cm.
- Izhevsk gun - 128 cm.
Knowing these indicators, you can first draw up drawings of a safe for a hunting rifle with your own hands. If you haven’t found the model you need, you can find a passport for the specific desired option on the Internet.
Pros and cons of making it yourself
Before you start working on a future cache, it is recommended to think carefully about all the advantages and disadvantages. Among the positive characteristics are the following:
- The cost is significantly lower than the market price.
- It is possible to make a storage unit that will fit perfectly into the interior of the room.
Main negative points:
- This is a difficult, painstaking process.
- There is no certainty that the product will be made with high quality, and this is the main guarantee of the safety of the items placed in it.
- You will not be able to independently determine the degree of resistance of the cache to hacking.
- Homemade models usually use simple locks that an experienced burglar can easily pick up master keys for.
So, professionally made products are the key to the safety of your belongings. But, if you still decide to do this work yourself, we will look in detail at how to do it and what you will need for this complex process.
Drawing up drawings
Before manufacturing, any design is first developed on paper. The most detailed diagrams and drawings are drawn up, which subsequently simplify the process of producing parts and the entire assembly. This stage makes it possible to simplify the task as much as possible in the future and protect against unforeseen difficulties caused by connecting parts of different sizes.
It must be emphasized that the scheme must take into account the length and type of weapons stored, their quantity and existing features.
Make your own DIY gun safe design today using the following guidelines:
- Parameters such as depth, height and width are individual parameters, so they must be calculated independently, taking into account the overall characteristics of the specific selected weapon model.
- Be sure to take into account the current or planned total number of shotguns, rifles, ammunition and other products that will be placed for storage in the cabinet being assembled.
- Each product placed must have a minimum width of 30 cm.
- Be sure to leave 20 cm for accessories.
DIY safe: drawings and dimensions
The parameters of the future product are determined, first of all, by its purpose, that is, by those things that will be placed inside for storage. Then all the indicators are transferred to paper or cardboard, and a drawing is made. It displays the front, back, side walls, location of hinges, doors, and locks.
It is important to remember here that when storing certain items you will need to follow the standards prescribed by law. For example, in a weapons cache, the wall thickness must be at least 3 mm. In this case, the height, depth and width depend on the largest object that is planned to be placed inside. It is recommended to add a small reserve to these parameters for comfortable placement and removal of certain things.
Tools and materials
So, we have found out the dimensions of a homemade gun safe with a drawing, now we begin to prepare the necessary materials and equipment so as not to be distracted during the work itself. We prepare the following:
- Sheets of metal from which we will subsequently assemble the frame and walls. Above we discussed how thick they should be.
- Ruler or tape measure for taking measurements.
- High quality fireproof locks. If you want, you can use several different locks, but 2 mechanisms for the main compartment and 1 for the department with cartridges and ammunition are required.
- Metal corners or profiles with a square-shaped section. The main purpose of these elements is to make connections and organize additional cameras.
- Door handles.
- Welding machine.
- Canopies. Their number directly depends on the size, age and number of doors.
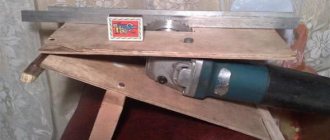
- Grinder with a disc for cutting metal to the desired shape.
The list above is minimal - only what is absolutely needed. If necessary, it can be expanded and supplemented depending on the tasks at hand.
Step-by-step instruction
Drawing of a small safe for documents, money or tools (pictured 2):
- side wall;
- loop sockets;
- top part;
- back wall.
Step 1
Using a grinder and a cutting wheel, cut off blanks from the metal corner, the length of which should be equal to the overall dimensions of the future safe. Number of corner strips – 8 pcs.
Step 2
Weld the workpieces together as shown in photo 3. Clean the seams as much as possible to prevent scale from getting between the frame and the outer walls and disturbing the geometric shape of the safe.
To strengthen the structure, you can weld longitudinal and transverse strips parallel to the planes of the walls, which can be used as seats for the shelf. It will be attached to them using bolted connections, for which holes of the appropriate diameter must be drilled in the jumpers.
If this is not done in advance, drilling holes in the lintels of the assembled safe will be a very difficult process.
Step 3
Weld blanks for the walls, bottom and top to the frame. All parts must fit tightly to each other at the points of contact - at the corners. The presence of cracks is unacceptable.
Stages of work
Experts distinguish 3 main stages: preparation, main and completion. During the preparatory period, it is important to purchase everything you need for a DIY gun cabinet. Next, a drawing is prepared, according to which the metal sheets are subsequently marked. All measurements and markings must be carried out using a tape measure or ruler, which will ensure a high degree of accuracy. You can use chalk for markings.
Then the racks are cut, the front and rear products correspond to the length of the entire structure and are the longest. The short racks are equal to the width and depth of a DIY gun or pistol safe. A stand is also required to secure the door (as a rule, its height is less than the entire cabinet). For example, if the height of the storage is 140 cm, the door does not exceed 120-130 cm in length. For door installation, you must use 4 additional shortened strips. When working with racks, the last element is the fastening element; their length should be 5-6 cm less than the depth of the finished structure. Then you can start cutting sheets for the walls.
At the end of the preparatory period, it is imperative to check whether everything was done correctly and corresponds to the drawn up plan.
The main stage is the most difficult to perform, as it involves electric welding. The main task here is to weld the prepared elements. First, the prepared racks are welded, and after that the assembled frame is sewn up with metal sheets. Please note that during the process you must constantly ensure that the corners are clear and straight. Otherwise, the structure will be crooked and the door will not open/close correctly. The result is a metal box - the basis for the future storage.
Now let's take a closer look at several of the listed points in the process of how to make a gun safe with your own hands, and then return to the final stage.
How to make the most clear diagram and accurately determine the dimensions
When calculating dimensions, as mentioned earlier, the characteristics of the gun are first taken into account. If this is assembled equipment, 10-15 cm is added to its length. If this is a non-dismountable weapon, the optimal length will be 130-140 cm. The height of the cartridge compartment is 30-40 cm. The golden mean in terms of depth is the 40 cm mark, with If necessary, the value can be increased. The average width is 40-50 cm. It can be increased if shelves are provided to accommodate specialized care products and accessories.
Cutting blanks
Previously, we looked at the method of preparing blanks for a hunting safe with our own hands. Here we will summarize what parts you should end up with: walls, doors, internal partitions and shelves (if necessary), frames (for compartments).
Making a frame and assembling a safe
Welding metal parts is not an easy task. Therefore, if there are no special skills or they are not well developed, we recommend using qualified specialists. Welding points are placed inside the structure and are made 10-15 cm apart. If you are wondering how to weld a gun safe with your own hands, use this algorithm:
- The assembled frame is welded to the rear surface. To make work easier, place the products horizontally on a plane where it will be convenient to work.
- After this, the remaining walls are welded. When the conventional frame is ready, the side corners are attached to strengthen the front panel, to which the door and its panel are subsequently fixed.
- It is necessary to install a stiffening rib along the entire door perimeter and provide holes for locking mechanisms.
- The entire previously assembled box is again installed horizontally on its back side as carefully as possible in order to begin fastening the door. Fastening is carried out using hinges for a gun safe, which are placed in the frame corners.
- We weld the ammunition compartment and install it inside. For its internal installation, we make holes for bolts on the back surface, and install corners for shelves on the side. Shelves can be made from various materials: metal (the most reliable option, but has significant weight), natural wood, modern high-strength plastic.
Stiffening
After welding is completed, you need to strengthen the entire structure by framing its front part with metal corners. First, the corners are installed on the sides outside, and then inside. In this case, the seams should not be visible from the outside.
Making the front door of the safe
The door leaf must be durable, so sheet metal remains the best option for its manufacture. And also a mandatory element is a reliable corner that protects against attempts by intruders to dismantle it. First, the frame is assembled, and then the corner is mounted (one or, if necessary, several). When the above steps are completed, proceed to the installation of locking mechanisms.
First, holes are made for two wells. Only after this do they proceed directly to the installation of the door structure.
The canopies are welded to the corners and walls of the assembled metal box. For this purpose, it is recommended to use the electric rivet technique. When implementing this method, welding is performed through holes made for self-tapping screws. This technique allows you to reduce to a minimum the number of holes in the material and the number of unnecessary welds.
Making a cartridge box
A safe for a handgun or any other type of weapon ideally has a compartment for storing ammunition, which, according to current Russian legislation, must be placed in specialized places designated for this purpose. Such places include a cabinet assembled by yourself.
First, the small compartment itself is welded, which will be located separately from the weapons. Then it is welded to the walls.
Completion of work
So, all the elements are installed. A couple of final points remain. First of all, it is necessary to install the locking mechanisms. There are currently no strict requirements for their selection. It is important that they are fire resistant. Therefore, the simplest option is to install a locking lock.
And the final stage is painting the created gun safe with your own hands according to the drawings and photos. This stage can be omitted if the purely functional component without aesthetic aspects is important to you. The interior of the cabinet can be trimmed with leatherette. To ensure maximum reliability and protection from dust, a rubber seal can be made around the perimeter of the door.
How to make a fireproof safe
Such modifications help protect valuables not only from burglars, but also from fire. In such a cache, two-layer walls are provided, between which a fire-resistant layer of soft sheet asbestos is installed - it is laid in several layers - or of a heat-resistant cement-sand mixture. Therefore, before you make a homemade fireproof safe for money, documents or other valuables with your own hands, make sure you have the following materials:
- Metal sheets (not thinner than 2 mm).
- Accessories.
- Locks.
- Fireproof component.
For greater safety in storing things during a fire, it is recommended to install doors with a thickness of at least 5 mm. In this case, the door is also made of two layers. A lock is installed inside it, and the remaining space is filled with a fire-resistant mixture or sheet asbestos. Experts advise mounting such products on the wall.
So, we make a fireproof safe with our own hands. To do this, we will weld 2 boxes from metal. The first of them will serve as the main building. The second base should be at least 5 cm smaller. We insert the smaller metal box into the larger one, and fill the space between the walls with fireproof material. Then we weld the connecting jumpers - this way the inner box will be attached to the outer one.
Draw your attention to! Experts say that when creating a fire-resistant hiding place at home, it is almost impossible to get 100% of the expected results. There is no guarantee that it will be completely resistant to high temperatures. Only factory structures manufactured using the most modern technologies, in compliance with established norms and standards, will be able to protect your valuables from fire.
Additional events
So, we have analyzed the diagram of a gun safe. However, it is important to note that there are a number of important nuances:
- For maximum security and protection, corners can be added to the front.
- To prevent the gun from being scratched during storage, the inside of the structure can be lined with soft material. All seams must be inside after welding is completed.
- If you make several additional corners inside the door leaf, you can immediately solve 2 problems: the strength will increase, it will not be possible to remove it from the hinges by ordinary removal.
- To reduce the overall weight of the product, it is recommended that the internal shelves be made of lightweight materials (plastic, wood, etc.).
Is it easier to buy a ready-made safe?
If we talk about the amount of labor expended and the time required for the manufacturing process, it is much simpler and easier to purchase ready-made storage. Purchased models are distinguished by increased performance characteristics: an additional degree of protection, high resistance to negative environmental factors and mechanical damage. Factory products offer various variations of locking mechanisms: coded, key. The first option is the most convenient, since you do not have to carry the keys with you all the time.
And the main advantage is that the finished product has a manufacturer’s warranty, which is provided for a period of one to 5 years. If you assembled the cabinet yourself, all subsequent responsibility for its malfunctions and damage lies entirely with you. But if you buy a design, the manufacturer takes upon itself the prompt solution of all possible problems.
We hope this material was useful to you. You will find even more detailed information in the presented videos, photos and drawings about a do-it-yourself gun safe. And you can buy a ready-made, high-quality safe in our online store hardsafe.ru. Place your order online or call any of the numbers listed to consult with the seller.
We protect documents from fire - fireproof safes
The primary purpose of a safe is to protect the contents. The most common fear is theft, however, fire is no less likely and is fraught with great damage - after all, it does not spare anything. Fire-resistant safes are used to protect documents and securities from flames and high temperatures.
The fire resistance class of a safe is indicated by a number and a letter. The numbers indicate the time during which the safety of the contents is guaranteed in the event of a fire. Letters is the type of this content.
Primary class - 30B, guarantees the safety of documents in case of fire for 30 minutes. A safe certified for class 60B is twice as big.
Fire-resistant safes of the DIS class are called “data safes” and are designed for storing magnetic disks, memory cards, flash drives, or rare media - film and photographic films. For example, a 60DIS class safe will ensure the safety of your digital archive for an hour in the event of a fire.
Due to the fact that a fire usually lasts more than half an hour, it is recommended to purchase fire-resistant safes with a class of at least 60B. With this level of protection, the likelihood that documents will burn is low. Of course, the higher the fire resistance class, the more reliably the contents are protected.
When choosing a fire-resistant safe, consider a fire-resistant option as an alternative. Its main advantage is its versatility - this safe will provide reliable protection not only from fire, but also from burglary. Between its steel walls there is not just fire-resistant concrete, but a whole “sandwich” of several composite layers - in addition to the standard heat insulator, there are also refractory metals, corundum, reinforced concrete, etc. The production of fire-resistant safes is much more complicated, which is why they cost more.
The choice of lock depends on your personal preferences. If you don’t mind carrying keys with you and want a simple lock that doesn’t require any maintenance, choose a key lock. If you have a good memory for numbers and don’t like bunches of keys, choose a combination lock. Fireproof safes are often equipped with double locks - for example, two keys, or a key and an electronic code. One lock blocks the second.
The Russian market presents products of both Russian and foreign origin - Germany, Great Britain and India. When choosing, you should give preference to safes with a fire resistance class of 60B and higher - in this case, you can rest assured about your documents. Ask the seller for a current certificate of conformity to GOST R 50862-2005, confirming the protective qualities of the purchased safe - this will protect you from low-quality products and unfair marketing.