Master class on sewing a lined vest
To make a women's vest, a pattern modeled according to the previous description is used. You can make it yourself according to your own parameters, using a straight dress as a basis, or use ready-made patterns.
We cut out all the details, lay them out on the fabric, secure them with pins and trace them.
If there is a pattern on the fabric, for example, a vertical stripe, then the layout of the patterns should be done by selecting the pattern.
We cut out all the parts with an allowance of 1.2 cm.
All parts are treated with glue.
Using a basting stitch, we connect the cut-off side of the front and the shelf.
Using a basting stitch, we connect the barrels of the back with the middle part of the back, and baste the yoke. Sew the sides together using a basting stitch.
All seams are machine stitched. We remove the basting.
We trim the allowances and cut off excess fabric.
Iron all seams on both sides.
Then iron the seams.
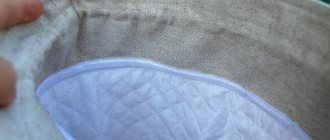
The reverse side of the product is shown in the following photo.
We cut out the lining, lining and neck facing.
We cut off the facing with the back, folding it right sides together. Let's collaborate.
Turn it inside out, baste it clean, iron it and sew it to the edge by 0.1 cm.
We apply the edging to the front side of the shelf with the front side and chop it off.
We cut out the fitting pattern, duplicating the lower edge contour.
We sew together the border and the shelf, running a stitch along the edge of the pattern. We will need it to repeat such a seam on the second selection.
At the bottom of the hem we leave 15 mm of free space. We will need it to grab the lining.
The vest is made from the main fabric and is practically sewn together.
Next, we’ll figure out how to sew the lining to the vest.
We machine stitch all the lining parts and press the seams. At the same time, we leave a free area on the side seam. Iron the fold on the back for free movement.
Pin the lining to the hems and facing of the neckline on the right side. Then we sew the lining on the inside using a machine stitch.
We do the same with the bottom edge of the lining.
We turn the sleeveless jacket inside out and cut off the armholes. We stitch and turn the product through the shoulder tunnels.
We suggest you familiarize yourself with Lacing sneakers - how to tie laces on sneakers beautifully and correctly
Through the hole left in the side seam we take out the shoulder sections and stitch them together.
We sew up the free area. We perform WTO on the collars, armholes, neckline, and shoulder seams. The vest is ready!
Quilted vest
For manufacturing, you can use ready-made patterns from the Internet.
Necessary materials:
- material for the top layer - raincoat fabric, cotton fabric, any other of your choice;
- a layer of insulation - something warm, of your choice;
- interlining fabric for stitching - should be thin and light; its use facilitates the stitching process, however, you can do without this layer;
- fabric for lining - you can use any fabric, such as fleece or Polartek (thermal fabric);
- long zipper for central closure, short zippers for pockets;
- accessories.
Description
We cut out parts from all layers of material. At the same time, we provide allowances of 2 cm for the top three layers. We will cut out the lining and collar later. We wash off three layers - the outer layer, the insulation layer, and the quilting pad. The basting stitches should not be tight, just fixing the set of materials.
To perform stitches, it is convenient to use a special foot with rulers. If it is not available, you can make seams using preliminary markings. Recommended stitch length is 3.0 – 3.5 mm.
We sew the quilted vest with basting seams. We carry out fittings and, if necessary, adjust the basting.
We make pockets.
We sew the seams, leaving the shoulder areas open. Be sure to fold the product along the axial seam of the back and align the parts, cutting off any irregularities.
We cut out the lining, reducing the dimensions by 1 cm against the details of the top. We sew the parts together, leaving free areas on the shoulder sections and in one of the side seams to a length of 10 cm.
Fold the lining and vest right sides together, maintaining a 1 cm allowance around the perimeter. We do not level the bottom cut yet.
We suggest you familiarize yourself with How to clean yellow tiles from bathroom tiles
We trim the armhole sections, pin and stitch along the entire contour. We cut out the insulation at the seam joints and cut the allowances. We turn the product inside out and sew it with a 5 mm roll of the main fabric using oblique stitches.
We process the bottom. If you wish, you can perform this operation last, if it seems more convenient to you.
We sew together the shoulder sections, passing the stitch directly through the main set and the lining. In this case, pay attention to the alignment of the seams.
We measure the length of the rollout and cut out the stand-up collar: two parts from the main fabric, one from insulation. Sew the outer collar to the rollout, leaving the edges open.
We insert the zipper starting from the bottom edge. We attach one side of it and close the zipper. We mark the junction of the collar seams (we use a pin). We pin and attach the second side of the zipper.
Let's get back to working with the collar. We pin the blank for the inside of the collar with the front side to the front side of the sewn part of the collar. We sew together the parts along the long and two short sides. At the same time, we leave 1 cm on the short sides, without finishing, for convenient attachment of the lining.
Fold the vest and lining right sides together, pin and stitch.
The following photos show how the sewn bottom edge complicates this operation.
Align the vest, straightening the layers. After making sure that nothing is skewed, we attach the lining along the wrong side to the cuts and to the zipper.
We align the layers, laying out the base 1-2 cm longer than the lining. We sew off the armholes, bottom edge, collar and zipper. If the model has a yoke, like ours, then you can go along it with an additional seam, securing the lining.
For beginning craftswomen, we offer a ready-made pattern for an insulated women's vest for several sizes. The model can be sewn with a zipper or buttons.
Patterns are given for European sizes:
- 36 (chest-waist-hips) 82-66-88 = 42 (gr.);
- 38 (chest-waist-hips) 86-70-92 = 44 (gr.);
- 40 (chest-waist-hips) 90-74-96 = 46 (gr.);
- 42 (chest-waist-hips) 94-78-100 = 48 (gr.);
- 44 (chest-waist-hips) 98-82-104 = 50 (gr.);
- 46 (chest-waist-hips) 102-86-108 = 52 (gr.);
- 48 (chest-waist-hips) 106-90-112 = 54 (gr.);
- 50 (chest-waist-hips) 110-94-116 = 56 (gr.);
- 52 (chest-waist-hips) 114-98-120 = 58 (gr.);
- 54 (chest-waist-hips) 118-102-124 = 60 (gr.);
- 56 (chest-waist-hips) 122-106-128 = 62 (gr.).
Fur vest with peplum
For production you will need:
- rabbit skins – 3 pcs.;
- velor fabric in the color of fur;
- lining fabric;
- buttons – 2 pcs.
Description
We don't need a paper pattern for a fur vest. A suitable T-shirt will fulfill its role. We place the T-shirt on the velor fabric and outline it with an allowance.
We cut out the basque and sew the sides.
Please note that the armhole depth on the front flap is cut deeper than on the back. This is clearly visible in the next photo - the front part is on the right, and the back is on the left.
We cut out two parts of the strap for the fastener. The width of the blanks is 6 cm, the length is equal to the length of the shelf.
From the lining fabric we cut out the front, back and peplum parts, using ready-made velor parts as patterns.
From velor we cut out facings for the armholes.
We strengthen the facings with adhesive fabric.
We suggest you familiarize yourself with How to shorten the drain hose of a washing machine
Sew together the shoulder seams, making a double stitch at a distance of 1 cm from the cut.
We attach the facing from the wrong side to the armholes with an allowance of 7 mm.
We turn the facing as shown in the photo and stitch along the seam at a distance of 1 mm along the front side.
We close the side seams and sew out the facing, turning it to the wrong side.
We strengthen the fastener strip at half the width with an adhesive gasket. Bend the piece in half.
Attach to the shelf on both sides.
We cut out two blanks for the stand-up collar. We stitch them together, turn them inside out, and reinforce one side with a gasket.
We turn the collar inside out and sew the edge.
We baste the collar and basque, then attach it.
We distribute the rabbit skins for cutting. One will be used for the back, the second for the front, the third will be used for the stand-up collar and shoulders.
We apply the skin to the back of the vest and outline the outline with chalk. We cut out according to the markings. You can cut the skin with a regular blade, but always from the wrong side.
We cut out the front shelves in the same way.
We attach the fur around the perimeter using a zigzag stitch. The stitch should be oriented along the pile, not across. When sewing, move the fur away from the edge.
We sew seams on the lining and sew it to the velor base of the vest. We start from the fastener bar, then move to the armholes, then go to the bottom edge.
How it turned out - look at the photo.
We sew the third skin to the shoulders, and from a strip of fur we make a stand-up collar. Sew the lining to the collar.
The edge of the skin hanging from the shoulders can be cut into strips.
We make two hanging loops and sew on buttons.
The vest is ready!
For beginning craftswomen, we offer ready-made patterns for an elongated fur vest for several sizes. This model can be made from both short-pile fur and long-pile fur.
Dimensions:
- 36 - 38 euros = 42 - 44 Russian;
- 40 euros = 46 Russian;
- 42 – 44 euros = 48 – 50 Russian;
- 46 euros = 52 Russian;
- 48 euros = 54 Russian;
- 50 – 52 euros = 56 – 58 Russian;
- 54 – 56 euros = 60 – 62 Russian.