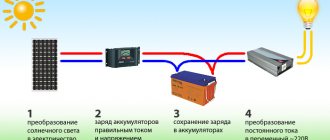
What do we want to get
In this modest tutorial we will make a controller that will mirror control the robot's arm. Such useful technical solutions can be applied in various fields and bring great benefits.
Such devices are often used, for example, by the military when clearing various explosive devices.
It is also quite possible that this kind of project can give impetus to the development of artificial intelligence training, when a robot learns based on human actions, and then can repeat and apply the acquired skills.
Platforms on 4 wheels - the basis of an Arduino machine
A platform on wheels is by far the simplest and most effective base for building a robot. There are many different blanks of this type on sale. Some of them:
Platform for creating a robot on Arduino, made of aluminum alloy. The platform is equipped with 4 wheels, each of which is connected to a separate motor. Motors are included. The platform can be used as the basis of a car or any other driving robot. The size of the platform is about 20 by 20 cm. Screws, nuts and wires for connecting the motors are also included.
Such a base for your future robot can be purchased for about $75 on the DX.com online store.
Basis for the Robotbase RB-13K054 4WD car. Photo dx.com
Another four-wheeled Arduino-based robot platform attracts attention with its wheels. They have a diameter of 80 mm, a width of 60 mm, and look elegant and reliable. This platform has a 1.5mm thick acrylic base. The body has good stability and is suitable for creating a fast-moving robot. Aliexpress sells this skeleton robot for $60. The kit is similar to the previous one - wheels, motors, wires and screws are already included in the kit.
Basis for a 4WD vehicle. Photo: aliexpress.com
Accessories
Below we list the components used in the project:
- Arduino UNO
- Servo drives MG995
- Servo drives DS3115
- Rotary potentiometers, 10 kOhm
Software:
- Arduino IDE
The robot arm uses three conventional PWM servos, and each corner is controlled by a variable resistor. Two DS3115 servo motors are used in vertical direction, and MG995 servo motor is used in rotation direction.
Assembling units
The following fasteners will be required:
- M3x10 screw with head under h/w - 1 piece
- M3x12 screw with head under h/w - 6 pcs
- M3 washer - 7 pcs
- M3 lock washer – 7 pcs
- M3 square nut – 6 pcs
And here are these previously assembled nodes:
First you just need to assemble them all together using grooves.
Immediately screw the elbow servo rocker to the rod.
The next operation requires some skill. The most convenient way is to place the square nuts into the grooves with tweezers and tighten the screws into them. There are three pieces on each side.
After you tighten the parts with six screws, the assembled structure will look like this:
Making a robot arm
We make the controller body on a 3D printer. You can download the .stl files in the archive below:
There is a hole and a positioning hole for screwing in the rotary potentiometer knob, as well as a recess for inserting the knob.
Assemble the fabricated parts and three rotary potentiometers together.
The rotary potentiometer is now located in the same direction as the rotation axis of the robot arm servomotor.
Preparing parts
Sheet plexiglass is sold with protective films glued to both sides of the surface. When laser cutting, these films are usually left so that dross forms only on them. Before using the cut out parts, you need to remove these films (on both sides!) using a stationery knife. Our manipulator uses parts made of 3mm thick sheet
...and 5mm
Arduino code
This simple code below simply reads the value of a rotary potentiometer using an analog pin, converts it to an angle and passes it to the corresponding servo.
#include Servo myservo1, myservo2, myservo3; float th1=90.0,th2=90.0,th3=90.0; float val1, val2, val3; void setup() { Serial.begin(9600); myservo1.attach(9, 500, 2420); // MG995 myservo2.attach(10, 820, 2140); // DS3115 myservo3.attach(11, 820, 2140); // DS3115 set_servo(); } void loop() { val1 = analogRead(A1); val2 = analogRead(A2); val3 = analogRead(A3); th1 = map(val1, 170.0, 880.0, 0.0, 180.0); if(th1 >= 180.0){ th1 = 180.0; }else if(th1 <= 0.0){ th1 = 0.0; } th2 = map(val2, 150.0, 860.0, 0.0, 180.0); if(th2 >= 180.0){ th2 = 180.0; }else if(th2 <= 0.0){ th2 = 0.0; } th3 = map(val3, 860.0, 160.0, 0.0, 180.0); if(th3 >= 180.0){ th3 = 180.0; }else if(th3 <= 45.0){ th3 = 45.0; } set_servo(); } void set_servo(){ myservo1.write(th1); myservo2.write(th2); myservo3.write(th3); }
Finally, connect the rotary potentiometer and connect everything to the Arduino.
That's all.
Shoulder assembly
Assembly fasteners:
- Servo drive - 1 piece
- M3x15 hexagonal brass female-female stand – 2 pcs
- M3x14 screw with head under h/w - 4 pcs
- M3x10 screw with head under h/w - 4 pcs
- M3 washer - 12 pcs
- M3 lock washer – 8 pcs
First you need to screw on the metal disc of the servo drive and the stand. The parts are symmetrical, the main thing is that the round plexiglass inserts do not end up on the outside of the arm.
After this you can screw the top part:
Assembling the brush
To assemble the grip, you will need plexiglass parts and the following components:
- Servo drive MG90S – 2 pcs.
- M2x10 screw - 4 pcs.
- M2 nut - 4 pcs
- M3x10 screw with head under h/w - 2 pcs.
- M3x18 screw with head under h/w - 2 pcs.
- M3x25 screw with head under h/w - 1 piece
- M3 washer - 8 pcs
- M3 lock washer – 7 pcs
- M3 nut - 3 pcs
To screw in the servo drives, you can use the fasteners included in the kit, but we prefer to use regular M2 screws. If you want to do the same, then the holes must be drilled (and additional fasteners must be purchased). Also, one of the rockers needs to be trimmed.
To begin, screw the servos onto the M2 with screws. Make sure that they are installed on the parts in the same way as in the photo:
Next, install the triangular parts of the hand and the free “finger” of the grip. The gripper is installed with a spacer of three washers. It must be tightened very loosely using a nut with a nylon insert. It should move on one side as freely as possible and, on the other hand, with minimal play. A special nut will prevent the fastener from unscrewing while driving.
Next, tighten the screws on the servo drives. The photo shows why we shortened one of the rockers.
Now you can screw the rockers to the servos. Before doing this, set the servos to the middle position. Then install the rockers exactly as shown in the photo. Please note that you need to align the corresponding teeth of the claw. After installation, tighten the screws and make sure that all shafts rotate freely and the claw closes and opens
Now all that remains is to combine these two parts. Do it as shown in the photo
The claw is assembled.
Elbow assembly
To assemble the elbow you will need plexiglass parts and the following fasteners:
- M3x15 hexagonal brass female-female stand – 2 pcs
- M3x10 screw with head under h/w - 4 pcs
- M3 washer - 4 pcs
- M3 lock washer – 4 pcs
The elbow is assembled in the same way as the shoulder. It will be difficult to confuse something, since the parts are symmetrical. We applied our blog logo on the elbow. If you engraved it too, then we will be pleased if it is visible on the outside of the elbow.
Installation of the first wrist traction
You will need the rod itself and the following fasteners:
- Bearing 3x8x3 - 2 pcs.
- M3x14 screw with head under h/w - 2 pcs.
- M3 nut – 2 pcs.
- M3 washer - 4 pcs
- M3 washer narrow - 4 pcs
- M3 locking washer – 2 pcs.
This rod holds the triangle in a stationary position relative to the ground. First, screw one side of the rod to the eyelet at the base of the arm.
On the outside, as usual, you need to install a plexiglass washer.
Now you can screw the second side of the rod to the triangle. To do this, you will need to install an additional washer so that the traction is maximum parallel to the shoulder.
The screw head must be on the inside, otherwise it will cling to the elbow.