DIY tricopter.
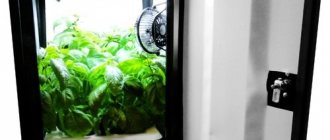
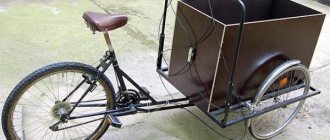
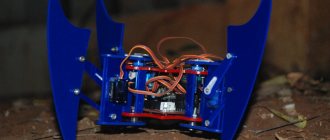
There are no fundamentally new solutions in the manufacture of this model; it is mainly built on the basis of the following materials: - “Tricopter (DIY Quadcopter: Part II.2)” https://security-corp.org/hard/diy/3700 -trikopter-kvadrokopter-svoimi-rukami-chast-ii2.html ; - “Forum. Tricopter" https://forum.rcdesign.ru/f123/thread156768.html In these sources, the assembly process is described in great detail, so I will not dwell on the details. To manufacture the model, quite budgetary equipment was used: - flight controller KK2.1 (a fairly simple and reliable controller, parameterized directly in the field, from the LCD screen, the only thing in my opinion it lacks is a barometer to automatically maintain a given altitude. When switching from airplane control, it is quite difficult to change positions precisely because another degree of freedom appears and you have to compensate for the vertical displacement of the model. With experience, this goes away and you begin to maintain the desired altitude “automatically,” but at the initial stage of training I would certainly like to , so that this function is performed by the controller, but then the price of the controller will then be much higher): Flight control board for multi-rotor systems Hobbyking KK2.1.5 LCD, 6050MPU and Atmel 644PA Product https://www.parkflyer.ru/ru/product/1204422/ — engines (very reliable engines have never failed in 2 years of operation, do not overheat): Turnigy Aerodrive DST-1200 1200 RPM brushless motor Product https://www.parkflyer.ru/ru/product/403252/ — propellers ( require mandatory balancing) Propellers 8045 SF (red) 2 pcs. standard rotation / 2 pcs. reverse rotation. Product https://www.parkflyer.ru/ru/product/510247/ - regulators (don’t worry that the current is only 12 A - for the above propellers they operate in normal mode and do not overheat. The regulators were reflashed according to this article https:// flydrones.ru/reinkarnatsiya-plush-a/, to be honest, I didn’t notice much of a difference after flashing...): Regulator for brushless motors HobbyKing 12A “Blue Series” Product https://www.parkflyer.ru/ru/product/ 100891/ — tail servo (a simple and reliable servo, there were no malfunctions during operation, of course it usually breaks during crashes, in fact this is one of the weakest points of the tricopter, but during careful flights it serves without any complaints): Turnigy™ TGY-50090M Analog Servo MG 1.6kg / 0.08sec / 9g Product https://www.parkflyer.ru/ru/product/529858/ - rotary tail mechanism (quite compact and quick to install, but it also has disadvantages - it is necessary to regularly clean and lubricate the gears, t .because dirt and dust easily get into them, if you don’t clean them in time, they will jam right in flight...): RotorBits mount for a servo with a gear drive (green) Product https://www.parkflyer.ru/ru/product/1201692/ - battery (an excellent popular battery, not so long ago it was also very cheap, for this configuration it lasts for 10 - 15 minutes of continuous dynamic flight, by the end of the flight it is slightly warm, i.e. 20C is quite enough): Turnigy 2200mAh 3S 20C Lipo Pack Product https://www.parkflyer.ru/ru/product/8932/ - for control I use the most budget radio control kit (this particular kit is configured via a computer and allows you to build the required “curve” gas", which is just desirable for comfortable maintaining a given flight altitude) Receiver/transmitter Hobby King 2.4Ghz 6Ch V2 (Mode 2 gas on the left) Product https://www.parkflyer.ru/ru/product/9042/ Everything else is made from textolite plates (1.5 mm) and aluminum profiles (10 mm), see detail drawings (Tricoptertemplate.pdf) - borrowed from the above sources. The legs are bicycle spokes, screwed to the profiles with fishing line, which turned out to be a very reliable and simple solution. The housings for the controller and motors are made using “stocking” technology: two layers of nylon tights are stretched over cellophane onto a blank cut out of foam plastic with a stationery knife, and then covered with epoxy resin. Painted with acrylic paints, I came across the plot for the cabin on one of the sections of this site. Here is a photo with the case removed:
The controller settings are as follows (I am currently flying in Self-Level mode - on): PI Editor: Roll: P Gain: 45; P Limit: 100; I Gain: 15; I Limit: 20; Pitch: P Gain: 45; P Limit: 100; I Gain: 15; I Limit: 20; Yaw: P Gain: 45; P Limit: 20; I Gain: 50; I Limit: 10; Stick Scaling: Roll: 30 Pitch: 30 Yaw: 30 Throttle: 90 Self-Level Settings: P Gain: 55; P Limit: 100; Misc. Settings: Servo filter: 70 Mode Settings: Self-Level: AUX; Link Roll Pitch: Yes; Auto Disarm: Yes; CPPM Enabled: No. This is a video of the flight: the video was filmed at a temperature of -17 degrees, it was snowing, and an average gusty wind was blowing (4...6 m/s). As you can see, the model is quite stable. In general, I would like to say that this configuration is weakly sensitive to weather conditions. Previously, when I was only interested in airplanes, before leaving for the field I constantly looked at the forecasts, sometimes due to strong winds I completely abandoned the planned trip. With this copter, everything has become much simpler: - firstly, it is not at all necessary to go out of town, a football field or even a basketball court is already enough, and flying around obstacles or flying through a gate adds spice to the flights; - secondly, you can fly in almost any weather, even if it suddenly starts to drizzle (I sealed the regulators in balloons, the engines are not afraid of water and snow, the controller and receiver are quite well covered by the case, and if it rains, then an ordinary medical device is pulled over the controller from above glove). — and thirdly, the folding frame is very compact, when folded it is put away in a regular bag, unfolds in one motion, there are no problems with transportation. Of course, on a copter, unlike an airplane, you cannot perform beautiful aerobatic maneuvers or even the simplest aerobatic complex (although there are, of course, complexes for helicopters that are well suited for a tricopter, since it is similar in control to a helicopter). But on a copter you can hover in close proximity (calmly admire the model floating in the air), fly in any direction and at any speed, drop loads, parachutes and much more... In general, there are pros and cons. But if anyone decides to try a copter for themselves, then I highly recommend this model to you. Believe me, with enough patience, you will not be disappointed with the result!
With respect and best wishes in your creativity.
How much does it cost to repair a DJI quadcopter?
I will give a small table in which I will list the average prices for repairing a DJI copter. As long as this article exists, the information is relevant. If you notice any inconsistencies, write your comment.
DJI quadcopter repair
Average prices for repairs of DJI Phantom quadcopters
| Name of repair | Average repair time | Average price, rub |
| Repair and replacement of GPS module | 60 minutes | 3000 |
| Replacement NAZA | 50 minutes | 3000 |
| Motor repair and replacement | 60 minutes | 2000 |
| Case repair, replacement of components | 120 minutes | 4000 |
| Replacing the compass | 50 minutes | 2000 |
| Repair and replacement of VISION gimbal | 180 minutes | 5000 |
| Repair and replacement of ZENMUSE suspension | 120 minutes | 3000 |
| Repair and replacement of the rotation regulator | 180 minutes | 3500 |
| Repair and replacement of central board parts | 120 minutes | 5000 |
| Chassis repair and replacement | 40 minutes | 1000 |
| Replacing the cable | 50 minutes | 3000 |
| Installation and upgrade of FPV system | 120 minutes | 3000 |
| Booster installation | 50 minutes | 3000 |
| Installing the DJI Light Bridge | 220 minutes | 3000 |
| Installing and connecting DJI Bluetooth Ground Station | 60 minutes | 3000 |
| Installation of ZENMUSE hangers | 80 minutes | 3000 |
| VISION camera repair | 40 minutes | 3000 |
| Vision Plus gimbal repair | 180 minutes | 3000 |
| Firmware upgrade and calibration | 40 minutes | 1000 |
As you can see, repairing a quadcopter may not be a cheap pleasure, but still, if you suffer the same fate as a broken drone, then contact service centers or private technicians for help. These guys definitely have the necessary spare parts and licensed programs for flashing.
I wish you all the best, and treat your flying comrades with care.
Model with lithium batteries
Quadcopters with a camera using lithium batteries usually receive good reviews. Controllers for devices are suitable for wired and discrete types. In this case, the motor is selected for 2 or 3 kW. The transmitter is of the high frequency type. Varistors can be installed via a diode bridge. In many cases, capacitors are of the capacitive type.
Their reducibility parameter is 6 μ. Before connecting the motor, the negative resistance on the device is checked. This parameter should not exceed 55 Ohms. On average, the receiver frequency is 30 Hz. Modifications with zener diodes are rare. The batteries are installed under the engine. Frames can be made with two or three posts.
Amplifier-reflector for antenna
Let's start with the simplest solution - installing a passive amplifier-reflectors on the antenna.
Drawings can be found in the article Amplifier for a quadcopter antenna.
Despite its simple manufacturing and very frivolous appearance, such a passive signal amplifier allows you to increase the flight range of a quadcopter by 0.5-2 times. In the article at the link above there is a video of positive testing of such a device with a collector quadcopter, from my experience I can say that this thing really works and the flight range increases.
In the video above, a parabolic reflector is tested; the flight range of the drone with it increased by 30%. For other testers, the flight range increases up to 2 times, it all depends on the pollution of the air at the place of flight.
This method of boosting the signal works with any transmitter, not just those manufactured by DJI.
If you don’t want to tinker with a parabolic amplifier-reflector, then you can buy ready-made signal amplifiers.
Transmitter Antenna Signal Enhancement Buy: BangGood Phantom 3 S/SE Remote Buy: AliExpress Black Mirror Plate Foldable Buy: BangGood Remote Control Amplifier Buy: AliExpress
Reviews of the model with four racks
Making a quadcopter with a four-post FPV camera is quite simple. First of all, you should deal with the fuselage part. For this purpose, a plastic frame is constructed. The diameter of the screws should be about 3.3 cm. The trigger for the model is selected as a contact type. The motor is used at 2.2 kW. The maximum frequency of the receiver should not exceed 3 Hz. An adapter is used to control the device. It can be installed via a rectifier or diode bridge.
In the first option, open capacitors are used. If we consider a modification with a diode bridge, then the capacitor in quadcopters with a large range of action is installed with a plate. The element capacitance must be at least 6 pF. Before connecting the controller, you should check the negative resistance. The specified parameter for a 2.2 kW model should not exceed 55 Ohms.
How to replace the remote control antenna
In the video above, the Syma quadcopter is being upgraded to increase its flight range by replacing the standard antenna-wiring with an external one with a larger dBi.
And in this video, installing an external antenna on the FrSky Taranis remote control.
As you can see, the procedure is very simple, it only requires accuracy and the ability to solder, and it practically does not depend on the type of remote control.
If you are just starting your journey into the world of radio control, then see the article Which drone control panel to choose.
Review of devices with a 3 kW motor
How to assemble 3 kW quadcopters with a large range with your own hands? Many experts in this case advise installing the motor on a lining. It is also important to note that it is more advisable to use a capacitor type height sensor. The receiver itself is applied at 3 Hz. To stabilize the model in flight there is a zener diode. It is installed via an adapter. A varistor is used to connect the device.
It is sold in pass-through and pulse types. In order to make the fuselage, a plastic frame is used. With a 3 kW motor, it is more advisable to select it for four racks. A triode is used to transmit the signal to the receiver. This element can only be installed through a rectifier. A diode bridge is not required in this case. The length of the frame should be about 23 cm. The height of the quadcopter with a 3 kW motor is no more than 12 cm. Many experts recommend installing lithium-ion batteries. Their capacity should not exceed 200 Ah.
Powerful antenna for the control panel
The next solution requires the ability to “poke a soldering iron” and “disassemble the drone control panel.” Instead of a standard antenna, an antenna from a WiFi router with a high gain (dBi) is installed.
In fact, you need to unsolder the standard antenna and solder the wire from the connector in its place, and any antenna can be attached to it.
Here is an option for using a homemade Vee antenna together with an external RF unit.
Since radio control equipment for aircraft models and drones operates at a frequency of 2.4 GHz, WiFi antennas that operate at the same frequency are perfect for it.
On a quadcopter, to increase the flight range, it would also be a good idea to replace the standard antenna with one with higher gain.
Here are the options for ready-made antennas and connectors for them.
2.4GHz RP-SMA Male 16dBi Buy: BangGood Cewaal New 2.4GHz Buy: AliExpress 2.4GHz 5dBi Wireless Wifi Buy: BangGood Free Shipping 2.4GHz Buy: AliExpress Mini RP-SMA to IPX Buy: BangGood UFL Extender to RP Buy: AliExpress
Three-rack devices
Quadcopters with a long range and a three-stack FPV camera are very common. Motors for these devices are selected with low power. Adapters are most often used with frequency receivers. Their conductivity parameter does not exceed 3 microns. Triggers for quadcopters are used with adapters. First of all, a frame is constructed for assembly.
The length of the frame must be about 33 cm. The height of the quadcopter is allowed 12 cm. The stands must be made of plastic. The minimum screw diameter is 2.5 cm. A selector is installed to stabilize the device in flight. The specified element is connected through a conductor. It's also important to note that many experts recommend using height sensors. Batteries for quadcopters are suitable lithium-ion type.
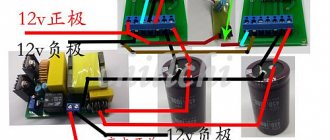
Assembling a device with two batteries
Quadcopters with a long range and a camera that have two batteries can only be made using a powerful motor. The minimum frame length is 40 cm. The average device weighs about 3 kg. A controller is used to control the modification. If we consider a model with a digital element, then the trigger is of a discrete type. Typically, the frequency of quadcopters is at 5 Hz. The output impedance fluctuates around 30 ohms.
If we consider modifications with operational controllers, then it is more advisable to install capacitors on a wave basis. Dampers are used to stabilize the device in flight. Many experts select regulators with a cover. The minimum length of the screw is 3.5 cm. The modification's triggers must be connected via a diode bridge.