Hi all . I have an old working refrigerator in my unheated garage. I would throw it away, but you have to pay money for it. I decided to take advantage of it. I decided I did it. In this article I will tell you how to make a household item out of an old refrigerator. The plastic of the refrigerator reflects light very well, which means there is no need to cover it with foil. I used an old frying pan in the refrigerator that I described in a previous homemade project. For the second shelf I made the same lamp only in a round housing on a radiator. The lamps do not matter - the most important thing is that they have a total of 40 -60 watts and blue LEDs to red ones 1 to 1. The second season I have seedlings growing in it at summer and winter, different lettuces grow, but not in hydroponics, but on the ground. To mix the air in the refrigerator, I installed two coolers that mix the air, the hotter one is constantly moved down.
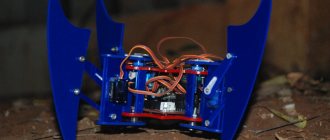
The refrigerator itself, on the bottom shelf you can see a frying pan with LEDs.
Let's take a closer look at the concept of a growbox. A growbox or GrowBox is a box-shaped structure equipped with light lamps and good ventilation to create certain microclimatic conditions for growing plants at home.
Growbox sizes can vary from 30 cm2 and more. The parameters depend on the number of plants planned for cultivation. The advantage of small ones will be compactness, large ones – convenience and practicality.
Getting to know the growbox
The main task of an equipped conventional growbox and a turnkey growbox is to maintain comfortable conditions for plant growth. It is important to properly organize lighting and ventilation of plants. Plants can be grown in pots, in the ground, or hydroponically.
Based on the above, we can say that the basis of a grow box is a box, which you can make yourself or buy a specialized one, and additional equipment in the form of electric lighting and ventilation.
Take a cabinet or box, install lamps and a fan - the box is ready. Sounds easy. Is it really? Let's look at the options: do-it-yourself growbox or buying a turnkey growbox, using the advice of experienced agronomists.
What material should you choose for the job? What temperature is needed and what is better - a cabinet or a box?
First of all, let's look at the main components that must be present in a turnkey grow box:
- ventilation,
- temperature,
- boxes,
- reflective film,
- heater, etc.
Lighting
Not all lamps are suitable for lighting. Growing plants is not an easy process; you need to select all the components correctly. For example, if you install a hundred incandescent lamps, the temperature in the box will be prohibitively high, but this will not bring any benefit, since their light spectrum is not suitable for plants.
Types of lamps suitable for lighting a grow box:
- HPS are sodium lamps that are used to illuminate plants and street lighting;
- CFLs – small fluorescent lamps;
- ESL – energy saving lamps;
- Led – special LED lamps for plant growth.
Wall covering in the block
To improve the lighting inside the cabinet, the inside walls are covered with material with reflective properties (penofol, foil). Another option is to paint the interior walls of the unit with matte white acrylic paint.
Ventilation
There are practically no restrictions here. The selected fan can be anything; its main task is to renew the air inside the box and remove high temperature from the heating lamp. Using the advice of agronomists, it is important to remember that the comfortable temperature range should be maintained from +22 to +27 0 C.
An electronic timer or time relay greatly facilitates the work of the growbox. It refers to additional equipment. The timer is programmed to turn on and off the lights and fan in the box. During the growth or growing season, most plants have enough light for 18 hours during the day and 6 hours at night. When the plant becomes mature and enters the flowering stage, additional lighting is set to 12 hours during the day and 12 hours at night.
If you think about the fact that the whole process must be set up manually, time must be noted and the lights must be turned on and off at a certain period, then an electronic timer will be very useful. Ventilation is important. Plants can become stressed if they turn on lighting and ventilation at different times and do not follow the regime. It is enough to configure the time relay once, and it will automatically work in the future, maintaining comfortable conditions, which is convenient in operation.
Let's return to the question, whether to make grow boxes with your own hands or turnkey - which one to choose? Let's consider both options.
How to make a growbox with your own hands
The main principle when assembling a grow box with your own hands is to provide comfortable conditions for growing plants. When designing, you can use expert advice or go your own way.
To make a mini-growbox or a regular growbox at home, you need to have the following material and set of equipment:
- cabinet/box (box)/block/chipboard;
- reflective material, for example, reflective film, foil or other material;
- instruments for measuring temperature and humidity - thermometer and hygrometer;
- lamp/luminaire or other lighting device;
- containers for plants.
Now let's move on directly to manufacturing. Assembling a growbox from the above materials is quite easy. All work can be divided into three components:
- Boxing design. It is better to make a visual drawing or diagram for a general representation of the work.
- Selection and acquisition of necessary equipment and materials.
- Subsequent assembly of materials.
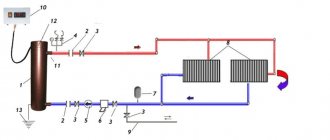
Growbox design diagram
Instructions
To determine the initial sizes, first of all, you need to determine in what quantity and what size plants you will grow. If you have no previous experience, it makes sense to familiarize yourself with the characteristics of plants by searching for information in the public domain or in a specialized reference book. Based on the data obtained and the desire to grow, determine the optimal amount. Growing plants is not a very difficult job, but it must be approached carefully and carefully. Calculate the required number of containers for them and, based on the results obtained, calculate the size of the cabinet, its width, depth and length.
If you have a box, box or cabinet with the necessary parameters, then use it, it will make your work much easier. If there is nothing suitable, then you can use chipboard. Order slabs of the required size and proceed to assembly. A diagram or drawing will help you. It is better to make drawings in three projections, with the required dimensions. These efforts will not be in vain, since it will be easier to select the starting materials and assemble the grow box.
It must be remembered that the temperature must be maintained in the desired range. A thermometer will help you cope with this task. A hygrometer will help determine the humidity of the surrounding air. For further work it is better to have both of these devices.
Don't forget about lighting. ESL and LED are perfect for creating comfortable conditions. LED lamps and luminaires appeared relatively recently, but are already popular.
The main advantages of LED are:
- fast heating, 1 second is enough to warm up the LED;
- LED lamps do not contain ultraviolet radiation;
- low energy consumption compared to conventional incandescent lamps;
- LEDs do not contain mercury, which indicates their environmental safety;
- LEDs can withstand impacts easily and are light in weight.
Growbox design and material
The most affordable and common material for creating a grow box is chipboard. It can be used new or used, the main thing is to cut it to give it the required dimensions. The dimensions of the grow box can be purely individual. It all depends on how many plants the gardener plans to grow in it and the availability of free space in the room.
Its height is very important, since it is this that will limit the vertical space for the growth of flora representatives. If a grower plans to grow something large in size, then the height of the grow box must certainly be selected based on the maximum growth of this crop. In most cases, a height of 1.5-2 meters is sufficient. And if the grower plans to grow low-growing plants, then he will have to make a stealth growbox, the height of which can be only 0.8-1 meter. The main thing here is to take into account the fact that the light source will occupy about another 30 cm of vertical space.
So, the grower decides on the dimensions, and then orders cutting of the chipboard sheets. Then, using any fasteners, the structure is assembled. It would not be superfluous to create in its upper part a small technical compartment 10-20 cm high, in which all the electrics will be located. It is also likely that the doors will have to be sealed with a special material so that light does not enter or exit the structure. Having a lock on the door will also not be superfluous, especially if the gardener has small children.
We won’t tell you how to make a growbox from a closet or other furniture. To do this, the grower will only need to go to the second point of our instructions on how to properly build a growbox.
DIY growbox
Sowing time is inexorably approaching, and all conversations begin to revolve around racks and boxes for seedlings, phyto- and other lamps for supplementary illumination of plants. This article tells you how to make a growbox with your own hands and what is the experience of FORUMHOUSE users using growboxes.
Traditionally, most of the gardeners on our portal grow seedlings on the windowsill, but
AntonpavlovFORUMHOUSE Member
— cold blows from the window, heat comes from the radiator under the windowsill; - ventilation has a negative effect on seedlings - at best, they wither reversibly; — attempts to somehow maintain the microclimate and install reflectors lead to the fact that light from the window no longer enters the apartment.
To make seedlings feel more comfortable on the windowsill, there is a method proposed by a member of our portal Mgolovanov. On the windowsill you need to put wide sheets of polystyrene foam (penoplex 2-3 cm thick), but not simple sheets, but curved from the side of the room. And already put boxes with seedlings on it.
MgolovanovFORUMHOUSE Member
In my rooms the norm is +25 with a humidity of 15-20% (very dry), and on the window sills +12-18 (with the transoms slightly open).
Another way is to make a growbox yourself.
A GrowBox for growing seedlings is essentially a mini-greenhouse, a device equipped with lighting and ventilation devices that create an ideal microclimate for plants indoors. Now you can buy a growbox of any size, stuffed to the brim with innovations and nano-technologies, which, moreover, will decorate any interior.
But for growing seedlings, a simple growbox, made with your own hands according to the most primitive drawings, will be quite sufficient.
You can make growboxes with your own hands from any “box”: use an old refrigerator, system unit, bedside table and cabinet, or assemble a case from sheets of chipboard and other similar material. “Seedling” grow boxes are small in size, 0.5 – 1 sq.m. The inside is covered with thin penafol or foil, or painted with white acrylic paint.
The microclimate necessary for plants is provided with the help of lighting, ventilation and humidification.
Devices for additional lighting are installed on the “ceiling” of the grow box or in its upper part. The topic of supplementary illumination of seedlings at FORUMHOUSE is covered in full: how to supplement which crops are illuminated, which lamps are more profitable to buy where. Phytolamps and LEDs, fluorescent lamps with cold light, lamps for aquarium plants - lighting devices are chosen depending on the crop you are growing. At the link you will also find drawings of racks for seedlings.
It is important to remember that illumination is inversely proportional to the square of the distance from the lamp to the surface - when we move the lamp from 10 centimeters above the plants to 30 centimeters, the illumination will decrease by three times. In practical terms, this means that the grow box must be able to move the lamp away from the surface of the plants.
The second point that should not be forgotten: the absorption of light by chlorophyll in a plant occurs in the blue and red parts of the spectrum. By choosing the right spectrum, you can still control the speed of seedling development.
The use of lamps often leads to an unacceptable increase in air temperature in the grow box, and the seedlings begin to stretch out or even “burn.”
Antonpavlov
For some plants, high temperatures are detrimental to balanced growth. Look how the fennel stretches.
Ventilation will help save plants from overheating. For many crops, air from the holes made in the body of the “box” would be enough, but taking into account the lighting, it is better to immediately think about a forced ventilation system.
Ellis Cu. Moscow city:
It is strictly necessary to install fans, otherwise you will fry the things even with LEDs - we went through all this last year.
A good solution for organizing ventilation in your “box” can be a computer cooler.
Some crops require lower air temperatures at night. Thus, according to the Soviet 1980 edition of the Protected Ground Vegetable Foreman's Guide, it is advisable to grow cucumber and tomato seedlings at certain temperatures.
Temperature recommended for growing seedlings of main crops
| Culture | daytime temperature | night temperature |
| Tomatoes | +20 degrees. | +16 degrees. |
| cucumbers | +22 degrees. | +18 degrees. |
But you need to keep in mind that in a homemade grow box you won’t be able to lower the temperature below room temperature even with the help of fans - unless you are a maniac and are not ready to make a hole in the wall of your home and lead the pipe from the grow box to the street. And even if you add blue color to the lamps: this will help slow down the growth of seedlings of heat-loving tomatoes and peppers, but will not affect cabbage.
Antonpavlov
No matter how much blue LED light you shine on the cabbage, it will still stretch at 25 degrees and by the time it is planted it will look like a “zyu”.
Ordinary valves on radiators can help in this situation, allowing you to control the temperature in the room.
To control the temperature in the grow box, a thermometer must be installed; Another necessary device is a hygrometer. Excessive moisture can cause seedling diseases.
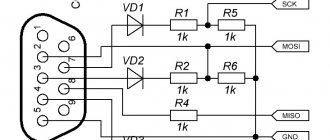
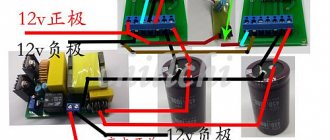
Everything you need to equip a grow box can be bought at an electronics store: a cooler and a 12-volt power supply for it, a timer, etc.; Users of our portal buy lamps in online stores. How to connect the equipment is clear from the diagram, the main thing is to want to.
Here is a version of a home grow box, which was made by a member of our site, osetroff. This is a complex growbox with three compartments, but we will look at one compartment.
Its dimensions - 57x57x38 cm - were chosen so that it would fit 15 pots for seedlings, and so that the height of the lamp above the plants could be varied from 5 to 35 cm. During construction, profiles for plasterboard 27x25 and 27x60 and short self-tapping screws were used.
osetroff
The growbox is designed like a refrigerator: there is a plastic door in front, the lamp is removed and moved to another level, like a shelf in a store, to be as low as possible above the plants.
The inside of the growbox is covered with reflective kraft paper with lavsan, and there is insulation under the paper. The strip lamps are powered by the power supply of an old computer.
The temperature difference in the room and box was 10 degrees. The mini-greenhouse is ventilated like this: on one side there is a small fan above the lamp, on the other there is a valve for the release of warm air. The grow box has a double bottom: warm air is supplied from the ceiling of the box to the floor, and electricity is recycled, which is used not for lighting, but for heat.
At FORUMHOUSE you will learn how to properly make racks for seedlings, you can watch a video that teaches how to grow strong seedlings, and we also offer you a cheat sheet that will help you calculate the timing of the sowing season. Look at different design options for grow boxes with drawings and photographs from members of our portal.
Selecting reflective material
When the growbox design is ready, you can begin arranging it. The first thing the grower has to do is cover the inside walls of the grow box with reflective material. You should not use foil or penofol, as the light will be refracted; if your budget is limited, it is better to cover the walls of the box with regular white matte paint. The best option would be Mylar Diamond ECO reflective film. Mylar film can significantly reduce the loss of light rays due to irrational scattering. It distributes light evenly over the entire cultivation area. This feature is possible thanks to the diamond-shaped three-dimensional pattern, which does not allow light rays to concentrate in one place (usually creating hot spots that cause burns to plants). Its reflection coefficient is 97%. The material of the product has a high tensile strength, and therefore can last for many years.
Growbox lighting
Now we move on to the question of how to equip a growbox. The first thing we'll start with is lighting the growbox. There is no way without it, because any plant cannot live without light for several days. Even when the grower was just thinking about how to build a growbox, he had to take into account the dimensions of the lamp. Even if you hang it from the ceiling itself, it will take up about 30 cm of vertical space. And if you use a rod or other hanging fasteners, then this is all 40-50 cm. This distance will directly depend on what lamps the grower chooses to illuminate the growbox.
Now to the most important question - how to choose lamps for a grow box. Their choice will directly depend on the dimensions of the structure and the number of plants that are located in it.
For small home structures, which includes almost all grow boxes and stealth boxes, we recommend using neon lamps. They practically do not heat up during operation, which makes it easy to maintain the temperature inside the structure at a level favorable for plants. They are also quite compact and consume relatively little electricity, which undoubtedly has a positive effect on bills.
For the growing season, the TNeon 6500 K Growing lamp is a suitable option. The spectral composition of the lamp is ideal for plant growth. The dominant blue light takes an active part in photosynthesis, allowing crops to grow leaf mass. For the flowering stage, an excellent option would be a similar lamp, only with a different spectral composition, in which red light dominates - the TNeon 2100 K Blooming lamp.
It has a beneficial effect on crops, allowing them to form inflorescences and fruits. Both lamps are made of high quality alloys that guarantee a long service life. It is recommended to use them in pairs, installing them in a TNeon 2x55W lamp.
With its help, plants will receive light of a favorable spectral composition during any stage of their life. Both lamps are powered independently, allowing you to turn them on separately. The device is made of durable steel sheet and coated with a durable white paint material that effectively reflects light. It can be hung using special hooks. It is also equipped with electronic ballast, 2G11 socket and three-pin power connector.
For full-fledged grow boxes with a height of 1.7 meters or more, we recommend choosing HPS lighting. It is worth noting that the greater the power of the lamp, the more area it illuminates, however, the more heat is generated, so we recommend purchasing a CoolMaster closed-type pendant lamp.
Growbox ventilation
Ventilation is a very important component of any grow box. It allows not only to renew the air inside the structure, providing an influx of carbon dioxide, but also to remove hot air that occurs due to the heating of lighting fixtures during operation. This makes life much easier for the grower, because it becomes much easier for him to maintain a favorable temperature inside. Also, do not forget that with the help of ventilation you can regulate the humidity inside the grow box, a favorable indicator of which is the key to effective fight against mold. Lastly, ventilation allows the grower to eliminate various types of odors and pollen. To do this, a carbon filter is installed in it, which does not allow aromatic compounds to escape.
How to calculate ventilation in a grow box?
Ventilation in the grow box is calculated based on the volume of the internal space. To prevent odor from being heard outside the structure, the air inside it must be completely renewed within 3-10 minutes. The volume is calculated by multiplying the height, length and width of the structure. Next, it is calculated how many times within an hour the fan will have to refresh the air inside. To do this, 60 minutes are divided into the selected interval. Depending on the resulting number, we calculate the required fan power by multiplying it by the volume of the grow box. We add 20% to the new number, thus taking into account losses due to air movement. We choose a carbon filter with the same or increased performance. We remind you that the outlet of the ventilation system should be at the top of the grow box, since hotter air always rises.
Components of the ventilation system
First of all, the basis of any ventilation system is a fan, which is installed to exhaust air outside the grow box, attached to the outside of its wall. As an example, I would like to give the duct fan model TD-MIXVENT 160/100.
Its productivity of 160 m3/hour will be quite enough for a stealth box and a small full-fledged grow box. It works almost silently. Its engine is protected from the negative influence of external factors in accordance with protection class IP 44, which provides it with a long service life. In case of overload, the fan can turn off on its own. The grower can also regulate the voltage supplied to it, which allows you to change the operating speed.
The MagicAir 160/100 m3 carbon filter will work perfectly in tandem with this fan, allowing you to clean the air inside the grow box.
All thanks to a cartridge with high-quality activated carbon, which is recommended to be changed only once a year. The model is equipped with a replaceable fabric pre-filter, which can significantly extend the working life of the cartridge by trapping dust, pollen and other small particles. It lasts for 3 months of work, after which it is enough to simply wash it. The material does not lose its qualities within 3 washes.
The last element of the ventilation system is the air duct. For the ventilation elements already mentioned above, an Aludec DA3 air duct with a channel diameter of 102 mm would be suitable.
It has a layered structure consisting of aluminum foil and polyester, which is based on steel spirals. The corrugated surface provides the air duct with ideal flexibility. Its total length is 10 m. It is secured using ordinary clamps.
How to make a growbox
The day I was approved for medical cannabis, I felt relieved. After that, I knew I needed to plant the plants as soon as possible.
I had been dreaming about this for a long time and was happily looking forward to getting my first harvest, curing the buds to perfection and collecting the resin for concentrates. I imagined how I would keep a journal of observations and gradually become a real expert in this field.
But then reality interfered with my plans: my house was small and located in a densely populated area.
My confidence immediately evaporated, and I quickly abandoned the idea of dedicating an entire room to cannabis. After some thought, I came to the conclusion that I just needed a discreet way to grow my own plants. This goal turned out to be much more realistic, and I decided to stick with it.
After months of researching about cannabis and looking around the house for suitable nooks and crannies, I was able to solve my problem. I needed a hidden grow box in the form of a cabinet.
On the Internet I found a suitable cabinet with dimensions of 76x60x177 cm, and then bought a duct fan with a diameter of 15 cm. I also had a 400 W kultub lamp from the previous grove. After downloading Google SketchUp, a 3D rendering program, I began creating the design.
Note. If you've never used Google SketchUp, the program can be difficult to understand. In some cases it is easier to use a regular pencil and paper.
First of all, I figured out the hood, which should provide the hemp with a flow of fresh air.
The basic rule for ventilation in any grow box: the inlet should be approximately twice the size of the outlet. This will maximize the efficiency of the fan and increase its service life.
Since I had a fan with a diameter of 15 cm (that is, the opening area was approximately 176 cm2), I took two 12x20 cm louvres, which in total gave me an area of 480 cm2. The grilles themselves reduced the free flow of air by about 30%, so the final area of the inlet openings was 336 cm2 - almost ideal.
Of course, I needed an air filter to prevent dust, animal hair, pollen, mold and other dirt from getting on the hemp. I made a box on the floor of the closet to which I attached the grilles, and left space inside for the filter.
After that I decided to hang the lamp. I had a very long and elongated HPS, which I placed crosswise in the closet for maximum effective lighting. It took me a little ingenuity to install it.
The width of the cabinet was 60 cm, and the length of the cooler was 50 cm. There was barely enough space to attach two more flexible air ducts with a diameter of 15 cm for additional cooling. Otherwise, I would have to keep the doors open, which is not the best option for secretive growing. So I decided to install ductwork on the outside of the cabinet.
I built an additional compartment for ventilation measuring 25x10x120 cm.
Next, I cut three holes with a diameter of 15 cm in the back wall of the cabinet, located at a distance of just over 20 cm from each other. With their help I could change the height of the lamp. I closed the unused holes with plugs.
On the top shelf of the cabinet I equipped a closed chamber for a duct fan. To it I attached a speed controller for its rotation and a timer for turning the light on and off. On top, outside the cabinet, I installed a carbon filter, placing it in a plastic container so that it does not attract unnecessary attention.
There is space left next to the ventilation chamber for technical devices. This is where the ballast and all the switches are located.
I also installed a kilowatt consumption tracking device to easily calculate additional monthly electricity costs. To prevent the equipment from heating up, I cut a hole with a diameter of 10 cm into the ventilation chamber.
In the end, I was able to harvest 264g of buds (255g after drying and curing), which cost me $1.64 per gram including the cost of electricity, carbon filter and fertilizer.