The period of early childhood is the most favorable for the development of all kinds of inclinations and abilities. And nothing develops a child’s creative thinking better than making all kinds of crafts with his own hands. This could be coloring books, working with plasticine, drawing, making various products from scrap materials, such as feather flowers, origami or appliqués. There are also crafts that combine different materials and types of work. For example, applications with origami or drawing elements. However, it is important to pay enough attention to the choice of a subject for children’s creativity, since good work is only possible if the child is interested. So, all children are delighted with the first spring flowers, so the “Snowdrop” applique will certainly interest them. Especially if the kindergarten teacher brings them several colorful pictures depicting these flowers and tells them about the peculiarities of their growth, an interesting fairy tale, a legend, or asks riddles related to them.
Preparation of materials
The Snowdrop application in kindergarten, like any other creativity, should begin with the preparation of materials. It is necessary a day, or better yet a few, before you plan to make this craft, ask the kids to bring the following tools and materials: scissors, glue, colored paper, standard white sheets and cardboard. It is important to draw children's attention to the fact that the scissors are comfortable for them to use - not too big and not too small. As for glue, it is most convenient for kids to work with a “pencil”, and for this activity it will be quite enough.
If it is planned that the “Snowdrop” applique should turn out to be more original, then additional items may be needed. These include white paper napkins, colored pencils, felt-tip pens or paints, cotton pads, oilcloth, stapler, and corrugated paper.
Application "Icicles"
This is a simple application that even small children can handle. But at the same time, it turns out very cute and gives hope that warmer weather is approaching. She needs very little:
- White paper
- sheet of colored cardboard
- pencil
- scissors
- glue
On a white sheet of paper with a pencil we draw hanging icicles and droplets. Cut them out and glue them onto a colored base. It turns out this is the call of spring:
While working, you can offer to listen to the wonderful Song - drops :
The droplets woke up the snowdrops...
Paper snowdrops: making a flower and stem
Since we are talking about appliqué, first of all it is necessary to select a base to which all the elements will be attached. To do this you will need blue or light blue cardboard. It is to this that the stems, leaves and flowers of the snowdrop, as well as snow and clouds, will be glued in turn.
The “Snowdrops” paper applique begins with making stems, which must be cut out of green paper and glued to the base. Next, you need to cut out a square measuring 5x5 cm from white paper and fold it diagonally. You will get a triangle, which must be cut in half in height using scissors. As a result, three petals will come out - a large one and two small ones. Each of them must be given a rounded shape. Next, two small petals should be glued to the stem so that the corners are together, and the rounded sides are at some distance from each other, and a third one should be glued on top. It is worth noting that it is necessary to fasten the parts only to the upper corner, then the “Snowdrop” applique will look voluminous.
Technique for creating the kanzashi snowdrop itself: master class
Make three petals for each stamen.
And glue the last two petals together to represent a bud. Glue it to the fifth toothpick without a stamen. Now make leaves for your primroses. Take ribbons of green satin shades and cut out trapezoids, the sides of which are 4 and 1 cm.
Snowdrops Kanzashi. Gift pot / Snowdrop flowers kanzashi. DIY
For work we need three types of satin ribbons, 5cm wide - white, yellow and green. And also a standard set: scissors, ruler, thread with a needle, glue, floral wire (any thickness that suits you - this will only affect the flexibility of the flower product), tweezers and a candle. Fig.1. We cut the white ribbon into 5x5 cm squares using 3 pieces per snowdrop. Fig.2. We singe the edges of the blanks and fold them as shown in the figure once, and then again along the dotted line. Fig.3. We cut the workpiece along the red line and process the cut above the candle. Fig.4. We received a workpiece.
Fig.5. Now we cut the resulting workpiece as shown in Fig. and process the cut above the candle. Fig.6. The workpiece must be processed again over a candle, melting the corners marked with a red line and giving the workpiece a rounded shape. Fig.7. Then immediately, before the cut processed over the candle has cooled, turn the workpiece inside out and give it an S shape with your fingers. Fig. 8. We get this petal.
Attention!
Rice. 11. For the center, cut 3 cm from the white and yellow ribbon, 1 piece per blossoming snowdrop. Rice. 12. And from the green - a segment of 2.5 cm. Fig. 13. And two round blanks for a bud and a half-opened bud. Rice. 14. We process the edges of all the blanks above the candle, except for the yellow one. We singe the yellow workpiece only one edge, and open the second to the middle with a fringe.
Rice. 15. Glue or sew the white and green blanks. Rice. 16. Prepare the floral wire by cutting it into 10 cm pieces and bending it at one end. Rice. 17. We sort the petals by size (no matter how hard we try, they turn out a little different). Rice. 18. We begin to assemble the flower by winding the yellow blank into wire, fixing it with either glue or a needle and thread.
Rice. 19. On top of the yellow one we wind the white-green blank in the same way, fixing it either with glue or with a needle and thread. Rice. 20, 21, 22 Glue the petals sequentially, aligning them along the top edge, not the bottom. The petals should slightly overlap the middle.
Rice. 23. We form the basis for the bud and the half-opened bud from a round green blank, stuffing it with padding polyester. Rice. 24. We get these oval-shaped blanks. Rice. 25. We glue them with white petals: the bud is joint to joint, and the half-opened bud is not completely open.
Rice. 27, 28 To give the blanks the final finished look, we form a “cup” using green threads by winding. Rice. 29, 30 It should turn out like this. In the future, I open the thread winding with varnish (I have a panel one left over from the renovation) to fix the threads and strengthen the structure.
How to make wonderful primroses from satin ribbons in two versions, and video from YouTube.
Headband for girls “Snowdrops”
A master class that will help you make a spring head decoration for a girl, for example, for a kindergarten matinee or for the March 8th holiday.
Necessary materials:
- Satin ribbon:
white (width 5 cm) – 2 meters;
green (width 2.5 cm) – 1.5 meters; green (width 0.5 -0.6 cm) – 2 meters.
- Plastic white rim (width at least 1 cm) – 1 piece.
- The stamens are yellow - 3 threads per flower.
- White cotton threads.
- Needle.
- Scissors.
- Felt in the color of green satin ribbons – piece 2*7 cm.
- Thermal gun + rods.
- Lighter or candle.
Note:
We will need felt if the width of the rim is less than 1 centimeter, since it will be quite difficult to fit a sufficient number of flowers on a narrow rim.
Let's start with the flowers.
So, take a white satin ribbon. Cut at least 30 squares of 5*5 cm. Treat the edges with fire from the cut side of the tape.
Take 3 threads with yellow stamens. Fold them together, then in half. Apply a little hot glue to the bottom and twist.
Now place the twisted stamens in the center of the square and carefully pull the thread together.
We wrap the “tail” of the flower several times at the base with the same white thread, trying to secure it as tightly as possible. Then we stitch the base with two stitches. Cut the thread.
We make the rest of the flowers in exactly the same way.
Next step: making leaves.
Take a green satin ribbon (2.5 cm wide). Cut pieces 4-5 cm in length.
Fold each rectangle in half. Cut out the leaf. Fire heat the edges. And make small folds at the base of the petal, also with the help of fire.
Our leaves and flowers are ready. Let's start designing the rim itself. Take a green satin ribbon (0.5 cm wide). Cut two small pieces about 1 cm long. Glue these pieces along the edges of the rim (as shown in the photo).
Then we glue the tip of the tape and begin to wrap the rim, constantly maintaining the tension of the tape.
You can arrange the flowers on the rim as you like. A bouquet of snowdrops will look both in the central or side part, and throughout the entire area of the rim. Take a green leaf and glue it just above the beginning of the rim (approximately 8 cm). We attach the first snowdrop.
Then glue two more leaves a little lower, covering the lower part of the flower.
We add two flowers on the sides, trying to leave as little distance as possible between the leaves.
In this order, we continue to decorate the rim, symmetrically alternating flowers and leaves.
This is what the rim looks like from the inside. If you have a thin headband, then you need to cut out an oval 12 cm long from felt. First glue the felt to the headband, then add flowers.
This is the beauty we get! Let your little daughter be the princess of spring!
Video from YouTube on how to make beautiful snowdrops from individual petals with your own hands, the flowers look like real ones!
Egg stand for Easter
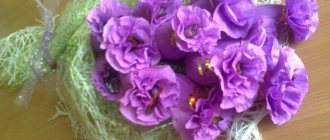
On the eve of the bright holiday of Easter, many women are busy looking for new and tasty dishes for the festive table. Every housewife wants to surprise her family and friends with her abilities. Every woman also wants to create comfort and a festive mood in her home on this day. This will be easy to do with the help of these kanzashi style snowdrops
. Small compositions of these flowers will fill the house with spring and tenderness. With these flowers you can decorate a dish with Easter eggs, put several flowers in different places in the rooms, or decorate beautifully folded napkins with them. It all depends only on your inspiration and desire.
To create a composition of 5 snowdrop flowers
you will need:
1.20 m of white satin ribbon with a width of 3 cm,
1 m of green satin ribbon with a width of 3 cm, 20 cm of yellow satin ribbon with a width of 2.5 cm, 50 cm of light green satin ribbon with a width of 3 cm, thin gold or silver ribbon, 5 toothpicks, universal Moment glue (preferably transparent), scissors, ruler, candle and matches.
So, let's make flowers.
First you need to cut 14 pieces of 7 cm each from the white tape. We will need 3 pieces for 4 flowers, and 2 pieces of ribbon for the 5th bud.
Take one piece of tape and fold it in half lengthwise.
Then fold the folded piece in half without letting go. A rectangle with dimensions of 3 by 3.5 cm should form.
Take scissors and lightly cut off the split edges that are on the bottom of one side. Next you need to light the candle and scorch the cut edge. After which you need to sharply and immediately squeeze the treated edge together.
Then take and cut off a little the corner between the side you just made and the piece corner. Then scorch the cut corner and immediately squeeze it with your fingers. Leave the workpiece for 10-15 seconds, and then carefully turn it inside out. You should have a petal formed.
Then take the two small edges from the bottom of the petal and bend each in two places. Then lightly trim the folded edges and singe. Now we have a real perfect snowdrop petal.
Make exactly the same petals from the remaining pieces of ribbon.
Take the yellow ribbon and cut it into 5 pieces. Cover four toothpicks one-third full with glue and wrap with yellow tape.
Then cut 5 pieces from the green tape with a length of 2-3 cm. Glue the green tape around the yellow one, just lower the green tape a little.
Below the green tape, glue the remaining white pieces of tape around the toothpick. These will be beautiful snowdrop stamens. Glue 3 petals to each stamen.
Glue the last two petals together. Glue the bud to an empty toothpick, placing it inside the flower.
For leaves
you need to cut the green and light green ribbons into small trapezoids with side sizes of 1 cm and 4 cm.
Then fold the equal sides of the trapezoid from the wrong side and singe them. Press the finished edge with your hands.
Then carefully turn out each prepared leaf. All leaves will be in the form of a round arrow.
Glue flower leaves below the petals.
Cut the gold or silver ribbon into small pieces and glue directly to the .
After complete drying, you can safely make compositions from these spring flowers.
More interesting:
Making sepals and leaves
Now the sepals, because only with them the “Snowdrop” applique will look realistic. To make it, you will need to cut out a square with a side of 1.5 cm from green paper, fold it diagonally and cut a triangular depression on one of the open sides of the resulting figure. Glue the resulting part at the junction of the flower and the stem.
There are leaves left. You need to cut out three strips of green paper, 10-12 cm long and 1-1.5 cm wide, which are sharpened on one side. Glue the finished leaves to the bottom of the stem. The “Snowdrops” applique made from paper will turn out to be more original if you twist the upper part of the leaves a little using the sharp side of scissors and glue them only to the lower part.
At the final stage it is necessary to make snow. To do this, you need to take two rectangles, 5x10 cm in size, cut out of white and blue paper. Having folded them together, you should use scissors to give the upper edge a waviness. Then stick the blue part onto the base, slightly covering the stem, and the white part 1-2 cm below.
Materials for work
To make a bouquet of five flowers, you will need:
- A white satin ribbon 3-4 cm wide and 1.3 m long.
- Green satin ribbon.
- A yellow satin ribbon 2.5-3 cm wide and 25 cm long.
- Light green satin ribbon 3-4 cm wide and 50 cm long.
- Thin golden ribbon.
- Toothpicks (5 pieces).
- Glue gel “Moment”.
- Scissors.
- Ruler.
- Matches.
- Wax candle.
Snowdrops made from napkins and paper
On the back side of green colored paper, using just a pencil, you need to draw leaves, stems and cut them out along the contour. It is with this step that the “Snowdrops” applique made from napkins and paper should begin. Then you can move on to the leaves. To do this, you need to fold a white napkin in four, cut it into even squares and, holding them all together, use scissors to shape the petals, which are fastened to each other at the bottom using a stapler. Next, you need to bend the lower edges so that the staple is not visible, and spread the upper edges in the form of a fan, giving the flower the shape of a snowdrop. White corrugated paper can also be used instead of napkins.
When all the applique elements are ready, all that remains is to glue them onto light blue or dark blue cardboard. The composition can consist of one flower or several. To get a more realistic picture, you can cut out trees and bushes from gray or black paper and stick them in the background, and attach a rectangle of white paper to the bottom of the base, which will imitate lying snow.
Crochet snowdrops
Have you heard the term "galantophilia"? It means nothing more than collecting snowdrops. One of the most famous and largest collections of these flowers grows in the west of the English county of Gloucestershire, in the town of Colesbourne Park. It was started by Henry John Elwes - 130 years ago he began collecting snowdrops, began their professional breeding and detailed descriptions. In honor of this scientist-breeder, they even named one of the types of snowdrops - “Elvis’s snowdrop”.
How to crochet snowdrops - job description on the goldenlucycrafts website
Paper applique with origami elements
No less interesting for children can be the “Snowdrops” applique made from paper with origami elements. Don't be intimidated by this technique, as folding the first spring flower is quite simple. To make a snowdrop, you need to take a square sheet of white paper measuring approximately 10x10 cm, which you need to fold diagonally, and then bend the top of the resulting triangle back. Then fold the sides down one by one. This will be the flower, without which the “Snowdrop” applique in kindergarten is unthinkable.
Next, you need to cut out leaves, stems and sepals from green paper according to the scheme described above. Then glue all the parts to the base, for which it is best to choose blue cardboard. It is also worth noting that the flowers must be glued with bent triangles to the outside.
Technique for creating petals
Cut 14 pieces of 7 cm long from the white ribbon. For four snowdrops, take three pieces of fabric, and the fifth flower will be a bud; two pieces will be enough for it. Take a piece of ribbon and bend it lengthwise, and then crosswise again. You will get a quadrangle 3 by 3.5 cm. Trim the edges from below on one side and melt the cut, pressing it sharply.
Cut a corner where the fabric folds. Sear it and press down sharply. Let it all sit for 25 seconds. Turn the petal inside out. Bend the bottom pair of edges of the petal twice. Cut them and melt them. Here is the first petal!
Snowdrops in a basket
When your children are familiar with all the variations of making snowdrops, you can invite them to complement their applique with a basket. To do this, you must first glue many flowers with leaves and stems onto the base, and on top of them - a basket, previously cut out of brown cardboard. To achieve a volume effect, the handle does not need to be glued.
The application “Snowdrops in a Basket” can also be made as follows: cut out a basket with a handle from brown cardboard, draw large cells on it with a black or gray felt-tip pen, and then make cuts on some lines into which to insert flowers. To prevent the snowdrops from falling out, you can cut out another template of the same color and glue it to the back of the product.