Making chain-link mesh at home
RSS Article Feed:
Search articles:
Home production of chain-link mesh is important for both commercial and personal purposes.
It is advisable to make it manually for the household to create cages for rabbits and various enclosures. If you need large volumes, it is better to order a ready-made PVC mesh. To make chain-link mesh at home, there are two key methods: with and without a machine. At the same time, you can also create the machine yourself, since it is a structurally simple mechanism.
Video: making chain-link mesh at home
SILK PRINTING AT HOME
home
Blog
Screen printing at home
Introduction
Every day our factory receives a large number of requests for sewing small batches of clothing (up to 50 pieces). These are mainly small brands that do not have large budgets and cannot order a large batch at once. Most customers want to decorate their products with a variety of images or logos. But since the batch is not large enough to order silk-screen printing from application factories, and they do not like other application methods, customers are faced with the problem of finding a factory that is ready to fulfill their order.
Why are factories ready to do silk-screen printing only on medium and large batches?
This method is the most reliable and economical, but why on almost any website will you see information that the minimum batch is 50 or 100 pieces? This is explained by the fact that preparation for application takes a lot of time, and for small batches there is no point in setting up equipment and preparing stencils (which also have a considerable cost).
In this article we will tell you how to do screen printing at home, make a stencil for printing and select the appropriate equipment.
Equipment
We will need a little, namely a stencil mesh, a wooden frame, silk-screen paint, a squeegee, a photosensitive emulsion, a sensitizer, the product to be applied to (in our example, a T-shirt), as well as a hammer, nails and pliers. I would like to make a separate point about such devices as a squeegee:
A squeegee is a tool that works on the principle of a spatula; it scrapes off all the paint from the surface, filling in the recesses and pushing the paint through the mesh. In our homemade method, you can use a homemade squeegee made of plastic or wood.
Screen mesh, paint, emulsion and sensitizer, frame and squeegee
You can find stencil mesh, emulsion and paint in a specialized store or order it online. The mesh is usually sold in sizes from 1x1 meter. Textile paint is best suited; it is better if it is plastisol, as it is suitable for all types of materials. Before purchasing paint, check which meshes it is suitable for (check the number of cells in the mesh and on the paint).
The photo emulsion is selected for the paint, the sensitizer comes complete with the emulsion.
What is a sensitizer? – This is a substance used to increase the photosensitivity of photographic materials. All you need to know about this is that it will need to be added to the emulsion, but more on that later.
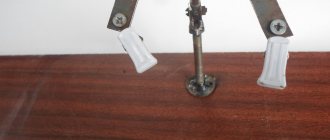
Installation of the mesh on the frame
The mesh needs to be pulled as tightly as possible and secured to our frame. The easiest way to do this is if the frame is wooden. Make sure that the mesh remains perfectly smooth, without creases or dents, otherwise the drawing will not turn out the way you expect it to be. Once you have stretched the stencil mesh, trim off the excess around the edges.
Installation of mesh on frame
Before you make or buy a frame, you need to figure out the size; there is only one rule: the frame must be larger than the print so that it is comfortable to work on.
Emulsion…
For the following procedures, we will need a dark room with a red lamp (these are used for developing photographs from film cameras), which can be purchased at almost any market or in a specialized store.
In a dark room, open the emulsion and mix it with the sensitizer (before this, the sensitizer must be mixed with water). Next, we apply the emulsion to the entire surface of the mesh, making sure that there are no gaps left, it is important that the entire surface is covered. Then leave the emulsion to dry for 30-40 minutes. After 20 minutes, you can blow dry it to ensure it is completely dry.
Stencil exposure
Before you begin this stage, you must prepare a drawing that you will transfer to your product. The drawing should be done in black, preferably on transparent or oiled paper. If you can only print it on plain paper (a regular white sheet will do), then you will have to cut out your design.
Place the frame on something black (you can use black fabric or plywood, but it must be black). Next, we place the finished drawing on the frame and cover it with glass on top, as tightly as possible so that parts of the drawing do not protrude.
Stencil exposure
When all the steps have been completed, you need to light the stencil. To do this, place a lamp (300 W is enough, but ideally find a lamp with a power of 500 W or more on the market or in a specialty store) at a distance of 40 cm from the stencil and turn it on for 30-40 minutes.
After this, we need to thoroughly rinse our stencil with a cold shower with the highest possible pressure. Our stencil is ready, let it dry and proceed to the next step.
Drawing
Before you start applying the print, you need to figure out how to position the T-shirt as tightly as possible on a flat surface. For example, you can stretch a T-shirt onto smooth, treated plywood, but here it’s more convenient for everyone, but we remember that the smoother the application surface, the greater the likelihood of getting a high-quality print.
Next, we press our frame as tightly as possible to the T-shirt with the inside side so that the mesh is as tight as possible to the T-shirt. Now the application itself... apply a small amount of paint to the inside of the frame and, with a sharp movement of the squeegee, draw the paint over the area of the drawing. After this, carefully lift the stencil and lay out the T-shirts to dry. That's all, the print is ready, all you have to do is wait for it to dry and you can enjoy your first silk-screen printing.
Drawing
Conclusion
Few people succeed in making a high-quality application the first time, but with experience you can do no worse than in many factories. This method is perfect for beginning brands and fashion designers, but for large batches or multi-color printing it will not be enough. If the article is popular, we will try to release a new article in which we will consider multi-color silk-screen printing at home.
Our Sewing Factory is engaged in applying prints on clothes using silk-screen printing. If we want to order a large batch of clothes, it would be best to do this at the factory, because They use specialized equipment, which reduces the likelihood of defects to zero.
A more detailed description of silk-screen printing can be found on the website Zi-tex.ru
It might also be interesting...
Sewing T-shirts wholesale
How to make a chain-link mesh without using a machine
It is quite possible to make a chain-link without a special machine, although the process will be quite labor-intensive. The material can be used metal wire or plastic.
Weaving a chain-link mesh from wire implies a clear algorithm of actions:
- We select a tool with which we will give precise bends to the wire.
- Selects a wide wooden board, the length of which is equal to the width of the future product.
- We drive nails into the board, observing a checkerboard pattern. Remember that the size of the cells depends on the distance between the nails.
- We cut rods of equal length using soft steel wire.
- We put on work gloves.
- We slowly bend the wire around each nail.
- The blanks are connected by weaving them into each other and rotating one of the rods around its axis, similar to screwing.
There is another way of weaving without a machine. For it you will need:
- Wire cutters that will be used to cut the wire into equal parts.
- Wire made of aluminum or other metal that can be deformed.
- Rulers made of wood or an electrode bent in half.
Next follow the instructions:
- Take a ruler or electrode and wrap the wire tightly around it. The turns should be located close to each other.
- Recheck the bends. Please note that the width of the ruler determines the size of the cells in the grid.
- Remove the wire, wind the second rod. Please note: you only need to wind in one direction.
- Stretch the removed blanks to equal width.
- Thread the resulting zigzag spirals into each other, making rotational movements.
- It is better to secure the first and last rows to avoid the mesh from falling apart.
- Plastic tape 3-5 mm wide or a long plastic tube of small diameter (2-3 mm). This material can be made from an ordinary plastic bottle.
- Alcohol lamp.
- Ruler.
It is possible to produce decorative chain-link mesh from plastic. To do this you need:
To create a plastic chain-link, follow these steps:
- Draw squares on the ruler that will serve to orient the tape.
- Use a clothespin to secure the edge of the tape or tube to the ruler.
Wind the material onto the ruler, heating each bend over an alcohol lamp for one second.
How to make a fishing net with your own hands
Industrially produced fishing nets are not cheap at all; in addition, they are inconvenient to store and transport from place to place. This article will show you how to easily make your own fishing net that will serve you well.
1. Whether you want to make a fishing net to help you catch fish with a fishing rod, or make a large net that you set in the water to catch fish, the first few steps will be the same.
2. First you will need threads, which you must cut into pieces of the required length. For a fishing net, you will need to cut the thread into lengths that are 1 foot (30 cm) longer than twice the desired length of your net, so for a 60 cm long net you will need 150 cm long threads. In addition, you will need cross threads, one for each inch (2.5 cm) of the final length of the net, the length of each thread should be 10% longer than the circumference of the net. For a cast-on fishing net, you will need to measure the desired length of your net and a second measurement that is 10% longer than the final width of the net.
3. You will need as many threads as there are inches in circumference (net) or length and width (cast net). In this case, you will get a network with a cell size of 2.5 centimeters wide. If you need a larger or smaller cell size, make appropriate changes to your calculations.
4. At this point, you will need to perform different procedures depending on how your network is designed. For the fishing net you just need to do a few very simple steps. Simply lay out the long strands parallel to each other, 1 inch apart, and then place shorter strands on top of the long strands, perpendicular to the long strands. At this point it looks like a real fishing net and you can skip the next two steps.
5. If you are constructing a net, you will need to make a rim from flexible, thin tree branches; branches cut from a live pine tree work best. Use the remaining threads to tie the two ends of the branch and make the rim of the net. The length of the rim should be such that you have one piece of thread for every TWO inches (7 cm).
6. Work with one half of the bezel (if it were a dial, you would take the 6 to 12 o'clock portion). Tie the threads to the rim at a distance of 2.5 centimeters from each other, so that half of the rim looks “overgrown with long hair.”
7. Now it's time to start tying knots. For a cast-on net, you need to tie a straight knot at each intersection of the threads. If you are making a net, the process is somewhat more complicated, but quite doable. You start by taking each tied thread and tying its loose end directly to the opposite edge of the rim. The hanging threads should now resemble a mesh. Now you need to tie the first short thread 2.5 centimeters below the rim with a straight knot to the first hanging thread, and then move in a circle from one hanging thread to the next, tying a knot at each intersection, until you return to the beginning. Go down 2.5 centimeters and repeat the entire procedure again, and then continue the process until you reach the bottom of the net.
8. You did it! There are, of course, a few more minor design changes left to make, but you can find information about them in the Tips section.
Adviсe
— If there are breaks in your net, you can easily repair it using the remaining pieces of thread; such damage often appears on the mesh of a net. - If you want to fish in a small river, you can tie a long stick to the narrow edges of the net and stick them into the bottom of the river, making sure that your net is suitable for such fishing. - If you want to really set up a net, tie a stone to each corner. Instead of rocks, you can try taking tennis balls and filling them with sand. Using a nail, pull additional threads through the ball to make it easier for you to tie them to the net. — Usually a clew knot, also known as a weaver's or bucket knot, is tied for all these purposes. It is very reliable and never comes undone on its own. if you tie it correctly.
Warnings
— If you are going to eat your catch, be careful, some fish have very sharp teeth. — Don’t forget to check the fishing regulations in force in your area. Some places prohibit net fishing, while others only allow the use of a net to catch fish caught with a line and hook. — If you plan to release the caught fish into the wild, use cotton or hemp threads to make the net. Nylon can damage the protective skin of the fish and cause its death. - Be careful when hanging the net, don't tangle it. Knots on nets are very difficult to untangle and if your net is tangled, cut only one strand, being careful not to make the wrong choice, otherwise you may end up with your net falling apart into separate strands!
What you will need
- Threads, cotton or hemp threads are best, but nylon threads are more durable. — Scissors — A flexible piece of wood.
Source: ru.wikihow.com
Using and making a homemade machine
Producing chain-link mesh at home using a machine is much easier and faster. Buying such a machine is expensive, but making it yourself is much cheaper. To make a machine for making chain-link mesh, you will need:
- A piece of pipe.
- Metal pieces from different types of metal.
- Plate.
- Bearing races.
- Welding device.
- Bulgarian.
- Rollers.
- Metal corners.
- File.
- Chalk.
- Rope.
- Sandpaper.
The most important part of the machine is the coiling unit. It consists of a screw and a knife with which the wire is curled. The size of the cells depends on the format of these components. Rotating, the knife creates turns of a certain size, and the auger sets the distance between them (pitch). A flat strip of steel acts as a coiling plate. At one end there should be a hole for the handle.
The auger is a hardened steel pipe with a spiral slot. In order to get such a groove, use a rope and chalk: attach a rope, outline it with chalk. Next, cut a slot according to the outlined pattern. Go over the cut with files and final sand with sandpaper. The length of the pipe should be sufficient to lay 3 full turns. There should be a space of no more than 1 mm between the knife and the pipe, otherwise the wire will be snagged. In this case, the knife should rotate absolutely freely, and its end should protrude 1-2 cm from the pipe.
For easy sliding of the wire, the corners and grooves must be well rounded and treated with oil.
You need to cut 2 pieces from a metal corner, equal in length to the pipe. We weld them to the pipe so that it seems to be located between them. This structure is fixed to the base by screwing it to the working surface through special holes. Place the machine itself so that it is convenient for you to rotate the handle, parallel to directing the spiral. Do not allow the workpieces to become tangled under any circumstances.
You can insert a piece of pipe into the center of the skein and attach a weight to the end of the wire by passing the end through the tension rollers. This helps get rid of wire ringing. The distance between the rollers is set using a screw.
Before large-scale production use of the machine, you need to check it by passing the wire through the device. If you get an even row with the desired shape and size of the cells, then the machine is assembled correctly.
Video: do-it-yourself manual machine for chain-link mesh
Machine for Knitting Fishing Nets • ARTAFISH.RU
A M.Laas, M.M.Pàþëàéä, A.T.Kaoki and A.ß.N.
Tallinn branch of the Central Design and Technology Bureau of the All-Union Fishery Association of the Western Basin. Zapriba (71) Applicant (54) NET KNITTING MACHINE
The invention relates to industrial fishing technology and was created for use in the process of manufacturing large-mesh rope trawl parts.
10 m. Today, manual formation of cells from thick rope with a diameter of up to 40 mm is very labor-intensive and practically unproductive.
The purpose of the invention is to increase productivity by mechanizing the process.
This goal is achieved by the fact that the means for forming cells additionally contains an endless drive chain with hooks connected to the latter by levers, stops installed along the movement of the chain, and an intermediate storage of formed loops, while the tubular elements are equipped with rods for securing the nodes and are placed coaxially each other, and the endless chain is installed perpendicular to the tubular parts. The drive has a snore-. a mechanism mounted on a shaft, a lever and an electromagnet in contact with the ratchet mechanism, with the lever mounted on the same shaft as the ratchet mechanism.
In fig. 1 shows a diagram of a machine for knitting nets; in fig. 3.5 on.
745995 cauldron storage for formed loops; in fig. 3 is a schematic representation of the beginning of knitting a net on a machine.
The means for forming a network mesh is essentially an endless drive chain 11 with hooks 12 (Fig, 3.2), connected to the latter by levers 13, stops 14, installed along the movement of the chain.
To fix the size of the formed mesh there is an intermediate storage unit 15 forming loops (Fig. 5).
How to make a loom for knitting nets
The drive has a ratcheting mechanism mounted on shaft 16, a lever 17 and an electromagnet 18, at the same time the lever is mounted on the same shaft with the ratcheting mechanism.
The endless chain 11 is installed perpendicular to the tubular parts.
The machine works like this.
Before starting work, use the stop 14 to set the required mesh size of the connected network and attach the loop drive 15 to the body.
The coil of rope 3 is installed under the hole in pipe 1. The end of the rope is passed through pipe 1, a knot is tied at the end and put on the rod
9 (Fig. 3). A loop of rope 19 is pulled out of pipe 1 and put on a hook
If the lever 17 is filled with swing loops, the electromagnet 18 is turned on, in contact with the ratchet mechanism, and the lever 17 is released, and the fixed loops of the rope fall to the floor.
To tie the second row of half-cells, the end of rope 4 is passed through pipe 3.5, tied to the end of the rope of the first row of half-cells, and the acquired knot is put on rod 10 (if you want to tie a network in the shape of a pipe, then the beginning and end of the rope
15 of each row of half-cells are connected together). A loop is formed from rope 4 and put on hook 12, the rope loop is stretched to the size of the mesh, removed from hook 12 and falls onto the lever
gp 17. The elongated rope 4 forms a knot at the end of pipe 2 and puts it on pipe 1. From the section of the rope between the knot on pipe 1 and pipe 3.
2 form a loop and put it on hook 12, after pulling the hooked loop to the size of the mesh, remove the knot from the rod 10, take the last knot of the previous row of half-cells from pipe 4.
5 and move it onto rope 4, tighten the knot and put it on rod 10. Loops are formed from rope 4 between the breaker on rod 10 and pipe 2.7 and put on the hook
A simple and quick way to knit fishing nets
12. Then the cycle repeats. If you need to change the mesh size of the connected network, you need to pause
35 chain 11, pull out the stop 14 together with the drive 15 from the hole and install it in a new hole, depending on the desired mesh size.
The advantage of the proposed device for knitting large mesh nets is that, thanks to the mechanization of the process, manual operations are simplified and facilitated. Compared to the well-known hand knitting, productivity more than doubles and, according to preparatory calculations, the annual economic effect from the introduction of the 1st device is 5 thousand rubles.
1. A netting machine containing an educational agent
745995 formed loops, here the tubular elements are equipped with rods for fastening the nodes and are placed coaxially with each other, and the endless chain is installed perpendicular to the tubular elements.
3.5. The machine according to claim 1, characterized in that the drive has a ratchet mechanism mounted on the shaft, a lever and an electromagnet, a contact. tirunnay with a ratcheting mechanism, with all this the lever is mounted on the same shaft with the ratcheting mechanism.
Sources of information taken into account during the examination
1. Copyright certificate USSR.M 140524, class. 25th 2.4/03, 1961.
Source
Source: https://artafish.ru/stanok-dlja-vjazanija-rybolovnyh-setej/
Production of chain-link mesh as a business
You can make a good business in the home production of chain-link because of the demand for the product. They need it:
- Owners of cottages and gardens. The area is clearly visible through the mesh: if the owner is away with his neighbors, he still controls what is happening on his territory. The product is also needed as a support for a hedge.
- Animal farm owners. Chain-link is used for cages and enclosures.
- Enterprises using such mesh as a fence. The high strength of the wire used ensures the correct operation of the security service.
- Construction companies.
The business of selling chain-link mesh will always be profitable. In addition, there is little competition in this area.
Knitting Fishing Nets
Agriculture and Food Cage and Chicken Coop for Poultry, Livestock Knitting Fishing Nets
- Product Category
- Quick Supplier Search Index
A total of 2,387 products from approximately 99 manufacturers and suppliers
FOB Price for Reference: US$0.145 /sq meter MOQ: 50000 sq meter
- Application: Packaging, Fishing, Shipping, Safety
- Material: PE
- Packing: One Roll One Polybag
- Standard: 70gsm, 80gsm, 2x50m, 3x50m. etc
- Brand: Sugrand
- Origin: China
Video Video Video
MOQ: 10 Ton.
- Technique: Weft Knitting
- Pattern: Plain Weave
- Style: Knitting
- Weight: ≥200g/m²
- Packing: Export Standard Packing
- Standard: 840,1260,1680,1890; D/1, D/2, D/3
Video Video Video
Sports Items and Entertainment Fishing Net Knitting Fishing Nets
- Product Category
- Quick Supplier Search Index
Total 1026 products from about 41 manufacturers and suppliers
FOB Price for Reference: US$0.145 /sq meter MOQ: 50000 sq meter
- Application: Packaging, Fishing, Shipping, Safety
- Material: PE
- Packing: One Roll One Polybag
- Standard: 70gsm, 80gsm, 2x50m, 3x50m. etc
- Brand: Sugrand
- Origin: China
Video Video
MOQ: 10 Ton.
- Technique: Weft Knitting
- Pattern: Plain Weave
- Style: Knitting
- Weight: ≥200g/m²
- Packing: Export Standard Packing
- Standard: 840,1260,1680,1890; D/1, D/2, D/3
Video Video
FOB Price for Reference: US$0.5-1.0 /piece MOQ: 500 pcs.
- Feature: High Strength, Low Shrinkage, Chemical Resistance, High Temperature Resistance, Wear Resistance, Waterproof
- Material: 100% Polyester
- Pattern: Painted
- Packaging: Carton: Make by Demand, 1000g/Cone, 1kg/Cone
- Standard: 100% polyester
- Brand: KANGFA
Video Video
FOB Price for Reference: US$3500.0-4300.0 /Ton. MOQ: 10 Ton.
- Material: Nylon
- Type: Cord Fabric
- Pattern: Smooth, No Pattern
- Structure: Uniform Fabric
- Packing: Export Standard Packing
- Standard: 840, 1260, 1680, 1890; D/1, D/2, D/3
Video Video Video
Page 3
Total 461 products from about 20 manufacturers and suppliers
Video
Source: https://ru.Made-in-China.com/tag_search_product/Knitting-Fishing-Net_nughysn_1.html
Do-it-yourself machine for making chain-link mesh - diagram
The production of chain-link mesh is the simplest business for home conditions. This business idea requires small financial investments. You can organize the profitable production of chain-link mesh at home using homemade equipment (drawings are described below). Over time, you can purchase ready-made automatic machines. The production technology is one of the simplest. Start your own production in three steps:
- Buy wire.
- Using a machine, weave a roll of chain-link.
- Sell the product at market value.
Business profitability from 70%. Chain-link mesh is a building material, which means it has seasonal active sales (6 months) and constant demand. It is impossible to replace it on the farm with cheaper fencing material. Let's take a closer look at all the stages of organizing the simplest home business.
Do-it-yourself manual machine for weaving a chain-link mesh
We make a machine for a chain-link mesh with our own hands. To understand the operating principle of coiling machines, let’s first analyze the design features of the finished product.
How to make a chain-link mesh with your own hands at home? The chain-link mesh is a chain of springs. Each individual line of the chain-link mesh has the shape of an oval spring when viewed from above (from the end side). During the process of forming a spring from wire, a second operation of weaving it into the previous spring simultaneously occurs. In this way, the whole fabric is woven. This simple operating principle of the machine during production allows you to produce high-quality chain-link mesh at home. The only limitation is the performance, which is at a satisfactory level.
To form oval springs from wire, it is necessary to make a coiling base from durable steel. As well as a screw sleeve, which sets the same pitch of turns. Together, these two parts form a spiral winding device, which is the basis of the operating principle of the machine. The winding bar is quite easy to make, as shown in Figure 3. And the sleeve is a more complex part. It should be made of a metal pipe with an outer diameter of 55mm. Along the entire pipe it is necessary to turn a spiral groove at an angle of 45 degrees on a lathe. Groove pitch 72mm. The width of the channel in the groove is 7mm. Now you need to correctly connect these two parts by placing the wound base inside the sleeve with a spiral channel. In order for the bar to rotate freely inside the sleeve, it is necessary to accurately match their axial centers. Making a stand and rack will help achieve a solution to this problem. The sleeve is connected to the stand by a weld. And the bar with the stand is hingedly connected, as shown in the figure. A handle or pulley for pass transmission from an electric motor is connected to the hinge.
The machine is fixed on the table so that the length of the table is no shorter than the length of the turns. By rotating the winding base (bar), wire is wound onto it with the correct bends and pitch of the coil, which provides a spiral channel in the sleeve. The wire moves along the bar and, rotating, is woven into the previous turn. After reaching a certain length, it is cut off with metal scissors. The process is then repeated cyclically until a web of the required roll length is formed.
To make this device you do not need drawings, just look at the schematic representation of the operating principle. And the sizes of the nodes depend on the desired cell sizes in the finished product.
Demand for mesh
Chain-link mesh is always in demand on the building materials market. Of course, its demand is sensitive to seasonality. But in the period from April to October, the sale of fish netting is characterized by good stability. According to marketing analyzes of building materials, chain-link mesh is purchased in 85% of cases for the construction of various types of fencing. For example:
- fencing at construction sites and summer cottages;
- construction of enclosures for agricultural species of birds and animals;
- production of sapetkas for storing hay and some types of feed or firewood.
10% of the needs relate to construction. For example:
- reinforcement for plastering work;
- pipeline protection;
- strengthening relief slopes.
The remaining 5% is used for other less popular purposes.
The price of the grid is formed depending on certain conditions:
- Design features: diameter of wire section; size and shape of cells.
- Type of consumables: galvanized metal; stainless steel; aluminum; with polymer coating; ordinary low carbon metal.
- Roll size (length height).
The pricing factors described above determine the range of products produced. For example, it is easy to attract buyers today with polymer-coated chain-link mesh. Wider assortment = more sales.
How to make a casting network with your own hands
The casting net is popular among fishermen all over the world. Recently it has become widespread in Russia. The popularity of this gear is explained by its ease of use. It weighs a lot, and it is often quite difficult to cast it, but the fishing efficiency pays off all the effort. Due to the high cost of this gear, many fishermen are trying to find out whether it is possible to make a casting net with their own hands.
Description of the gear
The casting net is a dome-shaped tackle with weights attached around the perimeter. Its design is very similar to the round canopy of a parachute.
Today such a net can be purchased at any fishing store , but it is very expensive there. Naturally, not all fishermen can afford such a purchase. In addition, ready-made gear does not take into account the physical parameters of the fisherman. They may be simply inconvenient or too big. Therefore, fishermen are eager to learn how to knit a casting net. Tables on the Internet make it easier to calculate the parameters of its individual elements and the network as a whole.
In our country, two types of casting gear are most popular:
American type casting network. She has powerful lines and massive weights. The peculiarity of its functioning is that when such a network rises, the radius of its lower boundary sharply decreases. As a result, the fish ends up in a kind of bag. Another characteristic feature is the presence of a special loop for securely holding the net with one hand.- Spanish type casting network. Its difference from the American variety lies in the presence of special pockets that ensure the capture of fish when lifting the tackle. The presence of these pockets is ensured by the special arrangement of cargo. They are sewn along the edge at a certain distance. This type is in no way inferior to the American one in terms of efficiency.
It is worth noting that the names of the types of gear do not reflect their design features . This is just a reflection of the traditions that have developed among fishermen. Tying an American woman is no more difficult than tying a Spanish woman. Which type is better - each fisherman decides for himself.
The technique of fishing with a casting net and the principle of operation of the gear do not depend on its type. The fisherman finds a place where fish accumulate and begins to throw the net there over and over again. After lowering the weights to the bottom, the cap tackle is carefully lifted. This net is not recommended for fishing in bodies of water with strong currents and a lot of snags at the bottom.
Selection of materials
Before you start weaving gear, you need to carefully prepare. Be sure to sketch out a drawing. Only in this case the net will be of high quality and will ensure a good catch. Before starting work you need to prepare:
The main web of the network. You can weave a mesh fabric yourself, but this work is very painstaking and complex. A novice angler will not be able to complete it. Therefore, it is recommended to purchase the necessary material in the store. This will save effort and time.- Braided cord. This is an important structural part of the network. The thickness of this element must be at least 4 mm. It will act as the edge of the tackle. Loads will be attached to it. This means that the length of the load cord must correspond to the circumference of the tackle.
- Throw rope. This cord should be thicker, but its diameter cannot exceed 8 mm. Ideally, the length of the throwing rope should be 7 m, but in practice 5 m is often enough for fishermen. However, professionals say that with experience there is a need to increase the length of the throwing rope. The longer it is, the further you can throw the tackle.
Set of weights. Each sinker tied along the edge of the tackle must weigh no less than 20 g and no more than 30 g. The number of weights will be very large, taking into account the fact that they will have to be knitted along the perimeter of the net in 10 cm increments. On average, one net takes up to 250 cargo.- Thick fishing line with a diameter of at least 1 mm. Slings will be made from it. In total, the seine will take at least 150 meters of fishing line.
- Central ring. It is necessary to fix the slings in one position. After passing through the ring, the lines are tied to the throwing rope. The connection between the slings and the rope can be achieved using epoxy glue or a special purchased device.
- A bay of lavsan threads for 100 m. They will be needed to fix the mesh fabric to the cargo cord.
When choosing the size of the casting net, you must not forget that its width is directly related to the circumference of the casting net. The required width can be calculated using a simple formula or looked at in a special table.
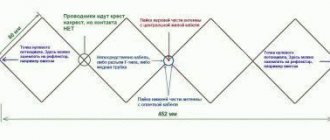
Seine weaving
So, there is a mesh fabric 3 m wide and 60 m long. First of all, it needs to be correctly cut into wedges.
They should be such that a circle can be assembled from them. When cutting wedges, you need to ensure that there is an angle of at least 45° between the vertical and the cutting line. The total number of wedges must be even. The fisherman chooses the number himself, depending on the overall size of the cast net. The resulting wedges should be carefully folded together. Next, the production of homemade gear proceeds according to the following plan:
Profitability of mesh production
The profitability of a home business for the production of chain-link mesh is at an attractive level for investment. The retail cost of a standard roll of chain-link (10 x 1.5 m) made of 1.6 mm thick galvanized wire with a cell cross-section of 55x 55 mm is $17. 1 kg of galvanized wire 1.6 will cost $1. Its consumption for production should be calculated using the following formula: (13.40 * D2)/A = Xkg/1m2. Indicator value:
- 13.40 kg/mm – constant;
- D – wire diameter in mm;
- A – cell diameter in mm;
- X – kg per 1 m2 of canvas.
That is: (13.40*1.6?) /55 = 0.62 kg. We have 15 m2 per roll, which means 0.62 * 15 = $9.3 – the cost of 1 roll. Now it’s not difficult to calculate the profit of $17 - 9.3 = $7.7 from one standard roll of galvanized mesh.
Advantages of producing chain-link mesh at home
This business idea is ideal for organizing home production due to a number of reasons. A business with small investments is determined by the following factors:
- The machine has a simple design and can be made by hand.
- The cost of consumables (wire, lubricant) is also very affordable for the first sales. Further, the business should be developed by investing earned money in it.
- Large areas are not required when organizing production. The mesh is wound into rolls and does not take up much space.
- Average performance. This is a rare degree of productivity for a home business. In 1 hour, a beginner can produce 2 standard rolls of chain-link.
It should also be noted that with such comfortable conditions for creating a business, its profitability remains at a good level. On the building materials market you can find plastic netting. But plastic will not be much of a competitor to metal fencing. Indeed, in 85% of cases it is used for fencing. While plastic mesh chain-link has its own disadvantages for fencing purposes:
- higher cost;
- low strength;
- zero fire resistance;
- fades in the sun.
In addition, a mesh with a polymer coating will not yield to many advantages of the plastic material. Organization of home production of chain-link mesh on a homemade machine, which you can make yourself according to the drawings.
How to decorate a chain-link mesh with your own hands photo
And for dessert, a few original solutions for decorating mesh fences. Look how original you can decorate a grid using: colored polypropylene tape, painted plastic bottles and Kinder Surprise boxes:
Chain-link mesh can also be used in landscape design:
The scope of application of such meshes is much greater than it might seem at first glance. Accordingly, this fact has a direct impact on the demand for goods in the construction market.
Making a chain-link mesh with your own hands
Making chain-link mesh at home. Homemade machine for making chain-link mesh: photo, video.
Chain-link mesh can be made at home using a simple homemade machine and metal wire.
There are inexpensive hand-held machines on sale, but you can make such a machine yourself; its design is not complicated.
Manual machine for making mesh netting.
Diagram of a homemade machine for chain-link mesh.
A manual machine for chain-linking consists of the following parts:
- Base.
- An auger is a pipe with a through groove in the form of a spiral.
- Knife is a plate for winding turns.
- Shaft with handle.
- Mechanism with rollers for tensioning wire.
The main parts of the machine are the screw and the knife plate, with their help the wire is curled into the spring. The size of the knife corresponds to the size of the wire turns, and the screw makes the distance between the turns - a step.
The screw is made of a steel pipe, on which a through slot in the form of a spiral is cut using a lathe.
The knife plate is attached to a shaft with a handle for rotation; if the wire used for knitting the mesh is soft, then a flat knife is used; if it is hard, then the knife must be bent around its axis; the stiffer the wire, the greater the bending angle.
The wire is fed to the machine under tension through a system of rollers.
To make a chain-link, you can use ordinary steel wire, galvanized or polymer-coated. A mesh made of uncoated steel wire will quickly begin to rust when exposed to atmospheric precipitation, so it must be painted immediately. It is more practical to use already galvanized wire; although it is more expensive, it does not require additional paint treatment. Polymer-coated wire is also used to make mesh, but has a relatively high cost.
Making a chain-link mesh with your own hands.
The technology for making chain-link mesh is quite simple: the machine is attached to a table, a coil of wire is placed near the machine, the end of the wire is passed through tension rollers and inserted into the winding mechanism.
We rotate the mechanism with the handle, and at the output of the auger we get a bent wire. We scroll the mechanism until we get the required length of the mesh blank, cut off the wire with wire cutters.
Next, we insert a piece of wire from the machine into the loop of the previous workpiece. We rotate the handle of the machine, the new workpiece is screwed into the loops of the previous workpiece, and again we cut off the workpiece. We continue to increase the mesh fabric in this way to the desired length.
As the wire blanks are built up, a web of mesh of the required length is obtained. The ends of the wire on the mesh along the edges need to be bent with pliers.
Using such a homemade machine, you can make a chain-link mesh for fencing a personal plot, making enclosures for birds, pets, or you can make a mesh for sale to order. The machine can be improved by connecting an electric motor and the productivity will be much higher.
The photo shows a machine working on this principle, but equipped with an electric motor.
Tips for beginning chain-link knitters.
Making a chain-link mesh, homemade machine video.
Fishing net knitting machine
Today, the production of fishing nets is divided into two main types: first of all, hand knitting without a machine and weaving with the specified device. We will not consider options for creating seines in production.
These products, which are manufactured in various ways, may differ not only in appearance, but also in quality. These two methods differ in the work processes, since in the first case manual dexterity is important, and in the second it is necessary to choose a good machine that will do most of the work of making nets.
If you are still wondering how to open a fishing business from scratch, we will try to explain all the nuances of this matter. The benefits of opening such a business far outweigh any risks.
- In this case, you will practically not need to invest money, since the equipment is not too expensive.
- You can work independently and involve your family. In this case, hiring workers will not be required, and this is a big savings.
- You can work in the garage or at home; you don’t need to rent office space.
- Starting a business from scratch, you can weave nets by hand at first, and later purchase a machine. And the greater your initial profit, the better quality equipment you can afford.
Based on all of the above, it is clear that the production of nets can indeed become a very good and profitable business, because this product is popular throughout the country and at any time of the year. You can sell it online, and you won’t need any special expenses to get started.
From time immemorial in Rus', the production of fishing nets was a very common activity, and to this day this art is wildly popular. Not only is fishing a pretty interesting hobby, it’s also a great business idea.
There are many people who have such a hobby in any region of our homeland. If the seine is well made, it will become a mandatory attribute of successful fishing in any body of water. But in order for the production of fishing nets to become a profitable business, you need to know a few basic points.
This will allow you to create products with high professionalism and sell them to people who are interested in fishing. We will talk about how to make high-quality nets, what types they come in, how to choose a knitting machine, and how to sell it all later in this article.
Networks without a machine
Nets without a machine are created from two materials: from durable nylon thread or from fishing line of the required thickness, which can be purchased at any specialized store. In order to successfully implement this work process, you must first prepare your workspace.
To do this, you can sit in any convenient place, for example in front of the TV, just sitting on a chair. It doesn’t matter where the production of fishing nets will take place, the main thing is that the process is carried out easily and simply.
Then you need to weave a shuttle with threads and begin to create the selected pattern. In this case, this is the customary name for the pattern that the network acquires during the manufacturing process. In fact, these are geometric wastelands between the threads, and the entire appearance of the product depends on what shape they are. There is nothing particularly complicated about this, the main thing is to choose a weaving pattern that is convenient for yourself, and everything will work out.
Networks on the machine
The machine takes care of all the main work, so you don’t need much manual dexterity.
Such networks are also created from nylon thread or fishing line - it all depends on what kind of product you want to see in the end.
But it is worth noting that if you plan to fish in a body of water with a large current, for example in a river, then it is better to make a seine from fishing line.
However, nets can be produced for sale in a variety of formats, patterns and materials, so that potential buyers always have a choice.
The main thing in this process is to choose a good machine, buy the necessary materials and just start working. Making fishing nets is not a difficult task; you don’t need to have any special knowledge or skills, everything is quite simple and easy.
Choosing a machine for hand knitting nets
How to choose the right machine for hand knitting nets? What should you pay close attention to?
The fishing industry is a sector of the economy where both large and small enterprises can feel confident. However, every fishing company needs fishing nets.
The production of such products can become not only a profitable business, but also easy to organize. To do this, it is enough to buy a machine for knitting fishing nets and then buy polyester or nylon threads as consumable raw materials.
Machine for hand knitting nets
For small production, you can use a hand knitting machine. To start working with it, just select the desired template and insert a bobbin with thread into the shuttle. And the knitting itself proceeds as follows:
- A thread is placed on the selected template.
- The lower part of the machine fits into the cell.
- The thread passes under the shuttle.
- The thread from the shuttle is pulled up and thrown in a semi-ring to the left.
- The mesh thread, passing by the shuttle, comes out from above.