In this video we'll talk about how to get rid of moles in the country. They do not feed on vegetables, but make numerous holes in the soil, which are used by shrews and voles, which can destroy crops. To get rid of these pests, you can make a pinwheel with your own hands.
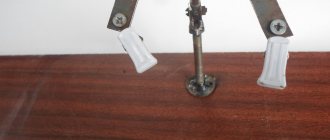
First, it is necessary to make a movable structural element. You will need an aluminum tube with a length of 25 cm. A through hole is made a little closer to one of the edges, into which it is inserted. The tube itself should rotate smoothly relative to the nail. A piece of wood, preferably round. A small carnation with a wide head. Thin copper or brass plate 4 x 25. Thin lightweight galvanized plate 15 x 15.
First we will make a weather vane that will rotate. We make a hole in the middle of the copper plate to attach to the nail. We hammer a small round piece of wood into the tube. It should fit snugly and not wobble in different directions.
We place a metal plate - a propeller - on a nail with a wide head. We hammer in a nail so that the wood does not split. We leave a small gap between this nail and the piece of wood so that the propeller rotates smoothly. We attach the shank so that the turntable can turn to the side relative to the wind. We use a 15 x 15 plate. Attached to the tube with a screw. One is enough. The plate should be in the same plane as the stud coming out of the hole. With its help, the structure is attached to a large, tall pipe.
The windmill must be at a height for the wind to produce an effect. The through hole in the tube is not made in the middle, closer to one of the edges. Where the propeller is attached. This is necessary so that the shank has a larger lever arm. Then it will be easier to move under the influence of air currents.
It is important that the propeller moves under the influence of the wind, so it is necessary to bend the petals correctly. The video shows how this is done. If you did this correctly, you can run with this windmill around the area and with an oncoming air flow, when you move quickly, the propeller should rotate.
Option 1. Simple weather vane
This product can be placed in the garden or local area just for decoration. However, it is also useful for schoolchildren, who are asked to keep a “weather diary” and determine the prevailing wind direction every day.
To make it, you will need a stick as a support, and a small piece of thick wire on which you will need to place the weather vane. The simplest option is to pierce a bottle with wire, bend a loop at the top, add a large plastic bead at the bottom, and fix the resulting structure in the center of the stick. Before installing the wire, you can paint the bottle in bright colors using acrylic paint. A cheaper option is to use multi-colored electrical tape, which you always have on hand at home.
What danger do underground inhabitants pose when they find themselves on the territory of a garden plot?
However, no matter what the defenders of underground inhabitants say, their presence on the site causes enormous harm:
- the animal actually feeds on insects, but their diet also includes earthworms, which, in turn, have a tremendous impact on soil fertility;
- daily blasting destroys the root system of plants that act as an obstacle to the path;
- distorts the external state of the site beyond recognition;
- leaves behind passages that are subsequently used by mice, causing considerable damage to the crop;
- mixes the lower heavy layers of soil with the most fertile ones, which promises a decrease in its quality characteristics;
- a lawn spoiled by pits is very difficult to mow with a lawn mower;
- digs up water runoff with piles of soil, which retains excess moisture;
- acts as a carrier of diseases that can cause irreparable damage to human health.
Moles are not difficult to deal with
Paying attention to the fact that moles are family animals, you can be one hundred percent sure that after a while they will begin to multiply, and the damage caused will grow exponentially.
Living underground, animals do not limit themselves in any way to underground paths; they create countless tunnels, one after another. Like people, they expand their home: they provide it with a corridor, storage rooms, and emergency exits. Corridors.
Moles are extremely voracious, they destroy everything that appears on their way: larvae, earthworms, butterflies, frogs, small shrews. All that they were not able to swallow right away, they leave for the future, digging out new loopholes for the bins.
Option 2. Pinwheel
A wonderful children's toy that can serve as a decoration for the local area. It is cut from one plastic bottle, from which the bottom is first cut off, and then the entire side surface is cut into 3-7 strips. This is how the turntable blades are made. They must be folded perpendicular to the neck and processed over a candle flame to melt the sharp cuts. Slightly softened plastic can be easily turned at an angle of 45 degrees or the surface slightly bent to form fan blades. A hole is made in the lid with a nail, then it is necessary to enlarge it slightly, but so that the diameter of the hole does not exceed the size of the nail head. After this, a stick is dug in, and a nail is nailed to it, onto which a large flat bead, a pinwheel, and another bead have previously been placed. Instead of beads, you can use stronger flat metal washers. In this case, the product will rotate well and will not fly off the nail.
LiveInternetLiveInternet
https://womanadvice.ru/vertushka-iz-plastikovoy-butylki
During the summer, almost every day we buy a bottle of water. From such simple waste material you can make great fun for a child or a real weather vane with your own hands. Wind spinners from paper or plastic bottles are made in different ways. It won't take much time, and the child will be really interested in taking part in the process and playing.
Hanging bottle spinners
For work we will need:
- clean two-liter bottle;
- colored electrical tape;
- scissors;
- centimeter;
- stationery knife;
- a ball with a swivel bearing (these are often used for fishing).
Now let's look at the simple step-by-step instructions.
- Wash the bottle thoroughly beforehand and remove all stickers.
- Approximately in the middle we cover the workpiece with colored electrical tape. With its help you can hide the remaining glue from the wrapper. The tape should only be applied to the straight part of the bottle.
- Using a centimeter, mark equal segments and draw vertical lines. The pieces are approximately one and a half centimeters wide.
- Then, using a stationery knife, we carefully begin to move from top to bottom. Try to make the cuts exactly along the lines, otherwise you will not get the expected result in the end.
- The distance from the bottom should be at least 2cm.
- Now we slightly press the workpiece for the pinwheel made from plastic bottles. Gently squeeze the “rays”.
- Now these “rays” need to be given the correct shape so that the wind can spin the spinner from a plastic bottle. To do this, bend each “ray” at an angle of 45° at the highest point.
- We do this at the very bottom, but in a different direction.
- Now all that remains is to decorate our wind spinners made from plastic bottles using pieces of electrical tape.
- In order to hang the turntable, we make a hole in the lid and insert a mount there. We make a loop from a piece of wire.
- The spinner is ready!
How to quickly make a pinwheel from a bottle?
A more traditional version on a screw-shaped mount or stick is even easier to make. For this you will need:
- large transparent bottle;
- marker and stationery knife;
- dye.
- To make a pinwheel from a plastic bottle, remove the sticker and divide it into five equal sections. We draw vertical lines. We cut off the upper part, where the flat surface begins to narrow. In the photo the border is indicated by a dotted line.
- Remove the top part and cut out the blades. On each part below we make marks of the same length.
- Now we bend each blade along the line from the mark to the base.
- We bend each blade in this way and punch a hole to further fix its position.
- Using a glue gun, attach a bottle cap to the center of the workpiece and make a hole to secure the pinwheel to the support.
- We paint the workpiece and everything is ready.
Colorful pinwheel made from a plastic bottle
A more complex option involves using several plastic bottles at once. Such mills are often installed on
- garden plots. To work you need to prepare:
- two plastic bottles;
- four caps;
- three large beads;
- pliers, scissors, wire.
Let's look at a step-by-step master class on how to make colorful pinwheels from plastic bottles.
- Cut the bottle in half with a stationery or paint knife.
- Now we cut the windmill blades with scissors.
- We bend the blades at an angle of 45° in the middle of the length or at the base.
- This is what our workpiece looks like at this stage.
- Gently smooth out the blades.
- We make holes in the middle of the wings and lid.
- We paint the workpieces using a can of paint.
- Use a glue gun to attach the caps to the bottom of the blades.
- We thread the wire into the bead.
- We assemble the windmill: string one piece onto a wire, then a second bead and another piece.
- We bend the remaining wire with pliers, thereby fixing the structure.
- The mill is ready!