Lilac cat
To make this cat, you don’t need to take old worn out socks - the toy will turn out ugly. Maybe there is a bright mismatched sock that has been waiting for this moment.
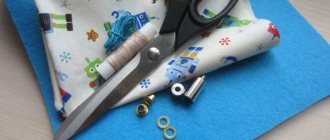
What you need for work:
- Sock.
- Scissors.
- The material for stuffing the cat is padding polyester or batting.
- Needle with thread.
- Buttons and yarn for decoration.
First, let's determine what length you like. If you want to make a fat cat, leave the very bottom of the sock.
Then you need to stuff the cat’s body and head with padding polyester. Stuff the body more tightly so that the head is not too big. After stuffing, fold the edge of the cut inward and baste with pins. Try to make sure that the arrows do not go. Sew along the basting line and pull the corners to make ears.
Remember the product, giving it the desired shape. Adjust your ears so they are pointed. Draw the cat's face with a marker or pen. Then we embroider the muzzle with black threads using a “back needle” stitch. Make a scarf for your cat from braid or thread with a button. So we made a craft from socks with our own hands.
Master class on making a sock puppet
It is better to use golf to make a doll, then it will turn out big. To create it you will need 2 socks (a golf sock and a sock of a different color), scissors, thread with a No. 40 needle, thick acrylic threads - beige or yellow, glue, eyes, nose, lips.
Performance:
- Cut off the convex part for the fingers from the golf course;
- Make a cut from the cutting side 3-4 cm upward, so that the heel is at the back (this will be the doll’s buttocks) - these are the doll’s legs;
- Measure 2-3 cm from the cuff side and mark it. After marking, measure another 2-2.5 cm, mark with chalk;
- Fill with padding polyester from the legs to the top mark, tie a thin hair elastic;
- On the second mark from the bottom, sew with threads, making a neck and highlighting the head from the total mass;
- Just below the neck, sew 2 opposite sides through padding polyester on both sides - these will be the doll’s hands, it looks as if they are lowered into the pockets. You can make arms that stick out separately from the body; to do this, just make a pattern of the arms, stuff them with padding polyester and sew them on;
- Make a pattern from a sock of a different color, 2 halves of a sundress and sew on top of the doll, make pockets in place of the hands;
- Sew on the mouth, eyes, nose;
- Mode equal length acrylic threads and sew over the elastic band around the tail - this is the doll's hair.
The doll will turn out to be original and beautiful, especially if you make it together with a child.
Red Cat
This cat is not easy to sew, but very simple. You don't need any special skills to work - just be able to hold a needle in your hand. A child can make a toy if you help him a little.
Materials that we will need for work:
Let's start our master class. First, cut off the elastic at the toe, then cut the sock from the top to the beginning of the heel. We will get a torso and two legs. From the second sock you need to cut off a strip that will be the tail, as well as two triangles that will become the ears. For the inner parts of the ears you will need pink felt. We cut the toe into two parts, they will become the cat’s paws.
We stuff the top with padding polyester, fold the cut bottom strips face to face, and sew the legs with any small stitches. We turn and stuff each paw and sew up the hole.
In order to mark the neck, you need to sew a seam with a “needle forward” stitch below the head, then pull the thread and secure it.
Now we take a sock of a different color and cut it this way: we cut off the part with the heel and toe, we simply don’t need them. The upper part of the sock with the elastic band will become the sweater, and the middle part will become the sleeves; it needs to be cut in the middle.
We turn the bottom of the sweater one centimeter to the wrong side and carefully hem it. Now you can put this sweater on the cat, then sew the paws to the sleeve blanks, then sew them on the side and turn them inside out. We stuff the paws with padding polyester, turn the top of the sleeves slightly inward and sew up the hole. We sew it to the sweater, grabbing each leg of the body.
We fold the blank for the tail, stitch it from the wrong side and stitch it, now we turn it inside out, a pencil will help us with this. After this, we stuff the tail with padding polyester and carefully sew it to the cat’s body.
We take pink knitwear and make an overlay for the cat’s face from it. To do this, first mark a place and sew a piece of knitwear over the edge using a frequent stitch, put a little padding polyester inside and, turning all the edges inward, sew further. For the bridge of the nose, select a light triangle made of felt, sew two such triangles together and sew them on first, then add padding polyester and sew up the hole. Now we make the ears; to do this, we fold the triangles in pairs and sew them together. We sew the ears into the right place for the cat. They must first be gathered and small folds made, and then sewn on.
At the end, we select buttons that will serve as the eyes of the cat. To do this, you can choose green or blue buttons, but preferably with two holes; by sewing them on, we make the necessary pupils for the cat. So our soft sock toy is ready.
Master class on making a snowman from a sock
DIY sock toys (master class) are often made in the shape of snowmen. For the first work, it is better to use the simplest idea. The Snowman toy can be entrusted to be sewn by a 5-6 year old child, under the supervision and help of parents.
Master class – “Snowman”
The snowman is white - therefore, take a white sock, white threads, buttons, eyes. You will also need a piece of fabric or a red or orange sock (nose), scissors, glue, a smaller colored sock (hat), filler (sand). If you need a large snowman, then choose a sock size 52 or larger.
Performance
:
- Divide the sock into two parts, cutting off the part with the heel at a right angle with the elastic of the sock;
- Iron the second part a little with a warm iron;
- By eye, outline 2-3 parts of the snowman, if desired. It’s better in 2 parts, so it will look more voluminous;
- Fill the sock with sand to approximately the middle and tie it tightly with white thread, first shaping it into a ball;
- Fill the upper part with sand so that it is smaller than the lower part (this is the head);
- Sew the upper part with thread, twist and tie the tip, as after the body. It turned out that the tail was sticking out;
- Fold the red fabric in half and draw a triangle at the bend with a pencil. Cut without cutting the fold of the fabric. Sew 2 edges with red thread, stuff with light filler (cotton wool);
- Sew the nose to the snowman, bending the edges inward so that the cuts are not visible. Or you can immediately sew the nose and then sew it to the snowman;
- Glue the eyes, sew 2 buttons on the body, sew the mouth with red thread;
- For the hat you need a smaller colored sock; cut off the top part with the elastic band. The side of the elastic band will be worn on the head. So, sew the lower part of the cut with a suitable thread and make a pom-pom. Put it on the snowman's head. Instead of a hat, you can buy a small bucket in a souvenir shop and glue it on with a glue gun;
- Make a scarf from a red ribbon or knit a braid from red knitting threads and tie it around the snowman’s neck.
Snowman is ready! Joy for the child and the development of fine motor skills, plus additional time spent next to the mother. In general, there are only advantages and pleasure. Such a master class on creating a Snowman toy will allow a child to realize all his original and incredible ideas with his own hands from socks of any color, not just white.
DIY sock crafts – a selection of master classes for beginners with photo ideas
A doll with alcohol inside will be an amazing surprise at any holiday when you take it out of the minibar. Socks and gloves will be excellent materials for creating interesting and educational toys. The most important thing is that creativity is uncomplicated, the material is always at hand, and the crafts are obtained at the highest level.
Cat with paws: step-by-step master class
- Turn part No. 2 inside out and sew it around the perimeter of the complex shape that was obtained after the cuts made on the toe. Be sure to leave a small hole for the sock to fill.
- Turn the stitched element inside out and fill it with padding polyester or cotton wool. The main part of our kitten is almost ready. All that remains is to sew up the hole on the foot through which the filler got inside the sock.
- Now you can start making the kitten's head. Turn the piece inside out and sew along the top edge. This is how the line of ears is formed.
- The lower edge of the part must be gathered with a needle and thread, leaving a hole for the filler. Through it, insert a small wad of cotton wool or padding polyester inside. Sew the hole closed using hidden stitches.
- The sock should form three pieces. It's better if they are soft. It will be a pleasure to play with such a kitten. Sew all the elements together to create a toy that looks like a kitten stretching.
- This is the kind of kitten you should get from the second sock. The baby will be able to draw his face again with his own hands.
Easy crafts from socks
"Bunny"
Now in 5 minutes we can make a simple but interesting craft from an ordinary sock. Even an 8-year-old child can complete the task; no sewing is required.
For the cute bunny we will need:
- sock;
- cereal;
- strong threads;
- lace and felt-tip pens.
Place a glass of cereal in the sock and tie it with a strong thread. Please note that when dragging, try to create ears, abdomen and head. Use scissors to cut triangles to give the hare long ears.
And finally, we’ll draw him a cute face and tie a bow with lace. This toy can be thrown and crushed.
Caterpillar
To create it we will use old unnecessary tights. Cut off one leg and sew up the inside out side with thread. We return our toy to the outside, fill it with filler and tighten it in some places with thread. We get round shapes of the caterpillar; around the tail we turn up the edges and sew them together. The eyes and mouth can be made from any materials.
DIY sock cat
For the cat’s head, you need to choose a sock of the same color, create a face from the heel, and don’t forget to cut out the ears. The stitching goes along the inside, then we turn the sock inside out and stuff it with the existing filler. You can secure this part with a cord or elastic band in the neck area. We make the body from a bright sock, we also stitch it and fill it with cereal.
The next step will be to design the cat’s face; to do this, take a piece of fabric and fit the filler, forming the nose. We denote the mouth by sewing a thread in the middle, this will make the muzzle slightly tighter, and the eyes will be buttons.
We make the tail from the remaining sock and sew it where it belongs. For the hands, you can use a tricky option, using two seams to make it look like they are in a pocket.
Sew a hare from a sock
There are different types of hares, you can sew them using the technology of making an owl or a kitten, adding a round fur tail and longer ears. Take white or gray socks and 1 colored one, scissors, threads, paints, eyes, cotton wool, buttons.
Performance:
- Cut off part of the sock (white, gray) to the heel - this is the body and head of the hare, sew it and stuff it with cotton wool. Find the middle of the resulting figure and tie it with a thread of the appropriate color - this will be the hare’s neck;
- Cut 4 circles from the heel and sew 2 pieces. stuff them with cotton wool and sew them to the body - these are the hind legs of a bunny;
- Cut out 4 rectangular pieces with sharp ends, sew them on the sides and stuff them with cotton wool, sew ears to the head;
- From a colored sock, cut off a part of the sock with an elastic band, make 2 holes on the sides - this is a jacket for a hare;
- Make the upper paws in the same way as the lower ones, but from a colored sock. Sew to the hare and put on a jacket;
- Glue the eyes to the hare, sew the mouth and nose with thread. Sew buttons onto the jacket;
In addition to the hare, you can sew pants, a hat, and a scarf. Add bows or elastic bands to the ears.
Complex crafts
Wonderful dog made from two socks
This craft will be a little more complicated, but no less attractive. To start the creative process, you need to prepare 2 socks, padding polyester, a needle and thread, rags and ribbons, scissors and a felt-tip pen.
We'll start the process by creating the torso, the front of the sock will become the head, and the heel will be the butt. From the remaining sock we will make legs. On the toe, clearly draw the contours of the figure with a felt-tip pen and stitch along them, remove the rest with scissors. In order to remain able to turn the sock inside out, you should leave a hole where the seam is and sew it up after filling.
There is also a sock, from which we prepare the paws, muzzle, ears and tail. Any stick will help you fill small details. Now we assemble a cute dog from the parts, don’t forget to sew on the eyes and nose. All that remains is to cut out the hanging ears, you can add a lining, and at the end we sew them diagonally to the head. You can decorate the toy decoratively, this is at the discretion of everyone.
Theater hand puppet
This doll will help organize a puppet theater for children. All that remains is to come up with a plot story and scenery.
We sew a monkey from a sock
Take 2 large socks, threads, scissors, eye accessories.
Performance:
- Cut the first sock from the elastic side to the heel, in half, sew the cut edges together - these are the legs, stuff the toy with padding polyester;
- Cut the second sock into several pieces. First, cut off the part from the elastic to the heel, and cut it lengthwise into three equal parts, these are the arms and tail of the monkey, sew and stuff with padding polyester;
- From the second, cut off the part where the fingers should be, stuff it with padding polyester and do not sew it up;
- Cut the part with the body lengthwise from the toe side and sew a part from the second sock to it - this is the monkey’s head;
- On the second sock, cut out the heel and sew it to the animal’s muzzle, stuffing it with padding polyester;
- Glue the eyes, and use thread to sew a seam along the heel - this is the monkey’s mouth;
- Now sew on the arms and tail of the monkey;
- From the remaining piece of socks, cut out 2 rectangles, sew and stuff. Next, we roll each one into a ball and sew it to the head - these are monkey ears.
For a monkey, you can sew a suit and a banana in your hand.
Crafts from gloves and socks
Take old woolen socks, cut off the front part of the sock, and make holes in the heels so that the threads do not come apart, you can sew them. And the wonderful gloves are ready.
You can also make amazing children's toys from gloves. For example, we fill gloves with padding polyester, and turn our fingers into monster tentacles. And all that remains is to sew it up, decorate it with eyes, teeth and bows. You can even create a whole series of such monsters.
Tank on February 23
To please your lover, or dad, brother, matchmaker, you often have to think about the originality of the gift. Now you will learn how you can make a quick and unique gift. To create it you will need four pairs of black socks, one red, a ribbon and a beautiful pen.
It is necessary to make beautiful rolls from dark socks and secure them with an elastic band. Place the red sock, heel up, lay the rolls on it, pressed tightly against each other. A row of black socks can be rolled up and secured for security.
The second sock will become the upper part of our tank, and we will insert the barrel into it, which will become the handle. To make the tank larger, you just need to increase the number of socks. Any man will like such a gift.
New Year's snowman made from a sock on a Christmas tree
Let's take a white sock and divide it in half, from the lower part we make a hat, and from the upper part we make a body. We will fill the toy with any cereal and cover the crest with a hat. We will tie a beautiful scarf around our neck. For a finished look, add eyes, a nose and buttons.
Old gloves as a useful thing
If you've lost one glove, don't worry too much, you can create a soft toy. Cut off the ring and little fingers from the glove, and sew the ring finger in place of the little finger. This will give you the second leg of the toy.
Fill the toy with filler, make the upper part of the glove in the shape of ears using a thread and a needle. Form a neck for the toy by dragging the area between the head and body. Make a ponytail from your little finger. Make the eyes and nose for the cat with embroidery, tie a beautiful ribbon around the neck.
Materials and tools
To sew kittens, we need very few materials and tools:
- a pair of children's socks or golf socks;
- scissors, thread and black marker;
- filler: padding polyester or cotton wool.
To make the toy look brighter and more elegant and retain its presentable appearance for a long time, it is better to buy a new pair of bright children's socks - such a purchase will cost very little, but will look much prettier. In addition, if a sock toy becomes a child’s favorite, it is possible that he will put it in his mouth. Almost all children will do this. Therefore, using a new product for crafts is much more hygienic than a used one.
The kitten can be made from a wool or cotton sock. The main thing is that the knitwear is soft and stretches well.
Dolls made from nylon tights
When making a doll, you must have:
- bottle and scissors;
- body nylons;
- textile;
- wire;
- two eyes;
- foam rubber and synthetic winterizer;
- braid and rope.
The size of the inner container will depend on what kind of gift bottle you want to place inside. The top of the canister needs to be cut off, put the bottle inside, this is to see if the bottle peeks out. The bottle is wrapped with foam rubber from bottom to top, and stitched at the top. The doll's waist is tied with a rope. A stocking is put on top of the entire foam rubber, to create volume of the stomach and butt, place a padding polyester.
We make hands from wire, and also wrap them with foam rubber and padding polyester. We make patterns for the palms from tights, sew a long strip of nylon together and put it on the hand. We attach the arms to the doll's body. We use white fabric as sleeves, make 2 identical patterns, and make one pattern for the body panel.
We cut out a rectangle of blue fabric, the width of which should be such that it will gather the trousers and then put it on the bottom of the bottle. After placing the pants on the bottle, place the red ribbon on the waistband.
Face for a toy
Instead of a head, we will have a neck below the shoulders from a one and a half bottle. We wrap it in foam rubber and sew it together, then do the same with padding polyester. Cut off the panel from the tights and pull it over your head. For the facial expression, we will make the doll's drawstrings using threads.
In order to do everything correctly and beautifully, you will need to watch video tutorials or photos from the site. To add volume to the cheeks, lips and chin, you will need to add padding polyester. We separate the upper and lower lips from each other, making a fold inside, you can make dimples. We make the ears by adding padding polyester under the nylon, we also make the brow ridges and eye sockets.
Final stage
We tie the top of the stocking, cut off what sticks out, and sew a forelock in this place. We make the same mustache and sew on the eyes. We decorate the shirt with braid, make slippers or boots from fabric and padding polyester.
There are so many ways to use socks, gloves and tights to create toys. Such DIY work cannot fail to captivate, the creative process will draw in even the lazy one. And how many gifts can be created from these improvised means. You don’t have to throw away an item if it is left without a pair or suddenly has a hole in it.
Working with your own hands develops hand motor skills, imagination, thinking and imagination. Children who do this kind of creativity at home will be able to cope with technology lessons without difficulty.
Making your own sitting kitten
Step-by-step instructions for making the simplest toy will help you understand the basics of homemade creativity:
- Turn part #1 inside out. Sew it along the top edge. This is how the kitten's head with ears is formed.
- Sew the square base to the bottom of the first piece, stretching its edge. The double base must be tight. It is convenient to do this when working with a knitted sock.
- You should end up with a piece that looks like a bag. This is the main part of the future kitten. All that remains is to fill it with cotton wool or padding polyester. After this, sew up the hole through which the filler got inside.
- To make the ponytail, cut the rubber band you cut from the sock. Turn it inside out and sew it on the sides to create something like a narrow bag. Turn it right side out, fill it with stuffing and sew it on.
- To make the kitten “alive”, draw a face. You can entrust this task to your baby - he will be pleased to give the toy character with his own hands.
The more densely you fill the toy with filler, the harder it will be. If you want your fidget to sleep with a kitten that you made with your own hands from a sock, it is better not to use more than 100 grams of cotton wool or padding polyester.
DIY cat toy made from socks. Master class with patterns
Children always like the sock cat toy. They especially like to first draw patterns from socks and then cut them out with scissors. The process of creating crafts with your own hands occurs with children by discussing each step.
Mom teaches her child to thread a needle and shows what stitches a cat can use to live with. Children become familiar with the technique of making soft crafts and the ability to use a needle and scissors.
Children are overwhelmed with emotions when they see that the sock cat toy is ready.
More master classes
Let me remind you that last time I included master classes, if you like them, click on the picture and follow the link to the master classes:
- What toys can be made from a sock? Any, the main thing is to accurately build the circuit. For beginners, it’s better to do this first on paper and then transfer it to fabric.
- The tightness of the sock is the most important thing. Stretched ones and made from loose knitwear will not work. Only dense ones that will hold their shape when stretched.
- You need to stuff the “filling” not in large parts, but in small pieces.
- Constantly massage to thicken and shape.
- Do not fill it too tightly so that the arms, head and legs can bend. Then the animals will sit, turn and walk.
- Always take into account the existing drawing! Pay attention to the symmetry of the picture on the toy.
- Any color variations are acceptable.
- The contours of the parts are applied to the wrong side.
- If you are crafting in the company of your kids, find feasible work for the children.
- You can fill the inside with small grains: rice, buckwheat, millet, or you can fill it with cotton wool, silicone, pieces of felt or foam rubber, small balls, etc.
Children's socks get lost all the time, it's a sad fact of life. But there is good news: if you are bored without a pair of colored children's socks at home, you can turn them into cute and funny toys.
You will succeed, even if you have only picked up a needle a couple of times in your life. The beauty is that they are elastic and easily take shape, without the use of patterns or patterns. A few stitches - and you don’t have a lonely sock, but a chubby character that a child will happily cuddle.
Make crafts from socks with your own hands with your child: he will definitely enjoy this magical process, when a familiar thing in his hands turns into a cute little animal.
DIY cat toy made from socks for beginners
If you know how to use a needle and scissors, then you can turn ordinary socks into an adorable craft for kids.
- couple of socks
- reinforced threads
- floss threads
- 2 beads
- button with eyes or stem
- satin ribbon
- holofiber or synthetic fluff
Master class on sewing a cat
1. Place your socks with your heels facing up. Cut off the tip of one sock and the front and top of the other. Then cut the second sock, 1-2 cm short of the heel, and cut off the front part. The upper part will be needed for the cat's head, the lower parts - for the body and hind legs.
2. Cut out a tail from the remaining fabric. Turn the parts inside out and use a back stitch to connect the sections, leaving holes. Turn the blanks inside out and stuff them with holofiber so that they have the required volume. Bend the elastic band on the body down.
3. Pull up the head hole. Connect the head and body with a hidden seam and bend the elastic upward. Quilt your ears.
I sew an owl from a sock
For the owl you will need:
- sock of the corresponding color;
- threads;
- eyes;
- scissors;
- glue;
- sawdust;
- decorative elements - optional.
You can offer a schoolchild to make a toy from a sock in the shape of an owl with his own hands, playing with the idea - as a talisman that helps to learn and gain wisdom. And offer to watch or read a master class on how to make it. After all, since ancient times the owl has been considered a symbol of intelligence, wisdom, and knowledge.
Performance:
- Cut off the toe, do not throw away the second part from the heel, it will be needed for making wings;
- Divide part of the sock in half, you can mark it with chalk or thread;
- Fill the lower part with sawdust, close the sides a little so that the body is separated from the head;
- Fill the toy tightly with sawdust;
- Deepen the cut of the sock a little, make a semicircle, and cut it with scissors. If, after cutting off part of the sock, you fold 2 parts of the cut, then 2 protrusions (corners) are formed on the sides - these are the ears;
- Sew from one ear and from the second to the middle of the cut, so that there is room left for stuffing with sawdust. Fill more sawdust on the side of the ears than in the middle. Sew up the rest of the part;
- Near the fold, draw a semicircle in the shape of a month with chalk, on one side and on the other. Cut, sew, leaving space for stuffing with sawdust;
- Sew wings to the body of the owl. Glue the eyes;
- Cut the beak in the shape of a triangle, stuff it with sawdust and sew or glue it between the eyes;
- Cut paws from the sock fabric. Make 2 thick strips, sew them together and stuff them with sawdust. From one edge, make 2 seams over the fabric - these will be the owl's fingers. Sew the other side to the body;
You can decorate the owl by adding a scarf and hat or covering the wings with sequins.
Toy cat-sloth with patterns - master class
The end result is a cute craft that you want to cuddle with and go to bed with.
- couple of socks
- reinforced threads
- floss threads
- scraps of light knitwear
- satin ribbon
- holofiber or synthetic fluff
Step-by-step actions
1. Place your socks with the heel up. Cut off the front parts and cut them in half to create pieces for the cat's paws. From the remaining parts of the socks, cut out parts for the head and body so that the toy cat made from socks has all the parts of the body.
2. From the cut off upper part of the sock, cut out a piece for the tail.
3. Connect the sections of the parts for the head, legs and tail from the wrong side with a “back needle” seam, leaving holes to make stuffing later. Turn out and stuff the two pieces for the paws.
4. Also turn the body piece inside out to fit the legs. Then insert the paws into the body piece from the back side (the heel of the sock) and pin them.
5. Attach the legs with a “back needle” seam, then turn them inside out and stuff all the pieces with synthetic down. Bend the elastic band on the body down.
6. Pull the opening of the head and connect the body to the head with a blind seam. Bend the elastic upward.
7. Sew the cat's ears with L-shaped seams to give them a natural shape.
8. Attach the front legs to the body with hidden stitches. so the cat can jump. Behind them, around the entire body, place a stitch “forward with the needle” and tighten the thread, thereby highlighting the cat’s chest. Please note that the sock cat toy does not yet have a nose, eyes or mouth.
9. Pull the muzzle. Cut a circle from light-colored knitwear to make a nose. Make a nose and attach it to the muzzle with hidden stitches.
10. From the same fabric, cut out 4 circles for the paw pads. Sew them on with hidden stitches, like patches. Shape your fingers again.
11. Cut out a patch from light knitwear and attach it to the place of the eyes using an overcast stitch so that the sock cat toy has eyes. Pre-fix the patch with pins so that it does not move.
12. Embroider closed eyes, mustache and mouth. Sew decorative stitches on the legs and body.
13. Tie a ribbon bow around the cat’s neck.
How to make a puppy from a baby sock, master class
Cut one sock at the foot area, just below the heel. From the top part, make blanks for the ears and tail. And the bottom one will become the puppy's head.
Place the second sock on the table, heel up. Sew the heel bulge until the sock takes the shape of an even “tube” and trim off any excess fabric. This is a blank for the puppy's body.
Make triangular cuts at both ends of the body. Make sure they are exactly in the center and leave an equal amount of fabric on the sides. These will be the paws, and they should be exactly the same.
Sweep the legs on one side, stuff the body with soft filling, and sew up the legs on the other side.
Take the bottom part of the sock that you prepared for the head. Using stitches, thread the thread around its perimeter and pull it slightly. Fill your head with stuffing, pull the thread to the end and sew up the resulting bag. Spread the filling so that the head takes the correct rounded shape.
Sew the ear and tail blanks, turn them right side out and stuff the tail with stuffing.
Prepare the eyes and nose from plush black fabric, sew them onto the puppy's face, and mark the pupils with contrasting buttons.
Sew on the puppy's ears and tail, add some blush with pink powder, and your good, cheerful pet is ready.
DIY kitten craft from a sock - step by step instructions
Together with your children, make a craft from socks, which will eventually transform into a cat. He'll be cute with cute leg warmers.
- sock
- parts of socks left over from other works (2-3 contrasting colors)
- reinforced threads
- floss threads
- 2 beads
- satin ribbon
- synthetic fluff or holofiber
Master Class
1. Place your toe with the heel facing up. Cut its front part, not reaching the heel 4-5 cm. Cut off the tip, and then the top part too. Divide the upper part into two parts uneven in width.
From pieces of socks of a different color, cut out parts for leg warmers, ears, the tip of the tail, nose, and patch.
2. Using a “back needle” seam, connect the sections of the triangular parts for the ears from the wrong side. Also, leave a hole for turning it inside out. Turn them inside out and stuff them with synthetic down so that the figure has volume.
Also turn out the largest piece. Place the resulting ears into it from the side of the future kitten's face (the heel of the sock) and pin them with pins.
3. Sew on the ears. On the opposite side of the large piece will be the hind legs. Sew parts for the cat's leggings and feet to them so that he has legs. Make the tail in two parts and sew the sections together to make it attractive. At the same time, use the “back needle” everywhere.
4. Using a “back needle” seam from the wrong side, connect the inner sections of the legs, leaving a small hole. Turn out and stuff the pieces. Sew the hole with hidden stitches.
5. Make a nose from a round piece and sew it to the muzzle with hidden stitches.
6. Secure the patch in place of the right eye with hidden stitches.
7. Using a tie, shape the front legs so that they bend. Cut out two pockets from the remaining fabric and, folding the edge, sew them with hidden stitches under the paws.
8. Embroider a smile, eyebrows, mustache and sew beads on the eyes to make your DIY sock cat toy come to life.
9. Decorate the hind legs with decorative ties and shape the toes to make the leg warmers stand out.
10. Embroider the kitten’s navel. Sew on a tail with a bright tip. It can also be supplemented with decorative stitches.
Attach a loop of satin ribbon to the cat's head. The craft is completed and the kitten in spats smiles at its creators.
What other toys can be made from a sock?
They create a huge number of toys from socks with their own hands, the main thing is imagination and the presence of an unlimited number of socks. Next you can read master classes on making a turkey, a boa constrictor, and a horse.
One of the simplest options for toys made from socks is making a boa constrictor
For this, take 5-10 pairs of socks, cut off the part before the heel, after the heel and toe to make rectangles. All parts are sewn together, alternating different socks. The first sock does not need to cut off the edge for the toes - this is the head, sew the eyes and a large forked tongue there.
An original idea for a sock toy - making a turkey
It will require 2 socks and 2 socks with toes.
Performance:
- From the first sock, cut off a part from heel to toe, stuff with padding polyester and sew on both sides - this is the body;
- From the second part of the sock, cut out two identical shapes of a turkey’s head from below - narrow, on top in a semicircle, sew and stuff with padding polyester. Sew to the body;
- Make wings from the second sock;
- Make a cone-shaped beak out of fabric, sew a piece of red ribbon on top of it, these are turkey earrings;
- Cut off a 3-4 cm portion of the socks, including the toes. Sew the top so that it is narrow - these are the legs of the turkey and sew to the body;
- From the remnants of the knee socks, cut the entire length of the rectangles, sew all the edges into one ribbon, and then sew them together to form a pipe, which is stuffed with padding polyester. Fold it in a zigzag several times and sew it to the buttocks - this is the tail.
You can decorate such a toy with sequins, sew a hat or a worm.
An easy sewing toy made from a sock in the shape of a horse
Take 2 socks. Cut one from the toe to the heel in the center - this is the hooves and torso, sew and stuff with cotton wool. Cut off the part from the heel to the toe of the second sock, sew it on the heel side and stuff it with cotton wool. Sew the head to the body with the elastic side. Cut 3 rectangles from the remaining sock, sew three tubes from them, fill them with cotton wool and sew them to the horse, 2 legs and a tail. Cover the tail with acrylic threads.
Thanks to simple step-by-step photo instructions, you can easily make toys from socks.
Sew bundles of thick, multi-colored threads from the top of the head to the middle of the back. Glue on the eyes, make a mouth, and 2 nostrils. For additional decoration, belts are used to make a bridle for a horse. Master classes on creating toy animals from socks with your own hands are simple and accessible for everyone: from small children to the elderly.