Desk lamp
An original lamp made of pipes will add some zest. The structure can be assembled from scraps available on the farm or purchased material at a hardware store. After purchasing all the materials, it will take no more than an hour to assemble the lamp.
Among the required components:
- Long and short nipple.
- Six pipe squares.
- There are the same number of small nipples that serve as corner clamps.
- Three purposes.
- Drill.
- Wire with switch and plug.
- Insulating tape.
- Hot glue.
First, all pipes are treated with solvent, and the stickers are removed. The light element is inserted into the socket, after which the wire is pulled through the square. The light bulb socket is fixed with glue. The structure is processed carefully so as not to affect the threads, after which it is left until the adhesive composition dries.
Main stages of work
Subsequent assembly of the lamp from pipes is carried out in the following sequence:
- Prepare a hole in the tee for the wire on the reverse side using an electric drill.
- Pipes are assembled along threads using nipples.
- 4 corners are taken as the base, three tees are twisted together, the standard hole is directed upward, and the homemade socket is directed to the lower invisible part.
- Two nipples connected to each other will serve as a holder.
- The cable is pulled through pipes without a switch.
- The switch is assembled and connected.
- The functionality of the assembly made from pipes is checked.
This design is easy to fix if you are not satisfied with the resulting design. The result is an excellent and inexpensive night light or work desk lamp.
Wall option
The pipe lamp, the photo of which is shown above, is made as follows:
- The grille is removed from the old street-type lamp. If it fits into the interior, this is not necessary.
- A pipeline flange is attached to the cartridge, which will serve as a base fixed to the wall.
- Then it is connected to a tee, nipple and angle. Another flange is attached, then the wiring is pulled through the pipes.
- The height of the lamp placement is adjustable.
- The lamp is connected to the socket and the switch is mounted.
- The flange is attached to the wall using screws, and the operation of the device is checked.
The operation will require the following materials:
- Lamp with or without grille.
- A pair of black nipples for plumbing purposes.
- Cable.
- Two metal flanges, the diameter of which matches the size of the cartridge.
- Screwdriver and fixing screws.
Making a floor lamp from pipes
A floor lamp made of pipes coated with black varnish will fit well into the interior of a bedroom made in light colors. The height and direction of the stand can be adjusted using fittings, which make it possible to give the lamp any shape. Moreover, this model provides for the presence of a lampshade.
It can be made from any available materials that fit into the style of the room:
- thick metal wire;
- kitchen bowl or small saucepan;
- colored glass bottles.
Loft lamps made of pipes with a concrete base
The lampshade is made from several wooden embroidery hoops and watercolor paper. The whole process is divided into preparing the mold, making the concrete base, connecting the wiring, assembling and fixing the pipes, as well as arranging the lampshade. The container for pouring can be made of plastic; its dimensions must be sufficient to support the weight of the entire structure.
Initial stages:
- Using a knife, make a hole for the cable.
- The reinforcement wire is placed in a container.
- The cord is threaded through the pipes with the necessary margin.
- Marking tape is used to mark the exit of wires from the solution.
The cord must enter the cement mixture at the point of connection to the switch, then feed through the middle part of the pipe flange, in which a hole is provided.
Final part
Further production of a lamp from water pipes is divided into several stages:
- A cement mortar is made and poured into the prepared form.
- The switch is fixed flush with the surface. Be careful not to let it drown in the mixture.
- Mount the flange on top of the solution, thread four mounting screws through the holes.
- After preparing the base, the wires are threaded through the pipes, attaching them to the flange.
- Next, the free edge of the cables is pulled to the cartridge, after which the latter is attached inside the pipe.
- The light bulb is screwed in, the switch is connected and turned over.
- A lamp with a low power rating can be left open.
- For a powerful light element you will need to build a lampshade. To do this, take two hoops and watercolor paper, and treat the seam with wood glue.
- This design allows you to choose any color and fabric covering used.
- The finished lampshade is attached using small screws that are screwed into the inside of the hoop from above, or with a thin wire attached to an additional flange of the pipe.
LED lamp
PVC pipe is optimal for this device. It is worth noting that this option is equipped with autonomous power supply. The design of the lamp is as simple as possible; anyone can assemble it with a minimum of tools and materials. You will need several larger pieces of pipe for the base, including angles and fittings, and smaller diameter PVC pipe for the stand. The system uses a resistor with a power of at least 1 watt. This indicator is designed for 6 LEDs.
The circuit is connected in the standard way. It is recommended to use type. This will allow you to quickly make a socket for it in the pipe and will not require cutting out additional elements in the form of a rectangle for the slide switch. In addition, the switch should not be instantaneous, otherwise you will have to constantly hold the button to operate the device. The lamp made of PVC pipes is equipped with a lampshade. Its painting is carried out in several layers. Otherwise, when the diodes are turned on, streaks or uneven processing will be visible. A battery of suitable capacity is mounted at a distance of 80 millimeters from the edge of the pipe at the base. You can also install a switch there. The main thing is that these details do not interfere with each other.
How to make an industrial style lamp?
An industrial style lamp implies the presence of household and industrial items in the design. The main requirement for compliance with the style is minimalism and ergonomics.
The lamp can be decorated in silver or dark colors. Small red details are allowed as a stylish accent.
Loft chandelier made of pipes
Modern trends in lighting organization often require taking into account not only the efficiency of lamp elements, but also the chandeliers themselves. You can create them yourself from scrap materials, while getting an original and inexpensive design. For example, it is possible to make a ceiling lamp from plastic pipes. To do this you will need the following components:
- Ceiling type socket.
- 12 branches for sockets and light bulbs.
- Polymer water pipes.
- 12 small lamps.
- A can of special paint.
- Paper.
- Ceiling rosette.
The work begins with developing a model of the chandelier and connecting the branches to each other. You can create both a symmetrical design and an original author’s model (it all depends on your imagination). Next, lay out the paper on which the painting process will take place. Paint on all sides and leave the lamp to dry. The ceiling rosette is painted on the visible side. If necessary, the chandelier can be sprayed again. Then all that remains is to connect the structure to the ceiling using screws and a flange, and also screw in the lamps. Check the design and enjoy a unique product. By the way, if you get tired of the configuration of the lamp, it can be transformed into a different style in a few minutes.
Procedure for making an LED lamp from pipes
The combination of LEDs and white plastic is suitable for a high-tech interior. This design is suitable for lighting an office, a store or a living room decorated in this manner. Hanging, wall or floor mounting options are available.
The basic model is a PVC pipe with a diameter of 60 mm, inside which LED modules are attached to thermal tape. You can also cut part of the pipe at an angle, install LEDs and cover them with plexiglass, securing everything with sealant.
Adjustable Table Lamp: Initial Manufacturing Process
This DIY pipe lamp is distinguished by the fact that it can be adjusted in reach and height. Many replacement parts are available to find at home, so it is also economical and also custom.
Materials used:
- Bicycle star.
- A pair of metal pipes with a half-inch thread (length - 450 mm).
- Flange.
- Fitting.
- Two elbows at 45 and 90 degrees.
- Two ¾ copper tubes.
- Socket.
- Polymer bushing.
- Electrical cable.
The bicycle sprocket will serve as the base. Holes for the flange are drilled in its center, after which it is painted. Then an iron pipe is screwed into the flange. The upper part of the element is attached to the base of the lamp, and the second part with a larger diameter is installed in such a way that a sliding effect appears. This will allow the upper part of the structure to be folded down by moving the top tube.
What difficulties may arise during the manufacturing process?
To avoid any difficulties during the work process, and to ensure that the lamp pleases you with its appearance, you need to take care of the following things in advance:
- The same thickness of the components of the base and its correspondence to the diameter of the thread on the adapters.
- Reliable fastenings. Buy mounting surfaces for wall lamps and pendants for chandeliers in advance.
- Installation of the lampshade. Often it is not possible to attach the desired lampshade due to different diameters of the outlet holes. It's a good idea to consider a design with an exposed incandescent lamp. You can use colored glass bulbs, the light of which compensates for the lack of a cap.
- Fastening the base. It is not always possible to find fittings with threads corresponding to the diameter of the cartridge. In some cases it will have to be mounted on glue.
It is important to remember that any metal structure through which electric current passes must be grounded, and all wire connections must be reliably insulated.
Final part
To fix the pipe, a hole is drilled in the lower compartment for the fixing screw. A pipe with a diameter of ¾ is soldered, which will allow you to maintain alignment and also get an original look. As a stopper, you can use a ¼ bolt, which is attached to the outer handle of the faucet. The lampshade can be made using one of the methods described above, attaching it with screws and painting it with copper or gold paint.
The rubber bushing is mounted in the opposite end of the fitting, after which the end of the wire is cut off and pulled inside the pipe to the cartridge. The lamp is screwed into the socket, around which the casing is clamped. A similar lamp made from water pipes will make it possible to provide the required amount of light under different conditions. At the same time, its cost is minimal.
Lighting devices in the loft style are not just a tribute to fashion, but also a practical, economical solution for basic or additional lighting. Let's consider how to make lamps from pipes on your own, what are the main features of working with the material, what the process of assembling them with your own hands will look like, how to make a pendant chandelier from metal pipes, a wall lamp from metal-plastic, a table lamp and couplings, as well as what difficulties this may arise.
Today anyone can make their own lamps based on metal, plastic and metal-plastic pipes. To do this, you need to acquire patience, a desire to achieve the planned result, a set of suitable materials and tools, and strictly follow the instructions. There are many advantages to such homemade products:
- Low cost of the product.
- Ease of use with a standard threaded connection.
- Possibility to create any design.
- Wide access to materials (parts can be bought at a construction market, second-hand metal shop, or simply found).
Of the processing features of the pipe materials used when creating lamps, the following nuances must be taken into account:
- All elements connected by thread must have the same standard and similar characteristics (pitch, diameter, direction).
- Metal-plastic pipes should bend well under force, and their surface should melt during heat treatment (also polypropylene analogues are most often suitable for this role).
- If the product is not planned to be painted, then it is better to use galvanized, stainless, copper or brass materials as a basis.
- The metal body of the lamps easily conducts electricity, so when installing 220V light bulbs on them, they must be grounded.
- The shape of metal-plastic lamps is set through bends, and for cast iron and metal lamps - with the help of all kinds of adapters, pipe sections and fittings.
To facilitate and speed up the process of assembling such lighting devices, manufacturing is best carried out in accordance with the following algorithm:
- Make a drawing/sketch indicating all elements, their sizes, characteristics.
- Before assembly, paint and dry all components and materials that require this, or decorate the surfaces in accordance with the design ideas.
- Assemble the lamp strictly according to the drawn up plan.
- Install wiring and light bulbs.
- Secure the lighting device, check its serviceability by connecting it to the network.
Important!
One of the most important indicators of the operation of a lamp with a metal body is electrical safety. Therefore, for those who do not have experience in electrical installation procedures, it is better to consult with an experienced specialist in this field before starting assembly. For internal wiring, you need to use a thick conductor with good electrical insulation and position it so that it does not rub against the edges of the pipes, the sharp edges of which must be removed using abrasive materials. In addition, whenever possible, it is better not to place the junction points of the cores inside such a structure; in extreme cases, reliably isolate them.
Hanging chandelier made of pipes
Let's consider one of the simplest options for assembling a pendant chandelier based on brass or copper pipes. To make such a lamp you will need:
- Five pear-shaped light bulbs.
- Ten pipe sections - two sets of 5 of the same length - short and long.
- One piece of maximum length as a ceiling hanger.
- Five adjustable brass hinges.
- Set of 5 ceramic light bulb sockets.
- Double wire (selected so that it fits easily into the tubes).
- A coil of electrical cable.
- Insulating tape.
- Electrical installation tool.
Making a brass loft chandelier
The loft style is characterized by a combination of similar lamps in one area. But you can make your own chandelier, which will have shades of different shapes.
In this case, lamps of different lengths are hung on a massive beam made of wood or metal, which are decorated with brass caps of different shapes: cylindrical, semicircular or triangular. Design elements can include water taps, kitchen utensils and other scrap that remains after repairs.
The unifying link will be the material of the lampshades and decorations – brass.
Wall lamp made of flexible metal-plastic
To independently assemble a wall lamp from metal-plastic pipes, you will need the following components:
- A set of metal-plastic pipes with lengths from 20 to 50 cm.
- A wood base or a piece of thick-walled plywood or other similar material.
- Wiring.
- Cartridges and lamps for them, as well as fittings of a suitable size.
- Metal saw or pipe cutter for metal-plastic.
- Screws, Phillips screwdriver or screwdriver.
- Paper, paint, decorative materials.
- Silicone sealant.
Manufacturing instructions
The process of making a wall lamp from pipes is as follows:
- A fragment of plywood or solid wood is adjusted to the shape intended by the design, painted or decorated.
- A hole is drilled in it (or several, depending on the number of tubes and light bulbs for them), with a diameter similar to a piece of metal-plastic pipe.
- This segment is inserted into it and sits on glue or sealant.
- After drying and fixing, two-wire wiring is passed into it.
- From the free end the segment is fitted.
- If the fitting is threaded, you can select the appropriate threaded cartridge for it. If not, the latter can simply be glued to the sealant, having previously connected it to the conductors.
- Next, the finished lamp is attached to the wall surface with screws or dowels.
- The light bulb is screwed in, the wiring is connected to the network and checked.
- As a decorative element for a fitting with a socket, you can choose a floor lamp, lampshade or sconce elements that are suitable in size to improve its design.
The main advantage of a lamp on a metal-plastic pipe is the ability to change the direction of the light flux due to its slight bending.
Making an oil lamp from pipes
Using a tee, a cotton cord and kerosene, you can quickly create an oil lamp that will help out on a hike and in the country. To do this, 3 pieces of thin rope made of natural fibers are pulled through the fitting, after which one side of the tee is closed with a plug, and an elbow is installed on the other, which will connect it to the stand.
The wick is held in place by 3 small hose adapters. Any oil or kerosene is poured inside it, and the wick soaked in it is set on fire.
Coupling table lamp
To make your own lamp from couplings you will need the following components:
- Short and long nipple - just a couple of pieces.
- Six couplings (angles).
- Six shortened nipples for connecting them.
- Three tees for water supply.
- Cord with plug and switch.
- Hot glue device.
- Insulating tape.
- Drill and other installation tools.
The scope of application of such a pipe lamp is quite wide - for primary or additional illumination of the work area of a table, workbench and any other place (due to the compactness of the lighting device).
Build process
Detailed instructions for making a table lamp from couplings are as follows:
- before starting work, all pipe sections, couplings and connections are cleaned with a household cleaner, for example, white spirit, stickers are removed and then dried;
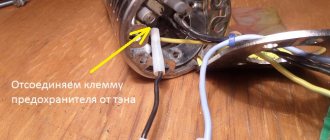
- in order to bring the wires to the connection point in the lamp, it is necessary to temporarily disconnect the wire from the switch;
- then a cartridge of suitable size is inserted into the coupling. You can secure it either using a thread, or by placing it on glue, using a gun, after first connecting it to the wiring;
Not every connoisseur of the loft style can afford to live in a real former workshop, if only because there are not enough abandoned factories for everyone. But industrial-style decor is quite affordable. Moreover, you can do it yourself.
To write today’s article, we went to the Palleto loft picnic that took place recently in Moscow and, under the supervision of the craftsmen from The Sarai, we assembled our first lamp from pipes and sawn wood. We share with you the subtleties and secrets!
You will need:
- Fittings for cast iron or steel pipes: couplings, tees, bends, barrels, angles (including transitions), threaded flange.
- Cartridge with thread and wiring.
- Wire with plug and switch.
- Heat-shrink tubing.
- Drill with regular and feather drills.
- Self-tapping screws.
- Decorative incandescent light bulb.
- Wood cut.
Making a lamp from water pipes with your own hands
By adding pieces of plumbing fittings of equal diameter to the design, you can adjust the height and width of the lamp. The pipes are attached to couplings, and fittings for lighting elements are installed at their ends. The fastening can be installed either sequentially or using a tee.
The process is reminiscent of assembling a children's construction set and allows you to make different types of lanterns:
- wall sconce;
- floor lamp;
- table lamp;
- chandelier;
- Street light.
Self-assembly of lamps from pipes
Even people who do not know the basics of plumbing can build a product from sections of pipeline, metal and plastic parts, and it will not be difficult for specialists involved in laying communications every day to come up with their own, unique, interesting options. The suggested instructions are just examples of how quickly and easily unnecessary materials can be turned into useful things.
A plumber's dream - a lamp made from a water pipe
For the installation of household communications, polypropylene is increasingly being used - a durable, flexible, reliable material that is resistant to rust and performs its functions for decades. The systems are installed instead of outdated metal pipelines, which are dismantled and thrown into a landfill. Let's take a few used iron parts and make a simple, convenient lighting device from them.
We will need:
- 1 pipe of arbitrary length;
- 2 flanges for stands;
- cross as a connecting element;
- 2 knees;
- electrical cord with switch;
- lamp (energy saving or LED);
- cartridge, coupling for fixation.
If the diameter of the base is 20 mm, then the remaining parts have the same cross-section.
Strictly technical, rugged lamps and cozy home floor lamps - all made from ordinary water pipes
The assembly process is simple. We connect the elbows and flanges with the cross - the stand is ready. We insert the pipe from above, then screw the coupling. We thread the wires, be sure to make insulation, since metal conducts current, screw in the light bulb. A few simple manipulations - and the original lamp made from water pipes is ready!
To give old parts an aesthetically attractive look, we clean all the elements with fine sandpaper and coat them with metal paint.
Video: Functional robot lamp made from pipes and fittings
Wall lamp made of flexible metal-plastic
For the wall-mounted version, we need a more dynamic tubular LED lamp that can be directed in different directions, and here metal-plastic products come in handy. Unlike plastic parts, they are durable, have elasticity, in other words, they bend.
The ability to bend and take different shapes will help make the lamp unique
For convenience, it is better to make the base, which is mounted on the wall, from a piece of wood - solid pine, birch blank, or a piece of thick plywood. We drill a hole in it for the flexible element. We grind out a body for the cartridge from a small block, taking into account that a movable fragment will be attached to the other side.
A ready-made wall lamp made from pipes is an excellent backlight for paintings or photographs.
All that remains is to complete the assembly. We insert an electric wire, previously threaded through the base, into a metal-plastic blank (20 to 50 cm long), fix the cartridge and make insulation. We fix the base on the wall, screw in the LED element and enjoy the resulting effect. It remains to add that the flexible tube for the lamp can be turned in any direction, and if desired, even tied in a knot if the length allows.
The cost of metal-plastic products of medium diameter is low - from 60 to 100 rubles per linear meter
Video: LED lamp made of plastic pipe
Three-arm horizontal illumination
A convenient lamp made from several movable copper tubes on a metal base can create full-fledged lighting for a small room or illumination for paintings, photographs, collages or shelves with souvenirs.
To work, you will need pieces of metal pipes of the same diameter, copper bendable tubes for making horns, several tees (according to the number of horns), a half-flange (for fixing the lamp on the wall or ceiling), plugs, electrical wire and fasteners. You will also need lamps - it is better to take LED lamps that do not heat the surrounding parts and the illuminated surface.
The tools necessary for assembly are found in every home:
- jigsaw or hacksaw for metal;
- pliers;
- screwdriver;
- drill and thin drills;
- insulating material;
- metal paint, brush.
First you need to prepare the copper tubes, then screw the base and finally assemble everything into a single structure. We make horns for lamps from copper blanks 30-40 cm long. To do this, they need to be carefully bent so that they take the form of a smooth arc. Beware of creases, as the corners on the tubes will spoil the appearance of the structure and will prevent the passage of the electrical wire. We screw compression fittings onto the ends, thread the wires, secure and insulate the cartridges.
We clean the metal pieces, paint them, and after drying, we twist them into a long pole. We attach copper horns to it at regular intervals, not forgetting about the safe connection of electrical wires. We fix the lamp we assembled with our own hands from pipes on the wall or ceiling so that the rays illuminate the desired area, screw in the bulbs and check. The design in a trendy industrial style is ready.
LED night light made of plastic pipe
Plastic is easy to process, so there are a lot of possibilities for decorating lampshades and shades made from this pliable material. Openwork lamps made of plastic and polypropylene pipes are installed on the floor, on a table, and used as a table lamp or night light.
Beautiful designer lamp made of plastic elements and multi-colored light bulbs
We stock up on plastic blanks and get to work. The best option is products with a diameter of at least 15 cm, so that the walls of the finished lampshade do not come into contact with the lamp, even if it is LED. Tools you will need are a drill with various attachments, drills, a utility knife, and a hair dryer.
Operating procedure:
- We prepare the base - a heavy stand with a fixed cartridge, and connect the electrical wire. A wooden block or a structure made of several parts will do.
- From a thick PVC pipe, cut out a section 20-30 cm in height, process the edges - this is the future lampshade.
- We apply an image to a plastic surface using a stencil - an ornament, a design, a pattern.
- Using a drill, knife, or scalpel, we cut out the excess parts, making cuts, slices, and through holes. We leave some parts translucent, reducing the thickness of the material. We heat it with a hairdryer to bend or deform the necessary elements.
- Place the lampshade on the base and turn on the lamp.
Video: Table lamp made of polypropylene pipes and fittings
The white color of the plastic, which is not suitable for a bedroom or living room, can be changed to a brighter shade by painting the surface of the lampshade with special acrylic paints. Ready-made lamps made from PVC pipes look simply magical.
To connect elements we use threads, bolts and nuts
Let's take an example from designers
The use of old unnecessary things to create unique interior items has long been of interest to designers, engineers, and self-taught craftsmen. Metal and plastic pipes have proven to be a convenient material for creating various lamps, chandeliers, table lamps, floor lamps, and sconces. Some of them look modern and are suitable for decorating offices and premises in the high-tech style, while others, elegant and stylish, are appropriate for an interior in the Art Nouveau style.
Artfully carved flowers and butterflies turn a plastic pipe into an amazing decor
It is curious that magnificent designer items, which cost a lot of money, are assembled from the most common building materials, which means that each of you, if desired, can create your own unique masterpiece, which is not inferior to well-known analogues either in appearance or in functionality.
Lamp design at home
The basic principles of making a lamp with your own hands are as follows:
- The effect of negligence. The more open, massive parts, the better.
- The undesirability of eclecticism. It is inappropriate to combine crystal lampshades with plastic pipes.
- Limited color range. Futuristic style does not involve bright colors. All decorative elements must be white, gray, black or bronze. The use of copper and brass is allowed.
- Material limitation. Fabric, rubber, natural materials will not fit into the style.
- Dim lighting. You should not use powerful incandescent lamps, because retro style implies dim light. You can use a dimmer to control lighting.