Beautiful kitchen corner “Etude” with a sleeping place
The kitchen corner is an attractive element of the kitchen interior, allowing you to save space and gather the whole large family in a small kitchen. Humanity has been using kitchen corners since the postmodern era. Despite the large assortment of kitchen furniture in modern stores, it is not always possible to find the right one. But this is not a problem for a person who has basic carpentry skills. A do-it-yourself kitchen corner is an opportunity to have furniture that is ideal in terms of style and functionality, without large financial investments.
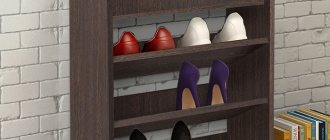
Soft leatherette kitchen corner with drawers for storage
How to make a kitchen corner with your own hands using diagrams and drawings
- Save
Not many people can boast of having free space in the kitchen for large furniture. In small kitchens, every centimeter matters, especially in the area where the table is located. In the kitchen you always want to accommodate as much seating as possible. A soft corner sofa can cope with such a task, which will allow you to use the space to the maximum. At the end of the article you will find a drawing of a kitchen corner, a diagram and step-by-step instructions that will help you make it yourself with your own hands.
- Save
Drawings and diagrams
A detailed drawing of the kitchen corner will allow you to avoid waste of materials and design errors. In addition to the general diagram of the product, the drawing must indicate the exact dimensions of the structural elements, the diameters of the holes and the cross-section of the fasteners. It is recommended for a novice master not to deviate from fulfilling the technical conditions proposed in the drawing. It should be taken into account that replacing materials will affect the performance characteristics of the headset.
Taking the drawings for making a kitchen corner as a basis, an experienced carpenter can make changes to its design, but you should not experiment with the height of the furniture. You can equip the sofas with additional storage space or adjust the length of the seats. When increasing the size of the headset, it is necessary to strengthen the frame parts. Reducing the length does not affect the structural strength of kitchen corners.
Soft corner using shelves from Ikea
To minimize carpentry work, you can use ready-made shelves from Ikea as a frame. To make such a corner with your own hands you will need the following materials:
- Chipboard or plywood.
- Ikea shelves with fronts.
- Upholstery fabric.
- Furniture foam rubber.
- Electric jigsaw.
- Drill.
- Construction stapler.
- Bolts and nuts.
Installation and fastening of the frame
- Save
When choosing the size of shelves, you should take into account such standards as: the height and depth of the seat should be 40–45 cm. The convenience of using shelves is that you can easily create not only an L-shaped structure, but if the space and area of the kitchen allows, then U-shaped.
All structural parts are connected to each other using bolts. But before that, you need to drill holes of the appropriate size in the side walls. If the drill does not fit in the shelf, then the hole should be drilled from the outside, separately in each wall. It is very important to take clear measurements so that there are no problems when connecting the structure.
To prevent the wood from deteriorating when the bolts are tightened too tightly, it is recommended to additionally use spacers under the bolt heads and nuts.
Installation of fronts and seat bases
After the frame is installed, the shelf fronts must be secured. You can do without this, which will make the structure much cheaper, but if you need additional space for storing various things, then you still need to install doors.
The base for the seats is made from sheets of chipboard (OSB) or plywood. Plywood with a thickness of 10 mm or more can withstand high loads and has good moisture resistance. The most economical option is to use particle board or oriented strand board.
The board is cut to the size of the corner using a jigsaw. Next, you need to sand the edges with medium-grit sandpaper.
Upholstery with soft material
- Save
This stage of work is the most labor-intensive. Furniture foam rubber should be cut in the same way as a sheet of plywood. Next it is glued to the base.
It is important to use a special glue in your work, designed for strong bonding of foam rubber to a wooden surface.
The next step will be covering it with fabric using a construction stapler. The distance between the staples should be 1–2 cm. Even an inexperienced person in this matter can do upholstery with a plain material, but you will have to adapt to a complex pattern, because this task is no longer an easy one.
The finished seat can be supplemented with soft pillows, which will also serve as a backrest.
How to bend a tree?
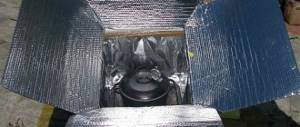
No, our task is not at all to bend an innocent plant. We are talking about wood building materials. How to bend a tree so that it bends and does not break? The method of bending wooden products has been known since ancient times: to give the wood a shape, all that is needed is heat and moisture, under the influence of which the plasticity of the material increases with all the ensuing consequences. How to bend a tree? Keep it in hot water ( the higher the temperature, the faster the processes occur
) or treat with steam (
a steam generator can be built from a kettle or use an iron
). The higher the temperature, the faster the wood gives way and you can start bending it. Moistened and heated wood can be bent under the influence of a load (the ends of the board are placed on supports), and a load is placed in the place of the future bend. Dried wood perfectly retains the minimum radius of curvature that was achieved during the bending process. Now we know how to bend wood, we can dwell on this issue in more detail.
Wood reaction to external influences
The fact is that wood reacts differently to bending. The convex part is subject to tension, the concave part is subject to compression. Moreover, the material also reacts differently to steaming. For example, the ability to compress increases by as much as a third, but the ability to stretch – by only a couple of percent.
. That’s why you shouldn’t think about how to bend a board more than two centimeters thick at home. It is also necessary to take into account that different types of wood react differently to bending. For example, such species as oak, larch, and maple bend poorly, but beech, ash, and walnut bend well. So before you think about how to bend the board, decide on the type of wood from which it is made.
Simple DIY kitchen sofa made from furniture board
- Save
A do-it-yourself kitchen corner made from furniture board is one of the most budget-friendly options for this idea. For work you will need the following materials:
- Acrylic paint.
- Textile.
- Drill.
- Jigsaw.
- Self-tapping screws for wood.
- Furniture panel (18 mm).
- Foam rubber (80 mm and 20 mm).
Cutting the shield and fastening the parts
Before you start cutting the shield, you need to draw up drawings of a homemade kitchen corner with cuts. The project must be developed in such a way that at least 3 people can comfortably fit on the sofa.
It’s better to start cutting the shield with a jigsaw, but you can also get by with a hand saw. During the cutting process, the tool should be held strictly perpendicular, and the ends of the shield should be located strictly at an angle of 90° in relation to the main plane.
The parts are fastened with self-tapping screws, and to prevent cracks from forming, you must first make a hole for the screw. The diameter of the drill should be 0.5–1 mm less than the diameter of the screw.
Hull painting
- Save
For painting, you can use alkyd enamel or acrylic. It is better to choose acrylic enamel, due to its stability, durability and lack of a strong odor, which will allow you to use the enamel directly indoors.
Before painting, it is necessary to treat the surface of the body with a primer to increase the adhesion between the varnish and the wooden surface. We apply the coating in 2 layers, and for a more saturated color - in three.
Making soft pillows
To sew pillows we use foam rubber, which, unlike padding polyester and holofiber, has a better density and is more comfortable to sit on.
For the backrest, you can use thinner foam rubber, and for the seats you will need foam rubber at least 80 mm thick.
If you have the opportunity to work on a sewing machine, it is best to sew removable covers with zippers or buttons. This option is convenient because the old fabric can always be replaced with a new one without extra costs.
Upholstery of backrests and seats
It is sometimes more advisable to upholster the headset elements before assembling them. Thin fabric is often used to cover the inner walls of boxes and cover the backs of seats and backs. Masking material is nailed with furniture nails or staples after upholstery.
Filler for soft kitchen corner
Those who make a soft corner for the kitchen with their own hands use foam rubber as a filler. You can put a 20 mm thick sheet on the back. It is better to cover the seat base with foam rubber with a thickness of 40 to 80 mm. Polyurethane foam with a density of at least 30 kg/m³ is durable and elastic. Softer foam will wrinkle after a short time.
The filler is fixed to the base with glue, which is applied to the contact surface of the wooden slab in a zigzag or checkerboard pattern. Along the edges of the base, polyurethane foam can be secured with a stapler.
Sometimes original mattresses and pillows serve as the seats and backs of the corner. The covers can be filled with crushed foam rubber, siliconized fiber, etc.
Which fabric to choose
The most common upholstery fabric for the kitchen corner is leatherette. Contaminants are easily removed from it. The material imitating expensive leather is cheap, wear-resistant and does not fade for a long time. For upholstery, you can choose microfiber. It is not inferior in basic characteristics to leatherette, but, unlike it, “breathes”. The disadvantage of microfiber is its short service life.
Those who choose flock should know that the inexpensive material is not practical, since its pile accumulates dust well. Beautiful, durable jacquard upholstery is expensive. Teflon fabric is not cheap either, although its properties are superior to other types of upholstery.
Natural fabric is least suitable for finishing sofas: it gets dirty faster. It is more difficult to clean. The material wears out quickly.
Fabric cutting and assembly
Before you make the upholstery of the corner with your own hands, you need to accurately determine the dimensions of the seats. When cutting fabric, you need to take into account the thickness of not only the base, but also the lining. When designing the development, you need to add 1.5-2 cm to the dimensions of the material. The side parts of the upholstery are sewn together. You can make a coating by combining fragments of materials of different colors and compositions.
DIY kitchen corner made of wood
A very simple but original kitchen corner can be made from a wooden board with your own hands. To work you need:
- Foam rubber.
- Wooden board 100x40 mm.
- Plywood or chipboard.
- Round dowel with a diameter of 15 mm.
- Drill with 15 mm crown.
- Jigsaw.
- Construction stapler.
- Batting.
- PVA glue.
- Upholstery fabric.
- Varnish and stain.
Sawing and grinding parts
First, you should create a drawing on paper or in a special program, and then you can start cutting the board into parts. To give the corner a more elegant look, you need to carefully cut out the shaped parts with your own hands. To make the elements smoother and neater, use a flexible ruler to draw lines on the surface of the wood.
All parts are sanded several times with sandpaper of varying degrees of grit. Next, according to the drawing, the entire corner is assembled using dowels and glue.
Staining and varnishing
- Save
Instead of enamel, it is best to use stain for coating. The stain does not create an unnecessary film effect on the surface of the wood, but, on the contrary, preserves its structure. The color can vary from light to dark red. The stain has the peculiarity of raising the wood pile during the painting process, so after drying it is necessary to sand the surface again.
Like stain, varnish should be applied in several layers. To speed up the process, you can use a water-soluble varnish, the drying time of which is no more than 30 minutes.
Frame assembly
Before using glue to fix the ends of all structural elements, it is recommended to assemble it “dry”. It is necessary to ensure that all frame parts fit without gaps.
If everything fits perfectly, you can start assembling the frame using glue. For reinforcement, you can use 4x4 metal corners that are attached to the inside corners.
The bottom of the boxes can be made of plywood or a sheet of chipboard. The selected material only needs to be placed on the furniture corners attached to the frame below.
Seat installation
From the same sheet of plywood or chipboard from which the bottom for the drawers was cut, you can make a base for the seat according to the dimensions indicated in the drawing. Progress:
Step 1. Take the foam rubber and cut out a piece from it, which should be 2-3 cm larger than the base on all sides.
Step 2. Glue the foam rubber to the chipboard.
Step 3. Cut out the batting along the contour and glue it to the seat with the same glue.
Step 4. Using a staple gun, attach the upholstery fabric.
The result is an excellent corner sofa that can decorate any kitchen.
How to make an original corner sofa from pallets
- Save
The direct purpose of wooden pallets is to transport goods. But this simple design can serve as a reliable material for making furniture.
Perhaps such a sofa will not fit in every kitchen, but it is also perfect for a gazebo in the garden, especially since a sofa made from pallets is not particularly difficult to assemble.
Selection and fitting of pallets
The first thing you need to do is inspect the pallets that will be used to make furniture for chips and damage, so that no troubles occur during operation.
A corner sofa is designed according to the size of the pallet. If space allows, you can make furniture from solid pallets, otherwise you will have to resort to using a circular or hand saw.
Connecting parts
Making a corner for a kitchen or gazebo is not difficult, because all you need to do is connect the finished parts together with screws.
It is recommended to install the trays in two rows to make it comfortable to sit, taking into account the fact that there will also be a layer of foam rubber or a thick mattress on top.
To make the back, you need to attach the pallet in a vertical position to the base. This completes the assembly.
How and why to make a kitchen corner with your own hands?
Beautiful kitchen corner “Etude” with a sleeping area
A kitchen corner is an attractive element of the kitchen interior, allowing you to save space and allow the whole large family to gather in a small kitchen. Humanity has been using kitchen corners since the postmodern era. Despite the large assortment of kitchen furniture in modern stores, it is not always possible to find the right one. But this is not a problem for a person who has basic carpentry skills. A do-it-yourself kitchen corner is an opportunity to have furniture that is ideal in terms of style and functionality, without large financial investments.
Soft leatherette kitchen corner with drawers for storage
How to make a kitchen corner with your own hands, basic rules and tips
The design of the dining area should not only be practical and functional, but also as comfortable as possible. This is where the whole family gets together, eats, and communicates. Many people prefer to make a kitchen corner with their own hands, then it completely corresponds to the parameters of the room. The products are versatile, convenient, and do not take up much space. Standard designs consist of a pair of small sofas and a connecting element between them.
Benefits of using and creating with your own hands
Soft kitchen corner of unusual shape
Kitchen corners are popular due to several of their properties:
- Compactness. They allow you to save space, which is the main advantage for a small kitchen that combines a kitchen and a dining room.
- Functionality. A corner sofa for the kitchen can contain drawers for storing things, food supplies or dishes, and vegetables.
- Comfort. A large family or company can sit at the table.
- Large selection of options. There are many different designs. You can select and assemble with your own hands a corner that is suitable in size, style, and finishing material.
- Cheapness. A kitchen corner made by yourself will always cost less than one bought in a store.
DIY wooden corner for the kitchen
Deciding on design and construction
Yellow kitchen corner with irregular table
The kitchen corner includes a short and a long sofa and a connecting corner between them. Those who don’t know how to make a kitchen corner with their own hands should take into account a few tips:
- You need to start by determining the location for the corner, its size, think over the design, and color scheme.
Drawing describing parts and their connections - For inspiration, you should look at photos in magazines or on websites specializing in design and furniture.
Soft and comfortable brown corner of custom sizes - The design can be as simple as possible: a frame, seats and backs on it.
Storage boxes will increase the functionality of the new furniture. They can be made retractable or with an opening lid. Corner kitchen sofas with a sleeping place can be used for temporary rest; they allow guests to stay overnight. Their production requires additional investments, more professional skills, the purchase of special fittings and a mechanism that allows you to fold and unfold the sofa. Beautiful kitchen corner made of wood - Corners can be right-handed or left-handed. This is important to consider.
DIY right-sided soft corner for the kitchenLeft-sided kitchen corner in the kitchen interior
- For upholstery, it is better to use leatherette or synthetic materials.
They are easy to clean, stronger and more durable than fabric. Material for covering a kitchen corner - If the product is intended to be soft, like a filler, it is most practical to use polyurethane plates or foam rubber.
Foam rubber for a soft kitchen corner - The manufacture of the corner should be carried out according to the drawings.
You can sketch them yourself or find drawings and diagrams for a wooden kitchen corner with your own hands in specialized publications or on the Internet. The found schemes will still have to be modified to suit your conditions: change the sizes. The drawn up drawing simplifies the work, allows you to more accurately calculate materials, and saves time. Drawing of a corner with dimensions - side view - After this, they make a list of all the corner elements and materials that should be purchased.
Details for the frame of the future corner - All missing tools, fixtures, fittings, and materials should be purchased in advance before work begins.
Furniture with spacious drawers
Kitchen furniture with built-in storage containers is very practical. In the interior space you can store equipment and bulky items that are used quite rarely. This will increase the free space that is lacking in any kitchen.
To assemble a homemade kitchen corner with your own hands, you will need drawings and assembly diagrams with step-by-step photos. Using ready-made information, making such furniture will be easy, and using available materials will save your home budget.
The kitchen corner consists of two rectangular drawers with backs, connected to each other. The seats can be decorated at your own discretion - covered with fabric, painted with durable paint or complemented with soft cushions.
Required tools and materials:
- Furniture board or thick plywood. Material thickness – from 18 mm.
- Jigsaw for cutting out parts.
- Ruler or measuring tape for calculations.
- Loops.
- Pencil or marker.
- Fasteners - self-tapping screws, metal corners.
- Plastic feet to protect the floor from scratches.
- Decoration materials - upholstery, fillers or paint.
Having prepared everything necessary, they begin to work. This model of kitchen furniture is easy to manufacture, thanks to its smooth parts, without roundings or cutouts.
Instructions on how to make furniture at home:
- The furniture panel is marked on a plywood sheet and the blanks are cut out.
- Connect the bottom, front and back walls together.
- A bar with hinges for opening the lid is mounted on the back.
- Fix the sides.
- Install the seat. To prevent it from bending under the weight of a sitting person, it rests on the ends of the front side and sides. For long sofas, an additional partition is installed inside the container.
- Floor legs are screwed to the bottom ends.
- The second sofa is assembled in the same way.
- The two parts of the corner are connected to each other. The seats should rise freely without interfering with each other.
- The backs are screwed on and additionally secured with metal corners.
Note! For simple, no-frills rectangular kitchen corners, it makes sense to combine the back and back sides. A solid furniture panel is much stronger than interconnected pieces. This point must be taken into account when marking the blanks and cutting out the back wall and back as a single unit.
Necessary materials
Materials for making kitchen furniture
To make a corner sofa for the kitchen you will need:
- laminated, sanded chipboard, plywood;
- fasteners: dowels, screws;
- loops;
- glue;
- nichrome thread;
- edge for decorating ends, thrust bearings;
- furniture corners;
- polyurethane plates if a soft corner is planned;
- upholstery;
- wood primer, paint, varnish;
Tools for assembling a kitchen corner with your own hands
In the process of making furniture you will need:
- electric jigsaw;
- furniture stapler;
- knife;
- drill, screwdriver;
- hammer;
- roulette;
Repair
Sooner or later, any kitchen furniture becomes unusable. It’s easy to repair homemade kitchen corners, since the master knows every assembly unit. The method and complexity of restoration depends on the damaged part.
- If the upholstery or filling needs to be repaired, they are completely removed. The chipboard is cleaned of foam rubber residues and the staples are removed. Then new material is glued and covered with fabric.
- If the paint is damaged or the varnish is worn off, the surface is treated again. If there is no paint of a similar color, you will have to repaint the entire corner. The upholstered parts are dismantled and the fittings are sealed. Then paint the surface and allow to dry.
- If the wooden elements are physically damaged, the entire part must be replaced. It is cut out according to previously used drawings or the damaged element is taken as a basis.
Using ready-made drawings and assembly diagrams with step-by-step photos, you can assemble a homemade kitchen corner with your own hands. Such furniture is more suitable for arranging your own kitchen, as it is made taking into account the available space and design style. Be sure to share your results in the comments.
Author: Sergey
Manufacturing process: step-by-step instructions
Soft kitchen corner with a shelf in the corner
For a long sofa, the following parts are cut out:
- the bottom, it can be made of plywood;
- bars for the frame;
- two side panels made of chipboard;
- two side parts for the long sides of the box (can be made of plywood);
- back;
- sitting
Assembling most of the kitchen seating area
The sofa is assembled in the following order.
- Cover the ends of the sidewalls with an edge, and the bottom with thrust bearings.
- Using a screwdriver and self-tapping screws, make a frame, then a box.
- The back is assembled and secured to the sides using dowels. The fastening can be reinforced with metal corners.
To make a short sofa, all steps must be repeated. The only differences are in the size of the parts.
Assembling the smaller part of the kitchen seating area
A long and short sofa are combined into a single structure using a corner connecting element. Using dowels and metal corners, the seat is connected to the back, then attached to the sides.
Ready painted frame of the future corner
At the final stage, upholstery is performed, if it is planned:
- The filler parts are cut out from polyurethane plates. The size of the filler is slightly larger than the size of the element for which it is intended. Soft filling is prepared for sofa seats and backrests. Attach with glue or double-sided tape.
- Upholstery parts are made in the same way, but their size should allow the material to be wrapped and secured with a stapler.
Corner with upholstery and pillows in the kitchen interior
If soft upholstery is not provided, then the wood is treated with primer and varnish. You can use paint or tint to change the color.
Beautiful kitchen corner made of natural wood with your own hands
Corner made of plywood and bars
Let's move on to the production process - we purchase the necessary materials and tools:
- Sheets of plywood, the quantity depends on the dimensions of the future corner. In order to calculate the quantity, you need to know the exact size of the sheet of material and the size of the furniture.
- Wooden blocks 50x50 mm.
- Foam rubber.
- Fabric for covering furniture.
- Finishing material. For example, we will use paint and varnish.
- Primer mixture.
- Drill.
- Hacksaw.
- Screwdriver.
- Jigsaw.
- Furniture stapler or hammer.
- Roulette.
For your information! If you are planning to make a wooden kitchen corner with a drawer for storing utensils, you should also purchase card hinges.
The first stage - marking and cutting
- First of all, in order for a wooden kitchen corner to come into being, it is necessary to select the optimal dimensions of the product. To do this, allocate so many square meters in the room so as not to negatively affect the traffic.
- After this, draw the dimensions of your corner on paper. Make sure that the L-shaped product is equilateral, for example, 1.5x1.5 meters.
- We get two seats of one meter each and a corner seat of half a meter.
Advice! The corner of the sofa should not be made at 90 degrees, but it is advisable to cut it off, so it will be perceived softer in the interior. Plus, this is a very good place for a shelf.
- Now you need to prepare templates for the legs. It is better to use a wide sheet of paper on which to draw what you want in a 1:1 scale, and then cut out the final result. There should be 4 such racks (made of plywood).
Use files with fine teeth - this will help avoid a lot of chips
- You should also saw off several bars that will serve as horizontal jumpers. In total, you should get three bars for each side: two under the seat, one at the center for structural rigidity. In a corner place, the bars are sawed at an angle of 45 degrees. For this you can use a construction miter box.
The convenience of a miter box lies in the ability to cut material as you like, and the line will always be straight
- Prepare plywood for the seats and backrest. The standard width of the board is considered to be 300-400 mm, so that it is comfortable to sit on. You can do more for the back, but it’s better to leave some free space so that your back can breathe.
The plywood structure is assembled using nails and screws, when a kitchen corner made of natural wood is most often dispensed with without the use of these hardware. The main thing is to stock up on high-quality fasteners that are not afraid of moisture and will not become rusty.
Second stage - assembly
- Initially, the outer elements are assembled. To do this, two racks are fastened together with bars. As we said earlier, two are attached under the future seat, and one is installed in the center.
- When the frames of the two parts are ready, you can begin to connect them and construct the corner part. Please note that the bars are at an angle, so the screws should be screwed in accordingly.
- Now we cut the foam rubber and the material that will cover the furniture.
The foam must first be larger than the surface on which it is attached
Important! It is better to use artificial suede, an excellent combination of price and quality. Many people use this material for kitchen corners made of natural wood, and they have a service guarantee of up to 10 years.
- We apply the foam rubber to the plywood and fix it at the corners with glue or double-sided tape.
- Cover the piece with suede and turn it over.
The fabric should be stretched as best as possible to smooth out the front side
- We take a furniture stapler in our hands and shoot around the perimeter so that pigtails remain at the corners.
- After which these braids are bent and fixed with staples.
Note! This is necessary in order to avoid unevenness in the material and achieve evenness and smoothness.
- Now we place the finished part on the bars and fasten it with self-tapping screws. The main thing is that the length of the screw is not too long, otherwise the tip of the screw may unpleasantly surprise you.
- All soft elements are attached: backs and seats. For elements under the back, use metal corners.
You can make only the seats soft, this way you can save both time and money
Decorating a finished corner - an element of kitchen design
Decor for the kitchen corner in the form of pillows with removable covers
Decoration is carried out in accordance with the interior of the kitchen and the preferences of the owners. Therefore, there can be many options. Here are some:
- Natural wood looks great in the interior of any room. This option is worth stopping at if the rest of the furniture is made of the same material. It is safe, environmentally friendly, always looks decent, and brings warmth and comfort. Natural wood is covered with tinting and varnish.
- If you are planning a sofa without upholstery, you can paint it to match the color of the kitchen furniture or, on the contrary, support an element of interior decor with color. A combination of two harmonious colors will look impressive.
- To decorate the kitchen corner sofa, use upholstery made of leatherette and dense fabrics. Such a corner can be with padding, soft, or without it, then the seats will be hard. A large assortment of similar materials in the retail chain allows you to choose the appropriate color.
- It is important to decorate kitchen sofas with plastic and similar modern materials. They are easy to clean, do not lose their original appearance for a long time, and are available in a large selection of colors and shades. But this material is not suitable for every interior style.
A simple do-it-yourself corner with soft, removable seats
Kitchen corner sofas will not go out of fashion for a long time, because they are comfortable, functional, save space, and create coziness. The kitchen is the most multifunctional room. For most, the kitchen is the place that unites all family members at one table. The desire to make this time more pleasant and the place more attractive is understandable. A new piece of furniture makes the atmosphere warm and cozy when combined with the right lighting. An additional lamp with adjustable height or sconces will be an effective decorative element.
Brown sofa corner for the kitchen with storage drawers
Video: DIY soft kitchen corner
A selection of photos with kitchen corners made independently
What are kitchen corners?
A piece of furniture, as the name suggests, is installed in the corner of the kitchen. The ensemble can include all elements: sofas (straight and corner), table and chairs (stools). But most often the corner is purchased separately in the form of three modules: a long sofa, a smaller seat and a corner pouf. Table and chairs (if necessary) are purchased separately by the owners.
Kitchen Area
As a rule, the assembled configuration of the corner resembles the letter L, but U-shaped models are also available. The design can be solid or modular. In the first case, it is necessary to clarify the orientation of the furniture (right or left). Models are available that allow the use of a longer module as a linear element, while the second element can be installed at a distance. Models with poufs symmetrically located relative to the corner element, each of which can accommodate one person, also fit perfectly into small kitchens. The corner can even be installed in a bay window, only its shape will be semicircular, triangular or polygonal.
Bay window sofa in the kitchen
For housing in which there are not enough sleeping places, and situations when there is a need to accommodate a visiting guest for an overnight stay are not uncommon, a module with a full-fledged folding place to sleep will be a real salvation. A minibar can be placed at the end of the sofa or a folding shelf can be installed, which can be used as a bar counter.
Kitchenette with sleeping area
Bright kitchen corner
How to bend plywood, fiberboard, MDF
At home, plywood is bent by increasing its humidity, then ironing it (an iron is required), and fixing it in a template. Any frame element can serve as a template and its shape does not necessarily have to be curvilinear. The product is attached to the template using tape. You can clamp bent plywood between two spacers, give it a bent shape using ropes, tying them around the product in several places along the radius of curvature. Plywood can only be used after it has dried. It seems that we have figured out how to bend plywood - let's move on.
How to bend fiberboard? The technique is the same as in the previous case! How to bend MDF? In this case, you can go in two ways: either bend thin sheets (no more than 5 mm) and glue them together, or use flexible MDF
, in which there are transverse slots on one side. The thickness of such sheets is usually 8 mm. When bending, they are placed on top of each other with their milled sides, and then glued together. That's all!
What to look for when choosing a corner model
When purchasing finished products and making furniture with your own hands, it is necessary to take into account a number of factors.
Modern classification of sofas
Room dimensions
Kitchen interior items may vary in size and number of seats. It is necessary to select the configuration of the corner taking into account the layout of the kitchen, its size and the rest of the furnishings. The installed corner should not serve as an obstacle to a comfortable stay in this room. A convenient option for kitchens with a lack of free space is a corner with a transforming table. Folding stools can be used as additional seating if necessary.
Folding stool
Kitchen corner options:
- corner modules to accommodate four people;
Diagram of a corner module for four people
- model for a company of six people;
Model diagram for six people
- compact model for three diners;
Corner for three people
- module with sleeping place.
Corner with sleeping place
Number of family members
The furniture installed in the kitchen should allow everyone living in the house to comfortably sit at the dining table. It is also necessary to take into account the possibility of guests arriving. Of course, if the dining room is not intended for such gatherings. It should be taken into account that a person of average build requires at least 60 cm to sit comfortably at the table.
The size of the furniture will depend on the number of family members
Ease of use
The corner can be hard or have soft filling under the upholstery. In the first case, sitting on the sofa will not be very comfortable, especially for a long time, but it will last much longer. In addition to the fact that the upholstery of soft models wears out faster, the filler itself has a service life (for polyurethane foam - 10 years, for foam rubber (its elastic modification) - 3 years). In addition, hard models are less susceptible to contamination. Such systems, as a rule, are cheaper than more comfortable analogues. And you can solve the issue of excessive rigidity with the help of pillows.
Example of a hard corner
Availability of storage space
The produced models allow not only to use the furniture for its intended purpose, but also to optimize the occupied space as much as possible. The presence of niches under the rising seats, in which you can store household belongings and food, or drawers, is very helpful, especially for owners of small spaces.
Kitchen corner with storage
Material from which the body is made
Connoisseurs of natural materials and comfort in the interior will appreciate corners made from solid wood. They are attractive and environmentally friendly, but are usually quite expensive. An analogue of wood is laminated chipboard and LMDF. These materials, which are cheaper and not always safe for health, are currently most often used in the production of furniture. If desired, you can also purchase a corner made of metal. Metal structures are characterized by durability, strength and resistance to external influences, but they cannot be installed in all interiors. Often a combination of different materials is used in production.
Metal corner for the kitchen
Modern kitchen corner
Material used for upholstery
You should choose the appropriate option based on the design of the room and the functionality of the coating. Natural or artificial leather can be used for finishing. Recently, the synthetic version is almost as good in quality as the original, but its cost is significantly lower. Impregnated synthetic fabric is also quite easy to clean from dirt, does not fade in the sun and does not attract dust. Aesthetically looking and pleasant to the touch, pile fabrics are not so easy to care for. A beautiful jacquard that looks like a tapestry or suede can be expensive. A good option is a fabric-based Teflon coating. Interesting models with a combination of finishing materials.
Sofa upholstery may vary
Kitchen design style
This factor is closely related to the previous two. If the kitchen is decorated in high-tech or techno styles, you can opt for metal structures. Wooden furniture is suitable for classic kitchens. One thing is important - the installed corner should not stand out from the general concept of decoration and furnishings.
The style of your kitchen is also very important.
Prices for different types of kitchen corners
Kitchen corners
Outdoor wooden corner
The Les-Stroi company offers to purchase a corner at an affordable price, which will help create the atmosphere of a completely completed renovation in the room. We offer all kinds of sizes: a wooden corner 20x20 for combining it with eurolining, a more massive wooden corner 30x30 , which can also be combined with lining or with imitation timber, provided that the joints were cut at 45°. The wooden corner 40x40 and its largest analogue - the wooden corner 50x50 - are more suitable when working with imitation timber. However, there are no specific rules. The main thing is that the edges of the corner completely hide the connection of the two parts and at the same time have a tight fit to the surface of the finishing material.
The wooden corner from Les-Stroi has a number of positive characteristics, despite the simplicity of this detail:
- The corner is made from sections of wooden blanks. This makes it possible to completely eliminate the presence of knots, affected areas or resin pockets. Thus, this product is used stably without losing its geometric dimensions.
- Pre-processing of the workpieces gives the corner a smooth and even surface. The fit of the product to the outer corner is tight, which means the aesthetic component is preserved.
- We use high-quality dried wood. This fact, as well as the gluing technology, allows us to achieve stability when the corner does not bend even with sudden changes in room humidity and temperature changes.
A wooden corner requires the fulfillment of several conditions and only then can the maximum aesthetic result be achieved. Firstly, the outer connecting corner must be made accurately to avoid loose fitting of the corner. During the fitting of the workpiece, the master will determine the presence of irregularities or distortions and eliminate them. Secondly, it is important to achieve the tightest and most correct fit from the point of view of geometry of the end parts of the corner. There are several devices that allow you to achieve this. Otherwise, the connection may look unsightly.
Do-it-yourself kitchen corner production
Assembling a kitchen corner on your own is not an easy task, but it is quite doable. When producing furniture, the following steps must be completed.
- Take the dimensions of the kitchen to determine the dimensions of the structure and furniture placement options. It is necessary to take into account the location of the door and window.
- Make a drawing of the assembled structure. You can create it yourself or use ready-made options.
- Purchase materials and accessories. Carry out cutting in accordance with the drawing.
- Assemble the corner from the prepared parts.
Drawings of a kitchen corner made of laminated chipboard
It is easiest to make a corner yourself, the body of which is made of wood or wood-containing materials. For those who do not have very good carpentry skills or do not have suitable tools, you can use the services of specialized organizations and order cutting of parts according to your drawings there. Those who want to make furniture themselves, at a minimum, must have a circular saw, a milling machine, a screwdriver, a sander and a stapler if they have to upholster the products with material.
Manual stapler
Stapler prices
Construction stapler
Average dimensions for a kitchen corner, where it will be convenient to sit at a meal:
- height from the floor surface to the seat: 45...47 cm;
- height including backrest: 87…90 cm;
- seat depth: 45…50 cm;
- the total length is calculated individually, based on the needs and dimensions of the room.
Let's take, for example, a standard design with three seats on a long sofa and one on a short one.
Drawing of a corner for 3 seats
The height of the corner is 90 cm, the height of the seat is 45 cm, its depth is 50 cm. For the production of products you will need pine beams with a section of 5 x 5 cm, 3 x 4 cm, laminated chipboard sheets, artificial leather for covering, foam rubber and synthetic winterizer as fillers.
Technology for assembling a corner (using the example of a long sofa)
Step 1. The first stage of sofa production is making the box.
First, a box is made
The sidewalls, bottom, and front walls of the frame are assembled onto dowels (glued). The result was a fairly simple design.
The parts are assembled on glued dowels
The sides of the backrest are attached.
Fastening the backrest sides
Prices for cordless drill/driver
Cordless drill/driver
Support rails are installed.
Installing support rails
Self-tapping screws are used for connection. Inclined supports for the backrest are attached.
Attaching the inclined supports for the backrest
The chipboard back is secured with self-tapping screws.
Fixing the back of the sofa
Horizontal slats are installed in the box, hinges are mounted to them (they are just being attached for now, they will be finally installed after the sofa is upholstered), with the help of which the box lid, which serves as a seat, will be lifted.
Hinges installed
The rising lid of the box (also made of chipboard) is cut to size.
The box lid is prepared
Step 2. Prepare the upholstery. Pieces of foam rubber are cut off.
Marking foam rubber for subsequent cutting
Installation of the soft filler is carried out using a special glue, which is designed for gluing wood and foam rubber. Foam rubber is attached to all surfaces of the corner frame, except the bottom. Thicker material is used for the upholstery of the back and seat.
Fastening foam rubber
A padding polyester is placed on top of the foam rubber (it reduces friction between the upholstery and the filling).
Sintepon is laid on foam rubber
The leather substitute is cut out and the cover is sewn.
Important! Correctly taking measurements for making a cover and sewing it is not at all easy. It is recommended to contact a specialized organization for this.
The material is securely fixed to the corner. You can't do this without a furniture stapler.
The material is fastened with a furniture stapler
Foam rubber with synthetic padding is also placed on the seat and covered with material.
Using a stapler
Prices for the model range of pneumatic staplers
Pneumatic staplers
Step 3. The frame is sewn up on the back side with a thin sheet of chipboard.
The frame is covered with a sheet of chipboard
Sheathing material is attached to it, after which the back wall is also decorated with leather substitute.
Rear paneling
The loops are secured. A seat is hung on them.
The seat is hung on hinges
A small sofa is assembled and decorated in the same way.
Upholstering a small sofa
Furniture upholstery must be treated responsibly, since any defects in the form of folds or protruding material will instantly spoil the appearance of the furniture. The second structure also has seat loops.
Installing hinges
The leather substitute is firmly fixed around the entire perimeter. The legs are fixed.
Legs are fixed
The result is a very attractive and stylish design, which, moreover, is distinguished by its functionality, since, thanks to the rising seats, it was possible to organize additional storage spaces for various kitchen utensils.
The reclining seats are very comfortable
It is not so easy to assemble such a structure yourself. The most accessible scheme for assembling a kitchen sofa is as follows.
- The lower perimeter of the frame is assembled from timber.
It is a rectangle, the width and length of which correspond to the dimensions of the sofa. All wooden parts must be treated with protective impregnation. Scheme of a simple kitchen sofa - Racks are fixed in the corners of the front side, the length of which is equal to the height from the floor surface to the seat.
- Racks with a height from the floor surface to the top of the backrest are mounted in the corners of the rear side.
- Depending on the length of the structure, additional vertical stiffeners are installed - either two or four. To do this, the length of the sofa should be divided into two or three parts (equal) and the racks should be fixed at these points (strictly opposite each other). Transverse reinforcing elements are attached to them.
- Holes are drilled in the frame to install the legs. Their number also depends on the total length of the sofa. Usually 4 or 6 elements are installed.
- Side rails are mounted; they are also load-bearing parts.
- The bottom is fixed, which is cut out from a sheet of chipboard.
- The sidewalls and the front wall of the box are fixed. They can also be made from laminated chipboard.
- The backrest is made of chipboard.
If desired, like the seat, it can be covered with material with pre-laid foam rubber. Assembling a kitchen corner - The seat is fixed to the piano hinges.
- The assembled structure is treated with a decorative composition. For these purposes, stain and varnish or paints with enamels are used.
- The ideal option is to upholster the sides (on both sides), the seat, the back and the front of the sofa.
Ideal upholstery option
When cutting foam rubber, it is extremely important to take into account the allowance for closing the ends. The soft filling and fabric are secured with a stapler. Structurally simple, but elegantly decorated, the corner, produced on its own, can adequately fit into the interior of any kitchen.
Location of communications in the kitchen
The upholstery of kitchen furniture largely determines the appearance of the structure. However, it should be remembered that defects that appear in the coating are not a reason to send a model that has served faithfully to scrap. Armed with a stapler and glue, and having prepared new fabric and foam rubber, you can quite quickly not only restore the appearance of a piece of furniture by removing the material that has become unusable, but also make the furniture even more attractive.
Chipboard corner
This furniture consists of three parts: two sofas of different lengths and a connecting part. For manufacturing you will need the following set of tools and materials:
- Jigsaw for cutting chipboard sheets.
- Metal connecting corners.
- Self-adhesive plastic tape for the ends of chipboard parts.
- Wood glue.
- Pencil or marker for marks.
- Drill and drill bits.
- Scissors.
- Dowels for fixing the walls.
- Confirmations.
- Seat hinges.
- Plastic legs for installing the corner on the floor.
- Stapler for fixing upholstery to chipboard.
- Ruler or tape measure.
- Hammer, screwdriver.
To decorate the kitchen corner, choose durable materials that are resistant to moisture: synthetics, microfiber or leatherette. The most popular fillers are foam rubber or polyurethane foam. The second material is more elastic and durable, but costs an order of magnitude more.
Assembling a long sofa
This part of the furniture consists of a back, seat, niche and sides. For parts with upholstery, use sheets of sanded chipboard. For the remaining parts, laminated chipboard is used.
The sofa body is assembled according to the instructions:
- The sidewalls are marked and cut out according to the drawings in duplicate. Places for confirmations and dowels are marked and drilled.
- Similarly, prepare the remaining parts of the sofa according to the diagram.
- The rough ends of the chipboard are covered with plastic tape, irregularities and sharp corners are eliminated.
- Plastic legs are nailed to the ends on the floor side or fixed with self-tapping screws.
- The parts of the niche are connected and secured to each other with confirmations.
- A seat bar with hinges is attached to the wall of the niche. They will provide the ability to raise the seat and use the interior space for storage. Install the seat.
- The lower and upper thrust strips are connected to the backrest by metal fasteners.
- All parts of the sofa are connected to the sides with dowels. After checking the correctness of the work, the parts are secured with confirmations.
To make the seat and back soft and comfortable, upholstery is done. To do this, cut out two sheets of foam rubber using scissors or a knife. For the back, cut the pieces according to the dimensions in length and with a margin of 4 cm in width. The seat needs a small offset of 2 cm to bend at the edge. Spare parts of foam rubber will cover the ends on the front side, and the corners will be soft. The filler is attached to the chipboard with glue.
The fabric is cut with a margin to secure it on the wrong side of the slab. The material is fixed with a stapler on one long side, the fabric is slightly stretched and secured with staples on the opposite side. The fabric is then straightened and secured along the short sides. The tension should be uniform, without visible differences.
Assembling a short sofa
The work process repeats the previous stage, but according to separate drawings. The sides of the short and long parts are the same in size.
Corner part
The connecting element plays an important role, as it turns two soft sofas into a full-fledged kitchen corner.
On the chipboard sheet, blanks for the stop strips and backrest, the base for the seat, and the side parts are marked.
The main stages of assembly work are as follows:
- The sidewalls and the central part are connected to each other.
- The stops are attached with metal corners to the sidewalls.
- Upholstery of the seat.
- Connect all the parts together.
For the final assembly of the soft corner, it is necessary to connect the sofas with the corner part with confirmations. Check the assembly accuracy and reliability of the entire structure.