On the eve of all kinds of holidays, carnivals and children's matinees, the issue of costumes arises. They can be purchased ready-made or rented at specialized points. But it will be much more interesting and enjoyable to dress yourself or your child in a costume you have made yourself. Even if you don't know how to sew, you can select appropriate clothes from your wardrobe and make, say, accessories.
For example, it is very easy to make a paper cap with your own hands. To do this you will need the most basic available tools and materials and a little time. We present to your attention a basic diagram on the basis of which you can later make a Pinocchio or wizard’s cap out of paper by painting it or covering it with foil.
How to make a paper cap?
How to make a paper chef's hat with your own hands?
Such a cap can become part of a carnival costume, or it can also be used at home for its intended purpose for little cooks.
We will need:
- white parchment paper;
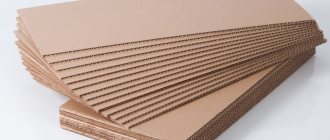
- white cardboard:
- narrow adhesive tape;
- scissors;
- ruler.
Progress
Paper birthday hats
Paper hats will be no less relevant at a birthday party. You can purchase ready-made ones in supermarkets and specialty stores, decorated in a wide variety of ways, in different styles, which is especially important for themed birthdays.
Or you can make them yourself, for example, the same for everyone, you can diversify the options by decorating each cap individually. Colored shiny ribbons, paper, and foil are suitable as decorations. For children, it is better to choose images of their favorite cartoon characters.
To make holiday caps we will need:
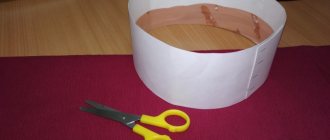
For Halloween, my little daughter decided to be a princess. I quickly sewed her a dress from an old T-shirt and tulle, all that was left was to add a few accessories. We wondered: what kind of headdresses do princesses wear? Disney cartoons came to our aid – hubcaps, of course! Today I will tell you how to make a cap with your own hands that will perfectly complement the image of your little princess!
Required materials and tools:
- 1 meter of tulle;
- paper;
- scissors;
- glue;
- ribbon.
Paper base
Making a paper cap is not at all difficult. All you have to do is cut out the trapezoid and glue it together. I will give you my measurements, but be sure to measure the circumference of your baby's head before starting work, and if they differ greatly from those provided, do your own calculations. So the base of the trapezoid should be 21 inches, the top 4 inches, and the side length 16 inches. Draw a trapezoid on your piece of paper and cut it out. It should look like what you see in the photo.
Let's add tulle
Let's continue working. Place the tulle in front of you. Place the paper part of the cap on it so that there is about 1 inch left to the bottom of the fabric. Now step back 1 inch from each edge of the trapezoid (except for the bottom, where we have already done this) and draw lines with a pencil. Trim the tulle along this line. Now place the paper piece with the base of the trapezoid towards the top side of the fabric and repeat the indentations. Trim. You should end up with an hourglass-shaped figure.
Glue the cone
There is very little left. You see, my story about how to make a cap with your own hands is very simple and quick. We are nearing the end of the work. Glue the sides of the paper trapezoid together. To do this, apply a strip of glue to the top side of one of the edges and press the second edge on top. Apply a little pressure with your fingers, moving along the entire gluing line. Now apply glue to the top of the paper cap, right down to the bottom. Glue the tulle by wrapping a paper cone in it. Glue it in the same way at the top of the cap. The second part of the tulle should hang freely - this is our small train.
Ribbons - ties
Having tried the cap on my princess, I realized that it needed to be fixed on her head somehow. Otherwise, we won’t have time to leave the house before my active child will lose it. I think you will have the same problem. Therefore, I suggest you make a cap with your own hands with strings. Take 50 cm of thin tape, fold it in half and cut it. Burn the ends with a lighter to prevent them from fraying. And glue one end of the tape to both sides of the cap. Now it's ready! Tie it up. You can turn your head from side to side and not be afraid that the cap will fall off! Happy Holidays!
A person can celebrate many holidays, and often a paper cap becomes an integral part of the costume. Many events are usually held on a grand scale, and some even organize carnivals and theatrical performances in honor of this. Especially often, such actions are carried out at children's parties. For each performance, a script is carefully developed, often requiring special costumes.
If the master is faced with the task of making a carnival cap, then several options can be used. It all depends on the look of the costume. For example, a cap may be necessary to create the appearance of a wizard, a chef, or a Christmas tree. Each type of product has its own operating options. The simplest and most inexpensive option is a paper carnival cap. With its support, you can make a holiday accessory in a matter of minutes. Paper caps are very easy to set up. To do this, it is not necessary to have special skills or use expensive materials.
As for how to make a paper cap with your own hands, you will need paper, scissors, glue and various decorations for the finished product. The sheet of paper should be square. We fold it in half. Now we bend the upper corners in the middle so that there is about 1 cm left from each corner to the center. Secure the corners a little with glue.
The wizard's cap is usually complemented with various attributes of the starry sky
There should be a 2-3 cm line at the bottom. Bend one part of it forward, lightly fixing it with glue. Then we turn the cap over and bend the other side. We straighten the product so that it can be put on the head.
After this, various decorations will be required. You can cut out stars, crescents, etc. from glossy paper. These elements are glued to the cap. A good way to decorate would be glitter. They are very easy to use. To do this, you need to lay down newspaper so that the material does not scatter too much. Then, using PVA glue, we draw patterns on the cap and sprinkle them with glitter. All excess will fly off at once, and the glitter stuck to the glue will linger on the cap for a long time.
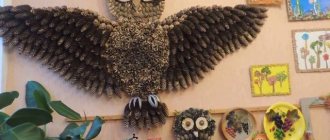
Craft product Papier-mâché Getting ready for Halloween 2 or Harry Potter Paper Glue Paint
Wishing you all a sunny autumn and good mood!
This is the hat that sorted the guys into houses in the book about Harry Potter for my son, who is now very interested in this. Each of the founders of Hogwarts selected students for his house based on certain qualities. But one day they started thinking: who will distribute students after our death? And then Gryffindor enchanted his hat, endowing it with the ability to recognize character traits, weigh the pros and cons, and direct the student to the faculty where his character would be fully revealed. Since then, every year, on the first day, the Hat tells newcomers which faculty they will study at. To do this, you just need to put the Hat on your head.
Maybe I'm ugly to look at, but don't judge me harshly. After all, you can’t find a smarter hat than me, no matter what you say. Hats, top hats and bowlers More beautiful than me, no doubt. But if they were smarter than me, I'd eat myself for lunch. I see right through all your thoughts, nothing can be hidden from me. Put me on and I will tell you with whom you are destined to study. Perhaps Gryffindor is waiting for you, famous for the brave men who study there. Their hearts are full of courage and strength, and they are also noble. Or maybe Hufflepuff is your destiny, Where no one is afraid of work, Where everyone is devoted and faithful, And full of patience and perseverance. And if your brain is in order, you have been drawn to knowledge for a long time, you have humor and the strength to gnaw granite on science, then your path is to the Ravenclaw table. Perhaps you are destined to find your best friends in Slytherin. There the cunning people go towards their goal, without hesitating any paths. Don't be afraid of me, put it on boldly, and I will predict your fate more accurately than someone else can do it. You are in good hands. Even though I am armless, alas, I am proud of myself.
Well, this is a version of the aged Harry - my husband’s father tried it on
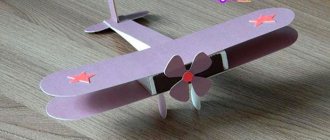
Paper headdress for herringbone costume
In recent years, the Christmas tree costume has become very popular at children's matinees. If, as a rule, there are no special problems with making a dress, then a headdress forces parents to work hard. In fact, everything is done extremely simply.
To work you will need a large sheet of paper, green tinsel and very small Christmas tree decorations. You need to make a regular bag out of paper. Then it needs to be cut so that the wide part fits the diameter of the child’s head. Now the decoration (tinsel) comes into play. You need to carefully wrap it around the paper cap. Then the carnival headdress, which by this point will already resemble a Christmas tree, is decorated with small toys. You should only choose plastic products for decoration, but in no case glass toys.
The Christmas tree hat is an excellent addition to the “green beauty” costume.
The Sorting Hat or my debut in working with papier-mâché
“I see a lot of courage.” still a good mind, there is talent, oh yes. and an indomitable desire to show oneself. Where should I place you?
- Not Slytherin. Not Slytherin.
- Not Slytherin? Are you sure? You could become great. Everything is here, in your head. And Slytherin will help you on your path to greatness, there is no doubt about that. No?
- Not Slytherin. Please, please, assign me anywhere, but not Slytherin.
- Well, if you are sure of it. let it be. Gryffindor!
Throughout the entire work process, this dialogue was spinning in my head. And music, of course, magical music from Harry Potter. A month ago I received this unusual order: for one event I needed the Sorting Hat from Harry Potter. I spent several days looking through possible options for crafting such a thing and settled on papiermache. The experience of working with papier-mache, gained in labor lessons as a child, turned out to be not very pleasant. And since then I haven’t even tried to make anything from papier-mâché. But then I plucked up the courage, paper, glue and got to work!
Paper chef's hat
It is likely that the script for a matinee or other festive event will include a character such as a cook. The costume in this case can be made very simply. It is enough to put an apron on the baby and give him a rolling pin. But this manner will not be complete if the child does not have a traditional cap on his head, which is indispensable for this profession. This product can be made from paper, or more literally, from several types of paper.
As for how to make a paper cap, you will need white parchment material, cardboard, adhesive tape or double-sided tape, a ruler and scissors. Even before making the product, it is necessary to correctly measure the child’s head. Only after this can you start cutting out the cardboard. The base of the paper cap will be made from it, which will be a strip 5 cm wide.
After this, you need to measure out the parchment paper. Its quantity should be twice the length of the base. This sheet must be laid out on a flat surface and gathered to form folds. We glue one side to the base so that the parchment paper takes up half the length of the cardboard. We attach the second side of the gathered parchment using double-sided tape to the remaining portion of the cardboard base.
It is better to make the base of the chef's hat from quite thick paper, and the cap itself from thin
Now the cardboard needs to be carefully glued together to form a circle. The top straightens and levels out a little. The folds must be left, but made more even in those places where it will be necessary.
There should be gaps on the sides that need to be eliminated. To do this, glue parchment paper to the base in the side parts of the cap. Let's make a cute and fun DIY paper chef's hat.
Advice!
This headdress is suitable for a matinee, stage performance, or just for home use. Many children love to help their parents and prefer to have their own kitchen apron for such occasions. A chef's hat would be a great addition here.
DIY Harry Potter hat
The Sorting Hat plays an important role in the Harry Potter books. She sorts students by house at Hogwarts School of Magic. Before making a choice, she analyzes the qualities of the freshman: his temperament, character, personality orientation, abilities, intelligence, emotionality, self-esteem. After weighing all the pros and cons, she chooses a suitable faculty where the child can achieve maximum knowledge and skills.
Now the hat has become an attribute of many holidays (New Year, Halloween). And it is also an indispensable part to complement the image of Harry Potter. After all, films about the boy with the scar are so loved by children from all over the world. Let's try to make magic props with our own hands.
Important. Be sure to measure your child's head circumference before you begin.
Birthday caps
For any holiday, regardless of whether it is for an adult or a child, bright caps will be a good decoration and addition. This is very cute and creates a joyful atmosphere when each guest will have their own cap on their head.
Often, heroes of the occasion purchase paper head caps in the form of blanks in specialized shops. After that, all that remains is to fold them correctly and put them on your head. But it will be much more interesting to make caps for all invitees yourself. If the reprimand is about a children's party, it is necessary to involve the child in this process. He will be able to choose the appropriate color of the headdress for each guest and decorate the cap himself.
The advantage of working independently on the production of such holiday accessories is that here the master has the opportunity to create the actual caps that will fit most successfully into the theme of the event. If no person has chosen a theme for the holiday, you can use glossy ribbons, foil, corrugated paper, glitter and small accessories as decoration.
Note!
But the most basic material for making holiday hats is colored paper; it’s better to take office double-sided paper. It is quite dense and bright. In addition, you will need cardboard, scissors and a thin rubber band.
You need to make a stamp for the cap from cardboard. Such templates are very convenient, since the caps are folded very quickly using them using a pre-provided lock. Before you start decorating hats, you need to equip any product with an elastic band; its size should be universal, that is, it should normally hold the cap on the head of an average adult. If you are thirsty, you can replace the elastic band with ribbons. This option is well suited for those holidays to which guests of different ages are invited.
Birthday caps can be complemented with various appliques, sparkles, feathers, inscriptions
As for the decoration, it can be absolutely anything. The simplest option is to use corrugated paper. It must be cut into strips and many cuts made along the edges. This fringe can be used to decorate the edges of holiday hats or roll the strip into a ball, which will turn it into a fluffy flower. Decorations can be anything, but they must meet the requirements for similar products. Paper hats should be bright, cheerful and create a positive mood.
Anyone who has done renovations knows how to make a paper hat to protect the head while painting. But the art of folding origami is not limited to this; there are many options for paper hats. Using simple patterns, you can pamper yourself and your child with a military cap, cap or wide-brimmed pirate hat.
DIY New Year's hat, photo master class for entertainers
Not only will your children love this fun New Year's hat, but it's also perfect for an adult holiday party. The holiday atmosphere is created with the help of details: the smell of tangerines, a chic table, a Christmas tree and... funny caps. We present to your attention a small master class on how to make this festive accessory.
To work you will need:
- colored cardboard;
- scissors;
- tinsel, sparkles;
- threads;
- glue.
Surely everyone has made something similar at least once on their own. Therefore, you should not have any difficulties. This craft is so simple that even children can do it without any help. And to make the process as fast and fun as possible, we offer you a master class.
- Cut out the template on cardboard of the desired color. Roll into a cone and insert the protruding parts into the slots. The cap is almost ready! To prevent it from opening at the most inopportune moment, carefully glue it along the edges.
- Then everything depends only on your imagination. Around the base, attach tinsel, pretty braid, or homemade paper trim for the edge using glue.
- You can also attach a small piece of tinsel to the cap, making a so-called tassel.
- Decorate the cap with sparkles, inscriptions or shiny rhinestones. You can beautifully write “Happy New Year!” on the cap. and also decorate the letters with sparkles.
- You can make them in the same style or completely different. Trust your imagination.
- At the base of the product, fasten two threads from the inside; for greater reliability, carefully thread them through the cardboard with a needle. This way they won’t come off and will press the cap tightly to your head.
If you have enough time to prepare, experiment. Tinsel pompoms can be replaced with fabric ones or you can create something new and unique. Believe me, even such a simple decorative element as a New Year's cap can make the holiday sparkle with colors completely unexpected for you and your guests.
new-year-party.ru
Magic cap
With your own hands, you can easily and quickly make a headdress out of paper that complements the costume of a wizard or magician. And if this blank is decorated thematically, it will turn into a national Buryat hat.
Tools and materials:
- scissors;
- paper;
- glue;
- decorations.
Master Class:
- Cut the paper into a square shape and fold it in half.
- Bend the upper corners into the middle of the workpiece so that there is a distance of about 1 centimeter from any center.
- Secure the corners with glue.
- There will be a line of 2-3 centimeters at the bottom. Bend one part of it forward and fix it with glue.
- Turn the cap over and bend the other side.
- Straighten the finished product and add decorations (stars, sparkles).
How to make a cap?
First you need to print a stencil of the cap and transfer it to paper or cardboard. Then carefully cut out. If you don’t plan any more decoration, then feel free to start gluing.
Attach a pompom made of thread and ties to the top of the cap.
So, we figured out how to make the simplest cap. Now let's look at what options for decorating a birthday cap you can make with your own hands from scrap materials.
Cap
Making a paper hat with a visor is not as difficult as it seems, especially if you follow the instructions below.
Master Class:
- Take a standard newspaper spread and bend the closed corners inward, bringing the edges and vertices together.
- Fold the bottom side out twice.
- Bend the locking corners on the reverse side, then bend the planes on both sides towards you, setting the size of the future hat (orientation towards the center determines the universal size).
- The lower plane needs to be bent towards itself along the edges, then the duplicate corners must be bent inward from it, which will need to be wrapped inside the workpiece.
- Turn the package face down, bend a large corner to the bottom edge and tuck it over the side.
- Straighten the workpiece, side corners, tucking it over the sides. Job finished!
Classic hat
Making a paper painter's hat is as easy as making a regular paper boat.
Master Class:
- Fold a rectangular sheet of paper in half vertically and then again horizontally.
- Fold the closed tops to the center at a right angle.
- Bend the resulting edges of the sheet upwards, and carefully tuck the free corners inward so that the workpiece takes the form of a triangle.
- Then bring the corners of the base of the formed triangle together so that the result is a square.
- The open corners need to be slightly bent towards the closed top.
- Then bring the side corners of the resulting figure together again.
- Then pull the edges of the formed “sides” in different directions until a cap is formed.
Cap
This is one of the simplest headdresses that you can create with your own hands. Using the step-by-step instructions below, it will only take a few minutes to make.
Master Class:
- Fold the rectangular sheet in half, bend the upper closed corners of the resulting fold inward so that they come together face to face, vertex to vertex.
- Then you should turn the top “side” up twice and turn the workpiece over.
- Bend the planes towards you on both sides, setting the required size.
- Fold the bottom edge of the workpiece towards you so that there is no overlap on the protruding folds, then unfold the edge and bend its vertices along the intended line of the formed fold.
- Bend the bottom plane upward twice to completely cover the folds made earlier.
- Turn the workpiece over and bend the top of the roll downwards so as to align it with the base of the workpiece.
- Tuck the fold over the side of the package and straighten the product.
Bottom line
New Year's decorations at home and preparing holiday costumes is an exciting process for all family members.
A hand-sewn cap will become a unique attribute that you can be proud of.
No holiday can be imagined without fun accessories. This applies not only to the New Year's carnival. The birthday of a child of any age or a corporate meeting will be decorated with bright festive caps, helmets and hats.
Once upon a time, such paraphernalia was popular only abroad. Now multi-colored headdresses lift the spirits during the holidays in our country. They are made from inexpensive materials, and therefore are accessible to everyone.
To have an unforgettable themed party, there is no longer any need to buy or rent expensive outfits. Guests just need to wear special hats. And the hero of the occasion can be given a special festive cap, which will remind those present of who is in charge at the party.
Advantages of holiday caps from our online store
Our resource offers a wide range of hats for a fun holiday. Thanks to the large selection of models offered, you can throw a party in any style. Girls will enjoy dressing up as fairy-tale princesses, and boys as brave cowboys.
We have holiday caps for every taste. You can buy both the same accessories and sets with different designs. With our help, you can easily and inexpensively organize an unusual holiday for yourself and your children. Our online store offers the best party supplies that will delight you with their bright colors, high quality and low prices!
Pirate cocked hat
Below is a diagram of a wide-brimmed hat pattern, which can easily be turned not only into the headdress of a pirate, but also a musketeer. You can make a hat from either fabric or paper (cardboard). The headdress is designed for a head circumference of 50-55 centimeters. You should duplicate the fields if you decide to print the pattern immediately in color in order to glue them together, making the back and front sides immediately black.
You need to cut out the parts of the hat along the black solid line, the dotted line indicates the fold points. The dotted line marks the limitations of the places where the parts are glued; there is no need to make bends along it.
toque
To make a classic chef's hat you will need a little time and several types of paper.
Tools and materials:
- cardboard;
- parchment material (white);
- double-sided tape (adhesive tape);
- scissors;
- ruler.
Master Class:
- Cut a strip 5 centimeters wide from cardboard. The length of the strip should correspond to the circumference of the head.
- Measure out the parchment paper. It is necessary to take a segment twice the length of the prepared base.
- Lay the sheet out on a flat surface and gather it up a little, creating folds.
- One edge of the parchment sheet needs to be glued to the base so that it takes up half the length of the cardboard.
- Attach the second border of the gathered parchment with double-sided tape to the remaining portion of the base.
- Glue the cardboard together to form a circle, straighten the top of the cap a little and align it where folds need to be left.
- To close the gaps on the sides, parchment should be glued to the base in these places.
The final stage of creating a chef's hat
We only have a little time left, so be strong! The head circumference of your small or not so small child is known, we measure the required centimeters on the resulting footcloth. Add another 1 centimeter to the measurements for overlap. We cut it off, roll it into a cylinder and secure it with tape on the outside and on the inside so that it is secure. The children's chef's hat is ready! And now your “cooks” will be happy to help you prepare lunch or dinner. Or maybe you are preparing a festive table?
In conclusion, I would like to wish the readers of the “Women’s Happiness” website understanding between you and your children. And let my instructions for making a chef’s hat help you get one step closer to your child. Or maybe there are several of them? May the talents of the cook in each of us be revealed!
New Year attributes are used to create a special mood. Children and adults love to dress up for the holiday.
If you want to make a costume with your own hands, a master class on how to sew a New Year's style hat to match any chosen outfit will come in handy.
Party hat
Tools and materials:
- cardboard;
- scissors;
- thick colored paper;
- thin elastic band (ribbons);
- decorations (feathers, appliques, corrugated paper).
Master Class:
- Cut out a stamp from cardboard for the future cap (the template is shown in the figure).
- Attach the template to colored paper, trace the contours, cut out the blank.
- Roll up the workpiece, securing it with a “lock”. The cap is ready!
- Equip the headdress with an elastic band or tape; the size should be universal and hold the cap tightly on the head.
- Decorate the cap as desired.
Samurai helmet
Origami can be folded from almost any paper. To make a Chinese samurai helmet, both a regular newspaper and an A4 sheet are suitable.
Tools and materials:
- scissors;
- paper.
Master Class:
- Using scissors, cut the paper into a perfect square.
- Fold it diagonally, then turn the resulting triangle into a square again; to do this, just bend the sharp corners to the top.
- Then bend the lower corners of the “front” side to the opposite corner.
- Bend the top peaks outward to form protruding “ears.”
- Turn the lower corner of the upper plane upward slightly, overlapping the bends of the workpiece, then turn it down to fix the shape.
- Then turn the cap over to bend the “extra” corner from the back side, up and unfold the product. Job finished!
With lace
So how to make a paper cap? It requires:
- thin satin ribbon;
- ruler;
- compass;
- hole puncher;
- pencil;
- scissors;
- A4 colored paper.
How to make a paper cap if you don’t have a compass? No problem. Semicircles can also be drawn by hand.
Step-by-step instruction:
- We take paper of the color that we like best, and measure 7 centimeters along the long edge, put a mark with a pencil, and also measure 23 cm.
- Mark 15 centimeters along the short edge.
- We connect this mark in a semicircle with the first one.
- Then we connect the same mark in a semicircle with the second mark.
- Take scissors and cut the paper along the drawn lines, rounding the corners. The result is a figurine that looks like an alien plate.
- We place the workpiece in front of us so that the upper corner is directed in the direction opposite to you. Take a ruler and a pencil.
- Draw lines from the top corner downwards at a distance of 1 centimeter from the edge.
- We take a hole punch and start punching holes along these lines.
- Now we take the ribbon and begin to thread it through the holes. This should be done starting from the top corner, from the back of the template towards you.
- From the right side we thread the ribbon to the left edge and vice versa. We do this as if we were inserting laces into shoes.
- At the end, tie the ribbon into a bow and cut off the excess ends.
- You can decorate the cap by gluing hearts or butterflies pre-cut from paper of a different color to it.
- To keep our holiday cap on your head, you can attach an elastic band to it from the inside using double-sided tape. Or make holes with a hole punch and thread a ribbon through them.
Cylinder
Tools and materials:
- pencil;
- plate;
- glue;
- scissors;
- thin cardboard.
Master Class:
- Cut the cardboard intended for the top of the hat into 2 identical strips (their width will determine the height of the future cylinder).
- Measure the circumference of your head and divide the resulting number by 2. Thus, the required length of each strip becomes known.
- Make an allowance of no more than 2 centimeters on the gluing line, cut off the excess cardboard.
- Glue together 2 pieces of paper overlapping along the transverse side to form a long strip of cardboard.
- Roll the formed strip into a cylinder (color side out) and overlap its transverse edges.
- Make cuts about 2 centimeters deep at a distance of 2 centimeters from each other along the conditionally lower side of the future cylinder.
- Take cardboard intended for the brim of a hat, place a soup plate on it and trace the outlines with a pencil.
- Place the formed cylinder in the center of the circle and trace its outline, then cut out the resulting “donut”.
- Place the cylinder on the table with the cuts down, apply glue to each element or use double-sided tape for this.
- Place the “donut” on the cylinder and press it so that the glue sets well.
- To hide the gluing areas, cut out an additional circle and attach it exactly to the top surface of the margins.
- To decorate the hat, you can use any contrasting paper ribbon.
Fan hat
For a little football fan you can make an original and sporty hat from corrugated paper.
Tools and materials:
- corrugated paper (for the base);
- 2 ribbons of corrugated paper in a contrasting color;
- 1 tape made of thin cardboard or thick paper;
- braid or lace;
- glue;
- decorations (paper applique).
Master Class:
- Fold a sheet of corrugated paper in half, iron it along the fold and unfold it again.
- Apply a thin strip of glue directly along the fold line; it is advisable to use thick glue.
- Place a strip of cardboard over the glue. The top edge of the tape should exactly coincide with the fold line of the base, in addition, you should leave a little protruding paper on the sides of the cardboard so that you can then fold it over and attach it to the tape.
- Apply a thin strip of glue along one edge of the paper tape.
- Glue it along the workpiece along the top edge so that the clean edge (without glue) coincides with the border of the base.
- Bend the bottom edge of the workpiece upward and attach a second strip of corrugated paper to it.
- Using scissors, create a fringe along the top edge, catching both the ribbon and the base.
- To create a lapel, you need to wrap the bottom border of the workpiece inward 1-2 times to the width of the cardboard tape that is inside.
- Wrap the workpiece around the head with the flap side facing out, measure and cut off the excess of the prepared base, leaving a small allowance.
- Fasten the future hat in the lapel area with glue or a stapler.
- Place a hat on your head and gather its upper part into a bun.
- Tie the formed bun with braid (lace) and fluff out the fringe.
- The cap lapel can be decorated using paper applique and other decorative elements.
Shiny cap with veil
How to make a paper cap? We will need:
- a sheet of paper approximately 30 cm by 40 cm;
- glue stick;
- scissors;
- gift wrapping paper;
- double sided tape;
- glitter;
- thread with sequins - 50 centimeters;
- rubber;
- a piece of transparent tulle or organza about 70 centimeters in length.
How to make a paper cap with your own hands?
- Apply a thick layer of glue to the smaller side of our paper. Glue it in the shape of a cone. Mark the excess edge with a pencil and cut it off with scissors.
- Place the gift paper on the table with the wrong side up.
- We apply our cap to the corner of the paper with the sharp end and make marks at the bottom on both edges. Draw an arc with a pencil and cut along it.
- We will glue the shiny paper onto the cone using double-sided tape.
- We glue it along the fold line and wrap it around our foil, securing the edge with tape.
- Place tape again on top of the first layer and secure the second edge. We cut off the excess with scissors.
- Making a veil. To do this, cut off the sharp tip of our cap about 1 centimeter from the edge.
- We collect the tulle from one edge into an accordion and insert it into the top of the cap. We glue it on the inside again with tape.
- Now we decorate the cap. We glue the thread with sequins along the bottom edge. Glue the glitter onto the veil. You can also show your imagination and decorate the cap to your taste.
- All that remains is to attach the rubber band. We make two holes with an awl in the place where the elastic will be attached, and thread it through them, securing it on the inside with knots.
- All is ready! Many people ask: “How to make a chef’s hat out of paper?” There is nothing complicated here either. All the steps are the same, the only difference is at the top.
Hat from a plate
Tools and materials:
- paper plates;
- paints, markers, pencils;
- scissors.
Master Class:
- You need to decide on the shape of the future hat, fold the plate in half.
- Draw the outline of the desired element and cut it out with scissors. The figure will be symmetrical, since the workpiece was folded in half.
- Straighten the hat.
- Color the headdress and add jewelry.
Hat with brim
Tools and materials:
- newspaper;
- scissors.
Master Class:
- Cut the newspaper into the shape of a regular square, fold it diagonally, then in half and in half again, and thus make a mark along the bends.
- Return the workpiece to the stage of a square folded in half.
- Fold the closed corners inward, without connecting their folds to the edges of the workpiece.
- Open the fresh folds from the inside and press them flat.
- Turn the product face down and bend the edges towards you along the previously marked fold lines.
- Bend the “sides” on each side towards you, straighten the workpiece and push the dome a little. The hat is ready!
An invariable attribute of the New Year's holiday is the cone cap. If you want and don’t know how to make a cap with your own hands from paper, you’ve come to the right place. You can make a cap from paper, cardboard or whatman paper. This method of making a cap allows you to make a cap for both the smallest child and an adult.
How to make a cap from whatman paper with your own hands?
Now we will tell you everything step by step. It comes out best from whatman paper. To do this, you will need a piece of Whatman paper in A1 format. Its size is 60cm by 84cm. How to make a cone for a Christmas tree from whatman paper, step-by-step instructions.
1.
We divide the wide side of the Whatman paper, where it is 84 centimeters, in half and put a pencil mark on top. We place a mark at a distance of 42 cm from the edge.
2
. You need to tie a pencil or pen to a thin rope or strong thread 1 meter long.
3.
Pressing the rope with your finger at the mark, you need to tighten it, and place the pencil right next to the opposite edge of the Whatman paper.
4.
Using the rope as a compass, draw a semicircle on whatman paper.
5.
Using scissors, cut out this semicircle along the line drawn in pencil.
6
. On one of the sides, you need to bend whatman paper along a straight line that connects the marking point at the top and the end of the circle at the side.
7
. Curled Whatman paper can be cut along the line, but it is better to leave it. This will help strengthen the walls of the cap. Then roll the workpiece into a cone, placing the curved end on top. This point is very important in making a cap. Right now you can adjust the size of the cap for a specific person - by twisting the cone more or less.
8
. Having fixed the cap with a paper clip, you need to apply glue along the edge of the curved end of the Whatman paper and glue it. For better gluing, you can temporarily fix the surfaces to be glued with pieces of tape.
9.
The Christmas tree cap is ready. Now you can decorate it with colored paper, cover it with fabric or paint it. At the bottom, you can glue ties made from laces or elastic bands with pieces of whatman paper so that the cap rests securely on your head.
How to make a Harry Potter hat with your own hands
Method 1 - from cardboard and denim
Tools
- Three-layer cardboard.
- Unnecessary black umbrella.
- Denim.
- Accessories for sewing.
Step-by-step instruction
- Draw two circles of 10 and 20 cm on cardboard and cut out the resulting circle.
- We remove the fabric from the old umbrella and cut off two elements. One is in the shape of a triangle, the second is large, for winding the brim of a hat, the shape is slightly larger than a semicircle.
- Cut out 2 more triangles from denim. Place the three triangles together and sew along the edge. You will receive three cones that will make up the center of the cap.
- To make the brim of the hat, take a large shaped element that was cut out from an umbrella.
- Remove all the corners so that the outer edge looks like a circle.
- We cut a strip of fabric from the inner central part, we get a line of 25 cm. We sew the edges and get a circle.
- We fold the fabrics against each other, connect the edges of the ring and stitch everything.
- We insert the made cone into the hat and hook it with pins.
- We attach the base ring to the cone and wrap it with black material. Make sure that the fabric completely covers the cardboard.
- Let's lower a little fabric at the top along the seams to give the tip some curvature.
The headdress is ready!
Advice . Make tucks in the center of the hat (mouth and eyes) to enhance the resemblance to the real thing.
Method 2 - from wrapping paper
Sorting hat, which can be made from wrapping paper, newspapers (papier-mâché).
What you need
- Cardboard.
- Scissors.
- Scotch.
- Glue.
- Newspapers.
- Black paint.
- Felt or black fabric.
Step-by-step instruction
- Draw circles on cardboard, step back from the margins by 7-10 cm.
- Cut out two circles from thick cardboard.
- Mark the hole for the head and cut off the excess.
- Make a cone out of cardboard and secure it to the bottom with tape.
- Next, proceed using papier-mâché technology. Apply glue to the hat and cover it with pieces of torn newspaper . To start, you can attach several layers of newspaper with tape. Then the cylinder will be denser, and you will not spend so much time.
- Next, layer by layer, apply pieces of newspaper and give the garment the desired shape. The hat should resemble a wrinkled bag. Don't forget to make indentations in the shape of the mouth and eyes.
Important! The components must dry very well before proceeding to the next step.
- Take black paint and paint the entire headdress. If you don't want to use paint, you can take felt or fabric and cover the hat with it.
Method 3 - made of fabric on a wire frame
What to prepare for work
You will need the following materials.
- Scotch.
- Scissors.
- Thick cardboard.
- Hot glue with a gun.
- Thick wire and wire cutters.
- Black and lining fabric.
Step-by-step instruction
- We form a cone from cardboard. We fix it with glue. The cone should be wide near the head and not very high.
- We seal the joints with additional tape.
- We use wire to move the cone . Cut the required length, approximately 15 cm, and fold it in half. We insert it inside the hat and pull it out from the very top. It turns out to be a loop on a hat, like for clothes. Fix it very well with hot glue.
- Take the lining fabric, cut strips and wrap the cone from top to bottom, securing everything with glue. Make the layers quite voluminous . In the middle, start adding the second type of fabric.
- Cut a square of black fabric to cover the base.
- We are making harvest fields. We lay out the square and place the finished cone on it. Take the wire and lay it out like a circle. Be sure to ensure that there is enough fabric to attach it.
- Secure the wire with tape. Now, using hot glue, we bend the fabric under the wire. You can use a sewing machine. The fields are ready.
- Glue the cone and fields together. Cut a hole for the head and sew the edges with thread for strength.
Once the work is completed, you can attach the eyes to the hat.