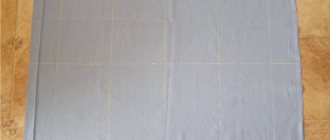
It has long been no secret to anyone that a wide variety of objects can be folded from an ordinary sheet of paper. Who among us did not make a paper airplane or a simple flower as a child? Remember how diligently we folded the piece of paper, and then enchantingly rejoiced at our creation. And even though the corners were not entirely even, and the lines were slightly not parallel. We invite you to return to the world of childhood and once again plunge into the magical world. This time we'll do something unusual: the choice fell on a bottle. Yes, yes, a sheet will make a paper bottle, which, according to most, can only be made from glass or ceramics. Let's surprise the world?! Like many others, the bottle will be born from a square-shaped sheet. Let's prepare the sheet for further work, for which we will make several auxiliary bends. Attention - not all bends must be made over the entire length or width of the sheet. Otherwise, the craft will turn out angular with distorted shapes. Fold the sheet in half horizontally and just mark the inflection line on the right. We return the sheet to its original position. In a similar way, by folding the bottom part up, we divide the lower right half of the edge of the sheet in half. Let's repeat the folding procedure so that the edge of the sheet is divided into eight equal segments.
Fold a strip one-eighth wide of the sheet up and carefully iron it along the fold line. Fold the top of the sheet down so that the edges of the sheet meet. Let's straighten the workpiece. Let's fold the top half of the sheet horizontally in half; the very first mark on the right edge, made when folding the whole sheet, will help us with this.
Let's straighten the workpiece. By alternately folding the sheet in half vertically, we divide the bottom strip into eight equal parts. And then we will divide each of them in half, marking the cents of each of the eight parts with risks. Based on the risks made and the inflection line of the bottom strip, we will bend the lower right corner back. We fold all adjacent elements of the bottom strip in pairs so that a convex diagonal fold is formed, and the middle marks coincide when folded. Starting from the folded corner of the sheet, we sequentially fold the entire lower part along the resulting fold lines. We'll get the bottom. The paper bottle is already beginning to take on familiar shapes. Let's straighten the paper blank to its original shape. Place the sheet so that the bend line dividing it in half is vertical. We will work with the left half of the sheet. Consistently folding the sheet in half horizontally, and then dividing the resulting parts into halves, we will arrive at the required result - we will divide the left half of the workpiece into thirty-two equal horizontal parts. Please note that we iron the kinks only to the central vertical line. Next, let's move on to the most important stage - folding the neck of the bottle. In this part of the work you need to be extremely careful. Using a concave fold, place the fourth strip on top of the third. Fold the right side of the sheet back. Based on the drawing, we will make a zigzag fold, in which part of the third strip will open slightly, and the sheet will bend vertically twice in different directions. We continue to fold the strips in pairs, gradually forming a neck. If everything is done correctly, the bottle will have an elegant neck. All that remains is to secure the additions made. To do this, bend a narrow strip outward at the top of the neck.
Using the previously described method, we will form the bottom of our vessel.
The wonderful art of origami has miraculously transformed an ordinary leaf into a voluminous paper bottle.
Real magic can be created using ordinary available tools and materials. So, it’s easy to make an amazingly beautiful and functional thing from simple toilet paper and a bottle. Using simple and understandable techniques for everyone can turn an ordinary hobby into a well-paid job, because original and beautiful handicrafts have long been popular all over the world.
In this article we offer you a simple master class on decoupaging a bottle with toilet paper. Try to master a new technique and expand your imagination.
In the kitchen of every housewife there will always be various jars and bottles of seasoning, mayonnaise, ketchup, which it would be a pity to throw away and have nowhere to use. Using the painted paper art technique and simple decoupage, an ordinary bottle can be turned into a unique spice jar. And most importantly, it will look beautiful and stylish.
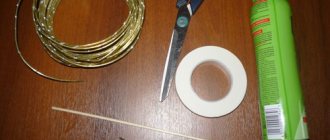
Necessary materials:
- bottle;
- toilet paper (white);
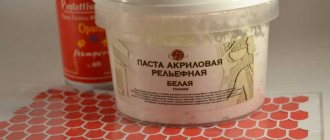
- white and blue paints (acrylic);
- golden paint (acrylic);
- double-layer napkin with a pattern;
- glossy varnish for coating;
- scissors;
- paint brush;
- glue (it’s better to take PVA);
- sponge.
Step-by-step description of the process:
- First, we need to prepare the bottle for decoration: wash, dry, remove the label.
- Since the bottle will be made in the Gzhel style, we choose the appropriate napkin. It is desirable, but not necessary, for the napkin to have both large and small designs.
- You need to cut out a large design from the selected napkin. This will be the central pattern of our bottle. And one small one - for decorating the lid.
- Now we prepare toilet paper (paper towels are also suitable), for this we cut it into small squares.
- We dilute PVA glue with water in proportions of 1 to 1.
- To apply the glue onto thin toilet paper as accurately as possible, we will use a brush.
- We apply the wet pieces evenly to the bottle. We don't need to achieve a perfectly flat surface. It will be more interesting and beautiful if the bottle has a small fold.
- In this way, you need to cover the entire surface of the bottle and the cap and leave it to dry for a while.
- Since toilet paper is a very thin and transparent material, it would be good to paint every edge of the workpiece with white acrylic paint.
- We perform the same action with the lid.
- Using acrylic varnish, glue a large design to the center of the bottle, and a small one to the cap.
- After our pattern has dried well, we paint the entire white part of the bottle and the lid with blue acrylic paint.
- Next, apply golden paint to the sponge and lightly move along the folds of the bottle to gild the product. We do the same action on the lid.
- We twist flagella from the remaining lower part of the napkin and paint the entire surface with a golden color.
- We form the dried flagella into the decorative patterns we need. Of course, you can come up with your own.
- For small decorative details, cut off a short distance of the flagellum and twist it in the form of half rings using a regular pencil.
- Apply a thin layer of PVA glue to the bottle in the places where our decor will be located, and glue the decorative elements.
- We cover the entire surface of the bottle with acrylic varnish in several layers. Our bottle is ready!
In this simple way, we made an amazingly beautiful and useful thing from ordinary toilet paper and an unnecessary bottle!
Original ideas for decoupage of bottles with your own hands
Before you start working on decoupage a bottle, decide for what purpose you need it. If you want to give a beautiful and original gift to an adult man, you can use ordinary eggshells and a few shells to decorate his favorite alcoholic drink. This can be done using various techniques and methods. For example, like this.
If you want to give the key to your heart to your beloved guy, do it in such an original form.
You can also wish for prosperity and profit by decoupaging an ordinary bottle. To do this, you need to add various coins of different colors to the decor.
For a girl who loves style and originality, these interestingly shaped bottles for the interior are suitable.
If you've been wanting to do something like this for a long time, then why not bring your ideas to life right now? Using various materials and your imagination, you can decorate almost any surface: candles, boxes, boards for vegetables and fruits, jewelry, watches, dresser drawers and everything you find at hand. Scientists say that during creative activities, the human body produces happiness hormones. So why not treat yourself to it?
Toilet paper, oddly enough, is perfect for decoupage. Due to its low density, the paper is well saturated with glue and adheres well to most materials. In addition, it can easily be used to form voluminous folds, contours, and images. The paper can be painted in any color, decorated with rhinestones, beads, polymer clay, etc.: all elements will hold firmly. How to use toilet paper for decoupage - read the article.
Toilet paper is perfect for decoupaging a New Year's bottle: lightweight paper will create interesting folds and will adhere firmly to the surface of the bottle. This type of decoupage is easy to do with your own hands; it does not require serious financial or time expenditure. In order to decorate the bottle, we will need white paint or decorative primer, silver pigment, PVA, a napkin with a New Year's design (for example, a winter forest, Santa Claus in a sleigh, etc.), synthetic brushes (flat and round), scissors , foam sponge.
To make a New Year's bottle using toilet paper, you need:
- Prepare the container: remove all labels and glue, degrease the glass with a special product, alcohol wipe or nail polish remover.
- Using a brush or sponge, tightly cover the surface with primer or paint in several layers. A new layer must be applied only after the previous one has completely dried.
- Glue the napkin, first rounding its corners with scissors. The applique must be glued dry, distributing the glue from the center to the edges of the design. When fixing the napkin with glue, you need to carefully ensure that air bubbles do not accumulate under the application and that the edges of the picture do not curl.
- Cut a strip of toilet paper half the height of the bottle.
- Cover the surface of the bottle free of the design with glue and, starting from the top of the neck, glue a strip of paper, forming folds with your fingers.
- After the paper has dried, paint it to match the background of the napkin.
- Apply silver pigment to the protruding areas of the folds with your finger.
- Cover the entire surface of the finished product with a finishing varnish-fixer.
This master class is suitable for decorating a bottle in any theme: using toilet paper, you can decorate a bottle in a marine theme (folds are great for simulating waves), imitate textiles on a flask, etc. In any case, volumetric elements will look impressive and unusual.
Master class No. 3: how to cut a bottle and make a vase, candlestick and other decorative items out of it
So, we've sorted out the painting and decor. Now let's talk about how to make a vase, pencil holder, glass or any interior decoration from an ordinary bottle, as in the photo below.
You can cut a glass bottle with your own hands in different ways. In this master class we use the simplest methods that can be easily repeated at home.
Method 1. How to cut a bottle using alcohol-preserved thread
This method is more suitable for cutting wine bottles and bottles with thin glass.
- First you need to wrap a thick cotton thread around the bottle and cut off the excess (top photo on the left).
- Now this thread needs to be moistened in any alcohol-containing solution - white spirit, ethyl alcohol or nail polish remover, as in this master class. After the thread is thoroughly wet, it needs to be wound around the bottle again in the right place.
- Now you need to carefully light the thread, quickly rotating the bottle until the flame goes out.
- Next, you need to lower the bottle into a pre-prepared container with boiling water for 3 minutes, and then quickly lower it into cold water - the sudden temperature change should cause the glass to crack in the right place.
Tip: if you want to make a vase from a champagne bottle, then steps 2-4 will most likely need to be repeated.
- Carefully break the bottle, and then sand the sharp edges with sandpaper - first coarse-grained and then fine-grained. Woo-ala, the bottle vase is ready!
Method 2. How to cut a bottle using a glass cutter
You can also cut the bottle using a glass cutter. To do this you need:
- Make a cut with a glass cutter. To make the edges even, you can wrap the bottle with an elastic band or tape before sharply. Instead of a glass cutter, you can use a glass drill;
- Then we burn the incision site, then lower the bottle into boiling water for three minutes, and then into a container with cold water;
- Carefully break the bottle;
- We sand the edges.
(Rate the material! Already voted:
For a creative person, any object can become a source of inspiration and application of their talents. Experts say that decorating bottles with your own hands helps you take a break from your daily routine and learn new handicraft techniques. Any container of an unusual shape can turn into an unusual decor, a delightful vase or an exclusive souvenir. Those who have been doing needlework for many years should take on the implementation of complex ideas, and beginners will be given confidence by a simple method of painting or filling glass containers with bulk materials.
DIY bottle decor
Looking at the finished samples, it’s surprising how unnecessary ribbons and yarn, beads and buttons find new life in bottle decor. Finished products are an excellent decoration for different rooms:
- kitchens in Provence, country or ethno style;
- hallway in modern style;
- dining area in the living room in retro or vintage style;
- teenager's rooms in the spirit of loft or techno;
- bedrooms in a romantic style, shabby chic or boho.
Do-it-yourself bottle decor looks most interesting in the form of entire compositions, when several glass, plastic or metal containers are transformed using one technique. It is better to display them on a common tray, a wide plate or a mirror shelf of an original shape.
Beautiful bottle design
Original decoration of bottles with various unnecessary items will eliminate the need for large expenses for the holiday. Traditionally, champagne bottles are decorated for birthdays, New Years, or when a young mother is discharged from the hospital. You don’t have to take an empty bottle, because ordinary champagne from the supermarket, decorated in an original way, will become a special souvenir for the holiday table.
Any glass container with rectangular walls can turn into a gnome house with a pipe - an excellent birthday gift.
An elegant bottle narrowed towards the center in the form of a waist is an idea for making a glass young lady in a hat or under an umbrella. If you add a taller container decorated in the shape of a gentleman with a big heart, you get a composition for Valentine's Day.
Creative personalities will appreciate the non-standard design of the bottle with their own hands, especially if you give such a gift on the occasion of a concert performance, personal exhibition or other open event.
DIY decor of cans and bottles involves new creative ideas. But at the stage of mastering this type of creativity, borrowed samples are suitable, which inspired with their ingenious simplicity and accessibility of execution, as in the photo.
Original decor of glass bottles
Decoration of glass bottles for interior
DIY bottle decor
Turning a bottle into a flower vase: decoupage with toilet paper
Using toilet paper you can create an original, practical and functional decorative element. For example, an old champagne bottle can be turned into an elegant vase. In order to complete the transformation, we will need: soft, white toilet paper, acrylic paint (color as you wish), pearlescent pigment, white acrylic, glue, scissors and fixative varnish.
We design the bottle step by step:
- We prepare the bottle for decoration: soak the container in warm water, remove the labels and remove any remaining glue, degrease the surface using an alcohol wipe, acetone, or a special product.
- Place the bottle on the roll and measure the paper so that its length is half the length of the bottle.
- Cut off a few strips.
- Place the bottle on the stand and coat it thoroughly with glue.
Master class on decor
- Starting from the neck, glue the paper diagonally, forming folds with your fingers. In order for the product to look neat, we insert the upper part of the strip inside the neck and remove the applique from there.
- We decorate the entire bottle in this way, leaving the ends of the strip for the bottom decor.
- After the decoupage has dried, we proceed to decorating the bottom: grease the bottom with glue and lay out each strip separately, forming folds.
- After the paper has dried and hardened, coat the product with the selected acrylic paint.
- Next, using a dry brush, draw the convex parts of the folds.
- We pick up pearlescent pigment with a fingertip and rub it into the decoupage in some places, creating the illusion of abrasions.
After drying, coat the bottle with a fixative varnish.
When choosing a varnish for fixing, you should pay attention to its characteristics: for example, yacht varnish gives a yellowish tint, and parquet varnish is not suitable for containers that will come into contact with water.
The vase is ready! This way you can decorate not only tall bottles, but also round glass containers, small bottles and vessels.
How to create three-dimensional drawings on a glass bottle
Decoupage bottles using toilet paper makes it possible to create attractive and unusual volumetric decorative elements. Thus, using toilet paper you can easily create floral decorations (flowers, leaves, twigs, vines), convex geometric patterns and other decorative elements of simple shapes.
The basis for creating decor is paper flagella. In order to create a three-dimensional element, you need to soak your hands in PVA diluted with water (in a ratio of one to one or one to two) and, without waiting for the glue to dry, tightly twist the paper rope. Afterwards, the desired element is laid out with a tourniquet and additionally coated with glue. After drying, the bulge is painted in the desired color.
In this way, you can make snowdrifts, clouds, or imitate stonework: the paper for these elements is simply crumpled and painted accordingly.
Decoupage of bottles with toilet paper: master class (video)
Decoupage a bottle with toilet paper is an affordable way to decorate glass containers with your own hands, which absolutely anyone can do. This technique makes it possible to obtain interesting, original three-dimensional elements and opens up wide possibilities for decoration in various themes. Try it and you will be convinced of the simplicity and effectiveness of this decoupage!
Who doesn't love taking photos of their growing children? Loving parents strive to capture every step, every moment of their child’s life. Surely, every family has several photo albums, as well as stacks of photographs that have not found their place in them. If you don’t yet know what to do with them, then you can combine business with pleasure and put the photos that are not included in the albums into paper ones..
Any crab is a passionate traveler. They love to move across expanses of water, even over long distances. This is how they end up in other bodies of water, where they meet their distant relatives. Our crab will be made from red colored construction paper. Just for the eyes, let's take a white sheet. You will also need to make small accents with a black marker. And so let's start making a crab out of red paper and...
In many modern cartoons you can find fabulous unicorns, which are very beautiful. They have a gorgeous mane and tail, as well as wide wings. Such elements can be easily made from paper and thread. Therefore, we find the remaining materials and tools and move on to the first stage..
An insect like a spider causes disgust and fear in many. However, there are also people who keep them in terrariums as pets. There are many types of spiders. Some are even considered very dangerous! If the appearance of spiders doesn’t scare you, then you’ll definitely like the cartoon version! The paper craft will consist of two main elements - a body in the form of a three-dimensional...
Creating a peacock from colored paper is very interesting and fun! After all, he has a chic fluffy tail, which can be made from paper in the form of paper stripes. We fasten their ends together to obtain one shape - a drop. But let’s make the main body and head flat...
Penguins are cute creatures that have black and white fur. Their image is complemented by small legs at the bottom and a beak, which in the craft can have a yellow, orange or light brown tone. A beautiful finish will be the eyes, which you can make with your own hands from cardboard or take ready-made plastic ones with rotating pupils...
A crocodile cannot be called a cute animal, because it is very aggressive and can easily attack a person. However, a crocodile made from paper as a craft can evoke pleasant emotions and delight if you make it with your own hands from simple and affordable material. Let's add plastic eyes and skin texture to the craft using a black marker or felt-tip pen...
Leo is the real king of beasts. You can’t confuse him with another animal, because he stands out with his muscles and gorgeous mane. You can make a lion from colored paper in the form of a three-dimensional figurine, where you will need dexterous fingers, a stapler and glue. This finished paper craft will not look menacing - we will draw a kind and nice face for our lion...
To create a cunning fox from colored paper, we cannot do without glue alone, so that the craft will serve us for a long time safe and sound. Using staples, a paper craft will keep its shape for a long time. Therefore, you can safely choose a beautiful shade of orange construction paper to create the main part of the body with the head. But for small craft parts, of which there are several, it’s suitable...
Using simple materials such as colored cardboard and paper, you can make three-dimensional animal figures. They will decorate a children's shelf with books or baby crafts, because such animals turn out to be very beautiful and cute. For each animal you will need one or another color of paper. For example, for a raccoon, the main color of the cardboard will be gray. It will be complemented by white, black and red. So let's get a cute one..
It has long been no secret to anyone that a wide variety of objects can be folded from an ordinary sheet of paper. Who among us did not make a paper airplane or a simple flower as a child? Remember how diligently we folded the piece of paper, and then enchantingly rejoiced at our creation. And even though the corners were not entirely even, and the lines were slightly not parallel. We invite you to return to the world of childhood and once again plunge into the magical world of origami. This time we'll do something unusual: the choice fell on a bottle. Yes, yes, a sheet will make a paper bottle, which, according to most, can only be made from glass or ceramics. Let's surprise the world?! Like many other crafts, the bottle will be born from a square-shaped sheet. Let's prepare the sheet for further work, for which we will make several auxiliary bends. Attention - not all bends must be made over the entire length or width of the sheet. Otherwise, the craft will turn out angular with distorted shapes. Fold the sheet in half horizontally and just mark the inflection line on the right. We return the sheet to its original position. In a similar way, by folding the bottom part up, we divide the lower right half of the edge of the sheet in half. Let's repeat the folding procedure so that the edge of the sheet is divided into eight equal segments.
Fold a strip one-eighth wide of the sheet up and carefully iron it along the fold line. Fold the top of the sheet down so that the edges of the sheet meet. Let's straighten the workpiece. Let's fold the top half of the sheet horizontally in half; the very first mark on the right edge, made when folding the whole sheet, will help us with this.
Let's straighten the workpiece. By alternately folding the sheet in half vertically, we divide the bottom strip into eight equal parts. And then we will divide each of them in half, marking the cents of each of the eight parts with risks. Based on the risks made and the inflection line of the bottom strip, we will bend the lower right corner back.
We fold all adjacent elements of the bottom strip in pairs so that a convex diagonal fold is formed, and the middle marks coincide when folded.
Starting from the folded corner of the sheet, we sequentially fold the entire lower part along the resulting fold lines. We'll get the bottom. The paper bottle is already beginning to take on familiar shapes.
Let's straighten the paper blank to its original shape. Place the sheet so that the bend line dividing it in half is vertical. We will work with the left half of the sheet. Consistently folding the sheet in half horizontally, and then dividing the resulting parts into halves, we will arrive at the required result - we will divide the left half of the workpiece into thirty-two equal horizontal parts. Please note that we iron the kinks only to the central vertical line.
Next, let's move on to the most important stage - folding the neck of the bottle. In this part of the work you need to be extremely careful. Using a concave fold, place the fourth strip on top of the third. Fold the right side of the sheet back. Based on the drawing, we will make a zigzag fold, in which part of the third strip will open slightly, and the sheet will bend vertically twice in different directions. We continue to fold the strips in pairs, gradually forming a neck.
If everything is done correctly, the bottle will have an elegant neck. All that remains is to secure the additions made. To do this, bend a narrow strip outward at the top of the neck.
Using the previously described method, we will form the bottom of our vessel.
The wonderful art of origami has miraculously transformed an ordinary leaf into a voluminous paper bottle. Watch the video on how to make a paper bottle
Original ideas for decorating a champagne bottle
For this we need:
- Champagne bottle
- Paper napkins
- Acrylic varnish
- Beads, beads for decoration
- Artificial flowers made from polymer clay
- Acrylic glass paste
- Tompovka
- Glue (transparent)
Progress:
- We clean it from the paper covering. It will be easier to do this if you first wet the paper with warm water.
- After this, we cover the cleaned bottle with acrylic varnish. We tear the paper napkin into small pieces that need to be glued to the glass. Using a brush, we form folds.
- Then we cover it with white paint using a stamper or a sponge, wait until it dries and apply a second layer of varnish.
- Now, using a fairly hard and dry brush, apply gold-colored paint to the folds. This way we emphasize the texture of the surface.
- In order to fix it all, we need an aerosol acrylic varnish, which we use to treat the entire painted surface.
- After the varnish has dried, we need to apply our decorations to it. For convenience, it is better to first think about how it would be best to glue them, and only then get to work.
- First of all, we glue the polymer flowers, which you can also make with your own hands.
- Then we add leaves to the flowers.
- Now comes the turn of large and medium-sized beads.
- We glue the beads with peculiar “feathers”.
- All that remains is to decorate it with halves of beads, which we apply in a chaotic manner.
- Don't be upset if you accidentally touch the foil while working. These defects can be easily hidden using the same beads or glass paste. Now she's ready for the holiday!
bottle decor champagne decor
bottle decor
champagne decor bottle decor champagne decor
Video tutorial: pineapple made from sweets and champagne