DIY fairy tale crafts - Zmey Gorynych
But let's start with a cartoon known to kids to interest them. In the cartoon “Three Heroes” there are several wonderful characters that are attractive to children. There is also a dragon here, they can sculpt it from plasticine. The magical stories about Shrek also have a similar character. And in Soviet cartoons and ancient fairy tales the Serpent Gorynych often appears
To make this funny cartoon character, you need to place it on the work surface next to your child:
- plasticine;
- a cloth for wiping hands;
- a plastic knife for cutting pieces of mass of the desired size;
- modeling board.
A step-by-step master class will show you how to make the Serpent Gorynych.
The child will roll 3 identical balls from plasticine. Since the Serpent Gorynych has 3 heads, we will make three identical blanks. Each of the balls needs to be pulled on one side, and on the other, make a small thickened sausage that will become the head.
The body of this fairy-tale character will look like a cone rounded at the bottom. It is also created from a ball, but larger in size than the head. Let the child roll four balls, but small ones; they need to be slightly lengthened, bent, to turn them into paws. Help the baby attach the neck to the body on one side of the head, and the paws on the other. To make a dragon's fluted spine, you need to roll small balls and give them a triangular shape. They are secured on the back along the spine of the fairy-tale hero. As you understand, dragon wings are also made from two balls. But then they need to be flattened by hand, sharpened on both opposite sides, and attached to this fairy-tale character. By cutting through the lower part of the head with a plastic knife, you will create Gorynych’s mouth. Use a match to make 2 punctures in the nose area to create this face piece. You need to roll three small sausages out of red plasticine, flatten them, and insert them into the dragon’s mouth.
Two green circles will become eyelids, two white circles will become the whites of the eyes, two small dark ones will become the pupils of one of the dragons. Do the same for the eyes for the other two.
Show your child how to use a plastic knife to make stripes on the dragon's paws. Here's how to make the Snake Gorynych from plasticine.
So that children know the heroes of Soviet cartoons, teach them how to make Cheburashka. Sit next to your child and place in front of him:
- corrugated cardboard brown and yellow;
- PVA glue;
- colored paper;
- eyes for toys;
- hot glue.
We make the head and torso of this character, using two round blanks for each of these parts.
For the head, first roll up a strip of yellow corrugated cardboard so that it becomes a circle, gluing the turns of PVA. Glue the beginning of a brown strip to the end of this tape. Twist it a little more and glue the brown tip.
We will make the part for the reverse side only from brown cardboard; the tape from it must be twisted tightly.
Now gently press into the center of pieces 1 and 2 to push these parts out. Compare the prepared elements with each other, glue them with hot silicone so that the curved parts are on the outside.
We continue to make Cheburashka further. Create a small circle using a strip of brown corrugated cardboard. Bend it on one side of the workpiece so that it becomes convex. Give it a teardrop shape by squeezing one end with your finger. Make the second part in the same way. Glue these pens to a fairy tale character. The ears are created in the same way as Cheburashka's head, only they are slightly smaller in size. As you can see, they need to be glued to the head using a hot gun. Also, using melted silicone rods, attach the eyes in place and the mouth and nose cut out from construction paper. The legs are made from 2 brown circles of corrugated cardboard. Place them and the handles in place, and secure them with hot glue. All you have to do is attach the bow, and the wonderful Cheburashka is ready. To sew a cartoon toy, take:
- soft brown and yellow fabric;
- matching threads;
- red yarn;
- two circles of white felt;
- tracing paper;
- pencil;
- scissors;
- a piece of chalk or soap.
From brown fabric you will need to cut out:
- two head parts;
- four ear elements;
- two parts for the body;
- 4 blanks for the leg and the same for the arm;
- brows;
- triangular nose;
- pupils.
From yellow fabric, cut out the face and abdomen of Cheburashka.
If you want to make contrasting ears, then cut out the inner part of the ear from yellow fabric, and sew the details of the inner ear to the outer one.
- Let's start sewing. Place the yellow muzzle piece on the brown head circle and connect these elements with a zigzag stitch. The tummy of a cartoon character is decorated in the same way.
- Now you need to fold the two parts of the ears with their right sides facing each other, stitch on all sides.
- Place the two head blanks right sides together and insert the edges of the ears on both sides. Stitch without covering the neck area. Through this hole you will turn your head inside out. Fill it with padding polyester.
- Sew together parts 1 and 2 of the paws, as well as elements of the arms. On these blanks, leave the spaces at the top unsewn so that you can turn them inside out through these holes and fill them with filler.
- Fold the arms and legs with the parts of the torso so that these elements are still inside. Sew along the edge, leaving the neck unsewn, through it you turn the workpiece right side out.
- Fill your belly with padding polyester. Place the lower part of the head into the neck and close this gap with a hidden hand stitch.
This is how the heroes of popular Soviet cartoons and children's books are sewn.
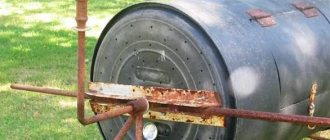
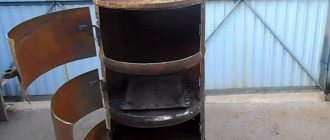
Original sink
Experienced summer residents were able to make an amazing structure out of an old barrel. Now this is not only an unnecessary thing that it’s time to throw away, but also valuable material. You can use it to create a sink for your garden and make the life of a gardener easier during the summer season.
note
! To complete the work, both a wooden and a metal barrel will be useful.
Materials:
- moisture-resistant silicone faucet;
- siphon;
- dye;
- drain;
- barrel;
- round sink;
- varnish
Tools:
- pencil;
- sealant gun;
- jigsaw;
- spanners;
- ruler;
- drill;
- brush.
How to make a moidodyr - a character in an instructive story
It was invented by the writer Chukovsky. This poem is often filmed in kindergartens or primary schools; a Soviet cartoon was also created based on it. If you need to make a Moidodyr costume for a performance, then watch the following master class.
To make a fairy-tale hero costume, take:
- one box in A3 format, the other in A4 format;
- scissors;
- markers;
- colored paper.
Take an A3 size box and make a slot in it, as shown in the photo.
When the boy puts on the Moidodyr costume, this hole will be on the neck and its upper part. In the same container you need to cut holes for the hands. They will be round. This is the upper part of the suit; for the lower part you need to make a washbasin from a smaller box, A4 format. Taking a glue gun, connect both parts. Measure the workpiece for your child. If everything suits you, proceed to registration. Self-adhesive film is perfect for this. Stick the light one on the sides and in the middle of the suit, and the dark one at the bottom so that it turns into a cabinet under the sink. Then draw with markers the facial features of the washbasin and its faucet spout. Don’t throw away the cardboard scraps; make a basin from one large one. Having cut out a part of a similar shape, you will need to draw on it the features of this household item using a marker. First glue a washcloth onto one side of the washbasin, and on top, slightly to the side, a basin. The work is completed. This is how Soviet cartoon characters are created. Find out how you can make them from other materials. Even socks will do for this. To make the famous crow from the children's animated film, take:
- a pair of striped socks, some plain;
- scissors;
- 2 cotton pads;
- filler;
- two small dark buttons.
To end up with a soft toy like this, take 2 identical socks; it’s good if they have bright-colored inserts on the heel and toe.
Cut both socks as shown in the photo. As you can see, one produces 2 large parts, and the second produces seven small ones. To make a crow's head, take the cut-off top of one sock, sew up the resulting hole on the arms from the bottom, fill it with filling, sew at the level of the elastic with a needle and thread, tightening the workpiece here to make a round head. To give this most popular hero of Soviet cartoons, or one of them, eyes, sew a black button onto a white cotton pad. Next, sew the eyes onto the sock, which became the crow's head. Tie two narrow pieces in the form of ribbons together in the center. Sew the resulting bow onto the bird's head. Using a dark thread, make stitches at the level of the nostrils to create the nose of a crow. Take the second part of the same sock, fill it with padding polyester, sew it on the other side to make a round body. Also use a needle and thread to attach it to the crow's head. The two larger parts of the second sock will become the wings of the cartoon heroine. Sew each one along the edge, leaving a small gap. Turn the wing out through it and stuff it with padding polyester. Now you need to sew it into place, then also decorate the second one. The tail is created in almost the same way, grind the edges of this part, leaving a small hole. Turn the tail through it and give it shape using filler.
Semicircular blanks cut from a single-color sock will become the legs of a crow. First, sew each along the edge, then turn it inside out and shape it with filling.
Taking a thread of the same color, sew 2 stitches on each paw to indicate the toes of this one. This is how the heroes of Soviet cartoons can get a rebirth. Kids will certainly love them, because they are so beautiful, soft, and cozy. You learned how to make a Cheburashka from corrugated cardboard. Now look how the most popular hero of Soviet cartoons (for many he was such) is made from fabric. A pattern will help you sew a Cheburashka.
Expert advice
Summer residents who made the sink share their secrets with beginners. First of all, they recommend paying attention to the following points:
- To make it convenient to use the invention, you should place a cabinet next to it. You can put all the necessary accessories in it and collect them in one place.
- You can install the sink in any corner. Both in the house and on the site. The main thing is that it is convenient to approach the washbasin. Otherwise, the structure will be installed for beauty.
- If desired, the composition can be supplemented with various accessories. Why not make mini waterfalls on top? Such decorations will definitely not get lost in the countryside.
DIY wolf from “Well, wait a minute” made of polymer clay
To make this character you will need:
- polymer clay of several colors;
- liquid plastic “Livid gel”;
- plastic knife;
- stack with a ball-shaped tip.
Master Class:
- Take gray polymer clay and mold it into an oval. Make one half of this figure narrower than the first, it will become the mouth of a wolf. But this is only the top of her head. Make the bottom one from a piece of polymer clay of the same color.
- You need to pinch off two fragments from the same mass, give them a triangular shape, and stick these ears on the head of the wolf from, well, wait a minute.
- Roll out a round nose from a piece of black polymer clay, and make eyes from white. To keep the whites round and thin, go over them with a stick ball, then stick them in place, just like the wolf's teeth.
- Use black polymer clay to create his pen hair. Using a toothpick, make dots in the nose area, and with a plastic knife, help make the mouth more realistic by making an incision in this place.
- Pass the same toothpick into the wolf's head and secure it here with a piece of clay. After tearing off a fragment of the plastic mass, roll it into an oval, give it the shape of a wolf shirt, and put it on a toothpick.
- Be sure to make his bell-bottom trousers out of black polymer clay, with paws made of gray plastic visible below. Make hands for our hero, if you want, put them in them, which you can also make with your own hands.
- Depending on the type of plastic, you need to dry it in air or in the oven. After which the strong figurine is ready.
Make similar crafts with your children so that the children know which Soviet cartoon characters their parents and grandparents liked.
Kids will also be happy to create fairy-tale characters, take the fruits of their labors to a competition, or leave them to decorate the house. If kids are not yet familiar with an interesting cartoon, be sure to turn on the video player for them, let them follow with interest the adventures of the hare and the wolf. It will be even more interesting for children to play with a sock crow if you show them which cartoon heroine it is from.
Like the plasticine crow, Cheburashka will also be loved by kids. So that they know this famous cartoon, the story about Gena the Crocodile, show them the plot.
I am the Great Washbasin, the Famous Moidodyr, the Chief of Washstands and the Commander of washcloths!
Today in our class there was an event dedicated to the talented children's writer Korney Chukovsky. I’m a little ashamed, but only today I found out that this is a pseudonym, but in fact his name was Nikolai Vasilyevich Korneychukov. It's doubly embarrassing because... Mom worked in a children's library all her life and I kind of should have known this :).
Well, at this event Matveyka had to act as Moidodyr and on the eve we started making the costume. We decided to make it from boxes (1 A4 box and one A3 box).
We started by making the top part (A3 box). We cut a rectangle from the side of the box, this will be the slot for the neck. I left 5 cm on the sides so that the entire structure would rest on the shoulders. The opposite side was simply cut along the sides.
Now you need to make holes for the arms. Matvey marked the future center of the hole (7 cm from the edge):
Didn't you think the pencil was crooked? :)) It’s magical for us, it takes any shape and can even be tied into a knot (and at the same time sharpens well in a sharpener) 
I cut out the holes myself, using a compass knife (a good thing, I use it often). The diameter of our holes = 5 cm.
The slits for the arms and neck are ready!
First fitting:
So far THIS looks a little like a washbasin. We make a sink with a cabinet from a smaller box:
Using a glue gun we connect the parts:
Second fitting:
The base is ready, now let's do some magic. And we’ll do some magic using self-adhesive film (the scraps have been waiting in the wings for a long time):
I was so carried away by the process of pasting that I completely forgot to take pictures of the intermediate stages, and outside the window it was already deep night. In the end, this is what happened:
I used 3 types of self-adhesive (you could just paint it with paints). I drew the outlines with a black permanent marker. I made a basin from the remains of the cardboard and glued it to the glue gun together with a washcloth. Moidodyr is ready, I tried it on myself to determine the optimal position of the “headdress”, I was afraid that the view would be blocked.
Marina Vladimirovna Morozova
Dear Colleagues!
I bring to your attention a master class on making a full-length costume for a character from K.I. Chukovsky’s fairy tale “Moidodyr”.
I had the idea of making “Moidodyr” for a very long time. I specially saved a large box from under the refrigerator in the garage. I knew, no, I was just sure that someday I would turn this box into a washbasin.
You will agree with me that a lot of activities in our kindergartens are devoted to healthy lifestyle. These include conversations with children about hygiene, teaching preschoolers the rules of personal hygiene, health days, and much more. There is no point in listing everything. There are also a lot of different events taking place in my gym.
Well, I really wanted to see “Moidodyr” in the gym.
And so, it turned out - “The Magic Washbasin”. My husband gave me a lot of help in making it. I don’t even know how I would have coped without him. After all, it was he who so skillfully turned a refrigerator box into a washbasin.
STEP 1:
First, he and I freed the box from the staples that held it together. Then the husband did several manipulations (cut something, folded something) and this is what he got.
We had to tinker with it in order to connect this entire structure with the same brackets (they are very durable)
. In some places they used a furniture gun.
STEP 2:
We made holes for the arms. I climbed inside this structure and slowly, a little at a time, cut it out so as not to make a mistake and not spoil everything. I did not cut out the hole for the eyes, because the old one was useful (the manufacturer made holes on the box to carry the refrigerator)
STEP 3:
I bought two new basins in the store (a larger one (red) for the head, a smaller one (white) for the sink)
, a mop (
to imitate hair)
and a faucet
(for the nose)
. I secured everything to the resulting structure to see how it would look.
Then I removed all the elements to continue finishing work.
STEP 4:
I covered the structure with self-adhesive film in two colors and reattached the Moidodyr elements.
STEP 5:
Along the edge of the hole for the hands, I attached the hands (waffle towels)
.
STEP 6:
I attached a curtain to the back with an elastic band so that my legs were not visible (through this hole I get into the inside of the washbasin)
.
STEP 7:
I found the right eyes and smile on the Internet. I transferred them to self-adhesive film, cut them out and pasted them on.