11.06.2019
Stoves are practically free or very cheap material, and at the same time they can make large stoves, including long-burning ones.
Manufacturing progress.
First, remove the top of the barrel, then cut the side for the door.
We take welding and attach the door of the future stove. We measure 200 mm from the bottom and install grate bars.
It is advisable to install another door under the ash pan to control the draft.
You will need fire bricks to protect the walls. We lay them out from the inside.
For the chimney bricks, we install the structure as in the figure below.
The bricks are laid out on the kiln mortar. The composition of the oven mortar is 1 part clay to 2 parts sand, the mixture is mixed with a minimum amount of water until it reaches a very thick consistency.
The thickness of masonry joints should not exceed 5 mm.
To increase the heat transfer of the stove, you can install another barrel on top. You need to make a hole in the barrel for the chimney and weld a piece of pipe under the chimney.
Two barrel oven
One of the highest quality barrel stoves, made with our own hands, based on the large containers available to us. The stove for kindling wood consists of two barrels: one for 200 liters, the second for 100 liters. A certain novelty, which not everyone will think of, is the increase in heat transfer due to an additional container, the walls of which are heated by hot air rising up to the pipe. The fuel also burns out in the second barrel.
The stainless steel pipe is made from truck exhaust. The pipe is specially made curved to increase heat transfer into the room.
Looking at the previous video, the thought arises: what if you use the second additional barrel as an oven? The next model implements just such an opportunity!
We made a stove for burning garbage at the dacha
Another stove for burning leaves and firewood in the country, and at the same time you can cook food on it. This oven is much simpler than those described above, but ease of manufacture in some cases is simply necessary, and this is its advantage. There is a big advantage to burning waste in a barrel. It's convenient and safe. A domestic 200 liter barrel was used for the stove. Its top is cut off by 16 cm. Firewood is placed and lit in the ash pit, and then leaves are thrown over the top. The author made a special bottom for the firebox from reinforcement and a hoop from a barrel. The bottom is placed on protrusions-corners in order to bring the fire from the wood closer to the top of the stove. A lid with a pipe is placed on top. You can cook food.
At the moment, the question is very relevant: how can we survive the cold, because heating a house with gas is now not at all a cheap pleasure, much less heating households with it. premises, a garage, a hangar are absolutely unheard of luxury. I propose to make your own oven from a metal barrel with your own hands. If the head and hands are in place, then it can be done even in half a day.
Furnace materials:
I found a metal barrel of handles and pieces of metal, handles and scrap metal in my garage. door from an old stove Fasteners, screws, nuts, rivets; (Attention, only steel or stainless steel) Sealant brackets - wire corners
Tools:
angle grinder grinding and cutting discs drills and drill bits metal scissors pliers, hammer, cleaver clamps
Designs of a potbelly stove made from a barrel, criteria for choosing materials, how to make it yourself
An old metal barrel is an excellent material for building an effective potbelly stove. The unit obtained in this way is suitable for heating any non-residential premises - from a garage to outbuildings.
The stove made from a 200 liter barrel is distinguished by its simplicity of design, does not cause difficulties in performing the work even for beginners, and comes with a water or air circuit.
But you need to clarify in advance the features of the device, the principle of its operation and the assembly diagram.
Do-it-yourself potbelly stove from a barrel
Selecting a quality barrel
To build a stove, you need to find a steel barrel, which was previously used in the paint, oil, chemical, chemical, and metallurgical industries for the purpose of storing and transporting the following groups of products:
- Bulk – oils, paints, diesel fuel, solvents;
- pasty - bitumen, thick lubricants;
- bulk - plasticizers, caustic soda.
Barrels come with an open or closed top, and can have different thicknesses of the lid and shell.
Any described container is suitable for a potbelly stove, if you thoroughly clean it in advance and rinse it from the inside.
The thinner the walls, the faster they will collapse under the influence of fire, and the stove will stop working properly. This means that you should select a product with walls of at least 2 mm.
Optimally, a stainless steel barrel, because its steel better withstands fire, thereby increasing the service life of the unit.
Instructions
At a certain point in construction, the question arises of how to properly construct a potbelly stove yourself. A 200 liter barrel just becomes one of the most suitable frames. The stove can be distinguished by shapes and sizes; it can be round, square, located horizontally or vertically. It all depends on your imagination and the room.
To understand the operating principle of the device, it is enough to understand the diagrams and assembly stages.
Work progress on making a stove from a barrel
1
.
Oven door We cleaned the cast iron doors from rust using an angle grinder. 2
.
A barrel for a stove. A barrel for fuel and lubricants, which is reinforced around the perimeter with steel rings, is better suited. As a rule, this is a 200 liter barrel. 3
.
Recycled materials When creating the stove, we used sealing cord, old handles and brackets. 4
.
Door location Measure and use a sharp pin or nail to mark the position of the door. 5
.
Opening for the door Drill a hole in the barrel in the corners for the future opening for the door. This is necessary so that the angles are exactly 90 degrees. 6
.
Processing the opening We cut holes on the door for putting on and removing the ash. Sharp edges are sanded. 7
.
Protecting the Doors Feeding doors install a protective piece of metal that prevents them from entering. 8
.
Assembling the door We use nuts and bolts of large diameter, and, if possible, refractory metals. 9
.
Chimney Cut a hole along the diameter of the chimney pipe. We make sun-shaped slits into the hole. 10
.
Chimney adapter We attach a piece of pipe to the chimney opening. The wall thickness of the pipe section is 1.5 -2 mm. eleven
.
Fastening a piece of pipe We insert the cut “rays” into the hole so that they alternate: one inside the oven, the second on the outside. 12
.
Hermetic connection We hermetically weave a paronite thread into the connection between the stove and the pipe section. 13
.
Adapter Then we attach the pipe section. It should be well pressed and clamped, and evenly compacted with thread. 14
.
Cuff for the chimney pipe We use an additional cuff made of galvanized steel. To make a cuff, we make a template. To make a template we use cardboard. 15
.
Mineral wool Add a seal to the cuff - mineral wool. You can also use any non-flammable sealing material. 16
.
We secure the cuff. We tighten the cuffs with clamps to bend them as tightly as possible near the pipe. Use a hammer to help bend the cuff. 17
.
The cuff is ready. We finish strengthening the cuff and sealing the transition section. 18
. We strengthen the walls of the stove. We attach metal plates to any holes or places with rust using rivets.
Blower measuring 50 by 300 mm. Firebox 300 by 300 mm. It is necessary to take into account the difference in the heights of the barrels and the height of the base that will be placed in the outer barrel;
3. A 100-liter barrel is welded on top with a steel sheet;
4. A hole for the chimney is cut in the steel sheet, the diameter of the existing pipe is taken into account;
5. A brick pedestal is laid out at the site where the potbelly stove is installed;
6. In 200 lit. in a barrel with a mixture of crushed stone and clay, the base for a 100-liter barrel is laid out using bricks;
7. The base is carefully compacted;
8. A 100-liter barrel is installed on a finished base;
9. The openings of the firebox and barrel vent are aligned and welded;
10. A door is cut out of a steel sheet;
11. The bolt is made from a steel sheet cut into a plate.
12. One end of the plate is bent in the shape of the letter “O” for the handle.
13. Hinges from a metal sheet plate in the shape of the letter “P” are welded onto the door and wall of the bourgeoisie, with the legs on the walls. There are 2 pieces on the door - the bolt will slide along them. On the wall of the barrel 1. It will hold the door when the bolt is inserted;
14. The door hinges are welded;
15. The firebox door is welded;
16. The chimney pipe is cut to the required length. The longer, the stronger the traction.
17. The chimney pipe is welded. Welding without gaps is necessary so that the smoke comes out only into the chimney.
18. The free space between the barrels is filled with a mixture of clay and crushed stone.
19. The curved edges of a 200-liter barrel are welded to the edges of a 100-liter barrel.
When cutting holes and parts, it is necessary to take into account that metal expands when heated. Therefore, the clearances of the door and other parts must be left sufficient for normal operation.
Between the ash pit and the firebox, to facilitate the removal of ash, you can place a grate assembled from metal corners.
Potbelly stove made from 2 identical barrels
A potbelly stove can be built from two 200-liter barrels. It is used for both heating and cooking. It is often used for smoking. Additionally you will need:
· Metal corner;
· An additional pipe carrying all structural parts and a chimney from the bottom of the stove to the top;
· Construction staples;
· Steel rivets.
2.1. Making a potbelly stove
1. A grate is installed in one upper barrel. We will use it for cooking, grilling and smoking. It is mounted from steel corners, measuring 20x20 mm.
2. Holes are cut for the ash pit, firebox, and access to the grate.
3. The parts of the oven are connected with a steel pipe (3-liter tin cans can be used). The edges of the metal pipe (can) are cut 2 centimeters. The pipe is inserted into the barrel and bent according to the “daisy” principle. The edges of the pipes are drilled together with the base of the barrels. Both barrels are held together with steel rivets or bolts.
Improved potbelly stove design
4. A valve is made for combustion intensity (adjustment). A circle is cut out of metal (with a diameter smaller than the diameter of the pipe holding the barrels together). The brackets are welded to the valve. A hole is drilled in the pipe, in the geometric center. Use a metal rod to install the valve in place.
5. A door and bolt parts are cut out of a steel sheet. The hinges are mounted on the opening of the firebox. The door is installed.
6. To give the structure rigidity and stability, it is reinforced with metal corners. They are fastened with steel rivets, bolts or secured by welding.
Brazier from 2 barrels
7. To prevent combustion products from getting on the prepared food, the cracks in the structure are caulked with asbestos and covered with parts of cans.
Making a potbelly stove from barrels does not take much time and does not involve complex work. To reduce the cost of construction, you can use used materials. This will not affect the quality of the finished stove.
A stove, called a potbelly stove, is installed in various rooms. Its main advantage is its heating speed. The stove quickly heats the air in the room in which it is installed, and the stove cools just as quickly due to the properties of the metal. Oven models vary.
It all depends on the wishes of the customer or manufacturer. The most popular option is a potbelly stove made from a barrel.
.
It's easy to do it yourself. You will need an ordinary tool, most often available to a practical man, a sheet of iron, a few pieces of bricks. One of the complex equipment
that is not always available on the farm is a welding machine. You can rent it or find it from friends.
DIY potbelly stove from a 200 liter barrel: drawings, diagrams, instructions and photos
> Miscellaneous
An old 200 liter metal barrel is an excellent material for making a simple potbelly stove.
The resulting stove is suitable for heating any non-residential premises, from garages to outbuildings.
A 200-liter barrel stove has a simple design and does not cause any difficulties even for novice craftsmen. Let's look at the features of this simple heater and discuss the assembly instructions.
Advantages of a barrel stove
When assembling homemade stoves, artisans often use old gas cylinders or sheet iron. Getting both, and almost free of charge, is problematic.
This applies to the greatest extent to sheet metal, which is most often simply purchased. 200 liter barrels are a more affordable raw material for the construction of heating equipment.
200 liters is quite a decent volume. A firebox organized in a barrel can accommodate a large amount of firewood, which is necessary for long-term combustion. There will also be room for a spacious ash pan. In other words, an old metal barrel will still serve for the benefit of a person, providing him with warmth and comfort.
A barrel stove is an excellent solution for heating non-residential premises of any type. It will fit in the garage, provide heat to a small workshop, and allow you to heat the basement.
Its assembly does not take much time, but you need to pay attention to the choice of source material. The selected barrel should not be rusted through - the thicker the metal, the longer the stove itself will last.
Therefore, there is no need to save on assembly materials.
Other advantages of a barrel stove:
- A volume of 200 liters is enough for normal combustion of the flame in the firebox.
- Possibility to organize a spacious and easy-to-clean ash pan.
- Unpretentiousness to fuel - the stove can work on anything that burns.
- Easy to use.
A potbelly stove made from a 200-liter barrel is in definite demand among those who need inexpensive and easy-to-assemble heating equipment.
There are also disadvantages:
- High case temperature.
- Low efficiency - part of the heat simply flies into the chimney.
- Thin walls - durable stoves require metal 3-4 mm thick.
Assembly sequence
The barrel stove is easy to assemble and requires equally complex tools. We will need:
- angle grinder (grinder);
- welding machine;
- a hacksaw for working with small parts (this is more convenient);
- Grinder.
You will also need auxiliary materials:
- pieces of sheet metal - for scalding doors;
- hinges for doors;
- chimney metal;
- metal for legs;
- brick and cement for organizing the base for the stove;
- fittings for creating a grate.
Prepare cutting wheels for the grinder and electrodes for the welding machine (if electric welding is used).
Making a potbelly stove from a barrel is not the most difficult task; the main thing is to follow our instructions exactly and observe safety precautions.
Initial preparation of the barrel
Making a stove out of a barrel with your own hands is as easy as shelling pears. The first step is preparing our “source code”. A 200 liter barrel must be cleared of paint (if it has been painted).
Those who neglect this step will have to inhale the aromas from burning paint. Our task is to make the barrel shiny, and at the same time get rid of rusty stains.
Use a grinder to sand the metal.
In the next step, arm yourself with a grinder and carefully cut out two rectangular windows in the barrel. Work with the tool carefully, as the sawn rectangles will be useful to us as doors.
We process the edges with the same grinder or file so that they are not so sharp. The door under the firebox should be larger than the door under the ash pan. In addition, the ash pan door will serve as an ash pit.
Assembling the grate
To make a grate, use reinforcement. The diameter of a standard 200 liter barrel is 571.5 mm. Therefore, the grate must be smaller in diameter in order to pass through the internal volume.
At the level between the firebox door and the ash pan door we make arbitrary projections - the grate itself will rest on them. For example, you can make them from sheet iron and weld them to the inner walls.
A potbelly stove from a barrel will generate quite a lot of ash, falling into the ash pan. Therefore, it must be large - the recommended height is 100-130 mm. Do not make the door too narrow, otherwise there will be problems with ease of cleaning.
Preparing the doors
The doors of our stove will be clearly smaller than the loading and ash windows. Therefore, they need to be scalded around the perimeter with pieces of sheet iron about 20 mm wide.
We also cut out handles from sheet iron and rivet or screw them to the doors.
At the next stage, we carefully weld the hinges, after which we weld the doors to the stove itself - now our 200-liter barrel is almost ready to serve a second life.
Making the base
For our 200 liter barrel, it is advisable to make legs. Use pieces of thick reinforcement for this or make them from metal corners 2-3 mm thick. The optimal distance from the bottom of the barrel to the base is 100 mm.
If you intend to make a potbelly stove from a barrel, think about where it will be installed. You will need a reliable non-flammable base. It is best to make it from brick or pour a concrete screed.
The space in front of the stove is made of non-combustible material - for example, from sheet iron laid here.
If the floor in the heated room is concrete, simply lay a sheet of iron on it and place the barrel on it.
Preparing the chimney
The design of a 200-liter barrel stove requires the presence of a chimney. It would be nice if it was removable - a “pipe-in-pipe” system would be suitable for this.
That is, we weld a smaller diameter pipe with a height of 100-150 mm to the stove, and then put a larger diameter main chimney pipe on it. You can also use ready-made factory dismountable chimneys.
The point is that the stove can be quickly cleaned by removing it from the base - a volume of 200 liters does not mean that it will never become clogged with fumes and soot.
Final assembly of the furnace
We take our 200 liter barrel with legs welded to it and install it on a pre-prepared base. We lower the grate inside. At the next stage, we weld the top cover with a short chimney pipe. Next, we put the main chimney on it and go for firewood.
Place some paper and small wood chips on the grate, light the fire, until a steady flame appears. Now start laying the main firewood - it is best if it is dry.
Wet logs burn worse, and they also smoke, clogging the chimney. Close the firebox door and use the blower to adjust the combustion intensity.
Do not forget to periodically add new portions of fuel until the set temperature is reached.
Modernization of the design
A barrel with an internal volume of 200 liters can provide a decent amount of heat. But the heat transfer efficiency will be small. Some of the thermal energy will completely fly away into the pipe. Therefore, the stove needs to be slightly modified. This is done in the following ways:
The steps we have given will help you make your barrel stove more efficient. If you don’t find a sample for 200 liters, you can take one for 150 liters - there will be a little less space in it, so you will have to add firewood more often.
- Brick walls are built to the right, left and behind the barrel - they will work as a kind of heat accumulators.
- The stove is scalded with round pipes of small diameter (for example, ¾ inch) - a convector is formed, which will cause air circulation in the room and effectively remove heat from the stove.
- By lengthening the horizontal part of the chimney - pass it through the entire room in order to take away maximum thermal energy from combustion products.
We will offer you a few more ideas for upgrading a stove made from a 200-liter barrel. For example, you can line its interior with fire bricks.
To organize the hob, use the cast iron insert in the top cover. Try to make a stove with increased heat transfer - weld two barrels together in height.
There are also modifications with horizontal barrels.
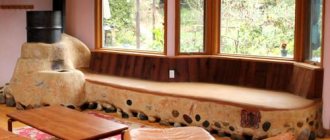
Interesting potbelly stove with stonework
A 200-liter barrel can serve as the basis for another interesting stove - with masonry inside. To assemble it you will need:
- the barrel itself;
- thick metal wire or fittings;
- large round river stones;
- chimney pipes.
There is no ash pan in such a stove, so cleaning will be some difficulties. We immediately recommend making the firebox door level with the bottom of the barrel - this makes it more convenient to remove the ash. We make a kind of grate from reinforcement or thick metal wire. Only here it will fulfill a different role - it will support the masonry.
To assemble the stove, it is necessary to cut off the top cover from a 200-liter barrel and equip it with a pipe for connecting the chimney. In the lower part we cut out a door for storing firewood with a height of 150-200 mm.
We fix a grate at a height of 250 mm, on which we pile stones to the top. Please note that large stones are needed so that combustion products can easily pass through the space between them.
The stove will need a strong, non-combustible base with a metal sheet in front of the firebox - it will be quite heavy, so the legs must be strong or absent altogether. The barrel is placed on the base before the stones are placed in it.
Otherwise, you won’t budge it later. After installing the stove in its normal place, weld the lid and connect the chimney - you can start kindling.
To improve traction, it is recommended to drill several holes with a drill with a diameter of 4-5 mm - air will be sucked through them.
Instructions for making a potbelly stove from a metal barrel
Everyone has an idea of a potbelly stove as an iron box in the shape of a rectangle, on which there is a door for storing firewood, as well as a chimney, often attached to the box itself on top. It used to be like this.
The most solid fuel burned very quickly in this design, while almost all the heat it generated went into the chimney. While the heating part was used, a pipe was used, which, as a rule, was laid through the entire room.
However, time does not stand still and significant changes have occurred in this matter.
Improved installation diagram for a potbelly stove.
Note. The potbelly stove has such a simple structure that, if necessary, you can assemble it yourself.
The principle of operation of a potbelly stove from a barrel
A potbelly stove made from barrels is very similar to the type of potbelly stove that we perfectly imagine. However, it is not mass produced. This structure is purely the creation of self-taught craftsmen. Among other things, the modernized stove has a round shape and is similar to the metal Slobozhanka stove.
The appearance of the simplest potbelly stove made from a barrel, however, has a large number of disadvantages
The main difference between them is the fuel combustion option. Wood sawdust is used for the following reasons:
- if you heat a potbelly stove with this fuel, it will be quite economical due to the low cost of this type of fuel;
- Sawdust that has been previously compressed burns out for quite a long time. One load is probably enough for 6-10 hours for this design.
It is quite obvious that a potbelly stove made from a 200 liter barrel looks good. Such a stove usually has a diameter of 600 mm. A hexagon with sides of 314 mm can easily fit into this circle. This makes it virtually no different in technology from conventional oven appliances.
The efficiency in such stoves, as a rule, does not exceed 15% (We previously wrote how to increase the efficiency of a fireplace or stove and recommended bookmarking the article.). If a screen is used to increase it, then such a stove does not last long and goes out of service after about one season.
Read the article on how to make an economical potbelly stove with your own hands and get answers to your questions.
The reason for this efficiency comes not only from the fairly thin metal, but mainly from the height of the barrel of 850 mm. Approximately 1.3–1.5 times less than the depth, the height of the firebox should be located in potbelly stoves made from a barrel.
In the case when the ash pan is made high and the grate bars are raised, then the lower part, as practice shows, will take heat and give it back to the air, thereby violating the entire correctness of gas dynamics.
In this case, there are only two ways out:
- You can wall the barrel up to the middle of the height in brick. This can be seen in photo 3.
Potbelly stove their barrels walled up in brick
- It is also possible to equip a refractory-lined oven at the top of the oven. And run a chimney through it.
In both cases the work will become more difficult. The service life of this furnace does not exceed five years, but the efficiency cannot be raised above 20%.
Source: https://slavarod.ru/raznoe/burzhujka-iz-200-litrovoj-bochki-svoimi-rukami-chertezhi-shemy-instrukcziya-i-foto
The essence of a classic potbelly stove
The classic stove model consists of a cast iron hopper (container). The monolithic container has a firebox and a smoke outlet. Such stoves were popular throughout the 20th century. To date, it has not lost its relevance. The main advantages are appreciated by many developers.
What attracts you to a stove?
- Work on: firewood, sawdust, coal, wood chips
. - The fuel burns quickly, heats the metal, which transfers heat to the room.
- Cools quickly, requiring no additional force or device to stop burning.
- The oven is small in size and does not occupy a significant area
. - Easy control over heating.
Components of a potbelly stove:
- frame;
- firebox;
- grate;
- blower;
- a 200 liter barrel, which will serve as the furnace casing.
How to make a pyrolysis oven with your own hands
First, we will look at the process of making a simple pyrolysis stove. Let's take the following drawing as a basis:
This is the simplest potbelly stove with smoke circulation. There is no pyrolysis here, but this is not a problem - to organize it we need to implement the supply of secondary air to the first smoke circuit.
This oven is made according to the following scheme:
A couple of metal tubes for air supply - and an ordinary wood-burning stove turns into a pyrolysis stove.
How to make a metal stove
A portable pyrolysis oven with your own hands is very simple. Make sure of this by reading the drawings in our review. To assemble it you will need sheet metal. We recommend choosing sheets with a thickness of 3-4 mm, which is necessary to extend the service life of the unit. Thin iron will quickly burn out, and the efficiency of the stove will begin to decline. A year or two of such operation - and it can be thrown into a landfill.
By the way, if you need a pyrolysis stove for a sauna, pay attention to the following diagram - here we see an enlarged combustion chamber, the same smoke circulation, only in the very top part there is a heater.
The design of the stove needs to be modified so that its firebox goes into the next room, and not into the steam room (it protrudes forward).
When starting to assemble a sauna or pyrolysis stove with your own hands, prepare sheets of iron and mark them in accordance with our initial diagram. The stove body consists of six metal plates, two more form smoke circuits. You also need to assemble a grate - to solve this problem, use fittings with a diameter of 12-15 mm. The grate is attached at a distance of 80 mm from the bottom of the oven using welding.
The most difficult task is preparing the doors. Cut holes in the sheet intended for the front wall; save the cut pieces. Weld 2 cm wide pieces of sheet metal around the perimeter of these pieces, welding them from the outside. As a result, we will get tightly closing doors. They will only need to be equipped with loops and simple hooks for fastening.
Pyrolysis furnaces for heating a home should produce maximum heat. This is what smoke circulation systems are for. Mount them according to the above diagram. Now all that remains is to make holes in the back wall and weld hot air tubes into them. Final assembly steps:
- Weld a piece of pipe with a diameter of 100 mm into the top cover - the chimney will be connected to it.
- Welding door hinges to the body.
- Preparing the legs - make them from sections of an inch metal pipe.
Our homemade wood-burning pyrolysis oven is ready. It turned out to be compact, thereby ensuring ease of transportation from place to place. Install it on a non-combustible base, connect the chimney and start it up.
How to make a brick stove
You will also need a machine that is suitable in size and power. Finding a normal order on the Internet is a real problem; only traditional stoves are publicly available. We recommend ordering its development from specialists or experienced people.
The metal stove is easy to assemble. If you have suitable hardware, cutting and assembling it will take a maximum of a few hours. But a brick pyrolysis oven is not easy to manufacture. You will need:
- Refractory brick for laying out a heating unit.
- Special fire-resistant cement mixture - it must withstand up to +1500 degrees.
- Experience in bricklaying - if you don’t have it, seek help from more experienced people.
A brick pyrolysis furnace is an analogue of a conventional metal stove. Only in size it turns out to be large and complex. The more bricks, the softer and better the heat transfer. There are no special design features here. Firewood is burned in the main combustion chamber (furnace). The resulting pyrolysis products are sent to the afterburning chamber. For its operation, holes are provided in the furnace design for supplying secondary air. They are equipped with doors; adjusting their clearance allows you to adjust the intensity of combustion.
Pyrolysis units with bottom combustion are in some demand. The firewood burns/smolders in the main combustion chamber, and the pyrolysis products are drawn down through the grate into the afterburning chamber. Secondary air is also supplied here, which causes intense combustion. Traction is realized naturally or artificially. In the first case, the stoves are equipped with efficient chimneys, and in the second case, blower fans are installed here.
The interior of the furnace, where combustion and pyrolysis reactions occur, is made of fireclay bricks. It can withstand heating up to +1000 degrees or more without cracking or bursting from the heat. All other layers are made of ordinary red brick. The chimney can be brick or metal. Doors are purchased in specialized stores. The operation of a brick pyrolysis stove will delight you with long-lasting combustion and pleasant warmth that persists even after it has died down.
Types of stoves
Most often, you can make 2 simple models from a barrel with your own hands.
Vertical model
The barrel is installed vertically on legs.
- It is recommended to use a cut out part of the barrel for the door. It is installed on hinges that are attached to the barrel and to the door. The hinges are riveted as follows: one part on the barrel, the other on the door. Moreover, the loops are located outside. The latch for the door
is made of two parts: a handle is welded onto the door, and a latch
made from a corner
. - Then comes the installation of grates: a metal plate with holes. Ordinary corners are suitable for securing them. The blower should be made of a dense pipe into which a damper is inserted. It should move
, but not come out completely.
The damper is adjustable with bolts, with a quarter turn
.
The blower opens to maximum when igniting. At night, the damper is closed almost to a minimum
, then the stove simply heats, but does not go out and does not increase the strength of the fire. - A round hole is cut out in the upper part of the barrel, and a chimney pipe is welded
. It is better to cut the hole in the form of triangles, running at angles from the center to the beginning of the cutout. When they are bent, a hole will appear, and metal remains for riveting. - Installed inside the barrel. It is needed to maintain the integrity of the bottom. The grate will prevent it from burning out and will help retain heat for a long time.
How does a pyrolysis oven work?
First, we will look at the operating principle of a pyrolysis furnace. Traditional wood stoves use the principle of direct combustion. Firewood loaded into the combustion chamber (furnace) is ignited and begins to emit thermal energy. This energy heats the walls of the unit, after which it penetrates into the heated rooms. Combustion products immediately fly away into the chimney. At the same time, another 10-15% of the heat flies there.
The disadvantage of a conventional oven is large heat losses. Combustion products fly into the chimney hot, they are full of heat, which can be collected and sent for heating. In the simplest case, users extend the pipe, making the horizontal section longer - it runs through the entire room. This reduces heat losses.
Pyrolysis ovens are designed somewhat differently. They have two chambers - in the first the fuel is burned, in the second the combustion products are burned. During the combustion of wood, pyrolysis products are released - these are flammable gases that burn at high temperatures. To burn them, secondary air is required - it enters the afterburning chamber, mixes with pyrolysis gases, resulting in the ignition of this mixture.
Other stove options
It is possible to make a potbelly stove with your own hands from a barrel of a more complex design, such as a hexagonal potbelly stove. For its base, the same 200 liter barrel
. A hexagon from the components of the future potbelly stove is inserted into it.
If we describe the structure of the furnace from bottom to top, then the order of arrangement will be as follows
:
- Felt padding for softness and stability of the structure.
- Asbestos,
or other non-flammable material that protects against fire. - A metal sheet. It protects the floor from possible fire and heating.
- Support bricks. They are the legs of a potbelly stove.
- Blower compartment
. This is a place where ash accumulates. - Firebox. A place to fire wood, coal and other selected fuels.
- Damper.
- Oven
. Place for cooking, heating air. - Lining compartment.
- Exit pipe for chimney.
All parts of the hexagon are inserted into the barrel. Doors for the make-up compartment, oven, and lining compartment are welded or riveted onto the front panel (part) of the barrel.