Today we will continue to work with paper and make one of the simplest, but at the same time, useful crafts. In the summer, most children have a lot of free time. And sometimes they spend it reading a book. Some people at school were asked to read a list of books according to the program, while others simply like to do it themselves. Both sometimes need to pick up where they left off reading. Yes, of course, you can just use the first leaf you come across for this. But why, when in 10 minutes you can make an original and very simple bookmark for books from paper using the weaving method?
We will need:
- two sheets of paper of different colors (preferably not very thin, but not cardboard);
- glue;
- ruler;
- pencil (or pen);
- scissors.
Stages of making wicker bookmarks:
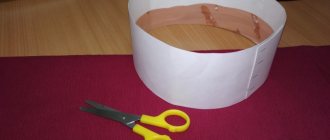
For crafts, it is advisable to take sheets of paper that match each other well in color. From the edge of each sheet we measure two centimeter lengths with a ruler. Depending on the length of the sheet and ruler, you may have to mark several times. We carefully draw lines along the marked points, without pressing too hard on the pencil/pen, marking the boundaries for the cut.
Then along the lines we cut two strips of paper of each color. On a strip of the same color we place a strip of the same color at an angle of 90 degrees, so that their ends coincide, forming a right angle and glue it. Glue a strip of a different color next to it. Make sure that these strips touch each other, but do not overlap. On top of the two glued strips, along the first (which served as the base) strip, we glue the last one, but also so that they only touch. We are waiting for the glue to dry.
We place the resulting corner of paper in front of us and carefully bend the right outermost strip at an angle of 45 degrees to the left, so that it lies along the other two strips.
We repeat similarly with the leftmost strip: bend it to the right. We continue to weave the bookmark in the same order. We try to ensure that the folds of each strip form an even line with the previously folded parts.
When the length of the strips ends, we glue the last strips that could be folded together. We cut off the remaining excess “tails” of other strips.
What to give a book lover for his birthday? A simple answer suggests itself: a book. You shouldn't be so unoriginal. After all, there are other options for birthday gifts for a person who loves to read.
A wonderful birthday gift option for a book lover would be an original handmade bookmark made of thread with a pompom.
It will take you no more than half an hour to make it, provided that you have never done anything like this before.
The end result will be this wonderful gift for a book lover - a bookmark made of thread with funny pom-poms at the end.
To make an original bookmark from threads we will need:
- Threads
- Scissors
The basis of the bookmark and the coolest element of the bookmark will be a funny fluffy pompom; the manufacturing technology is described in detail. But we will repeat ourselves and tell you about it again.
We wind the thread around the fingers and get a small skein (look at the picture). The size and degree of fluffiness of the pompom will depend on its size. But don't overdo it!
Then, when the skein has reached the desired size, we pull it across with thread, thereby fastening it well.
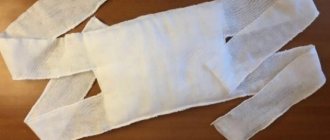
The second component will be a braid, which you all have been able to weave since childhood. Using the remaining threads, we weave a braid, the length of which should be slightly larger than the average size of a book page.
We tie the pompom to the resulting braid and that’s it, the bookmark is ready for donation and further use.
We have made a large selection of a wide variety of ideas, where you will find the ones that are very easy to do with your own hands. In this collection, every student will find something interesting for themselves and will become even more exciting.
We offer you a selection of amazing bookmarks for books that everyone can use for their own pleasure. With such original bookmarks you will want to open the book even more often. All that remains is to choose the one you like the most and start creating such an interesting one. In addition, September 1 is almost upon us and book reading will definitely increase. So why not make the process even more fun?
DIY bookmarks made from pompoms
In order to make such bright fluffy bookmarks for books you will only need knitting threads and paper clips.
Use knitting threads to make fluffy pompoms, trim them if necessary to make them look neat.
Now match the paper clip to the color of your pompom. If the color of the paperclip and the color of the pompom are combined, you will get a very fashionable and stylish thing.
Tie the pompom to a paper clip with a secure knot.
Now you will never lose the very place in the book where you stopped reading.
If you don’t want to use paper clips in making bookmarks, you can do without them. Just leave a long thread on the pompom, which will serve as a kind of bookmark.
Ready-made bookmarks will be an excellent symbolic gift for friends, work colleagues, children and family.
In our age of modern technology, a book can be read on various electronic devices by simply downloading it from the Internet. But there are people who will always prefer printed publications. These are people who love the smell of a new book, for whom flipping through printed pages brings true pleasure. And this article will be just for them.
To avoid spending too much time searching for the desired page, use a bookmark. It's always been like this. And in this article you will clearly see how you can make beautiful bookmarks with your own hands from various available materials. It can be paper, felt, old photographic film, ribbons, or templates that you just need to print. We will look at just a few methods.
Original ideas for making bookmarks for books with your own hands
When reading a book, it is important to remember and record the page you stopped on; in this case, a bookmark will help.
It is not at all necessary to go to a stationery store to purchase this simple accessory; we recommend making bookmarks for books with your own hands. Believe me, it's very simple! We invite you to make several original bookmarks using colored paper, felt, thread and paper clips. Consider the ideas below. So, first, let's look at a few simple ways and make a bookmark for a book with your own hands, using available materials.
From paper
Bright and very beautiful paper crafts can be made with children. Bring unusual ideas to life.
Option #1 - Worm
Strips of colored paper;
A sheet of colored cardboard;
- First, print out the templates, for example, the one in the photo. Then prepare all other materials.
Glue colorful stripes on top of the template.
Now you can cut out the worm.
Glue it onto a strip of cardboard that will serve as the base for your bookmarks.
Using a hole punch, make one hole in the area of the worm's head; this hole will be needed in order to tie the ribbon later. You can make a bookmark using the scrapbooking technique, it will turn out very beautiful.
- Glue the eyes and secure the ribbon. That's all, a simple and original craft made from colored paper is ready. We are sure that the children really enjoyed this master class.
Option No. 2 - Heart
If you are looking for unusual ways to create bookmarks for books from colored paper, then this option is just for you. You will need a minimum of time to work.
- Print and cut out the required template. Make markings as shown in the photo.
According to the diagram, you need to fold the paper along the outlined lines, so that you get a corner.
Connect the halves of the hearts and glue them together.
Now decorate the big heart with smaller figures in scrapbooking style or paint with felt-tip pens as you wish. You can do this with your child.
Option No. 3 - Origami Hedgehog
Let's create origami from paper, we'll make wonderful bookmarks for books. So, let's begin.
A sheet of brown and light brown origami paper;
- Fold the light brown piece of paper diagonally in both directions.
Bend the sheet to form a triangle, fold the top of the sheet halfway.
Now fold the right side of the triangle into the middle, and then the left.
Next, we unbend the edges, the left part of the triangle must be folded parallel to the central vertical line of the figure.
Repeat the same with the second side.
After this, you need to bend both ends into the resulting pockets.
Insert a sheet of dark brown paper into the corner of the bookmark, draw spikes on the brown sheet with a regular pencil, cut and glue.
Option No. 4 - Origami Christmas tree
See a few more cool ideas that will come in handy when creating bookmarks for a book, check out the proposed master class. You will definitely delight your children with these origami bookmarks.
- Green origami paper;
- Prepare the materials from which you will make the craft, fold the green leaf into a triangle, then connect the two corners.
Lay out the sheet, bend the upper corner of the triangle parallel to the base.
We bend the right and left corners inwards, now you need to straighten these corners.
Fold two corners to the top of the figure.
Next you will need to place them in pockets.
Let's start cutting out the Christmas tree from the green part of the figure.
All that remains is to glue the “trunk” of the tree from brown paper.
Option No. 5 – Bookmark with weaving “tie”
- 4 strips of paper in two colors;
- First, take three strips. Glue the orange and white stripes to the white stripe using double-sided tape, as shown in the photo.
Glue the orange strip parallel to the white strip.
Now let's start weaving. Turn the workpiece over so that there are two strips on the right and left.
We bend the white stripe inward from the right.
Now we do the same on the other side.
We continue to braid the hair as shown in the photo.
Option No. 6 - Bookmark - mouse
- Transfer the outlines of the mouse onto paper, cut it out, and glue it onto a landscape sheet.
Glue all the elements according to the picture.
Attach a lace tail and paws. Make a bow from a red scrap and attach it to a lace.
From felt
Not only bookmarks made from paper, but also felt, are quite interesting. Let's try to make them together.
Felt scraps in purple, pink and white;
- Cut out an owl blank from paper using a template (for the head you will need two identical parts, but we will cut one part of the head in the area of the eyes and beak, and the second will go to the backdrop, do not make a slot in it).
We transfer the contours to purple felt, cut them out, and make the necessary holes. Next, cut out the remaining details (eyes, beak).
Now you need to sew the eyes and beak with thread. Then you will need to cut out other interesting details - heart eyes.
Dress
Floral fabric;
- Transfer the outline of the pattern onto the fabric and a piece of felt.
Cut out these parts, glue them together, then you will need to stitch everything along the contours.
From threads
Make an original bookmark from threads using a simple manufacturing pattern. It's very simple.
Pompon
- Knitting;
- Wind the threads around your fingers as shown in the photo.
Tie the resulting skein in the middle, leaving a hanging edge.
Then cut the tied skein on the sides to create a pompom.
From paper clips
Even ordinary paper clips can become the basis for a unique bookmark. Just decorate this stationery with a bow, buttons or thread and you’ll get a fun bookmark. Another idea is to straighten the paperclip and bend it into a heart, star, or clef shape. Isn't it original?
Try making an exclusive bookmark yourself, it's very simple. Fantasize and admire the results of your own work!
Use various cool scrapbooking ideas, experiment and create.
Some more interesting ideas and master classes
Watch the video for more details: 10 options for creating triangular bookmarks:
Paper bookmark
The easiest way to make a beautiful paper bookmark with your own hands is. Hundreds of options! Below we show some bookmark options for inspiration. In the meantime, we’ll describe how to make a heart-shaped bookmark.
- White paper without lines;
- Cardboard (also white);
- Scissors;
- Unnecessary postcard;
- Glue (stationery)
- A simple pencil.
As you can see, these materials are not some unusual ones, but those that anyone can find at home if they wish.
- Fold the paper diagonally;
- Below (in the corner) draw the upper half of the heart;
- Carefully cut out. This is a template for a future bookmark.
- Place it on the card and trace it;
- We make a cardboard heart about half the size of a paper one;
- Glue the parts together.
This is a very simple method, so this bookmark can be made even with a child. You can also make origami bookmarks, monster bookmarks and other corner variations from paper, and much, much more. It would be inspiration.
Bookmark for books made of paper. Master Class
Valentina Korobkova
Bookmark for books made of paper. Master Class
Bookmark for books made of paper. Master Class.
Good day, dear friends and colleagues!
Paper is an indispensable material for all kinds of crafts. It is impossible to briefly talk about everything that can be made from paper.
And now I’m offering a master class on making bookmarks for those who want and love to work with paper.
For work we will need: a set of colored cardboard, a set of colored paper, PVA glue, a glue brush, a pencil, a ruler, scissors, a hole punch.
Take blue paper and cut out a rectangle measuring five by twenty centimeters.
Then fold it in half (as in the photo)
and cut at an angle, leaving a margin of five millimeters. Now you need to spread out the workpiece and bend the resulting teeth one at a time.
Glue the blank onto red cardboard, give it a shape - cut off the corners.
Paper clip bookmark
The paperclip itself can be a bookmark. But you must admit that just a paper clip doesn’t look very attractive. I want the bookmark of my favorite book to look beautiful. For this you need:
- Paper clips;
- Beautiful or unusual buttons;
- Hot glue;
- Felt.
- Glue a paperclip to the back of your chosen button;
- To cover this part of the paperclip, glue a piece of felt on top.
There are no restrictions here. Choose buttons of different shapes, sizes, colors and so on. Conduct experiments, and you will certainly be able to create an unusual and beautiful bookmark.
Just remember that a paper clip can ruin the book pages.
DIY bookmarks - bookmarks made of paper, felt, buttons and ribbons
To make it more convenient to use a book or notebook, always opening it on the page you need, bookmarks are used. You can buy them in a store or make them yourself, which is much more interesting and useful.
You will learn how to make such bookmarks with minimal effort and great pleasure from it.
Bookmarks for books made of paper (diagram): paper heart
– colored cardboard or old cover, postcard, magazine page
– a sheet of white paper
– glue stick or PVA
1.
Take a sheet of plain white paper and fold it diagonally. Using a pencil, draw an arch (see image) - this will be half a heart. When you straighten the sheet, you will get a full-fledged heart.
* You can simply draw a heart on paper; it does not have to have ideal shapes.
3.
Cut out the heart. You have a template.
4.
Place the heart on the edges of the envelope, trace it and cut it out. You now have a corner for a book or notebook. It needs to be decorated.
5.
Draw a smaller heart on thick paper and cut it out.
6.
Glue the small heart to the big one.
DIY paper bookmarks: spring dress
How to make a felt bookmark for a book: felt heart
1.
Fold a sheet of felt in half, draw a heart (or use a paper template) and cut it out.
*You can cut two triangles. Choose the shape of the bookmark yourself, the main thing is that both halves are the same.
2.
Using thread and a needle, sew both halves together, but leave the top of the heart (or the base of the triangle) intact so you can place the bookmark on the page.
How to make a bookmark from toys for a book
– small plastic toy
– knife or scissors
– a lighter or matches (to heat the tip of the paperclip).
1.
Cut off part of the toy.
2.
Heat the tip of the paperclip. It is advisable to hold the paperclip with pliers to avoid getting burned.
3.
Insert a paperclip into one of the parts of the toy - since it is hot, it will go into the plastic toy easily (the plastic will melt).
4.
Wait until everything cools down, and you will have an original bookmark - as if the toy is inside a book.
Bookmarks for children's books: buttons
– superglue or hot glue
1.
Glue the paperclip to the back of the button.
2.
Cover the glued part of the paperclip with a piece of felt, also gluing it.
3. Experiment with button colors and shapes to create many different bookmarks.
Beautiful bookmarks for books: bow
Bookmarks (photo): hearts made from paper clips
– large brightly colored paper clips (several colors are possible)
Using pliers, bend each paper clip so that it resembles a heart shape.
In the photos you can see how to do this.
How to make an original bookmark: pompom
Making bookmarks from felt with patterns
Beautiful bookmark for books and notebooks: bookmark with bracelet
1.
First you need to make a small bracelet. To do this, cut a small piece of thin wire, put several beads on it, twist the ends and insert them into one of the beads.
*If necessary, cut off excess wire.
* In this example, the diameter of the bracelet is about 4 cm.
2.
Cut a long piece of ribbon (2 times the height of the page). Tie the ribbon to the bracelet.
* Try to take a thicker tape so that it does not slip out of the book.
Origami bookmark
Bookmarks for 1st grade books: elastic band with button
1.
Sew a button to one end of the ribbon.
2.
Thread the other end of the ribbon through the elastic and sew it to the ribbon.
Now you can insert the bookmark into the book and put the elastic band on the button.
Bookmarks for textbooks: bookmark with bead
– beads and other decorations that can be threaded
– thick thread or rope
– paper, glue and matches or skewers to create your own bead (if desired).
*You can use purchased beads, you can make your own, or both.
1.
Cut a piece of thread or rope. Its length should exceed the height of the book. Tie a knot at the end of the thread.
2.
Place one or more beads on the thread and tie a knot again.
* To make your own bead you need to wrap a strip of paper (newspaper) around a match, adding glue periodically.
3.
Tie a knot at the other end of the thread, put the bead back on and tie another knot after it.
*If necessary, cut off the excess ends of the thread.
Paper corner bookmark “Monsters”
– thick and colored paper
– envelope (if necessary)
– felt, markers, stickers, stamps, glitter and other decorations (optional).
You will find video instructions below.
1.
The easiest way to make such a monster is to cut off the corner of a regular envelope and decorate it as you like: add monster teeth, eyes made of colored paper, felt or buttons, scales made of wrapping paper with a corresponding design, etc.
2.
You can make your own bookmark from plain or wrapping paper.
Take a piece of paper and draw a small square on it. In this example, the square measures 6 x 6 cm.
To the right and above the drawn square, draw another square of the same size.
The result should be 3 squares that form the letter L.
3.
In the top and right square, draw triangles by connecting the ends of each square (see image). Paint over the outer triangles - they are not needed.
4.
Cut out the resulting shape. You have a template.
5. Place the shape on colored cardboard, trace and cut out.
6.
Using a pencil and ruler, draw lines on the figure to make a square (see image).
*If you wish, you can cut out a small square from pretty wrapping paper and glue it onto the square drawn in the piece.
Film bookmark
No matter how strange it may sound, a beautiful bookmark with your own hands can be made from such a seemingly unusual material as old photographic film.
- Old photographic film;
- Hot water;
- Knife;
- Needle and thread;
- Scissors;
- Beautiful picture.
- To remove photographs from film, you need to immerse it in hot water for a few minutes;
- Carefully remove the old images with a knife, without damaging the holes along the edges. The film should be transparent. The stripes from the knife will gradually become invisible;
- Select the desired length, fold in half and sew along the edges with colored threads;
- Insert a double-sided picture inside.
Bookmark with beautiful stones made of velvet ribbon
This is an unusual bookmark. It is expensive in stores, but making it yourself will cost you much less.
- Decor (any beads, pendants, etc.);
- Wide colored satin or velvet ribbons;
- Scissors and nippers;
- Glue, needles, threads. Think about what you want to attach to the ribbon. Start from this;
- To neatly trim the edges of the ribbon, you need ribbon clips.
- Place the tape on the page and measure. Then fold it twice as much, because the bookmark will be double-sided;
- To choose the right combination of colors, attach different pendants and rhinestones to the ribbon and choose the one you need;
- We glue each tape properly, folding it in half;
- Attach a clip to the end of the tape;
- Hang your chosen decor.
Thanks to such a bookmark, your book will look like a king.
Surprise your loved ones: make beautiful bookmarks for books with your own hands
If you like to read paper volumes and need to bookmark certain pages in order to return to them again, make bookmarks for books with your own hands. You will always open voluminous publications exactly where you left off. Many people use punched coupons, candy wrappers, or miniature calendars for these purposes, which are not always at hand. Today in the Homius review we will show several master classes on making bookmarks from quite affordable materials. After spending 15-20 minutes, you will make the right amount of beautiful and unusual crafts, which you can even present as a small souvenir to your loved ones.
Bookmarks for books made of paper: detailed instructions and master classes on making crafts with your own hands
From colored paper you can make not only ordinary bookmarks, but also completely unique crafts. Bring bright and beautiful ideas to life with your children.
PHOTO: pinterest.nz You can make some pretty cute bookmarks from bright paper
Bookmark in the form of a colored tie
To create a bright bookmark in the form of a tie, we will need:
- bright paper 2 colors, for example, white and red;
- double-sided tape and scissors;
- hole punch and colored ribbon.
- Cut colored paper sheets into strips of equal width up to 7 mm.
- On the horizontal white stripe, stick two vertical stripes of white and red colors on double-sided tape.
- Glue the horizontal red stripe.
- Weaving begins by folding the white stripe inward on the right.
- Fold the red one under the white stripe.
- Continue weaving in the same way, alternately bending the strips on the right and left sides.
- At the end of the weaving, glue the lower ends of the strips with double-sided tape. Trim the ends.
- Use a hole punch to make a hole in the top and thread a beautiful ribbon through it.
PHOTO: vannadecor.ru You can combine more shades of paper in your work
Bookmark in the form of a colored pencil
For work we will need:
- colored bright paper and ruler;
- glue and scissors.
- Cut each sheet of colored paper into strips measuring 8x20 cm.
- Fold the top part 1 cm so that the colored side is above the white side.
- In the middle of the top, make a bend exactly in the center of the workpiece.
- Fold the strip at the top of the colored side into triangles towards the fold.
- Bend the triangles again, you should get a pointed top. Carefully iron the fold line.
- Turn the strip over and fold the bottom in half.
- Place the ends of the strip into the resulting pocket and glue the bottom part.
PHOTO: vannadecor.ru Bookmarks are very similar to real pencils
Bookmark-hedgehog using origami technique
To work you need to prepare:
- colored paper and glue;
- scissors and ruler;
- pencil and black marker.
Let's get to work.
- Cut out a square from colored paper.
- Bend the workpiece diagonally.
- Bend the top half outward.
- Bend the left side of the workpiece inward first, then the right.
- Unbend the edges and fold parallel to the center line, first the left, then the right.
- Make pockets.
- Fold both ends into niche pockets.
- Take colored paper and insert it into the corner of the workpiece.
- Draw the thorns and cut them out.
- Glue the spikes and draw eyes and a nose with a marker.
PHOTO: megamaster.info Detailed instructions for making a corner bookmark
PHOTO: megamaster.info You can glue ready-made eye and spout blanks
How to make a bookmark from textiles
The problem with paper bookmarks is their fragility; for lovers of reading, it is better to use more practical crafts, for example, made from fabric. They are convenient, and you can come up with an original design. Even if you don’t have a sewing machine, you can always sew a couple of stitches by hand.
Stylish bookmark with an unusual design
For work we will need:
- threads and bright ribbons;
- buttons and hair ties;
- scissors.
Let's get to work.
- We decide on the size of the bookmark based on the parameters of the book.
- Bend one end 1.5-2 cm.
- Place the hair tie into the loop and pin with a safety pin.
- Sew by hand or machine the folded end.
- Sew the button in a convenient place.
PHOTO: kakprosto.ru Such a bookmark will never be lost while reading
PHOTO: kakprosto.ru The design of the bookmark can be chosen in accordance with the binding of the book
Owl bookmark
For work we will need:
Let's take a closer look at all the stages of making an owl bookmark.
| Description of action | |||||||||
Do you like to read books and still don’t have a bookmark? No problem, in this article we will offer 16 photo ideas for original bookmarks that you can very quickly make with your own hands. Magnetic bookmarkA convenient magnetic bookmark is attached between the pages; even if you shake the book, it will not fall out.
When working with colored paper, it is better to use PVA glue, since simple paper glue turns yellow over time and stains appear on crafts.
Wait for the glue to dry and try the bookmark. Paper clip bookmarkA small and simple bookmark made from a paper clip will help hold pages in place.
Shorten the ends of the bow. Bookmark with buttons
To make bookmarks, it is better to select small buttons, but not very small. A bright and interesting bookmark is ready. Fabric bookmark with flowerA beautiful bookmark with a flower is suitable not only for your favorite book, but also for your diary. To create a flower, it is advisable to select thin and airy fabrics, for example, organza, chiffon, silk, you can use an old bow.
Paper wormYou can involve children in making paper bookmarks. To work with colored paper, especially for cutting out small parts, invite your children, they will really like this activity.
|
Bookmark with bracelet
Such bookmarks are quite rare, and this will make it look even more beautiful.
- Wire cutters;
- Thin wire;
- Various beads;
- Ribbon;
- Scissors.
- Make a small bracelet: take a wire and put beads on it, twist the ends of the wire and insert it into the bead. Choose the diameter of the bracelet yourself, there are no limits.
- Measure the length of the tape, which should be twice the size of the page. Tie it to the bracelet.
That's all. It looks pretty nice.
Suede bookmark
- A piece of suede;
- Awl;
- Cutter;
- Acrylic paints;
- Waxed cord;
- Pen.
- Using a metal ruler, use a cutter to cut out the suede into the size you need.
- Use an awl to make holes along the edges at equal intervals from each other;
- Use a cord to tie the bookmark. Life hack: to make the lace fit easily into the holes, lubricate its end with superglue. Then it will harden and pushing it into the hole will not be difficult;
- Using a pen on suede, draw a picture or pattern that you want to see on the bookmark;
- Use acrylic paints to paint what you drew. To make the drawing bright, the paint can be applied in several layers.
A beautiful DIY suede bookmark is ready. All you have to do is wait until the paint dries and you can use it.
Bookmark for specifying a stitch
Although it is simple to implement, it is very effective to use.
- A piece of scrap paper;
- Rubber;
- Cutter;
- Scissors;
- Pencil or pen.
- Using scissors, cut out a small rectangle from scrap paper;
- On the reverse side, use a pen or pencil to draw an arrow. Choose the size that is comfortable for you. The size of the rectangle also depends on this;
- Cut out the arrow. For a neater look, its edges can be rounded;
- Use a cutter to make two cuts along the arrow. After this we thread the elastic band;
- We put an elastic band on the page of the book and tie it with a tight knot. Remove excess parts with scissors.
Such a bookmark will help you find not only the page, but also the line where you stopped, since the arrow can be moved.
Satin ribbon bookmark
This option can be done in literally 5 minutes.
- Clip;
- Satin ribbon (width as desired);
- Glue;
- Thread and needle;
- Scissors.
- Cut a piece of tape about 10 cm long;
- Fold this piece into a beautiful bow;
- Gather the fabric in the center and sew them with threads or glue them together;
- Attach the resulting bow to the paperclip using a small piece of the same ribbon, wrapped around the center.
This is a fairly simple method that does not require too much time and money.
Do-it-yourself fabric bookmarks
Hello residents of the Crafts Fair! I’m coming to you with my simple master class on sewing fabric bookmarks. In the age of information technology, the book, in its classic paper version, is losing its leading position as a source of information, but, you see, it’s nice to turn the pages of a new book! And for those who love books, this master class will come in handy! After all, this simple bookmark can be made as an excellent gift for a book lover of any age and gender!
So, we need :
- cotton fabric (any thin fabric can be used)
- linen (for elasticity)
- Non-woven fabric (for rigidity)
- Blocks + tool for their installation
- A little grosgrain ribbon
- scissors - zigzag
Stages of work:
Step 1 - Making a pattern
From linen we cut out 2 rectangles 7*18 cm
From adhesive non-woven fabric 2 rectangles 7*18 cm
A strip of their cotton 5*18 cm
From a grosgrain ribbon of a matching/contrasting color, cut a piece of 7 cm and 12 cm
Step 2 - strengthen the parts
Glue the interlining to the linen pieces using a hot iron and iron well.
Step 3 - sew the stripe
Take a strip of cotton fabric and smooth the sides of the strip as in the photo.
Then we take one linen piece with interlining glued on. Using pins, we attach a strip of cotton fabric exactly in the middle of the future bookmark.
Using a sewing machine, sew the strip to the base with a simple stitch.
Step 4 - sew on the ribbons
We attach two strips of grosgrain ribbons with pins across the strip to the base. And we sew it in the same way as a strip of cotton fabric.
Further on the photo there will be 2 bookmarks, because... I did it for two books at once!
Step 5 - sew the base
Now you need to sew the base parts. To do this, take a linen piece with sewn stripes and a linen piece without anything. Fold the wrong sides inward and sew along the perimeter, departing 8 mm from the edge.
Step 6 - level the base
To level the base you will need scissors - zigzag or simply scalloped. Align the edges of the bookmark with a zigzag.
Step 7 - install the blocks
We make a hole at the top and in the middle of the bookmark (I do this using a special tool), take a block, insert it there, and with the tool for installing blocks we squeeze the small grommet.
Step 8 - secure the ribbon and enjoy the pleasant little thing!
We thread a 12 cm piece of tape into the block and secure it.
That's it, the bookmark is ready! I got two at once!
The decor, width, height, color of the bookmarks can be varied to suit your taste, there will be a million options. If you want to give it as a gift, you can take noble, expensive fabrics. Below are photos of my other bookmarks, I made them for my daughter’s school textbooks.