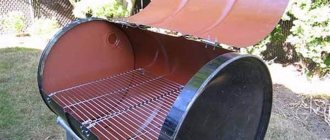
Trips for a picnic or out of town are usually perceived by everyone as a trip to a barbecue. And to cook quality kebabs or barbecue, you need a good grill. Making a fire on the grass, in general, smacks of a barbaric attitude towards nature; the fire pits then do not become overgrown for years. Yes, and it is unsafe in terms of fire. And barbecue also requires strong, even heat, which is difficult to obtain from fire coals constantly blown by the wind. No one will carry a whole grill “assembled” with them either, even if it’s a car trip. The solution is a folding or collapsible grill.
Folding barbecues are available for sale. Or rather, prefabricated ones, since not everyone will undertake to disassemble them after assembly and use. They are made from several steel plates that are inserted into bent angle legs. The grill itself is not bad and is cheap, but the heat warps it greatly, the plates on the antennae get very jammed in the legs, and disassembling such a grill is a big problem. And even if you take it apart, you definitely won’t be able to put it back together again. But if you get dirty with soot - from the heart.
But you can make a truly folding barbecue with your own hands, from the same sheet metal. You just need to slightly change the design of the grill and then it will be assembled, or rather unfolded and folded, in a matter of seconds. And it will also not get your hands dirty, since all the internal smoked surfaces of the grill will be closed.
Main characteristics of a camping product
A portable barbecue made by yourself has a number of advantages over a stationary one, the main ones of which are:
- compact dimensions;
- ease of transportation;
- light weight;
- high strength;
- ease of operation;
- low cost.
Regardless of the chosen shape of the structure, when disassembled its thickness does not exceed 4 cm, and skewers and a grill grate can be freely placed inside the product. For convenient movement, the product is equipped with a handle.
DIY folding grill
It is better to make the bottom of a DIY camping grill from a stainless steel sheet with a thickness of at least 3 mm. It’s even better if the folding grill is completely made according to the drawings from stainless metal - such a product will have a long service life.
The standard length of a homemade device is 60-80 cm and the width is selected in accordance with the size of the skewers. As a rule, most folding barbecues are made according to drawings optimized for 40-65 cm - this is the most convenient to use and easy to transport design, which can accommodate 6-7 skewers with meat.
Make holes in advance with a diameter of 1 cm in the lower part of the sides. This will ensure air flow to the coals while cooking the meat.
Making legs for the hearth
New or used water pipes are used to make the legs. These are quite durable products with an almost unlimited service life. Before cutting pipes into blanks, it is advisable to clean them of internal deposits. This will significantly lighten the products and rid them of foreign odors.
You need to make the legs in the following sequence:
- The pipes are cut into pieces of the required length. For this it is better to use a grinder. The metal is polished, treated with anti-corrosion impregnation and fire-resistant paint.
- The edges of the pipes are threaded. It must be lubricated immediately to prevent rust formation. Lubricated areas are wrapped in thick cloth to protect the connection from dirt.
- Plugs are welded to the bottom of the legs. After this, holes are drilled in the pipes. They have threads for screwing on the wheel axles.
If it is not possible to make external threads on the pipes, then they are fixed in the holes on the frame using clamping bolts or pins inserted into through holes.
Another way to make legs is to use the same angle steel that the frame was made from. The difficulty will arise with choosing the type of fastening of these fragments. Making grooves for the corners is quite difficult. It is easier to use two bolted connections for each leg.
Preparation of materials and tools
To make a camping mini barbecue with your own hands, a standard set of tools that is in any home arsenal is enough. The missing equipment can easily be borrowed from friends or acquaintances.
You will need:
- grinder, cutting wheels for metal;
- drill with a set of metal drills;
- welding machine with electrodes and welder’s mask;
- metal corners;
- metal scissors;
- tape measure and other measuring instruments;
- fastening elements - hardware.
Making the bottom of the oven
The base for the barbecue is a rectangle made of sheet steel, with openings for air, grooves for attaching sides, and holes for screwing to the frame.
The procedure for making the hearth bottom consists of the following steps:
- A rectangle measuring 300x600 mm is cut out of sheet iron. Its edges are aligned and rounded to prevent injury from them during assembly and disassembly.
- Holes with a diameter of 20 mm are drilled in the base. The optimal distance is 5 cm between the holes. If there is a lot of this (in strong winds and high pressure), then the holes can always be plugged with bolts. Through holes are made to fasten the base and frame.
- Grooves are cut along the edges of the plate to install longitudinal and transverse sides. For this, a drill, grinder and jigsaw are used. For a reliable connection, 3 grooves are made along the length and 2 in the width.
- The grooves are filed with a file to obtain perfectly smooth edges with the correct shape. The steel is treated with anti-corrosion impregnation.
When the impregnation has dried, the base is screwed to the frame. The bolts are inserted from above, and the nuts are screwed from below, so they do not stick to the thread.
Step-by-step manufacturing process
You can make a camp grill yourself from the materials at hand in just a few hours.
Step-by-step instructions and detailed drawings will greatly simplify the manufacturing process:
- We choose the optimal design option.
- We determine the required dimensions and prepare drawings.
- We assemble the bowl for the coal.
- We mount the structure and make fastenings for the legs.
- We equip the product with a device for transportation.
- We apply corrosion protection and paint the finished product.
Selecting a Design Option
A folding grill is an indispensable thing for a picnic. Sometimes such designs are made in the form of a suitcase with a lock or a book. Both models can be completely collapsible or hinged.
Mangal book
Hinges installed between the bottom and side walls of the roaster make it easier to connect the elements. They can be secured using bolts or welding. Aluminum rivets may not withstand constant exposure to high temperatures, so their use is not recommended.
Dimensions and drawings
Before starting work, it is necessary to prepare a drawing of the future product, which will not only simplify the manufacturing process, but also improve the quality of the final assembly. Drawings of metal barbecues are made on plain paper.
Diagram of the barbecue device
When calculating the dimensions, take the maximum number of skewers simultaneously placed on the frying surface, and take into account the trunk area for transporting a portable barbecue.
Standard characteristics of an optimal barbecue:
- product width - 30 cm;
- structure length - 60 cm;
- height of side walls - 15 cm;
- height of legs - 60-100 cm.
This model is designed for frying meat on 6 skewers. The basic package of the product includes:
- metal frame-stand with clamps for legs;
- stainless steel bottom;
- 4 legs;
- 2 longitudinal sides;
- 2 side boards;
- grill grate;
- fastening elements (washers, nuts, bolts).
Simple folding grill for eight skewers
Assembling the charcoal bowl
So, we make a barbecue in the form of a sliding suitcase with hinges of standard sizes:
- We cut out the bottom in the shape of a rectangle from a stainless steel sheet.
- We cut out the sides with slots for skewers.
- We make protrusions on the side walls for attaching the end elements.
- For convenience, we attach hinges between the bottom and the walls.
- We cut out the removable walls that will be inserted from the end of the body when assembling the barbecue.
Design and fastening of legs
To make a folding barbecue stable with your own hands, you will need a basic stand in the form of a durable frame. For this purpose, the metal corners are welded together. The bowl and legs of the product are attached to the finished frame structure.
Homemade grill suitcase
For the legs, 4 pieces of fittings or ordinary water pipes with a diameter of 17-20 mm and a length of 60-100 cm are perfect. When assembling the fryer, the legs are attached to the bottom or to the inner edge of the frame or bottom using 4 nuts pre-welded to the base.
To make a grill grate, thin reinforcement rods are welded together. How many of them will be needed depends on the size of the future product.
Transport device
For ease of movement, a handle is welded to the collapsible suitcase.
Barbecue in a suitcase
To prevent the structure from falling apart during transportation, a special lock or hook is screwed to one of the walls, acting as a lock.
Corrosion protection and painting
You can give an aesthetic appearance to the finished product and protect the metal case from corrosion by covering it with special heat-resistant paint in cylinders, which can withstand temperatures up to 600ºC. A good solution would be to treat the grill with special anti-corrosion agents. Blueing metal will require additional knowledge and effort.
Making a barbecue frame
The base is needed to give the roaster stability and secure the legs. If the mobile hearth is not used for its intended purpose, then the frame is used as a stand for drying shoes, mushrooms and berries on the grid, as a stop when sawing various objects.
The base is made in the following sequence:
- Markings are applied to the steel corner. Fragments of a given length are sawed off. Using a grinder, their ends are given the desired configuration, and the places where welding will be carried out are cleaned.
- The corners are laid on a flat base (paving slabs, asphalt, a board made of wet boards), and the correctness of their location is checked with a square. Spot welding is used to fix the frame. After this, welding is performed along the seams.
- Steel couplings with internal threads are welded to the sides of the frame. They will serve as the basis for the legs, which will fit into them along the threads. This solution will allow you to adjust the position of the grill on uneven terrain. Instead of couplings, steel tubes can be welded. Holes are made in them to secure the legs with pins.
When the metal has cooled, the beads are ground off and the frame is cleaned of rust. After this, the corners and couplings are treated with a special impregnation against corrosion. If desired, the frame is coated with fire-resistant paint.
Expert advice
In order for the barbecue to be of high quality and to serve well for many years, experts recommend choosing heat-resistant metal sheets, which, unlike heat-resistant ones, are resistant to physical deformation.
Shish kebab on the grill
Proper conditions for storing and using a homemade brazier, thoroughly cleaning the body from accumulations of ash and soot, timely cleaning and painting of detected defects will prolong the performance properties of the product for a long time.
Making the sides of the roasting pan
To make the sides, the sheet metal from which the base was made is taken.
The sides are made like this:
- Blanks are cut from steel sheets with sides corresponding to the parameters of the base. The height of the racks is 17 cm, based on the fact that 2 cm will be spent on connecting the protrusions in the grooves.
- Markings are made for the grooves. To avoid mistakes, the sides are applied to the base, and already machined lower grooves are designed on them.
- The openings are being cut out. Their edges are adjusted and ground until the sides fit perfectly with the base and with each other.
- Devices are installed to connect the sides. Here the choice depends on the availability of fastening material and the skills of the craftsman. The easiest way is to use ordinary bolts, which are used to close doors from the inside.
The final stage is making recesses for placing skewers. They are made using a grinder. First, triangular slots are made, then their edges are ground down with a grinding disc.
Checking the functionality of the barbecue
After all the parts have been manufactured, it is necessary to carry out control assembly and disassembly of the mobile barbecue. This is done in order to more accurately fit all the parts together, eliminate minor defects, and grind off all sharp edges and corners. The final stage is to fire up the grill in normal mode. If disassembly after the stove cools down is successful, then the work was done correctly. Jamming of parts is a consequence of thermal expansion of the metal. They are carefully separated and adjusted to size, leaving an increased gap. Next time, assembly and disassembly will be no problem.
We make grate bars
Many consider this element of the barbecue to be unnecessary, since combustion occurs even without it, the grate bars weigh a lot, which is especially noticeable when hiking. However, the steel grate creates a layer between the smoldering coals and the sheet steel of the base. This prevents premature burning of the bottom. In addition, the coals do not clog the air holes, since only ash passes through the grate.
The grates are made as follows:
- Blanks for the future grating are cut. You need at least 5 long pieces and 10 short ones. The size of the workpieces must be such that they fit freely into the oven.
- The rods are placed in the roasting pan so as not to block the holes in the bottom. Their initial tack welding is carried out directly on the base.
- The fixed grate is removed from the oven and thoroughly welded. At the corners and in the middle, legs 1.5 cm high are welded to the grille.
It is advisable to level the plane of the grate to make it easier to mix the coals.


