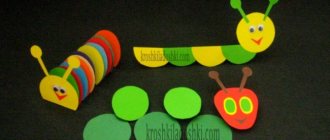
It is very easy to make a caterpillar craft from chestnuts. In fact, this is the most common craft made from the named natural material, but the variations in its creation, of course, differ. We will tell you how to make a simple and cute caterpillar from chestnuts and plasticine, which, despite the ease of its execution, turns out beautiful even for the little ones. But you will still have to work with your fingers, in some places - with the help of your mother or teacher.
DIY chestnut caterpillar
In autumn, in the park you can see a sea of chestnuts under your feet. Having collected a decent amount, you can keep even the smallest children occupied at home. One of the simple crafts can be called a caterpillar made from chestnuts.
Materials:
- Chestnuts
- Toothpicks
- Plasticine
Arrange a dozen chestnuts by size in a row, from largest to smallest.
Pre-prepare pieces of plasticine to connect the caterpillar. Take brown plasticine for this.
We assemble the caterpillar by gluing the chestnuts together using plasticine.
After making the body, attach two toothpicks to the head, which will act as ears-antennas. Make a funny face for the caterpillar.
Children of kindergarten age can cope with such a simple craft. A minimum of time and material is required to make such a simple caterpillar from chestnuts.
Spider
If you have one chestnut and several toothpicks in your arsenal, consider that the craft is ready. Make holes in the chestnut so that broken toothpicks can be inserted - these will be the paws. We paint the face or make it out of plasticine.
It is interesting to complement the work with cobwebs. We make it from threads and toothpicks. We connect two or three toothpicks in the middle and wrap them with thread like a spider web.
DIY potato caterpillar
Another vegetable that can be found in abundance in the fall is potatoes. You can also make interesting crafts from it. The child will make a caterpillar from potatoes in just a few minutes.
You can make a caterpillar from potatoes using the same principle as from apples. The vegetable itself can be partially painted with green paint. We'll make her paws out of carrots.
The appearance of your caterpillar will depend on the baby’s imagination and how he will decorate it.
Basket
You will need: chestnuts, glue gun, balloon, tape, felt-tip pen, decoration elements - thuja sprig, walnut shell, autumn leaves.
Master Class
- Inflate the balloon until it is round.
- Attach the ball with tape to your work surface.
- Draw a line in the center of the ball.
- Glue the chestnuts together around the ball, then deflate it.
- Place the circle of chestnuts on your work surface and glue the second row on top of the first. It is worth noting that the chestnuts of the second row should be in a checkerboard pattern and their number should be less than in the first.
- When 2 rows are ready, it is necessary to strengthen them with glue from the inside.
- Glue the third row of chestnuts on top of the second in a checkerboard pattern and in smaller quantities. Make the remaining rows in this manner, gradually reducing the number of chestnuts until the bottom of the basket is covered. Also, don’t forget to reinforce the inside of the basket with hot glue.
- Create the handle of the basket by gluing the chestnuts on both sides until they meet in the center.
The chestnut basket is ready!
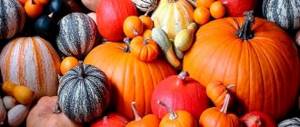
How to make a caterpillar from a tomato
Every fall we have to fantasize about crafts for kindergarten. What are they used to make crafts for thematic exhibitions? Crafts made from vegetables and fruits have become the main characters lately.
We are familiar with such a vegetable as the green tomato, which is denser than its red relative. Therefore, green tomatoes are suitable as crafts.
You can hold the tomatoes together using toothpicks. The legs can be made from small tomatoes or rowan berries.
Caterpillar legs made from carrot rings will look great
And carrots can also make an original fantasy hat.
The caterpillar can still be so funny
Mushroom glade
Interesting and believable mushrooms will be obtained from the shiny fruits. Use a flattened shape or cut in half. An acorn will serve well as a leg. You can improvise a whole forest clearing with grass and leaves. This kind of work does not require any expenses; we use common autumn gifts of nature.
Creative works for school exhibitions (children do with the help of adults or independently)
Autumn is the time to create. Schools organize exhibitions and competitions where you can show off your uniqueness. Likes and emoticon language are very common among schoolchildren. All this will be reflected in combination with nature.
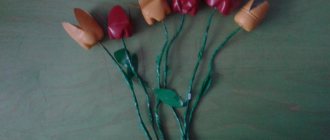
heart
To make a heart we will need fruits and wire. We string the chestnuts, having previously made a hole and bend the product to give it a heart shape. The work will be brighter and more colorful if you paint the chestnuts with paints or draw patterns on them. You can cut out a heart shape from cardboard. Secure our product around the cardboard, and glue the fruits to the cardboard on both sides. We fill the remaining voids with beads, pumpkin seeds, beans or any other cereal. If you attach a string to the heart, it can also be used as a New Year's decoration.
Beads
We make beads or a bracelet based on the heart principle. Instead of wire, use strong thread. Alternating with pasta pre-colored in different colors will add creativity to the work.
Owl
The nocturnal bird often attracts the attention of children with its interesting appearance. We make it from fruits, leaves, and acorn caps. Where our main material will serve as the body and head. Large and bulging eyes can be caps from acorns, and wings can be leaves.
Emoticons
Armed with bright yellow (preferably acrylic) paints, we create the world of emoji. Our fruits can rejoice to tears, smile, be sad, yawn. We make legs and arms from plasticine. You can design a house or an outdoor park for them. It all depends on your imagination.
We do it for the soul (suitable for those who love comfort and warmth, and also have perseverance and a desire to craft)
We start making crafts with the children to complete their homework. However, being involved in the creative process, giving away a piece of our soul, we do not want to part with our work of art. If you feel the urge to touch art, create. Interesting products decorate the home and fit into the interior.
How to make a caterpillar from acorns
Anyone who has seen what a caterpillar looks like understands perfectly well that making one from natural material is not at all difficult. Acorns are one of the best and most convenient materials for creating crafts.
Acorns are a malleable material that can be easily pierced and can be held together with matches, toothpicks, and even twigs. And children love to hold them together with plasticine.
A simple caterpillar made from acorns can be made quickly by simply connecting acorns using plasticine
Plasticine will help not only to hold the acorns together, but also to draw the face of the caterpillar
You can use acorns with caps to create the body of a caterpillar and fasten them with toothpicks
It would seem that such a simple craft as a caterpillar can be so simple and original.
Wreath
You will need: wreath base, chestnuts, glue gun, ribbon.
Master Class
- Apply a bead of hot glue to the chestnut and glue it to the wreath base.
- In the same way, cover the entire base of the wreath, placing the chestnuts next to each other.
- Glue on a second layer of chestnuts, filling in any gaps.
- Make a ribbon bow and glue it to the wreath.
- Prepare a piece of ribbon and glue it well to the back of the wreath, forming a loop for hanging.
The chestnut wreath is ready! I recommend watching this video!