On topic:
Beautiful DIY decorations - Christmas tree decorations in...
Oct 27, 2018
We make original Christmas tree decorations from pumpkin seeds -...
Oct 26, 2018
Christmas decorations from tape reels - we make beautiful things from...
Oct 25, 2018
Christmas tree toy Snowman made of papier-mâché - master class
Oct 24, 2018
BACK FORWARD 1 of 4
Christmas tree toy Penguin made from light bulbs
To paint the light bulb you will need acrylic paints in white and black.
First of all, you need to cover the entire light bulb with an even layer of snow-white paint and wait until it dries thoroughly.
Then draw the silhouette of the future penguin with a pencil and apply black paint. Draw the penguin a black back and two black wings.
Don't forget about the eyes and beak. These details can be drawn, or you can glue beads or rhinestones.
Glue a loop of decorative tape to the top of the light bulb.
DIY Christmas tree toy Santa Claus made from a light bulb
Draw a sketch of the future Santa Claus onto the light bulb with a black marker. Paint most of the light bulb with snow-white acrylic paint, and beige in the area where the face is.
Using black acrylic paint with a thin brush, draw the borders. Use red acrylic paint to paint the metal part of the light bulb, and decorate the top with a fluffy pompom made from a piece of cotton wool. And of course, don’t forget to tie a loop.
Lighting options
Today, paper lighting fixtures are associated with Eastern culture. It was here that the first people began to produce products from paper materials: lanterns, umbrellas, and other items.
As they say: “The East is a delicate matter.” This statement comes to life beautifully thanks to creativity and the use of paper materials. As a result, ideas are transformed into lighting devices that are unique in their design and design.
The origin of the paper comes from China. But, despite this, lighting devices from such raw materials can be made in absolutely different style solutions:
For your information! A decorative lamp made of paper can fit perfectly into the overall interior of a room only if it is made independently by the owner of this room.
DIY Christmas tree decorations made from light bulbs
A very original and quick way to make Christmas tree decorations from old light bulbs is to coat them with glue and then sprinkle them with glitter.
This way you can make a whole collection of homemade Christmas tree decorations. Shiny light bulbs look very beautiful and elegant on the Christmas tree!
Plants for an eternal terrarium
Now we go to the forest, there we will find all the necessary plants for the terrarium.
Forest plants are more resilient than indoor plants, so they will become wonderful inhabitants of our terrarium. We will need moss and some plants with a small root system. We will also collect twigs, stones in the forest, and most importantly, don’t forget to take some soil. There is nothing to worry about if insects or earthworms get into the terrarium from a light bulb. They will also become residents of our micro world.
Fill the terrarium with soil before adding plants.
The next stage is creative. With enough patience, you can create miniature worlds in a light bulb by arranging stones, twigs and selecting plants for the terrarium that will combine and complement each other.
The easiest way to place plants in a terrarium made from an incandescent lamp is to use tweezers and a small stick.
Don't forget to add a little water using a syringe. Without water, no organism can survive, which means we won’t have an eternal terrarium in a light bulb.
After all the plants are placed inside, it is necessary to seal the terrarium hermetically. So that oxygen from the outside world does not get inside, and the water that is inside does not evaporate.
You can close it with a small stone, stick or acorn, which gives a very original look to the terrarium. And fill our cork with super glue on top.
Many of you have indoor plants at home that are pleasing to the eye, serve as interior decorations and supply you with oxygen. There are an incredibly large number of species of such plants and also many ways to grow and maintain them.
Today we will design a self-sufficient ecosystem that does not require self-care and will be a good decoration for your interior or an original gift.
Florarium
,
plant terrarium
is a special closed container made of glass or other transparent materials and intended for keeping and growing plants. A certain air humidity and temperature are created inside, which helps create an environment for the normal development and existence of plants. Florariums appeared in the middle of the 19th century. The first plants to be used in florariums were various types of ferns.
As follows from the description, we will need a closed glass container. You can use glass jars, medical flasks, bottles, in general, any vessel that can be sealed without problems. Having entered the search query “closed ecosystem”, I found an interesting option that uses an ordinary incandescent light bulb, and a bunch of material on how to disassemble it and plant plants there without damaging the glass. This option seemed quite interesting and easy to assemble, so I decided to try it.
So, what do we need to create our miniature ecosystem:
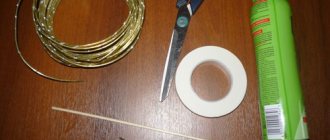
1) Small stones for drainage and stones for composition 2) Sand 3) Fertile soil 4) Various types of moss 5) Bark, small branches for composition 6) Stone or driftwood for a platform 7) Incandescent light bulb Two-component glue or hot glue 9) Pliers 10) Flathead screwdriver 11) Tweezers 12) Syringe 13) Water 14) Paper
After a short walk through the forest and outskirts of the city, I easily found all the material I needed.
Let's start assembling. The first thing we need to do is prepare our light bulb. Using pliers and some force, carefully break the black ceramic insulation, being careful not to bend the base of the light bulb or break the glass.
You should have a hole like the photo below.
Next, using a flat-head screwdriver, you need to break and squeeze out the glass rod on which the filament is attached and remove it from the light bulb. Try to make the largest hole possible, this will make the future process of planting easier for you. After all excess has been removed, I recommend rinsing the light bulb with water to avoid contact with small glass particles.
Next we need to make our light bulb stable. You can glue legs from something to it, you can glue the light bulb itself to a beautiful piece of driftwood or, as in my case, a stone. To securely glue the glass to the stone, you can use two-component glue or hot melt adhesive. I used two-component Poxipol glue.
Now we need to make a drainage system. Drainage is a system for removing water through the roots and soil, which allows plant roots to breathe when there is a large amount of moisture in the ground.
Drainage is done very simply. In our case, we place a small number of small stones at the bottom. For convenience, I made a tube out of paper, which will also facilitate the process of filling the light bulb with sand and soil, as well as rid the walls of contamination.
Then we fill our light bulb with a fertile layer of soil. Don’t be afraid if the roots of other plants or humus get into the soil - this will only work to your advantage, as it will provide your system with useful organic substances.
The next stage is creative. Here you need to demonstrate all your artistic abilities to the maximum and beautifully place the components collected in the forest. To make the task of planting the plants in the bulb easier, I used tweezers and a ballpoint pen. As a result, I ended up with this composition.
The final step in creating an ecosystem is to add a few drops of water. You can use a medical syringe for this. You should not water the plants abundantly; excess moisture will lead to their death. After we have watered, it is necessary to seal the bulb hermetically. There are no special rules here, you can use anything: an acorn, a wine bottle cap, a plastic cap, a wooden stick, etc., the main thing is that no air gets into the structure. I used regular black buttons, having previously sealed the holes for attaching them to the material.
After some time, condensation from water droplets will begin to form on the walls of the light bulb; there is no need to be alarmed by this, it means that the process of the origin of life is proceeding as it should. These droplets will appear periodically and then settle into the soil, simulating rain.
Excess water will go into the drainage at the bottom of the light bulb, provided that you have organized it correctly. If you suddenly realize that you have poured too much water into your florarium, simply open the hole and leave it open for a few hours to allow the excess moisture to evaporate, then seal the bulb again.
A day after building my florarium, I decided that the composition needed to be supplemented and attached another light bulb to my platform stone, but this time larger. This is what the final version of my ecosystem now looks like.
Using the same principle, the Englishman David Latimer
grows Tradescantia in a bottle (a genus of perennial evergreen herbaceous plants of the Commelinaceae family), which has been in an enclosed space for more than 40 years and has never been watered.
Do you also constantly throw away old light bulbs? Just look at what you can turn them into!
DIY Christmas tree toy Snowman made from light bulbs
To create such an interesting Christmas tree decoration, you will need a white light bulb or a regular light bulb coated with snow-white acrylic paint, a small piece of fabric, buttons and a piece of colored cardboard.
Make a hat and scarf for the Snowman from a piece of fabric.
Use a marker to draw his eyes and smile. Cut out the nose from colored cardboard and glue it on. Buttons also need to be glued.
You can experiment with the style of clothing for your snowman: these could be knitted hats, scarves, caps, hairstyles made of threads, etc.
Video material
These are the ideas that will help you become the creator of a real hot air balloon, albeit a small one. We wish you successful results of your creative work!
The number of light bulbs that burned out in each house during its existence is probably impossible to even count. And they are all thrown away, as a rule, “to nowhere.” It turns out that they can be used usefully - making interesting crafts from light bulbs. Of course, in addition to these, you will also need other materials for some original little thing, but it will not be difficult to find them, many of them are available in every home.
Christmas tree toy DIY Christmas tree made from a light bulb
You need to unscrew the light bulb and put fluffy green lumps inside.
The lumps can be thread pompoms, colored cotton wool, foam balls, candies in green wrappers, etc. We collect the light bulb.
We paint the light bulb with acrylic paints.