Bird feeders made from improvised materials: simple ideas with photos
Simple and very original feeders can be made even from materials that at first glance seem completely unsuitable for this purpose.
From gelatin
For example, what is the connection between the feeder and gelatin?
But in fact, it’s straight. Dissolve gelatin according to all the rules:
Step 1. Dilute a tablespoon of powder in a glass of cool boiled water (250 ml) from the refrigerator.
Step 2. Wait an hour, stirring the solution periodically so that the gelatin does not settle to the bottom. You can heat it in a water bath all this time.
Step 3. Heat the gelatin on the stove, but do not bring it to a boil - only until it is completely dissolved.
Step 4. Stir thoroughly and add bird food.
Step 5. Pour into molds and leave to cool first at room temperature.
Step 6. And then put it in the refrigerator for several hours.
The main thing is to think in advance about how the mold will be attached to the tree. That is, it is better to immediately tie a rope to it, and only then work with the food base.
Although you can simply put the ends of the rope in the liquid mixture, and then it will harden along with it. It turns out to be a very interesting and practical version of the feeder.
Walnut feeder
Other “delicious” methods come to the rescue - for example, coconut.
From a children's construction set
In principle, fantasy has no boundaries at all, and a feeder can even be made from a construction set. Great fun for a child, especially if you do this craft together.
Feeders made from plastic cans
Above we made feeders from bottles, now we’ll try to design several options from unnecessary plastic cans. You can choose the right size jar yourself.
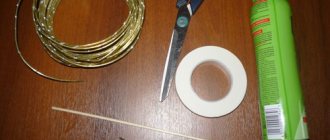
Let's start with the first example. For it we will need:
- plastic jar;
- scissors;
- paper semicircle;
- marker;
- ruler;
- acrylic paint;
- felt (orange and yellow);
- thread and needle;
- hot glue;
- decorative materials;
- rope.
- Remove the sticker. We take paper, you can use any paper, in our case it is an ordinary white sheet. We will cut a semicircle from this sheet. Its width should be approximately nine centimeters and its height up to seven centimeters. Dimensions may vary depending on the size of the jar.
- Place the circle on the jar, trace it with a marker and cut it out. We've got our first hole. Do another one like this, on the other side. The base for the feeder is ready. Now it needs to be decorated.
- We take yellow or gold acrylic paint. Cover the jar completely. After drying, we draw figures that look like bricks using bronze color. Paint the lid with the same color.
- While the paint dries, let's work on the decorative elements. Let's take felt and cut out two maple leaves from it. Using thread we embroider the veins on the leaves. Let's prepare other details, these could be acorns. Glue everything with hot glue. Place the rope at the bottom of the lid and screw it on.
Homemade bird feeder made from plastic bottles
What else, if not wood, can you make a bird feeder from? Of course, made of plastic.
The material does not need processing, can withstand both heat and cold, and is resistant to moisture. The only drawback is that it is short-lived, but definitely enough for 1 season. It’s also lightweight, but this problem can be easily solved: there are always heavy objects around the house that will reliably balance the structure.
To make this simple model, which even a schoolchild can handle, you will need:
- a sufficiently voluminous plastic bottle - at least 1 liter, and preferably 3;
- scissors (a stationery knife is also convenient);
- strong rope for hanging;
- tape to prevent injury (more details in step-by-step instructions);
- weighting agent (for example, dense material - linoleum, etc.);
- felt-tip pen.
We will act like this:
Step 1. Let's do some art first. Using a felt-tip pen, mark 2 small windows on opposite sides of the bottle - these will be 2 entrances for birds. It is better to make them exactly in the middle, not too large and not too small, so that all guests can get a treat, but at the same time the wind does not blow away the food.
Making from a 5 liter bottle
Let's move on to the second manufacturing method. We use the same materials. Ready? Then let's start:
- Place the bottle with one side facing you. We mark two points on the sides, approximately in the center. And we put two dots below. Cut a hole in the marked space. We don't touch the top.
- We bend the cut plastic up. This will create a visor. We repeat the work on the other side.
- We make holes with a knife above the visors in the visors themselves. We pass a branch through them. We've got the top perch.
- We make two more holes on both sides under the cutouts. We insert two sticks there, we get two more perches, but at the bottom.
It's simple, we figured out how to make a feeder from a 5 liter bottle. It is advisable to hang it not far from the window in order to see feathered guests and replenish food in a timely manner.
Such crafts do not have to be left transparent; you can show your imagination and paint them or add decorative elements.
Check out other interesting options for crafts made from waste materials
From unnecessary containers
This option is also made of plastic. You can take any unnecessary plastic jar. We will use:
- tall jar;
- stationery knife;
- marker;
- ruler;
- Double-sided tape;
- hot glue;
- korok (it is often used for mouse pads, or you can take any other beautiful material) choose a sheet of a suitable size;
- an awl or drill with a thin drill bit;
- rope;
- decorative elements (flowers and lace).
Now let's start step-by-step production:
- Just like last time, remove the sticker from the can. We draw an oval on one side and the other. We make the width about eight centimeters, the length about thirteen centimeters. Sizes may vary depending on the size of the jar.
- Apply strips of tape along the sides at the top and bottom. Remove the protective tape and glue the crust. We cut holes in it, just like on the can. We treat the places where the ovals are with hot glue.
- Remove the cover. Using a drill or awl, we make two holes on the sides. We thread the rope. We return the cover to its place.
- All that remains is to decorate the feeder. We glue lace at the top and bottom, and decorative flowers on the sides.
Ready. Please note that the decorative elements used can be damaged by bad weather, so it is better to remove such a feeder under a canopy during rain or snow.
Making a feeder from plywood and branches
The first design will be very simple and making it will not be difficult. For work, prepare:
- several pieces of plywood measuring 30x30 centimeters;
- a sheet of roofing felt or other waterproof material (its size should be larger than plywood);
- more branches;
- small snag;
- self-tapping screws;
- saw;
- furniture stapler;
- drill;
- pruner
If everything is ready, you can proceed to the instructions, which will describe in detail how to make a bird feeder from branches:
- We take thick branches. We need to saw off two branches of the same length and two more a little shorter.
- We drill four through holes in one sheet of plywood. We use a thin drill for this. We turn the sheet over and use a thick drill to make another hole, but through it. We will need them to hide the screw heads.
- We take thick branches, make holes in their bases and screw them to the plywood. Similarly, we screw five short branches to the sides. These will be the posts for the future fence on our feeder. We leave one side open to create an entrance.
- Now, with thin branches, we begin to braid the racks. Where the entrance will be located, we cut off the excess branches.
- We still have some driftwood left. We use it as a fruit and bread holder. The hole for its fastening should be made before installing the roof, so immediately decide where it will be placed.
- We install the roof from the second sheet of plywood. Let's protect the roof. We use a sheet of roofing felt. You can secure it with a furniture stapler.
Ready. The feeder can be hung on a tree or attached to a long, strong stick and placed in the snow or ground. We add food and watch the birds. Here is the first way to make a bird feeder with your own hands.
Plastic bottle feeder
Another simple manufacturing method, which we propose to consider together with megamaster.info. Here we will use only available materials that almost everyone has in their home. If you need a quick production to keep your child busy and happy, stop at this instruction.
To make a bird feeder with your own hands you need to prepare:
- large plastic bottle (approximately 5 liters);
- stationery knife;
- several branches of medium thickness;
- rope;
- marker.
Having such materials, you can make not one, but several options. Let's start with the first one:
- Place the bottle on the table with the side up. Mark 4 points on this side so that a rectangle is formed. Cut it out with a stationery knife. We do the same work with the opposite edge.
- Now, on one side, where the rectangle is cut, we make one hole at the top and bottom. We insert a stick there. This will be a perch. On the other hand, you can repeat the work.
- We make two holes at the top and bottom. Take a rope and cut several pieces of the required length. We burn the edges so that the rope does not unravel. We thread the ropes and tie them at the top.
With the first instructions on how to make a feeder with your own hands, you figured out, the product can be hung on a tree.