Repair and decoration
06/05/2018 Anastasia Prozheva
Today, a fashionable trend is the use of natural stone in the interior and exterior design of a country house with a summer cottage. For this purpose, various types of natural materials are used, from marble and granite to ordinary sea pebbles. Sea pebbles are round stones. On average, their diameter varies from 1 to 10 cm. Sea pebbles come in various colors: all shades of gray, brown, beige, orange, reddish, white, yellow and even lilac. Crafts made from sea pebbles are durable and amazingly beautiful. They personify maritime style. Therefore, having the opportunity to get sea pebbles, you can safely begin to implement a wide variety of ideas.
Pebble Dominoes
Pebbles probably served as a material for making dominoes among our ancestors. Let's repeat their craft! You just need to draw the dots.
Draw a line across with white paint to divide the stone into two areas. Now draw dots in each zone: from 1 to 6 dots per side. Alternate all possible combinations of numbers: 1/5 – 2/4 – 6/3 3/2, etc.
And if you first paint the entire stone with paint of a contrasting color, it will turn out absolutely wonderful.
It is better to use woven bags to store stone dominoes.
Painting on stones for children step by step
If you decide to spend interesting leisure time in the summer with your child, then first collect beautiful and smooth stones. Drawing on stones can be included in the program by educators, as this activity develops imagination, fine motor skills and tactile sensations.
You can draw absolutely anything, so even small children can do it.
It is very important to prepare the stone before your child draws on it. Wash the stones well and allow them to dry completely. Prime to ensure the image is clear. Then give it to the child and let him draw patterns, butterflies, flowers, or whatever his imagination suggests.
Gouache is ideal for painting on stones. Help your child imagine that stone is not just a material for a summer craft or a basis for painting.
He can turn into a real caterpillar, an owl or some other animal.
Using stones, you can even create a fairy-tale plot with the main characters and decorations. After the craft from scrap materials is ready, coat it with varnish.
Tale on the Stones
Tic-tac-toe made of stones
In order to make a craft from stones - a simple and effective game of tic-tac-toe, you will need a bag, lined with 9 squares - it will also serve as a playing field. And 10 stones. Color them in any 2 colors.
You can show your imagination and create something completely unusual. In our sample you can see lemons and oranges. Who will win?
Such a board game can be both a wonderful handmade gift and a wonderful souvenir - a memory of a vacation at sea.
LiveInternetLiveInternet
Quote from kumushki's message
Read in full In your quotation book or community!
Do-it-yourself artificial stone for the garden. Master classes
These are the kind of stones we will learn to make with our own hands, thanks to
I suggest you watch a very interesting master class on how to make decorative stones for the garden with your own hands.
This boulder-stone now decorates the garden.
Necessary materials:
For reinforcement: chain-link mesh or burlap For mortar: cement + sand (1:3) To lighten the weight of the stone: old bags, foam plastic Several pairs of thin rubber gloves.
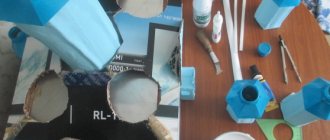
Form for stone-boulder
Step 1 The frame - the shape of the stone is made of wire mesh.
Step 2 Fill the frame frame with plastic bags and foam. This is necessary to lighten the weight of the future artificial stone-boulder and reduce the consumption of concrete mortar. This will also delay the “falling through” of the cement mortar into the frame.
Option 1 Step 1 Prepare a concrete solution from 1 part cement, 3 parts sand, you can add a little washing powder to the mixture. Add water, the consistency should be quite dry (so that the solution slips less when applied to the frame).
Carefully place the cement mortar on the frame in small pieces.
Step 2 After the first layer of solution has set a little, make the solution more liquid and coat the stone with it, trying to “smooth” the edges. Using a spatula and your hand, you can make interesting accents on the stone - bulges and depressions.
Step 3 Once the top of the stone is finished, wrap the stone in plastic wrap and wait for the mortar to dry. After the top of the stone is ready, turn the stone over and cement the bottom (step 3). Option 2 Step 1 Take a piece of burlap that will completely cover the frame. Pour water and cement mortar into a bowl and place the burlap in it, then squeeze it out. Place burlap over the frame.
Step 2
Prepare a concrete solution from 1 part cement, 3 parts sand, coat the burlap with the solution. Step 3 Fold the edges of the burlap down. Leave a few folds and form bulges and depressions on the stone. Cover the stone with film to allow the solution to harden.
You can form accents on the stone over several days with a thinner solution.
Author:: https://ideidetsploshad.info/publ/ofrormlenie_detsk...y/iskusstvennye_kamni_dena6355
We continue master classes on making stones for the garden. In this master class you will see how to make molds for vertical artificial stone with your own hands.
Step 1 Make a vertical hollow frame for the stone using chicken wire. For stability and ease of use, fill it with foam and bags. Step 2 Prepare a concrete solution from 1 part cement, 3 parts sand. Add water, the consistency should be quite dry (so that the solution slips less when applied to the frame). Apply cement mortar in small cakes over the surface of the stone frame.
Step 3
When the cakes have hardened, begin to coat the voids with the solution. Gradually shape the stone into the shape of a natural stone.
This artificial stone now decorates the garden.
Author:: https://ideidetsploshad.info/publ/of...vida/44-1-0-569dena6355
Found here
Story cubes made from stones
By drawing a wide variety of pictures on pebbles, you can create your own version of the Story Cubes game.
Have the player take a handful of jackdaws from the dark bag and tell their story based on the images.
Studying colors and shades from stones
To teach a child to distinguish the nuances of color and shades, it is better to show them with an example. Color something! And what could be more affordable than pebbles?
Paint them all the colors of the rainbow, mix colors, add black and white to show the difference between lighter and darker.
Involve your child in making! And such a handmade stone craft will undoubtedly become one of your favorite toys in the future.
DIY garden crafts. Painting stones master class.
In the simplest case, you can simply select the stones you like and paint them with acrylic paint, applying a simple design. Such crafts for the garden are already cute, and you can easily make them with your children.
We will tell you a more advanced version of beautiful painting on stone. In fact, this is also not difficult, it just requires knowledge of basic techniques.
Toy food made from stones
Color the pebbles and get toy food for your dolls! The shape of the pebble itself will tell you what kind of food it wants to pretend to be.