Not only children, but also adults love to weave from rubber bands. There are a huge number of ideas of what can be made from multi-colored silicone. These are various key rings, toys, mobile phone cases, and unusual interior decorations. The article will discuss how to weave an owl. This particular bird was not chosen by chance. She personifies wisdom and fortitude.
From the history of modern needlework technology
Initially, a loving Malaysian father, Chong Chun Ng, came up with a device for knitting baubles for his little daughters. This item was a small board with small nails driven in at a distance from each other. Over time, the device was improved, and with its help it became possible to weave not only simple baubles, but also various 3D figures and three-dimensional decorations.
Today, the lumigurumi technique is gaining popularity among needlewomen around the world. Small toys made from rubber bands can be bought in many souvenir shops and shops. But it’s much more interesting and entertaining to make such crafts with your own hands. Moreover, to make lumigurumi toys, you just need to stock up on colored rubber bands of various colors, prepare a machine, a slingshot or a fork for weaving. The work may also require decorative elements and various accessories.
Small toys, key rings and pendants are woven from colored rubber bands. The most common among many lovers of handicrafts are owl figurines. We suggest, using detailed master classes and recommendations from more experienced craftswomen, to make an owl that can be hung on a bag, used as a keychain, or simply presented to friends as a small souvenir.
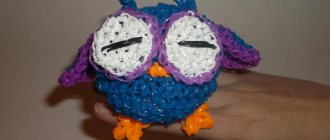
Keychain made of multi-colored rubber bands “Wise Owl”
To work, you will need a set of elastic bands, a weaving machine and a hook (special plastic or regular one for knitting). Following the proposed work pattern exactly, you will get a beautiful handicraft.
Step-by-step description of working with photos
- Place the machine in front of you on a flat surface with the notches of the pins facing you.
- Slide 3 elastic bands evenly (without twisting) onto parallel pins.
- Next, pull 2 rubber bands diagonally (this is the bird’s eyebrow blank), one in the center and in pairs on both sides.
- For the nose, put on an orange elastic band (in the middle).
- Continue to put the elastic bands on the diagonal of the work machine, thereby forming the shoulders and head of the owl.
- For the bird's belly, attach 4 pairs of white parts over the previous elastic bands.
- Then put on 3 pairs of elastic bands on each side of the workpiece.
- For the paws, use separate orange rubber bands to first make clamps, and then pull the blanks onto the machine. They should be hooked to the last column of the machine.
- Mark the bird's eyes with black rubber bands (do them in 4 turns).
- After all the working elastic bands have been pulled onto the pins of the machine, use a hook to begin weaving the figure. To do this, grab the lowest elastic band and, stretching it a little, throw it forward from above. It is necessary to perform similar manipulations on each row, first of the body, and then of the head.
- Make a loop on top for the keychain and remove the finished figurine.
As a result of such simple manipulations, you will get a funny keychain in the shape of an owl. In your work, you can use rubber bands of completely different colors. The brighter the working material is selected, the more interesting and attractive the resulting craft will be.
Lesson: funny snake made from rubber bands
Prepare elastic bands of three bright colors to make a cute snake:
- first, on the far left row, throw on one elastic band of two colors (for example, black-white-black), and then three elastic bands of the main color of your snake (let it be yellow);
- repeat this entire pattern in the same row downwards;
- then make the second tier (same row, same colors);
- repeat the pattern in the center and add a second similar tier to it;
- secure the last column of the outer row with four turns of the main (yellow) elastic;
- you can do the same on the third row if you want the snake to have a long tail. But you can start weaving with two rows.
It is also very easy to weave cute koala bears, bunnies, mice, horses, dolls and many other interesting toys on the loom.
This activity perfectly develops fine motor skills, teaches perseverance, concentration, accuracy, and helps develop imagination and creativity. Be sure to try making some figurine with your child, and soon you will have a lot of wonderful bright products.
Everyone affected by the “rubber epidemic” knows that you can weave bracelets from rubber bands both on special machines and on any handy object - a slingshot, and even. But the most interesting and unusual bracelets made from rubber bands are made on a small machine, also called “monster tail”. Let's say right away that weaving bracelets from rubber bands on a small machine is somewhat more difficult than using other methods, but the result is worth it.
Making a “Double Fishtail” bracelet from rubber bands on a small machine
Let's take a closer look at how to weave bracelets on a monster tail loom. And let’s do this using the example of a weave called “double fishtail”:
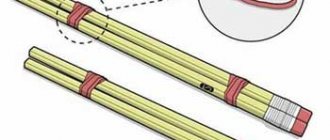
- Let's prepare everything you need for work - a small machine, a hook and, of course, multi-colored silicone rubber bands. Their number depends on the desired length of the finished product. What’s so convenient about weaving on a small loom is that you can weave a bracelet of absolutely any length on it, because it in no way depends on the size of the loom itself.
- We twist the first green elastic band in a figure eight and put it on two pegs.
- We put a second green elastic band on the adjacent two pegs in the same way.
- In the second and subsequent even rows, we will put the elastic bands on the pegs without twisting them. In this case, they must be placed diagonally between the four involved pegs. We put on the first elastic band of the second row.
- We also place the second elastic band of the second row diagonally.
- In the third row, as in all subsequent odd rows, we put on two untwisted elastic bands, placing them parallel.
- The next step is to throw the elastic bands of the first row into the center of the weaving.
- As a result, our weaving looks like this:
- We put on the elastic bands again, crossing them.
- We throw the elastic bands of the second row into the center of the weave.
- We put on two elastic bands, placing them parallel.
- We throw the elastic bands of the third row into the center of the weave.
- We alternate putting on crossed and parallel elastic bands until the bracelet reaches the desired length.
- Let's start finishing the work. We put elastic bands on the pegs in parallel and alternately throw all the elastic bands remaining on the pegs through them into the center of the weave.
- Carefully pick up the elastic band remaining on one of the pegs and throw it onto a peg located diagonally. We repeat the same manipulation with the elastic band on the second peg.
- Now we only have two pegs involved in our work, each of which has 2 elastic bands.
- We leave one elastic band on each peg, throwing the second one to the center of the weaving.
- We connect both elastic bands and thread a C-shaped fastener into them
- We thread the other end of the clasp on the other side of the bracelet.
What else can you weave on a small loom?
In addition to the “Double Fishtail” bracelet discussed above, you can weave many other bracelets, jewelry and three-dimensional figures on the “monster tail” loom. Here are some types of bracelets that can be woven from rubber bands on a small machine:
- “Slingshot” bracelet, for which you will need approximately 60 elastic bands of different colors.
- “Double chain” bracelet, the weaving of which uses about 80 elastic bands of pink and blue colors.
- “Fishtail” bracelet with a chain around the edges, which differs from the usual “Fishtail” by the presence of a single-color edging.
- A very impressive and unusual “Double Infinity” bracelet, the elastic bands of which are twisted in figure eights.
- "M" bracelet consisting of intertwined letters "M".
- “Ladder” bracelet, which is also convenient to weave from rubber bands on a small machine.
- “X” bracelet, the elastic bands in the outer layer of which are intertwined in the form of the letters “X”.
- Bracelet with pompoms
- You can use figurines woven on such a machine as decoration:
The sweet and tasty name of the accessory evokes only positive emotions. And believe me, the appearance of this rubber band bracelet, called Candy, will evoke only positive and bright emotions in its owner!
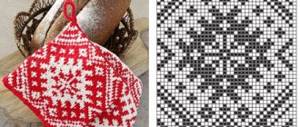
Wicker fresco with an owl
As in the previous master class, you will need a set of colored elastic bands, a detachable machine and a hook with a comfortable end for gripping.
Step-by-step description of working with a weaving pattern
- Preparatory stage
- Prepare the machine for work: the middle central row of the device should be removed and installed so that the recesses in the pegs are directed to the right. Only after this can you proceed directly to weaving.
- On a checkered sheet of paper, draw a diagram for your future craft using multi-colored markers (gel pens). For the first craft, you can use ready-made calculations, and when you fully understand and master the principle of weaving, you can safely sketch more complex diagrams of various figures (animals, plants, hieroglyphs, etc.).
- Main working stage
- Place yellow rubber bands in pairs on the outer row of the machine.
- Weave them (throw them over) and, following the diagram, weave the first row, vertically throwing elastic bands over the posts of the machine.
- Continue weaving the second and each subsequent row, introducing elastic bands of the color indicated in the diagram.
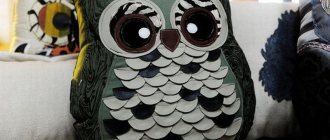
Soft figurine "Owl"
A voluminous craft in the shape of an owl can be attached to a bag or school backpack. And if instead of a soft filler you add buckwheat or rice, then such a figurine will turn into an antidepressant toy that will help relieve tension. To make a three-dimensional toy, you will need elastic bands of different colors, a crochet hook (preferably iron) and filler (depending on the purpose of the craft).
Description of the work process
- Using a hook, make a working loop from one elastic band. This is the initial ring, into which 6 elastic bands should be inserted one by one, and, making a loop, knitted with the previous one. In the first row you should have a tight ring.
- In the second row, the number of working elastic bands should be doubled (12 pieces). To enlarge the ring, you should knit 2 elastic bands into each small hole of the previous row.
- In the third row, you should increase the number of working elastic bands to 18 pieces (we knit 2 pieces not in each hole, but through one).
- We increase the fourth row by knitting 2 elastic bands in every third hole.
- The bottom is ready. Now you should knit the owl piece in height. To do this, the number of elastic bands in each subsequent row remains constant. To make the owl multi-colored, you can change the color of the parts for each row.
- When the owl's body reaches the desired height, fill the resulting bag with filler (sintepon or buckwheat) and connect the top of the part with elastic bands.
- Thread several elastic bands through two opposite edges and cut them. You will get ears.
- Separately weave 2 eyes (according to the bottom principle - 2 rows).
- Use orange rubber bands to make a bird's beak.
- Glue on the eyes and beak.
The owl is ready! You can make several of these multi-colored figures with different fillings. By increasing the number of rows of the bottom and, accordingly, the height of the body, you can increase (decrease) the size of the finished craft.
Weaving from rubber bands is not only an interesting and exciting activity, but also very useful. Painstaking work develops fine motor skills and logical thinking, and also contributes to the development of fantasy and spatial imagination.
Nowadays, owls enjoy special attention, and this is understandable. The night bird has long symbolized wisdom and knowledge for people, so images of owls can be found everywhere: on clothes, as accessories, in printed publications and more. Owls made from rubber bands are also very popular, and this article will focus on them.
Video about weaving figures from rubber bands
Video on how to weave figures from rubber bands:
The emergence of such a craft as weaving takes its roots from ancient times. Having a minimal supply of knowledge and materials, ancient people could easily build things and interior items using only one weaving technique. If you are wondering how to weave a three-dimensional figure from small elastic bands yourself on a special machine, then this article is for you!
Weaved from everything that came to hand. They made a variety of crafts that were useful not only in everyday life, but also as clothing. Therefore, there is no need to be surprised by the various variations of weaving techniques and basics.
The ancestor of all the basics of weaving is the macrame technique. It consists of knots and is performed using various types of materials, mainly strong threads. Modern needlewomen make products using this technique quite often. From time immemorial, craftsmen have been performing light and not so simple crafts almost every day. Even for beginners, many weaving techniques may seem simple, because in reality they are.
Today, such a technology of weaving crafts as making them from rubber bands is gaining momentum. According to the famous American entertainment channel, multi-colored rubber bands were recognized as the most popular toy in the world for 2013. It seems that nothing new happened with the birth of such a miracle, but still, the world will no longer be the same without their existence. This article will most likely be useful to parents, first of all. Because children have long been aware of what technologies, what crafts can be done with their help.
An activity such as weaving from rubber bands has a number of undoubted advantages. Thanks to the specific properties of making crafts from them, the child develops attentiveness, perseverance, fine motor skills and memory.
Thanks to this process of weaving crafts, you can reveal the child’s potential; he chooses the color, shape, and pattern of the product when creating his own product.
The slingshot is used as a machine for making crafts. It helps to quickly build the necessary crafts and make the children’s work easier. With this machine you can make animals, fruits, vegetables and cartoon characters. Perhaps the most common are products in the form of animals and fictional characters, but this applies to more complex production.
Even without a large machine, it’s easy to make simple crafts from rubber bands; you can try to make 3D bracelets from this material for beginners.
In this master class you will learn how to independently weave a three-dimensional figure from bright elastic bands on a machine special for the job. There are several types of machines:
- Large machine
- Small machine
- Mini machine.
All of the listed types are perfect for making crafts from rubber bands with your own hands. There is a special set of elastic bands for braiding, called a monster tail, designed for this hobby. But its package does not always include tools for work. Therefore, when choosing sets, you should pay special attention to its contents. On the Internet you can study photos and videos of making various kinds of crafts from rubber bands.
We weave from a photo of an owlet on a slingshot
To demonstrate the weaving, we used pink elastic bands for the body, black ones for the eyes, and orange and white ones for the beak with legs and abdomen. The result is a rather bright owlet that simply cannot help but attract attention.
We will weave our owlet using a slingshot using a hook. The following is a detailed master class with photos:
- Pull the first ring onto the right pin of the slingshot, twisting it four times, then put on two pink elastic bands. Throughout the entire weaving, we will mainly throw on two elastic bands.
- Take the hook and move the twisted ring to the center.
- Using the same hook, transfer the elastic bands to the left side of the slingshot.
- Twist the orange rubber band in four on the right pin.
- Put on a new pair of pink elastic bands.
- Transfer the orange elastic band to the pair you are wearing.
- Using a hook, throw all the remaining elastic bands into the center.
- Throw on a couple of pink rings.
- Throw off the bottom pairs from all columns.
- Put on a couple more pink rubber bands.
- Drop two elastic bands located below and repeat steps 8 and 9.
- Take the hook and move the elastic bands from the left pin to the right.
- Pass the hook through the ring at the very beginning of the weaving, it is twisted in four.
- Throw this elastic band over the left side of the slingshot.
- We put on two white rings.
- Throw a pink ring over the elastic bands you just put on.
- Add a couple more white rings.
- Throw off the white rings located below.
- Repeat steps 15 and 18 two times. 20. Move the elastic bands from the left pin to the right.
- Move the rubber band from left to right.
- Place the hook back into the twisted pink rubber band.
- Place the ring on the left pin of the slingshot.
- Throw on a new pair of pink elastic bands.
- Move the ring to a new pair.
- Grab the ring from the left pin and move it to the right one.
- Screw the orange ring onto the left post four turns.
- Throw on a pair of pink elastic bands.
- Move the twisted orange ring to the center.
- Remove two pairs of central pink elastic bands from the right pin. They are located between the white and new rings.
- Put on a pair of pink elastic bands.
- Drop the bottom pink rings from each column. Please note that we are not touching the white and lowest pink rings for now.
- Repeat steps 30 and 31 three times.
- Throw on some pink rubber bands.
- Remove all the rubber bands from the slingshot, leaving only the ones you just put on. The body of our owl is ready, you can straighten it and start weaving the heads.
- Throw on a new pair of pink elastic bands.
- Take off the bottom rings.
- Add two more pink rings.
- Hook over the bottom elastic bands.
- Move the rubber bands from the left column to the right.
- Twist the black rubber band four times on the left side.
- Throw on a pair of pink elastic bands.
- Move the black elastic to the pair you just put on.
- Move all the rubber bands on the right side after the black rubber band.
- Throw on a new pair of pink rings.
- Discard the rings located below.
- Move all the elastic bands to the right using the hook.
- Now you need to insert the hook into the central rubber band, where the head of our owl begins. It is located in the upper part of the body.
- Thread two orange rings onto the hook.
- Pull them through the center elastic and return them to the hook.
- Throw the resulting loops onto the left pin of the slingshot.
- Draw two pink rings.
- Move the orange ring to the center.
- Transfer all the rings to the right pin.
- Place the hook back into the center ring.
- Now put two pink elastic bands on the hook.
- Pull them through and return them to the hook.
- Place the resulting loops on the free left pin.
- Throw on a new pair of pink rings.
- Remove the loops from the left pin.
- Transfer the rubber bands of the new pair from the right pin to the left.
- On the right pin, put a black elastic band, twisted in four.
- Throw on a couple of pink rubber bands.
- Take your hook and place the black elastic in the center.
- Send the elastic from the left column to the center of the weave.
- Put on a couple more pink elastic bands.
- Drop the bottom two rings from the posts.
- Throw on one pink ring.
- Send all the rings on the slingshot to the center, leaving only one ring.
- Remove the loops of the remaining ring onto the hook.
- Pass the loops through each other and then tie them into a knot to secure our figure. The owl is ready! Sometimes not everything is clear in the photo; in this case, you can use the attached video, where you can consider individual points that caused difficulties.
Step-by-step instruction
To understand how to weave an owl, you must follow the following sequence of actions:
1. You need to put an elastic band on three columns and at the same time twist them so that you get a figure eight. Then put orange elastic bands on each side, after wrapping them three times. 2 more elastic bands are put on the outer posts.
2. The irises of the color from which the tummy will be made are placed on the central pegs, and then the orange elastic bands are thrown off.
3. On the right side, elastic bands are put on three pins, which are used to make the body, and the elastic band located below, as well as another one running horizontally, is thrown into the central part. It is necessary to stretch the tummy materials and hook them to the nearest peg.
4. The horizontal iris returns to its place. And from the right and central part, more elastic bands are thrown on the stomach, from the left iris from the body color. Then you need to throw off all the rows located below and along the horizontal plane so that the tummy bands can be returned to the center.
5. The horizontal elastic band should be put on three columns, after which you will need to repeat the step already done again.
6. Once again perform weaving in the described way.
7. At this stage of work you need to make the owl’s head. Rubber bands are thrown along all the pegs, then you need to throw off the irises located below and in the horizontal plane. Place all the materials on a couple of posts.
8. How to weave the owl further? Well, what is a bird without a beak? It is necessary to fasten the elastic bands to those that play the role of the body, throw off the lower part and put the elastic bands on 3 pegs.
9. One is put on in a horizontal plane, and two more for each column, then you need to throw off the bottom row and form the eyes.
10. The irises are distributed on the outer posts, and then they need to be put on the parts located on the left and right, again throw off the bottom of the craft, fasten the loop and remove the resulting craft.
A detailed description of how to weave an owl on a loom has been completed.
Video tutorials on weaving an owl from rubber bands
When weaving 3D figures, it is very important to immediately imagine how it will look in finished form in order to plan the consumption of rubber bands and make a bright craft. It is worth using compatible colors. Below are videos from which you can choose the appropriate option. You can immediately see what kind of 3D figure you will end up with and how many rubber bands you will need for this.
How to weave a small owl on a loom
The video lasts 15 minutes and is presented in very good quality. At the same time, weaving a keychain in the shape of an owl on a machine is demonstrated. The finished owl turns out bright and looks like a real owl, and weaving it is not difficult.
Weaving 3D lumigurumi owl figurine on a hook
The duration of the video is 47 minutes, it will take a long time to watch, but at the same time it explains in detail how to knit a rather complex, but very beautiful 3D owl. You will need a lot of elastic bands, but the craft turns out to be voluminous and very large, and since everything is woven using the lumigurumi technique, in addition to elastic bands, you only need a hook.
How to knit an owl fresco on a loom
An interesting type of weaving is shown in this 15-minute lesson. This time we show you how to make a small fresco in the form of an owlet, and a diagram of the fresco is also attached to the video. For the weaving itself, you will need a small amount of elastic bands and two rows of a full-size loom. The quality of the video is not very high, but this does not affect understanding. Everything is explained and shown in great detail.
Owl weaving on forks
The following video tutorial lasts 20 minutes, which shows how to weave a simple figure, for which you do not need a special machine, because all weaving is concentrated on forks, which everyone has at home. The craft has an interesting and bright look that cannot be ignored, and anyone can do it. Everything is very well explained and shown.
How to weave an owl from rubber bands on a machine
Weaving an owl from rubber bands on a loom is perhaps the easiest way to make an owl. How to weave? To do this, choose the appropriate colors of elastic bands for the owl, and then, according to the weaving pattern, throw the elastic bands onto the posts of the machine, observing the sequence of colors. Then you remove the elastic bands from the post, intertwining them with each other. And you do it the same way in a certain sequence. Weaving an owl on a machine involves throwing on and off elastic bands. As a result, after completing the weaving steps, you remove the toy from the machine. The elastic bands are pulled together and you get a finished owl toy.
Owl made of rubber bands
How convenient is weaving on a machine?
Using a special tool for weaving is very convenient. To achieve different patterns, the different colored irises must be arranged and combined in the correct sequence.
First of all, you need to choose a combination of colors so that the craft looks bright and original. For example, you can use blue, light green or pink, and for the owl’s tummy take irises that will contrast with the above. The bird's eyes can be made black, and the legs and beak can be orange.
How to weave an owl from rubber bands on a fork
In addition to the machine, you can use a fork to weave an owl from rubber bands. You already know that you can weave equally charming and cute little things from rubber bands on forks.
The tines of the fork replace the loom posts in weaving. To weave an owl from rubber bands on a fork, you need to combine 2 forks so that the cloves point in different directions. To weave an owl from rubber bands, the rubber bands are thrown onto the tines of a fork, after which they are intertwined in a certain order and then the product is removed from the forks. It turns out a finished owl from rubber bands on a fork.
Owl made of rubber bands
Weaving 3D (3D) owls from rubber bands
In addition to simple owls from rubber bands, you can make a three-dimensional 3D owl. How to weave this miracle? For this, the lumigurumi weaving technique is used. What is lumigurumi? This is the same as amigurumi, with the only difference being that in amigurumi, toys are knitted in the round with crochet and thread, and in lumigurumi, there is a crochet hook and elastic bands. The patterns are the same, only the knitting material is different.
Look at the photo of a 3D owl made from rubber bands. These are masterpieces of art!
Owl made of rubber bands Owl made of rubber bands Owl made of rubber bands The author of the owl from rubber bands is Marina Shamina The author of the owl from rubber bands is Liza Kotova Weaving an owl from rubber bands on a machine. The author of the owl is Ekaterina Chuvanova. The author of the owl made from rubber bands is Lada Levant
Video tutorial on weaving a bracelet from rubber bands on a mini-loom
In order to weave beautiful original accessories from rainbow loom you will need a little imagination, weaving skills using simple patterns and the desire to create a unique item. The methods of creation are somewhat similar, differing only in small nuances, which is why new designs and stylish bracelets are obtained. Master classes will help you learn complex techniques and the secrets of weaving. For an example of such a lesson, look at the video, where the sequence of execution is explained and shown in detail, so there will be no problems with weaving and the result will be excellent work:
Found an error in the text? Select it, press Ctrl + Enter and we will fix everything!
Weaving from rubber bands on a machine is a fascinating activity. Using a mini machine you can make a beautiful pencil case, pencil cap, dolls, keychains, dragon, pony, using a variety of multi-colored rubber bands. But for beginners it is better to watch video tutorials and try the simplest figures. Over time, you may end up with a beautiful spider, pencil case, cupcake, mural, Elsa, or even the most beautiful hearts.
Lumigurumi is the name for weaving made from rubber bands. This trend in needlework and hobby comes from the Japanese amigurumi. But if in Japanese art knitting needles with threads and a hook were used, here a special hook is also used, but the basis is a special machine.
With a small machine you can make a wide variety of figures - keychains, dragon, dolls, pencil case, spider, cupcake, hearts, ponies, Elsa, Android, fresco.
By picking up a hook or a mini machine, you can make the most incredible crafts from rubber bands:
- Accessories. This is a phone case in the shape of a dragon, a pencil case for school supplies, key chains, a bag in the shape of a pony or doll, a wallet and much more;
- Decorations. Dragon bracelets, exquisite mural, pendant, ring, choker, necklace. And this is a small part of what you can do with your own hands;
- Figures of cherries made of rubber bands on a machine, a person, a pony, Elsa, a doll, a spider;
- Weave a picture to decorate your room, make clothes for a doll, your toy dragon.
Everyone chooses what they want to create. You don't need much to do the job - a machine, a lot of rubber bands, a hook and your time. We also recommend studying video lessons with Sergei, learning about the basics of weaving with rubber bands and just having a good time. This is a great activity for the whole family and a great hobby for young children.
The benefits of weaving with rubber bands
Weaving from multi-colored rubber bands brings great benefits to the child. After all, in order for him to get a person, a keychain, a cupcake, a spider, a pencil case or a pencil cap, he needs:
- Make some effort. This develops character, forces the child to learn to achieve his goal;
- Focus on the process. Attention is concentrated, the child becomes calmer and more assiduous;
- Be patient. This way, your child will not give up halfway in the future if something doesn’t work out;
- Work with small rubber bands. This develops motor skills, improves coordination, and develops vision.
The first lessons should be held together. Conduct training in a playful manner so that the child himself wants to make a dragon, hearts, a cap for a pencil, toys from rubber bands on a machine, a pony, a cupcake or a keychain.