How to make a crossbow with your own hands: manufacturing features and recommendations from professionals
Despite its age, the crossbow is still able to compete well with some types of weapons. Unlike its ancestor, the bow, this design has an automatic arrow release system, thanks to which the shooter can concentrate on aiming without wasting energy on pulling the bowstring. Given the popularity of this weapon, many craftsmen are interested in how to make a crossbow with their own hands. To do this, you should take into account many nuances, know the design features of a modern crossbow, the types of such weapons, factors influencing the firing range, etc.
What is a crossbow?
Before you make a crossbow with your own hands, you need to understand the features of this weapon. It is also called a crossbow or arrow thrower, which perfectly characterizes the features of its design. In simple terms, this is a bow equipped with a special mechanism for cocking and releasing the bowstring.
There is a full-fledged hammer here - a trigger, through which the shot is fired. Thanks to this innovation, the crossbow is superior to the traditional bow in many respects, namely:
- lethal force;
- shot range;
- shooting accuracy.
However, in most cases, a crossbow is inferior to a bow in terms of rate of fire. To level out this drawback, special shortened arrows or bolts, and sometimes bullets, were used.
Device Features
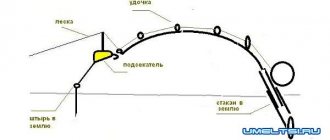
The main part of the crossbow is the stock into which the arrow is placed. It is combined with the trigger mechanism.
A guide groove for bolts is installed in the upper part of the stock. At the end of the stock there is a stirrup and a cross. Wooden or steel shoulders are fixed to the latter.
The traditional trigger mechanism consists of a lever, a washer with a slot for the arrow shank and a retaining spring. Thus, when the trigger is pressed, the bowstring is released from the hook, transferring energy to the arrow.
At the moment, there are several types of triggers used in crossbows. The most popular of these is the pistol-type design.
What does a crossbow consist of?
Compared to a traditional bow, several elements have been added to the design of the crossbow. This weapon consists of the following parts:
Types of crossbows
Today, there are several types of crossbows. Regarding their purpose, such structures are divided into:
- Sports. The appearance and characteristics of such weapons directly depend on the sporting discipline in which they are used. As a rule, such designs are equipped with special aiming systems and various attachments designed to improve shooting accuracy.
- Hunting. Such crossbows require relative compactness with high power. Therefore, block-type models are most often purchased for hunting.
- Amateur. These are lightweight guns that are designed for target shooting and have relatively little power. Exact copies of antique crossbows are also produced, which, although they are combat prototypes, are most often used to decorate interiors and replenish collections.
Regarding the design, there are:
- Classic models. In this case, energy is accumulated directly in the arcs, after which it is transferred to the bowstring. The operating principle of such crossbows is similar to the simplest bow models.
- Block. This is the most advanced type of this weapon. A special system of blocks in this case contributes to the proper distribution of load between the elements of the system. Thus, the power of such a crossbow increases, and its dimensions decrease.
Dynamite
When dynamite explodes, it destroys blocks around it, except obsidian and adminium. Can be used to create traps, explode mines, griefing. Dynamite explosions are often disabled on multiplayer servers. Dynamite is activated by a button, lever, pressure plate, tripwire and red dust and explodes after a few seconds; when it explodes, the dynamite will activate other dynamites that are nearby.
Model manufacturing technology
Making a crossbow with your own hands will be somewhat more difficult than making a bow. The fundamental difference in this case is the presence of a stock and a trigger mechanism. However, if you have skills in working with hand tools, then you should not have any particular difficulties.
Material selection
Before you make a crossbow from wood, you need to learn how to choose and prepare the material correctly.
Wood has the best properties for making a crossbow. This is an indispensable material for creating a stock and bow, since the wood is easy to process, has good flexibility and is very durable. In addition to wood, various composites and spring metal are used in the manufacture of arches today. However, for DIY production, it will be easiest to use wood.
Of course, something more reliable and wear-resistant should be used for the trigger mechanism. That's why it is made of iron.
To make the body of a crossbow, it is best to use the following types of wood:
The density of these rocks is quite sufficient to withstand significant loads exerted on the stock and bow of a crossbow. Soft types of wood such as pine and linden are absolutely not suitable for the manufacture of these parts.
Preparation of material
Due to the significant loads placed on the elements of the crossbow, it is not surprising that sooner or later they will fail. To prevent this from happening in the near future, it is necessary to use pre-prepared material in the production of the crossbow.
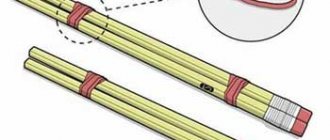
The wood should be collected wet and dried within a year. To make a bow and stock, you must select branches that meet the following characteristics:
- For a one-piece design of a stock with a butt, you should choose a branch at least a meter long. To make arcs, the length of the branch must be at least 180 cm.
- The diameter of the workpieces must be at least 10 cm.
After protecting the cut points, you need to do the following:
- The workpiece is sent to a dry place, protected from sunlight.
- It is advisable that the raw materials remain here for at least a year.
- Next, you should clean the workpiece from the bark, after which it should be kept in a dry place for another week.
- Now the log can be sawed in half, after drying for about a week.
Making shoulders
On the workpiece, you should choose the side that is characterized by thinner annual rings. As a rule, this is the northern side, on which the fibers are denser than in other parts. The bow or shoulders are made from this part.
The production of shoulders is carried out as follows:
- First, the middle is outlined, from which you should measure 2 cm in each direction to install the crossbow stock. This part of the bow should have maximum thickness.
- From the middle we begin to gradually cut off excess material, moving towards the edges. The workpiece should be thinned in this way on both sides.
- From time to time it is necessary to check the bending of the bows using a test bowstring. It is a strong rope with many loops. By placing a string on the bow, you can determine the degree of deflection and its uniformity. This way, the places where excess material should be removed are identified. This process continues until the product bends evenly on both sides.
How to handle knots
When preparing material, it is advisable to choose those branches that are as free as possible from knots and other defects. It should be understood that any large knot is a weak point in the structure. However, if you were unable to find a workpiece completely free of defects, it does not matter.
The removal of knots must be carried out already in the process of shaping the crossbow's shoulders. A well-sharpened knife is used for this. They should be cut in such a way that a protrusion about 1 mm high remains above the surface of the workpiece. Next, the defect is sanded with sandpaper.
Making a stock
After the arms of the weapon are ready, you should proceed to making the stock. To do this, you must follow these instructions:
- Initially, we select the location of the groove along which the arrow will move during the shooting process. This place must be perfectly level. Any notches or irregularities can disrupt the trajectory of the arrow, dampen some of the inertia, or even make the weapon unusable.
- Typically the gutter is about 30 cm long. It should be carefully hollowed out and sanded.
- Behind the chute it is necessary to cut a recess for the trigger mechanism. In the front part, grooves are created for installing the shoulders.
Trigger
To understand how to make a trigger mechanism for a crossbow, you first need to understand the features of its design.
If you do not plan to make a powerful weapon, but want to create a light and compact crossbow, then the arrow release mechanism can be made of wood. Beech or oak wood is used for this. If we are talking about weapons with a tension force of more than 20 kg, then the parts of this mechanism should be made of metal.
The most primitive trigger mechanism is called a “nut”. Its design is extremely simple. This element is a cylinder and consists of the following elements:
- on one side there is a trigger stop;
- at the opposite end there is a bowstring hook.
Chapter 9: Triggers
Chapter 9: Triggers
Kelbly's and Jewell triggers.
The dominant trigger in modern benchrest is the Jewell. Kelbly's have introduced a new benchrest trigger and it's increasingly being seen in competition. Benchrest shooters usually take a wait-and-see approach before committing to a new design, so only time will tell how successful this new Kelbly's creation will be. It has a new and intriguing design with a single piece milled body (no plates to bend or spacers to screw them together) and it uses a movable pin to change the actuation weight ranges. In any case, at the time of this writing, the 1.5-ounce Jewell benchrest trigger was the standard in the benchrest world.
The function of the trigger mechanism is to transform a 1.5-ounce finger strike into releasing the potential energy of 20 pounds of compressed spring that moves the firing pin assembly forward. This is an incredible achievement considering how smooth a good benchrest trigger can be.
It's always interesting to see the reaction of someone dry-firing a benchrest rifle for the first time. It usually takes 3 or 4 tries before that person just starts to feel the trigger. This is always a “click”, followed by more and more attempts. Finally, when the trigger starts to fire with some semblance of control, they usually get hooked and start wanting a benchrest rifle. I suppose it's a little underhanded, but damn it, the sport is always in need of new blood, and if the trigger can hook them, why not?
There is, of course, a dark side to triggers. From time to time they either do not work or do not always fire. Any of these situations cause endless problems.
Let's talk about caring for and preserving triggers. No one should have to fear removing the Jewell trigger from their rifle or even disassembling it. It's quite simple, and there are a few things you can do to improve the way it works. All you need is a table, a chair, a set of allen keys with round ends, a set of small screwdrivers, good light and a little peace and quiet. You'll also need a squirt bottle of lighter fluid (more on this later).
Turn the rifle upside down on the stand to prevent damage to the scope, then remove the trigger guard and trigger/trigger retainer assembly. When lifting the trigger assembly, be careful not to drop the screws. I use a small cup to place the parts in every time I work the triggers so I don't have to crawl around on my knees looking for tiny parts that have fallen on the floor.
For periodic cleaning, blow out loose dirt with compressed air, spray a liberal amount of lighter fluid into the trigger mechanism, and shake out excess. Lighter fluid is all the lubrication the trigger needs. Do not put oil, grease, Teflon or anything else into the trigger mechanism. Oil is a magnet for dirt, and soon it will clog your entire trigger mechanism. Lighter fluid leaves a thin film and allows the trigger to function well.
The parts of this trigger mechanism are made of 440C stainless steel, hardened to 58 Rockwell hardness. They should show minimal wear. Stainless steel develops the passivation layer discussed earlier and therefore does not rust under normal use.
If the trigger is giving you problems such as backlash, misfiring, increased trigger pull, misfiring, or any other thing that doesn't go away after cleaning, then it's probably time to take it apart. Obtain the instruction booklet that came with your trigger. Jewell triggers come with good instructions that include diagrams detailing the adjustment process. If you do not have these instructions, do not disassemble your trigger. Better call a friend and get a copy of the instructions from him.
Label the trigger holder so that after assembling the trigger you will know which way to face it. There are trigger holders that can be placed backwards, but this will change the amount of striker travel due to the trigger being positioned back in one position and forward in another. Knock out the two pins that hold the trigger in the holder and set these parts aside in a cup.
Place the trigger mechanism on a surface (table) as shown in the diagram in the instructions, and begin removing screws, etc., placing these parts in the cup. Be especially careful with the very small spring located under the trigger pressure adjustment screw, it is very easy to lose. Make sure to put everything in the cup. Remember, there is a short and a long screw on all spacers. Don't ignore this when reassembling. If you bend the plates while they are disassembled, you will most likely ruin the trigger mechanism because the internal parts will rub, so be careful!
Look for signs of wear on the inner surfaces of the plates. If they are present, use very fine sandpaper, from the 1200 to 2000 grit range, and lightly polish the plates until the wear marks disappear. Next, take a sheet of sandpaper and place it on the table. Place each trigger piece on it and rub them until they look and feel polished.
You should also polish the contact and engagement areas. A word of caution when performing these steps, do not be rough or aggressive. Do not change any engagement angles. It is critical to perform a very controlled, precise movement parallel to the surface being polished. If you feel like you can't do it right, stop and reassemble the trigger. If this doesn't bother you, use a very fine polishing stone and the very fine sandpaper mentioned above. Do not round any contact surfaces or significantly change any dimensions. Simply remove any signs of handling or wear. The internal parts are very hard, so you will need to apply some force to get everything to shine.
The two most critical areas for polishing are the ramp on the firing pin block (mating with the bolt), and the sear between the trigger and the upper lever. Again, when polishing these two points, it is critical to keep all surfaces flat. Machining marks on the inside surfaces of the trigger sear area are common. Personally, I was not able to completely remove these marks without changing the critical dimensions. Simply use a Q-Tip with a small piece of fine sandpaper wrapped around it to buff the inside of the area as best you can.
Once you are satisfied with the smoothness of your polish, clean all parts with lighter fluid and reassemble the trigger mechanism. Start by screwing the spacers to one of the plates and inserting the two axles and securing them with holders. Replace the trigger first, making sure the trigger tension adjustment spring is pressed against the spacer. Next, place the hammer block in place, then the lower arm, upper arm, and finally the main spring. Place the second plate and screw it. All!
Assemble the trigger mechanism on the holder, making sure that the axles are flush with the outer surfaces. Otherwise, they will rub when inserting the assembly back into the receiver. Screw the trigger mechanism to the rifle, but do not screw the trigger guard yet. Now is the time to adjust the trigger. While the rifle is still upside down in the holder, place the bolt into the rifle and make sure it cocks. If not, unscrew the sear engagement adjustment screw until the bolt begins to cock and turn the release adjustment screw back a turn or two. Follow the instructions in the booklet to adjust the trigger.
When you think you have adjusted the trigger, turn the rifle in the holder to its normal position - with the optic facing up - and firmly close the bolt several times ( No live ammunition in the chamber! ). The trigger should not fire. If it works, then either increase the sear engagement (by unscrewing the sear engagement screw), or increase the force of the trigger spring by tightening the spring more. Do these steps in very small increments until the involuntary shots stop. Then recheck the trigger pull to make sure it is light and crisp.
I adjust the overtravel so that I leave it a little larger than usual. Everyone likes to adjust the overtravel screw so that the trigger stops as soon as it fires. I think this can cause a problem when you're in the heat of the moment trying to finish a group and you pull the trigger too hard. Once the trigger is engaged, it doesn't matter how far the trigger goes back. It is much more important that you don't knock the rifle while the bullet is still in the barrel by pulling it back than it is to have the trigger swing back a little after firing.
I recommend carrying a spare, fully adjusted trigger for matches. There have been several occasions where I have had to change triggers mid-match. A grain of gunpowder, dirt, cleaning fluid, etc. can end the match for you if your trigger breaks and you don't have a replacement.
A common question I get asked is how often do I clean my triggers? I clean them before each season and again in the middle. I also clean them after I come from games in Midland or Phoenix where there is a lot of dust. Some shooters have triggers that they are forced to clean before each match, and as far as you know, this is part of the preparatory ritual, which is just fine.
In free range rifle shooting and some hunting applications, trigger/striker assembly timing is very critical. In these shooting disciplines, the claimed uniformity of Kelbly's new trigger may provide an additional advantage.
How to make a mini crossbow?
To shoot a crossbow, it is not at all necessary to acquire skills in working with wood, purchase the necessary tools and procure raw materials, waiting a year to start work. The current model can be made from ordinary corrugated cardboard. Naturally, such a crossbow will not be suitable for sporting or hunting purposes, but it will be just right for target shooting.
The production of such a prototype involves several stages:
- First we make the shoulders. To do this, you need to cut out several identical blanks from corrugated cardboard, which are fastened together into a single structure. Thus, the necessary rigidity is created, because this part of the crossbow will bear the maximum load.
- Then the trigger and locking mechanism should be cut out of cardboard. They are also made from several layers glued together. To create additional rigidity, it is necessary to strengthen these structures with ice cream sticks.
- The main part of the crossbow is represented by the stock, just like in its combat prototypes. This design consists of two identical parts that are connected to each other by means of jumpers.
- We insert the trigger mechanism inside the stock and glue the main part of the crossbow.
- Now you need to attach the shoulders to the base. This should be done very carefully to avoid distortion, otherwise the accuracy of a shot from such a crossbow will be in question.
- At the last stage it is necessary to tighten the bowstring. For this purpose, stationery rubber bands are used, which are intertwined with each other. The more rubber bands you use, the more powerful your crossbow will be. However, you should not overdo it here - three or four layers will be quite enough.
A crossbow is a pretty serious weapon that you can make yourself. If you do not have the skills to work with wood, then you can start your own crossbow production by making a miniature model from corrugated cardboard. It will not only please you with its appearance, but will also allow you to practice your shooting accuracy. And the next stage will be the production of a full-fledged wooden crossbow.
Piston and sticky piston
Pistons can move blocks, this property is used to create traps and trusses. A sticky piston attracts and pushes blocks out, while a regular piston only pushes them out. The simplest example is cutting reeds using a piston, red dust and a button, thus increasing the number of pistons and connecting them with red dust, installing repeaters, you can create a reed farm that will cut 28 reeds at once by pressing one button.
How to make a crossbow trigger at home
The crossbow trigger is one of the most important components of this cold throwing weapon. To make a trigger yourself, you need to have a complete understanding of its structure. In addition, you need to be able to use various tools and equipment. Know turning and plumbing, at least at the student level. In other cases, if you have no idea what a lathe is, you can simply order the necessary parts from professionals. We will start making a crossbow trigger with the simplest entry-level drawings.
When making any complex mechanism yourself, you need to act on the principle - the simpler, the better. Because the more parts there are in a mechanism, the more precise their fit to each other must be, otherwise frequent breakdowns are possible. Therefore, do not chase factory drawings of modern crossbows. Making them at home is often technically difficult.
The simplest escapement mechanism used by the warriors of ancient Rus' in the eighth century is shown in the figure below.
All parts can be made of wood; they do not require special technical knowledge. The principle of operation of the mechanism is as follows: a wooden lever, which is fixed to the crossbow stock with an axis, pushes up a special pin. This pin pulls the bowstring off the ledges, and the arrow begins to fly. True, this release mechanism is suitable for crossbows with a small tension force of the arms (arc).
The following illustrations show various variations of simple triggers.
I think comments on such simple devices are unnecessary, everything is clear without words. Such crossbow release mechanisms are recommended for DIYers who do not have access to turning equipment, or who simply want to reconstruct antique crossbows.
Now let's touch on more complex drawings of trigger mechanisms. But their production already requires turning and metalworking skills.
Red dust
Red dust is used as wires to conduct electricity to other machines. Red dust is mined underground and immediately falls out of the ore in finished form. The installed red dust can be easily collected with one blow of the hand or any object. In the screenshot, the lamp is activated by a lever using red dust, this is the simplest use of mechanisms.
Crossbow pin mechanism
The pin mechanism is easy to manufacture. It's easy to do it yourself. How to make a pin mechanism? For the pin mechanism, you need to make a groove on the stock. The bowstring will be wound through this groove. A hole is drilled directly under the bowstring, into which either a wood or metal pin is inserted. A bar is attached to the bottom of the stock so that when you press on it, it presses on the pin. The pin, having thus received the command, pushes the bowstring out of the groove. The device is simple, easy to manufacture, but has many disadvantages: there is no safety lock in the mechanism, the trigger is heavy, and it also wears out quickly.
Crossbow roller mechanism
It is also possible to make a similar design with your own hands.
In order to make a roller trigger, you need to purchase a metal roller. In the video, on the one hand, we make a notch for the bowstring, and on the other hand, under the trigger lever. We insert the roller into the stock and secure it with an axis passing through the stock and the center of the roller. The operating algorithm of the roller mechanism is as follows:
- if the bowstring is on the roller, it presses on it.
- the other side of the roller rests against the trigger lever and prevents it from turning.
- By pressing the lever, we allow the roller to rotate and release the bowstring.
photo. Trigger
Modern, the simplest crossbow trigger mechanism
The trigger mechanism of a crossbow, also called a lock, can be a common structure with a guide, or can be mounted in a separate housing. Some are more common.
photo. Crossbow trigger
All locks are divided into three types:
- With a lower hook (nut);
- With top hook;
- With a fixed hook (pin).