The essence of the process
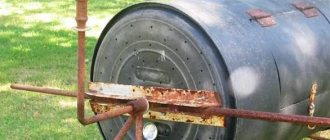
Spot welding is a popular type of joining metal products using the contact method. Metal products are welded to each other not along a continuous line, but at several points. This method is characterized by relative simplicity of execution and high productivity, which explains the wide scope of its application. In particular, this method is used when welding batteries with your own hands.
The essence of spot welding is extremely simple. It consists in the fact that the parts to be welded are pressed tightly against each other, and then a high-power electrical impulse is applied to them. After the heating of the parts reaches the required temperature, a core consisting of molten metal will form at the point of contact.
Increased compression of the parts leads to the beginning of mutual penetration of molecules of metals pressed against each other. After turning off the current, a slow decrease in temperature begins to occur at the welding site, and the metal will crystallize. The welding site is so strong that when you try to separate the resulting joint, only the metal located near the welding point will crack.
The simple principle of this type of welding includes tight pressing of the parts being joined and the subsequent generation of a pulse of sufficient force.
The advantages of spot welding include:
- Connection strength.
- Environmentally friendly process.
- Manufacturability.
- Rapidity.
- Low current and voltage values.
- Minor deformation.
- Easy to do.
- Ease of use of the device.
- Economical.
Carrying out this process will not require the purchase of such types of consumables as electrodes, gas cylinders, wire and flux.
Do-it-yourself spot welding diagram for batteries:
Making a connection using this method involves three simple steps:
- Compression of parts causing slight deformation of parts in that area.
- Supplying current to the area where the contact is located, causing the metal to melt and form a core.
- Turn off the current. Cooling of the metal and its crystallization.
When exposed to current, the core expands to reach its maximum size. A belt with a dense structure is formed around the liquid core. After turning off the current, it is necessary to leave the parts pressed for some time until the tension at the welding site is relieved. Due to the previously occurring deformation of the metals, there is no spattering, the spot weld is neat and does not require subsequent cleaning.
Do-it-yourself spot welding of batteries leads to a very significant reduction in the amount of money needed to purchase expensive equipment. One of the main requirements is preliminary preparation. This includes cleaning the surface from existing contaminants. Otherwise, when welding, the power will decrease, which will lead to wear of the apparatus used.
If, after welding is completed, sagging still appears due to splashes of metal, then they must be carefully cleaned. Splashes reduce connection reliability. It is also possible for a defect such as a burn-through to appear. This can happen when the current is too high, the pulse lasts too long, or the parts are compressed too hard. In this case, it is necessary to reduce the current strength and the amount of pressure.
When the impulse is weak, it can lead to lack of penetration. This defect can also occur if the compression force is not strong enough, or the compression of the pliers weakens during the process. Lack of penetration can occur if the weld points are too close.
Buy or make it yourself?
Despite the widespread use of technology, the cost of professional equipment is quite high. Therefore, among home craftsmen there are schemes for independently manufacturing a device for spot welding from a simple transformer and mechanical pliers. You can make with your own hands both a powerful device for joining 4-5 mm of metal, and a jewelry device that can help a radio mechanic. Manual work in the garage does not require expensive equipment.
Homemade spot welding machine
Such a device is quite capable of welding non-critical joints. If a person’s life depends on the strength of the weld (for example, body repair), it is better to purchase a factory machine spot welding device with a pneumatic drive of the pliers and a customizable controller, or use other types of welding.
The manufacturing quality of factory-made devices is higher, they are designed for specific tasks, the strength of the connections is higher, and safety precautions are present. These devices allow you to cook a lot, and are configured to work in factories.
Battery device
This term refers to a device that is capable of first accumulating (accumulating) energy and then expending it to provide various types of work. Such charge and discharge cycles can be performed many times.
In common household batteries, a voltage of no more than two volts is generated between the plates. For many devices this is not sufficient, so similar types of batteries are connected in series. Then they can be installed in one housing. A structure assembled from such elements will already be a battery, the abbreviated name of which is the abbreviation “AKB”.
Each of the component parts, called banks, contains two blocks with positive and negative plates. The plates with their accompanying grids are separated from each other by a separating plate called a separator. The device is placed in a durable case, tightly closed with a lid.
The scope of use of rechargeable batteries in everyday life begins with cars and ends with toys. Therefore, contact welding of batteries with your own hands leads to a simple solution to many pressing problems. Also, enthusiastic craftsmen can make their own apparatus for resistance welding of batteries. Homemade spot welding for batteries can be no worse than professional ones in terms of its results.
Device assembly process
Assembling a welding machine requires a clear sequence of actions. The process includes several stages.
First of all, you need to place the welding current source in a metal housing. The electrical plateau is assembled on a PCB. Then it must be placed inside the source body and fixed vertically in it. After which, the finished output transformer is installed on the base of the housing and fixed on it. Next, a welding cable is attached to the secondary winding busbar using bolts from above. Its other end is in direct contact with the electrode in the contact gun. The input cable from the electrical network is connected to the terminal block, which is located on the electrical plate.
ready-made device
In order to construct a resistance welding machine with your own hands, you must have all the necessary tools, including: a grinder; electric drill; hacksaw for metal; tap; file; chisel; hammer; screwdriver; vice; calipers; pliers; knife; scissors; die.
Do not forget that resistance welding, like any other type of joining parts, requires some experience. This is important because The quality and reliability of the weld depends on the skills of the welder. Compliance with safety regulations is a prerequisite. Welding work should only be carried out in a special protective suit, gloves and a protective mask on the face, since there is a high risk of hot metal getting into exposed areas of the body.
To summarize, we note that resistance welding with your own hands is not an easy process.
But if you follow the technology for doing the work and approach it with all responsibility and seriousness, the result will not be long in coming. Resistance welding has a wide range of applications. It can be used to connect parts of metal products, car components, body parts, as well as for repairing all kinds of devices. [Total: 0 Average: 0/5]
When is welding required?
In an autonomous power source in the form of a battery, sometimes it becomes necessary to replace one or several faulty elements at once. During operation, the battery may find itself in unfavorable conditions. For example, during rare and short trips the battery may be discharged, and during heavy work it may experience increased loads, which leads to imbalance. Frequent charging may cause the electrolyte to boil away. A malfunction of the generator or starter will have an undesirable effect.
A method such as soldering is unacceptable, since it is impossible to overheat the controller built into the circuit. Therefore, spot welding of batteries is used. When replacing a failed battery, the new element must match the current-voltage characteristic.
Contact welding of batteries at just a few points ensures heating of the metal, but in a very limited space, excluding thermal effects on other areas.
Manufacturing of the device
A spot welding machine with small dimensions is called a spotter. You can easily make a welding machine for spot welding batteries yourself. The battery spot welding machine is divided into a mechanical component and an electrical component. Mechanical contains electrodes that conduct current and elements necessary for compressing parts. In the electrical part, the main component is the transformer.
A spot welding machine for batteries may contain an old transformer. It is common to use a transformer that was previously included in the design of the microwave oven if it fails and cannot be repaired. You can also use a transformer from a non-working TV.
The old transformer must be removed carefully so as not to damage the insulation. The secondary winding must be completely removed. You can first cut off the top part, and then remove or knock out the remaining part using some tool, for example, a chisel. After this, the work area should be cleaned.
This is followed by the release of the groove in which the new winding will be wound. It is easy to make from a thick welding cable. Even four turns of winding prepared in this way will give a good indicator. You should not make the cable particularly long, as this will reduce the reliability of such a device as a battery welding machine.
The updated transformer should be secured to the base with self-tapping screws. Electrodes are installed opposite each other and will be soldered together. Soldered electrodes are connected to wires. One of the important circumstances is the location of the switch. It is positioned so that it is not far from the pincers on the body on its left side.
If the machine for spot welding batteries with your own hands includes a car battery, then such alteration of the transformer will not be necessary. A charged machine battery will be used as a power source. It must have significant power to prevent expansion when the metal heats up.
Both electrodes, covered in an insulating coating along their entire length, are fixed in the block. To maintain the distance between them, the connector is fixed. The wires coming from the battery are fixed in the terminal block. The battery spot welding machine is conveniently connected using a foot pedal. A sewing machine pedal will do, but it is advisable to purchase a new one.
To connect a foot pedal there must be a special connector. An important part is the preparation of the electrodes. Their role can be played by soldering iron rods sharpened to a cone. You can also use regular copper wire with a diameter of 2-5 millimeters.
The electrodes must be pressed to the parts using a clamping device. The clamping device must be adjustable. This expands the field of activity, using it to weld parts of different thicknesses.
A do-it-yourself battery welding machine, of course, cannot compare with the factory version, but checking its operation after assembly will bring it closer to these characteristics. For testing, you should select some unnecessary part. Test resistance welding for batteries should first be carried out at low power. If the result is normal, the next test can be carried out at maximum power.
A correctly selected mode will ensure that there are no weld marks. At the same time, tightly connected parts must successfully resist tearing.
Microwave welding machine
Hi all.
No work with metal is complete without welding. Welding cuts and joins metal structures. But a good welding machine costs a lot of money. But it doesn’t make sense to buy cheap ones, because such machines cook the same kind of flour. But you can easily make a welding machine yourself. There are many articles on the Internet on this topic. Well, almost all of these homemade devices turn out to be very weak. Or powerful, but huge, heavy and uncomfortable. But there was one option for making a welding machine, it was made by the author of the kreosan channel. It differs from others in its compactness and power. Today I will show and tell you the entire manufacturing process of this device. If anything is not clear, then at the bottom of the article there is a video where everything is shown in detail. Let's get started, for manufacturing you will need: 1. Two transformers from a microwave 2. A cable or large-section wire 3. A holder for electrodes 4. Epoxy glue 5. A grinder, a hammer, etc. tools Step 1. Manufacturing
Step 2. Testing
I don't understand electronics. If you have concerns about the assembly and operation of this homemade product or improvement, then share them in the comments. We can end this here, thanks for watching. If the article is good, then give it a like.
Source
Become the author of the site, publish your own articles, descriptions of homemade products and pay for the text. Read more here.
Battery welding
Welding batteries found in household and computer technical devices involves removing them, repairing them, and installing the corrected version in their original place. In this case, it is necessary to restore all reliable contacts.
Spot welding for batteries will require the use of a machine for this purpose, which will be much more economical to make yourself. Craftsmen can find many components of the future device in their households. So, for example, as a case you can use the case of an outdated computer system unit or an old charger that has already stopped working. Thrifty fans who like to do everything with their own hands will probably find the wires.
To start the device, it is permissible to use a switch from an electric drill. It is necessary to ensure the availability of fasteners in the form of screws, nuts, and self-tapping screws. Some components will still have to be purchased, but you should try to do it cheaper, for example, by using online stores.
The simplest option that can be used to carry out resistance spot welding for batteries with your own hands is a connection using the battery itself. To do this you will need the following:
- battery from a car or some household appliance;
- single-core copper wire;
- relay for five hundred to thousand amperes;
- switch;
- variable resistor;
- capacitor;
- stranded copper wire.
Two electrodes should be made from one wire. Their ends must be cleaned and secured together using electrical tape, having previously been aligned along the length. The ends of the improvised electrodes should be in parallel planes at a distance of a couple of millimeters.
Cables intended for charging are connected to the opposite ends of the wire using special clamps. The pre-charging cable should be connected to the battery terminals. Polarity does not matter in this case.
Spot welding for batteries begins with the fact that after installing a nickel plate on the battery, metal rods are pressed against it, acting as electrodes, which are energized and current is supplied. The metal melts at the point of contact with the surface of the battery.
When contact welding for batteries with your own hands occurs in home production, you can use other additional elements. The stranded wire is connected to the battery using special clamps. Its other ends are connected to a relay and a soldering iron tip, which acts as an electrode. The remaining relay contact must be connected to the other electrode.
If you follow this scheme, if the relay contacts close, voltage will appear in the battery. To control the relay, you will need a capacitor with significant capacity. In addition, you will need a resistor and a switch connected to each other in series.
Do-it-yourself contact welding for a battery requires that the capacitor terminal must be connected to the battery, and the switch terminal must be connected to the resistor. Do-it-yourself welding for batteries begins with placing a piece of tape or a nickel plate on the end of the battery, and pressing it with force on top with electrodes. After this, you can already operate the switch. Voltage will appear on the electrodes due to the contacts on the relay closing.
Since the electrodes are shorted through the applied plate, a short circuit current will begin to flow through this plate. This instantly causes the melting of that part of the metal that is located between the electrodes.
Do-it-yourself spot welding of batteries is done using a transformer and this is a prerequisite. The transformer will not need much power. 300-500 Watts are enough to rewind the winding.
To manufacture a device with which it will be possible to carry out spot welding, it is necessary to perform the following actions:
- cut the plexiglass for the body into pieces according to the previously drawn up drawing, and make the necessary holes in them;
- assemble a housing for the future device from these parts;
- dismantle the secondary winding in the transformer;
- wind the required number of turns on the primary winding;
- strip the free ends of the cable and solder lugs to them;
- connect the cores of the network wire to the primary winding;
- attach a plug to the power cord to connect to the network;
- fix the transformer in the housing using screws;
- install a microswitch and resistor on the side of the case;
- Drill mounting holes in the required places.
The location of the switch is important. It should be located on the left in close proximity to the ticks. To create a more advanced model with better characteristics, you should use capacitors and a thyristor. Thanks to this, the current will be supplied more impulsively, and the necessary time intervals will be maintained.
Before you start using the cables, they should be visually inspected. They must be clean. Welding can be started only after all components of the device have been inspected and tested. For convenience, the assembled device must be placed on a table or workbench.
Safety precautions for spot welding
The main thing when using spot welding machines is to comply with electrical safety rules. When operating the equipment, there should be no exposed contacts or violations of cable insulation. All contacts when connecting the device to the network must correspond to the nominal parameters; the use of automatic circuit breakers and grounding is mandatory.
When holding metals, use dielectric gloves; the handle of the pliers must be reliably insulated.
Means of protection
A standard welder's kit is quite suitable for spot welding. Thick overalls, cotton or split-leaf gloves, a transparent shield or goggles, a respirator or an exhaust hood - this is the entire set of protective equipment.
Security measures
Always check the equipment before starting work! The housing parts must be reliably grounded, the handles and holders must be insulated.
Maintenance and reconfiguration of the device is performed in the off state.
The pedal or control button should be in a convenient place.
The welder must hold the workpiece or tool firmly and stand firmly and steadily.
Welding lithium batteries
The peculiarity of lithium batteries, which are widely used in technical devices, is that they are very sensitive to overheating. The positive output is especially afraid of this. Welding of lithium batteries can be successfully done by welding nickel plates to them.
In order to weld lithium batteries at home, you need to build a fairly simple device for this. It consists of a transformer and its control system. Control should not be a matter of simply pressing a button, since human reaction does not allow it to be done quickly enough. When slowing down, there will be a burn through both the plate and the battery contact pad itself.
The device must have a regulator with the ability to set the time in milliseconds. It must have a graduation in which each interval corresponds to ten milliseconds. The limit is set to 120 milliseconds. The most optimal time setting is 30 or 40 milliseconds. It all depends on the thickness of the plate and the quality of contact between the plate and the element.
The built-in controller controls the triac, which is necessary to turn the current supply on and off. On the other side there is a controller power supply and a filter. Do-it-yourself spot welding for lithium batteries begins with plugging the device into an outlet. A plate mounted on the battery is placed under the electrodes. After pressing the button, tacking occurs instantly. Trying to tear it off will not work. To be sure, you should add a couple more points.
Welding li ion batteries can be carried out in various ways. To assemble this type of battery into a single unit, a suitable option is mini resistance welding for welding li ion batteries.
Preparing the transformer
The transformer is a key element in resistance welding. It raises the input voltage to the desired level. A device made from a large microwave oven has a transformation ratio suitable for this and a power of 700-800 W. Welding made from it produces 4 kW of voltage and can join metal sheets up to 5 mm thick.
If you have such a stove, then proceed to carefully remove the part. Step by step procedure:
- Do not use a hammer or other heavy tool. Unscrew the base of the microwave housing, remove all fasteners and carefully remove the transformer from the connector.
- The secondary winding of the device is made of thinner wire and there are relatively more turns on it. You don't need it. Remove the turns using a small hammer and chisel without damaging the primary winding. Also remove current limiting shunts, if any.
- Remove the magnetic core. If it is made by welding, then use a hacksaw or chisel to remove the secondary winding from it. Sometimes you literally have to pick it out or drill it out. This is also a very delicate operation, since it is dangerous by destroying the magnetic circuit.
- Now start winding the new secondary winding. Use a wire with a cross-section of 10 mm or more. It doesn't have to be new and whole.
- It is necessary to wind 2-3 turns onto the core (to obtain 2 V output), as in the photo. Excess length will cause an unnecessary increase in resistance.
The video will help you understand the details. You can get more current out of spot welding. To do this, you will need to install a second similar transformer, combining it with the first one in a circuit. In this procedure, it is especially important to correctly connect the terminals of the different windings of the two transformers (use a voltmeter), otherwise you will get a short circuit. After assembling the spot weld base, measure the current it produces. Remember, you cannot generate more than 2000 A at home due to wiring.
18650 batteries and their welding
The 18650 battery can rightly be called universal, used in most household appliances. It belongs to the lithium-ion type. Due to their popularity, such type of work as do-it-yourself spot welding for 18650 batteries is of great importance. The technical parameters are contained in the very name of this type of battery: the first two digits “18” indicate the diameter of the battery, and the next “65” indicate its length. Dimensions are indicated in millimeters. The last number indicates the cylindrical shape of the battery.
Depending on the chemical indicators, several types of 186560 batteries differ, but all of them can be classified as lithium-ion. Lithium-cobalt batteries have the highest capacity. Lithium-cobalt batteries cannot be used in those devices that will begin to put a heavy load on them during operation. Otherwise, they will fail in a short time, and repairs will require spot welding for 18650 batteries.
The best batteries of this type are considered to be lithium manganese. They are characterized by stable operation and long service life, therefore they are very popular among users. The safest types include lithium iron phosphate.
Their relative safety is explained by the fact that the iron phosphate cathode included in the composition is non-toxic and resistant to high temperatures. However, if the case is severely damaged, they may explode or ignite and then welding of 18650 batteries will be required, which will correct this situation.
The machine for welding 18650 batteries is not too complicated and can easily be made independently at home. In order for batteries to fail less often, they need to be properly charged, which must be carried out according to available technology. To do this, use a special charger. It can be independent or work only when connected to the mains.
It will take about three hours to charge the battery. The charging speed is affected by the current. Its optimal value is 0.5-1 Ampere. After charging is completed, the battery will automatically disconnect from the charger, which ensures that the battery does not overheat and damage it.
Welding 18650 batteries with your own hands involves going through the following steps:
- Place the battery on a flat surface.
- Place a small plate on the surface of the batteries, designed to connect several containers into one.
- After applying current to the electrodes, the plate will be welded to the battery.
DIY 18650 spot welding should be done with copper electrodes connected in parallel. This homemade spot welding for 18650 batteries is an excellent replacement for conventional soldering, which causes the cells to overheat. An instantaneous pulse discharge will connect the parts tightly, but without overheating. Using this method, it seems possible to organize the work of both construction tools such as a screwdriver and computer equipment.
Spot welding diagram for batteries:
The machine for welding 18650 batteries is easy to assemble yourself. Once assembled, a performance test should be carried out before use. This is done in the following sequence:
- Place several used batteries on a horizontal surface. In the future, you will need to connect them into one block. You can wrap them with tape to secure them.
- Place the connection plate on the top surfaces of the batteries. The plate should be positioned evenly and symmetrically.
- Press the electrodes onto the structure.
- Turn on the current and make sure welding occurs properly.
- Make several connecting points.
- Turn off the current.
- Make sure the connection is reliable by trying to break it.
If the check was successful, then you can start working.
Welding techniques: reference books and GOSTs
Welded reinforcement also has special conditions and acceptance procedures in accordance with established GOST. Technical requirements for metal welding and embedded parts are also specified according to GOST, and then they undergo some tests. The quality of welded reinforcement and embedded metal elements must comply with GOST 10922-64. This reference book is called “Reinforcement and embedded welded parts for metal structures. Technical tests and methods. This GOST also applies to embedded parts, joints of reinforced concrete structures and welded connections of reinforcement elements.
Technical requirements for spot welding of metals and reinforcement mainly come down to the following indicators. The materials used for the manufacture of welded reinforcement must necessarily comply with the currently valid GOSTs, as well as technical specifications. Also, welding work is carried out strictly according to working drawings, which were approved in the prescribed manner.
Another requirement that is indicated in all reference books is the permissible deviation in the dimensions of welding fittings. Deviations in the cell sizes of mesh rods that have a diameter of up to 10 millimeters should not exceed “+ -” 10 millimeters.
The distance between the clamps (transverse rods) of the frames and between the flat elements of the parts of spatial reinforcement products, as well as the parameters of the mesh cells made of rods with a diameter of more than 10 millimeters should not be 10% larger than the design dimensions. The distance between the spatial frames and the rods of the flat frames should not exceed the design by more than 0.5 of the nominal diameter (but not more than 15 millimeters). For rods of different diameters, the tolerance is determined by the rod of small diameter.
Converting a screwdriver to lithium batteries
A screwdriver is one of the most popular construction tools. Over time, the cadmium batteries in it may begin to wear out. Even fully charging them doesn't help. To give the screwdriver a second life, you should switch it to lithium batteries, welding the batteries into a battery. A spot welding diagram for screwdriver batteries will help you do this quickly and efficiently.
The first step is to disassemble the screwdriver battery and remove the old cans from it. Only the terminal part is useful. You will also need a board designed for three batteries. It is advisable to choose batteries with a large capacity. You can solder with plates removed from the screwdriver battery.
The maximum power must be set. After acid treatment, you can turn on the soldering iron. The surfaces must be tinned using a soldering iron. Then attach the plate and solder it to the surface of the batteries at maximum speed.
Spot Welding Components
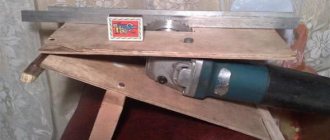
The pedal for the welding machine is used to make this process easier. Such small devices are commercially available, but you can also make them yourself from scrap materials. To do this, you will need two wooden planks connected to each other by a movable mechanism.
If it is strongly recommended to use the transformer after removing it from the old microwave, then you will inevitably have to spend money on purchasing some elements. In order not to bother too much, you can purchase the entire set at once. Fully assembled kits are available. This, of course, makes the work easier, but it introduces additional costs and deprives the joy of creativity. A compact controller can be purchased separately. The trick is the presence of a display. There are also boards with a display. They will not cause heavy consumption, but will provide convenience when carrying out contact welding.
Instead of wasting time on sharpening metal rods that will later play the role of electrodes, you can purchase ready-made ones. They are already sharpened copper rods that will be clamped in holders. Usually a set contains ten pieces. As they wear out, they can be replaced, so the number of sharpened copper rods offered in the kit will not be excessive.
You can purchase a coil of nickel plates for spot welding batteries. An interesting point is the presence of slots in the tape. There is an option when the tape is sold in already chopped pieces. The amount of current when spot welding batteries will require the selection of plates of a certain thickness.
If you don’t have any old microwaves that have failed and you don’t want to disassemble the ones that are still in good working order, you can purchase a new transformer. At the very least, this will guarantee better performance of a homemade battery welding machine. There is also a complete set of necessary elements that only need to be assembled into a single whole.