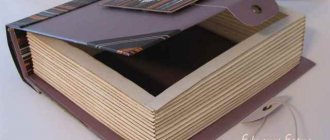
Preparing a book block.
The book block is all the pages of the book that we will bind into a leather cover. I will tell you more about preparing a book block in another master class, but briefly the gist is this:
Removing the old cover:
Remove any remaining paper from the spine:
We prepare paper endpapers and fold them in half along the grain.
I glue the endpapers to the book block with PVA glue. I apply glue to a strip 6mm wide.
I add captal to both sides of the book block and reinforce the spine with binding fabric.
You now have a book block with endpapers in your hands, ready to be bound.
How to make a book or manual
In today's realities, gadgets are rapidly replacing the regular book, because it is so convenient to keep many of your favorite publications or an entire library for learning in a small device - an e-book.
An e-reader, tablet, or smartphone greatly simplifies life, for example, for a schoolchild, when primary school students do not need to carry a heavy backpack that looks larger than the child himself.
At first glance, the advantages of electronic devices are obvious and indisputable, but books and paper publications continue to live today. A banal ordinary book is more pleasant to read, tactile sensations, paper, printing, some people like the smell of a new book, newspaper, magazine.
Methodological publications and reference books, where you can take notes or complete some tasks. It is possible to make such corrections in an e-book, but in my opinion it is not convenient.
But we will return to the topic of publication - making a book at home.
First, let’s decide why print and waste time on something when you can buy it, moreover, cheaper and of better quality.
We have to print two materials, the first is a small collection on Physics, which is simply impossible to buy from us, because... This is a publication from another country.
The second one is actually a book in terms of the number of pages, but I published it by accident, after publishing a collection on Physics. I didn’t look at the number of sheets and just sent everything to print, so don’t throw it away :)
In my opinion, it is better to use newsprint; it is thinner than regular office paper, making it easier to leaf through and the thickness of the book will be slightly smaller, and it also has a pleasant yellow color for reading.
I myself will print on regular office paper, because... I was unable to quickly find newsprint nearby.
The printing will be in color on a Canon Pixma inkjet printer with a CISS installation, which makes the cost of printing itself very cheap.
To print this or that book, you need to understand how we will stitch it. For the manual, we use the booklet option, where the program will distribute two pages of the source on a sheet on each side and in such an order that a stack of papers can be folded in half and stapled together.
In regular Adobe Acrobat Reader there is such an option when printing - Booklet
Print a booklet from Adobe Acrobat Reader
To control the result, you can print not all at once, but in batches; for this we indicate which sheets to print. I made batches of 10 sheets.
For example, here we will print sheets 5 and 6 of our directory, and these are specific 8 pages from the publication in total, they can be seen in the preview at the bottom right
Printing a Specific Sheet
The first side of the sheet is printed
The first side of the manual
The first side of the manual
Printing takes place in two stages, first one side is printed, after which the program explains how to turn the paper over correctly so as to print the second side of the booklet, for each printer the scheme may differ depending on the printing principle
How to turn paper over correctly
Accordingly, you just need to take out the printed one and put it in the loading tray with the white side facing you
Positioning the paper for printing on the second side
Positioning the paper for printing on the second side
After printing on both sides, be sure to check the sequence of pages; it will be excruciatingly painful if after assembly it turns out that the sorting was incorrect.
Checking the sorting
I make the cover from not very thick cardboard and print the first sheet on it.
Cover on white cardboard
To get a beautiful, glossy cover, it is better to laminate it at a copy center, but I just stuck on self-adhesive book stickers. It turned out not very aesthetically pleasing, but it was cheap, reliable and practical(c)
Apply self-adhesive tape to the front of the directory
Apply self-adhesive tape to the front of the directory
Using a ruler, mark the middle of the top sheet
Mark the middle of the sheet
Or just bend it in half
Fold the sheet in half
We collect all the sheets in the correct order, align them and secure them with office clips
We fix the sheets with clamps
We punch holes with an awl depending on the size of our staples
Punch holes with an awl
We insert the staples and bend them so that the bend is beautiful and hold the staple in the right place with a knife
Bend the brackets
Staples are bent
If there are no staples, you can use a thread and sew with a snake first in one direction, then in the other along the same holes, but using staples is faster and easier.
Holding the center of the sheet with a ruler, bend the entire manual in half
Fold the manual in half
If necessary, cut off the resulting “house” at the edges with a stationery knife. Be sure to use a new blade or break off the used one
Trim the edge of the notebook
Now we fix the binding using the same clamps and leave it for several days so that the resulting booklet compacts and does not open on its own.
We fix the binding with clamps
Result of directory printing
Now for the second product, which is really close to the book. Here it is no longer possible to perform firmware like a notebook or booklet and fasten it with staples. Yes, it was possible to make several notebooks and sew them together, but it would be difficult to do any beautiful trimming of the edges at home, and the whole process of making notebooks first with stitching with thread, and then with “laces” together is quite a labor-intensive task.
We print the book as a booklet and now cut it in half, we can already see that the paper is folded on the side of the binding, there was no time to do the stitching, but I had to use it and I fastened the sheets with clips
A4 sheets cut in half
We straighten the sheets and compress them with two planes, and fix them with a clamp, or with a vice and an auto-clamp like I did
Fixing the sheets
If there is nothing to fix it with, then simply press it down with something heavy, although it will be more difficult to work
We make cuts with a regular hacksaw blade; by the way, tightly compressed paper is quite difficult to saw
Making cuts with a blade
To make the binding we use the following set: PVA glue, thread, water, some paper from the kitchen, gauze.
Let me note right away that the goal is not to make a beautiful book with a cover, endpaper and other beauty, it is possible, but it takes a lot of time, but here the goal is simply to sew it together.
Material for making binding
We dilute the glue with water based on the thickness of the PVA glue itself, it should not be very thick, but it should not be watery either.
Diluting PVA glue
We soak the threads with glue, insert them into the cuts and soak them with glue again
Insert and glue the threads
We blot the future binding generously, but without fanaticism.
Blot the binding
We cut the gauze along the length of the binding and the paper, although I couldn’t glue the paper :)
Cut off the gauze and paper
Now we lay the gauze and soak it in several layers on a wet one, with pauses of 5-10 minutes between layers
Glue the gauze
I wanted to decorate the binding with wrapping paper, but the glue made it warp, so I used the paper as a way to press the gauze to the paper and removed it after
Wrong paper
Now we leave it to dry for several hours, or better yet, forget about the book for a day.
Ready binding
Preparing the skin.
First, you need to get a couple of pieces of vegetable tanned leather. The pieces should be rectangular in shape and slightly larger than a book block.
Then find an embossing design on the Internet or draw it yourself. I search for drawings on Google, most often among tattoo designs. I download them to the computer and adjust them to the size of the future binding. Please note that part of the top cover on the spine side is free from the design by about 2cm. We will subsequently cover this strip with a leather binding strip. Accordingly, there is no need to apply embossing there.
What size should the leather be? Very good question. I have included all sizes in the picture below.