With the advent of thermal guns, permanent connections of plastic or wood became much easier to produce. Nowadays, glue guns are very popular both for repair and for decorative purposes - many interesting crafts are made from colored silicone glue. The main disadvantage of this device is its fragility. Usually, budget models of heat guns quickly break down, and constantly buying new ones is just a waste of money.
You can easily make a glue gun yourself. On the Internet you can find many different variations of homemade glue guns. Some craftsmen make a heat gun with heating from a household lighter. Still, it is better to use a safer and more practical method using an electric soldering iron. This glue gun does not have an open flame and does not need to be constantly refilled. And best of all, it can be done in just a few minutes.
Hot melt earrings
No matter how dismissively and even a little condescendingly we treat the idea of using hot-melt glue for purposes that are in no way related to its direct purpose, no matter how sarcastic we are about this in the comments to such collections, let’s be frank: it happens that certain ideas are recalled it’s very, very strong inside, which means you need to buy sticks for a glue gun and you need to create!
How to make earrings using hot melt glue - master class from fourfrontdoors
Hot glue button
Every person sometimes suddenly needs something that is not in the house. What if you lost a button and there are no more fasteners? This problem can be easily fixed with a heat gun. Create a beautiful glue button that can be used to decorate a child’s outfit before the next matinee. To do this, prepare:
- glue gun;
- glitter (sparkles) of any color – 1 jar;
- toothpick – 1 pc.
The manufacturing process is simple and consists of only four steps.
- Scatter the glitter onto a cutting board, then use a plastic drink lid to gather it into a circle.
- Heat the glue in the gun and fill the glitter circle with it.
- While the craft is still wet, sprinkle a small amount of glitter on top of the glue.
- After the glue mixture has dried, take a toothpick or gypsy needle and poke holes in the button. Your button is ready.
Candlestick decor made from hot melt adhesive
Ideas on how to use hot melt glue can be liked or not, make you want to joke and troll the authors, or are a source of inspiration and delight. None of this matters. The only thing that matters is whether you like the end result, whether you want to admire what happened in the end, whether you will use the product or thing. Take a look at this candlestick, imagine it at home - and it will immediately become clear that you should pick up a heat gun and start creating!
In the same way, by the way, you can decorate not only a candlestick, but also vases, cups and any other household items.
How to make a candlestick using hot melt glue - master class from Curbly
How to do it yourself?
You can make such a device in just a few minutes, and the benefits from it will be greater than from most heat guns that can be found on sale.
The first thing you need to do is cut off the bottom and neck of a metal drink can, and also cut the resulting cylinder lengthwise. The result should be a small sheet of metal. It needs to be twisted into a cone so that the narrow hole has a diameter of about 2 - 3 mm. This will be the nozzle of the heat gun. On the other hand, you need to trim the base of the cone with scissors. The main part is completed.
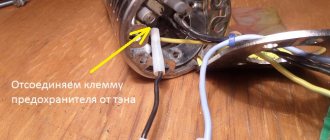
Next, you need to place a cone on the soldering iron tip so that the rod fits between the layers of the nozzle wall. And for more reliable fixation, steel wire is used. You need to make an eye from one end of the wire.
To do this, you can wrap it in one turn around the shaft of a thick screwdriver and twist the eyelet. Now the eye needs to be put on from the narrow part of the cone, and the other part of the wire must be twisted around the bolt on the pin, which secures the copper tip.
The glue gun is ready. Having turned on the soldering iron to the mains and warmed it up enough, you can insert a silicone rod inside the base of the nozzle, and you can start gluing materials. The disadvantage of such a tool is that if you are careless, you can accidentally burn your fingers with a hot soldering iron, because the rod will have to be pressed into the base of the cone yourself, without a special device. For decorative purposes, such a lotion is unlikely to be suitable. But if a glue gun is needed only for periodic repair work, then it is not necessary to buy it at all - it is better to make it yourself.
Texture beads of hot melt adhesive
Do you like to bake unusual cookies? Do you like creating mastic cakes? Do you love experimenting with homemade paper and decorating it with all kinds of prints? Do you enjoy experimenting with interior design, decorating furniture, walls, floors and any other surfaces yourself? In all of these cases and many others, you simply need a personal collection of texture rolls!
How to make texture rollers using hot glue - master class from Potteryblog
Hot glue bracelet
For an adorable hot melt glue bracelet, making glue is quick and easy. This craft will not leave your daughter indifferent and will be a wonderful gift even for an adult girl. Prepare:
- empty tin for drink;
- hot glue;
- materials for decoration - stones, sequins, sparkles, bouillons, rhinestones, beads, liquid pearls to choose from.
Follow the complete manufacturing instructions to ensure the craft is a success. First, heat the glue in the gun. Lubricate the surface of the jar with sunflower oil to prevent the glue from sticking, then apply several horizontal rings parallel to each other. Don't overdo it: the number of strips and the gap between them determine the width of the finished product. Use a heat gun to fasten the horizontal rings together by drawing vertical or zigzag lines, and additionally wrap a colored thread around the can. While the craft is still warm, decorate it with the prepared decorations. You can also use a can of spray paint to give your decoration the color you want.
When the work is finished, wait until the glue cools and hardens, then very carefully remove the craft from the container. This product will take one of the first places in the list of your best crafts.
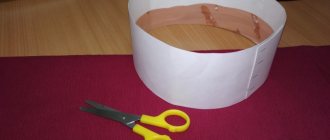
Hot melt crown
For some reason, there is a widespread stereotype that a child’s crown is a winter decoration. Probably, it is carefully distributed by those who do not have girls at home, because the happy owners of daughters, nieces, and granddaughters know very well: a real queen girl always needs a crown, without a lunch break, without weekends and holidays! In general, experiments with hot glue are a good reason to create a couple more crowns, what do you think?
How to make a crown using hot glue - master class from Tikkido
Hot glue snowflakes
Do you want to give your home interior a fabulous atmosphere? Create decorations for the holiday, original hanging decorations for furniture and doorways of your home yourself. Crystals, bunnies, Christmas trees and other New Year's crafts made from hot glue will be one of a kind, and if you involve a child in the process, their making will turn into an exciting game.
To make snowflakes from hot glue, you will need:
- pencil with soft lead – 1 pc.;
- electric glue gun;
- metal tweezers – 1 pc.;
- wax paper - 2-3 sheets;
- nail polishes – 3-4 jars of different colors;
- cosmetic sparkles (glitter) – quantity to choose from.
Let's start making crafts. Start by laying a sturdy wax-soaked sheet on the table. Foil and cardboard will not work - under the influence of the high temperature of the glue, they will firmly stick to the work surface and ruin it. Below are seven templates for your convenience.
Tip: the working surface can be replaced with heat-resistant baking parchment.
Transfer the depicted figures with a pencil from the drawing to the sheet or use your own stencils. Then grease with sunflower oil, this will make it easier to remove the crafts. To make glue, just heat the rod in the gun. Draw patterns, clearly following the lines. Some of the decorations can be painted with paint and nail polish. To do this, wait until the glue has cooled and then paint the figures to your taste.
To decorate the rest of the figures, sprinkle glitter on a piece of paper. Don't let them cool completely or the glitter won't stick. Next, take each figure with tweezers and carefully roll it in grains of sand on both sides.
Tip: if you haven’t had time to decorate your crafts with sparkles, grease them with PVA glue and cover them with glitter.
To make a hanging decoration, string the toys on craft thread or lurex cord. In addition, by gluing crafts to threads and tying them to a hoop or other ring, you can make a round garland (mobile). This craft will be great fun for children and a unique gift for a loved one.
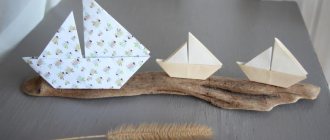
Hot glue corals
Good news: from now on, in order to decorate your own home with beautiful decorative corals, you don’t have to go to Egypt, buy them there for a lot of money, and then export them illegally from the country, risking considerable fines. Now all you have to do is arm yourself with a glue gun and use your imagination a little - and then, believe me, absolutely amazing, whimsical corals will appear in your home that will surprise and delight everyone.
How to make decorative corals using hot melt glue - master class from Оhohdeco
Required materials and tools
Since the process of assembling the device itself takes place “on the knee,” to make a hot glue gun from a soldering iron you will need a minimum of materials and tools.
For a homemade glue gun you will need:
- The simplest soldering iron, preferably with a tip about 25 mm long;
- Metal drink can, any size;
- Current steel wire;
- Scissors;
- Silicone glue stick.