Boats made using origami technique
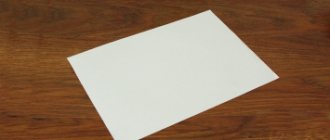
To create a boat you will need special origami paper, which can be purchased at craft supply stores. But for simple models, you can use ordinary A4 office paper or single-sided colored paper (in this case, it is easier to explain to your child how to work with the front and back sides of the workpiece).
Coated paper taken from an old magazine will make the boat a little more durable in the water. And if you dip the finished craft in molten paraffin, the boat will become waterproof, almost like a real one. In addition, you need to stock up on a ruler or pencil to iron out fold lines and sit in a well-lit place.
You can start creating a paper fleet.
Making yard and gaff
As with making masts, all the holes required for each yard must be drilled before you begin making them. Using drawings and diagrams, carefully mark the position of each block or pulley. Make sure that all the holes you drill are on the same straight line and, most importantly, parallel to each other, since in the future the different angle of inclination between the blocks will be very noticeable.
Gaff fastening. Beyfoot is clearly visible
Blocks can be secured to yards and masts simply by tying the "tail" of the block around them. However, due to the very large number of these blocks, a small model may look 'crowded'.
Gaff. Pay attention to the fastening of the threads.
Interesting options for homemade boats
Simple boat
Children as young as 3-4 years old can make a simple boat. A square sheet of paper is folded diagonally, then again. Approximately in the middle of the bottom line of the resulting triangle, mark a reference point. A small triangle is folded upward from this point, carefully smoothing out the folds. Mark the approximate line of the side, bend and turn out the sides on both sides. If the boat is made from plain paper, you can color it with pencils or felt-tip pens.
Classic boat
The classic look is familiar to many from childhood. The rectangular sheet must be folded in half and the middle marked on the fold. Fold the sides towards the middle. The rectangular part from below is bent upward, the workpiece is turned over, and the action is repeated.
The corners formed on the sides are inserted into the base of the workpiece on both sides - first the upper ones, then the lower ones. If you need a paper headdress, then you can stop at this stage. But if you do make a boat, then you need to straighten the workpiece in the shape of a square, connecting the opposite corners, and turn the lower corner of the top layer up, then turn it over and repeat. Straighten the workpiece again and fold it into a square. Gently pull the top corners to the sides.
Simple sailboat
A sailboat can be made from a square sheet that is folded in half horizontally and vertically. The top and bottom of the workpiece are bent towards the middle. Next, the side parts are bent towards it. The upper corner on the right side must be straightened, smoothing its lower diagonal fold. Straighten the remaining corners in the same way. Next you need to pull the halves of the workpiece - the right one towards you, the left one away from you. Turn the protruding lower corner to the right. Use a drop of glue to connect the sides in the bow.
Colored sailboat
The colored sailboat is made from blue and white single-sided paper. The square sheet is folded in half horizontally and vertically. The workpiece is turned over on the other side and folded diagonally. On the white side, two opposite corners are bent towards the center.
To form the sails, you need to bend the workpiece so that you get a white triangle on top, located vertically. Repeat on the other side. To reduce one of the sails, you need to bend it down and then up again, leaving a small fold that is tucked inside. The lower part of the sailboat is bent to the reverse side, and from the front side the craft looks like a blue boat with white sails.
Twin-pipe steamer
This steamer is made up of a square. Bend the sheet diagonally to mark the center point. All four corners bend towards the center. The workpiece is turned over and the action is repeated. The craft is turned over again, and the corners are again bent towards the center. There are pockets in the corners of the workpiece, two of which, in opposite corners, must be opened. The unopened corners are stretched, and the result is a toy that will not only look good on a flat surface, but also behave quite steadily on the water.
Boat
The boat has a more complex design; school-age children can handle it. A square sheet of paper is folded diagonally, marking the center of the workpiece. The top and bottom lines are folded towards the center to form a rectangle.
All four corners of the workpiece are bent towards the middle. Next, the two upper and two lower corners are folded towards the middle (do not forget to properly iron the folds with your fingers or a ruler). The upper and lower corners of the resulting diamond are brought to the center of the workpiece, the model is turned inside out and takes its place in the paper flotilla.
There are still many options for making boats using the origami technique. Motor ships, catamarans, motor boats, cutters, junks - for children who are interested in mastering origami, you can select increasingly complex patterns with step-by-step instructions. The main thing is that the process of creating a new toy brings pleasure to the child.
Ship made of clay
Clay ships
You might think that a ship made of clay is nonsense. In fact, even in reality there are floating landing stages made of reinforced concrete (hollow, of course). Well, the model with a clay body is a very simple and visual thing to make. Last week we made the clay part - the body. Moreover, I paid special attention to the smoothness of the contours of the body. It was necessary to smooth the sides symmetrically with both hands from bow to stern, feeling like water flowing around the ship. Today we took up the masts and sails. There are no surprises here - bamboo sticks (skewers) and paper. True, for greater realism they made yards (horizontal sticks).
Here is one of the flagships:
I left the whole flotilla that had accumulated in our port by the end of the hour in my blog so as not to produce more photos. Here.
Hello masters and craftswomen. I created this blog at the request of the girls, so I called it mini MK, most likely these are some explanations of the sizes, and I want to talk about some details of the process of making ships and sails. Yes, there is a lot of MK on the Internet and I have already written to the girls about this before (maybe someone will say that there is nothing new here.), but they ask questions and it is not difficult for me to share the answers with you.
Using this template, I cut out a shape from polystyrene foam, before the ships were much “potbellied” (which didn’t make me very happy) - they turned out to be “inflated” because in all my ships, or rather, there was a gift hidden inside (you know what))))) . Over time, I changed the template and made it a little narrower. I hope you can figure out the sizes
This is what the bottom of the ship looks like. I pick out the hole with a knife, then with a joint or a cutter (these are small knives for wood carving). Of course this work is the most dreary.
The photo shows 2 parts 4 cm thick glued together, then I cut out the top part-lid using the template. Then I bring the workpiece to the desired shape, I showed with a dotted line that you can cut the foam at this angle, but just don’t overdo it, because. you can make a hole))) (this is if you make a ship with “filling” as in my case. Then we sand it with a coarse sandpaper (I do this over the bathtub, I collect large waste and throw it away, and I simply wash off the small ones with water, and there is practically no dust) Then I level it with a fine sandpaper. The ship takes on a symmetrical shape and becomes even.
I’ll say right away that the photos will be from different manufacturing processes of my ships. This is an example of what glued blanks look like, which we will further bring to mind. The height of the base of the ship is 12cm.
Ships in other techniques
A cute toy in bright summer colors can be made from multi-colored cardboard. For the frame, you need to cut out two blue strips, divide them into three parts and bend them in these places. Glue the ends of the strips together to form the bow and stern. A part of the deck is cut out of blue cardboard in the form of a rectangle, the edges of which are bent and glued between the strips of the frame.
From yellow paper you need to cut out two rectangles of different sizes for the sails, make small holes in them and insert a wooden skewer-mast through them. Next, make a hole in the deck and insert the mast there. Cut out a waving flag from red paper and glue it to the mast. Portholes and other details can be completed with a felt-tip pen, and toy figures of sailors or pirates can be placed on the deck.
Also, many ideas for paper boats can be implemented in applications, using as a model, for example, the ancient oriental puzzle “Tangram” or various mosaic patterns.
Children can learn a variety of ways to create toy boats. Today there is no shortage of training materials, diagrams and instructions. And the attention of adults to this activity will make it even more exciting.
Parts identification
Using the dimensions given in the instructions and referring to the drawings, identifies all yards, gaffs and topmasts required for a particular mast. Cut the pieces to the required length and fold them together with the required mast. In the same way, collect all additional parts, such as topsails, salings, various blocks, etc., that relate to this mast. Use a clear plastic bag to keep all the pieces together. You can sign each of these bags. Repeat this step for all masts and bowsprit.