Have you ever tried working with salt dough? Try it, it's a very exciting activity. And the dough is not difficult to make, all you need is flour, salt and water (although there are several ways to make salt dough). From salt dough
you can make funny
toys
, all kinds of
souvenirs
, table decorations, wall panels. will give your home warmth and special comfort.
Friends, we already know the talented girl Tatyana Belova, she has already shared with us her master class on how to make a flower pot in the shape of a turtle. Now let's get acquainted with another of her works, this one.
That's what a funny dog Tatyana turned out to be. She told how she made it.
First we make a blank from foil.
Take the salt dough and roll it out into a not very thin layer.
Now we need to wrap our dough around our dough.
For the nose and eyebrows, add more dough.
The dog's mouth will be open, so we need to make a hole in the dough and form a mouth. Select the nose.
Use a stack to draw the details of the face: eyebrows, eyes (here they are closed on the dog)
We make folds along the body of the dog.
Now we need to make the ears. Roll out a small piece of dough and cut out oval ears from it.
We form the front legs of our dog, make toes and marigolds.
Let's work with the hind legs and give them the desired shape.
Now let's take care of the tail. Let's make a small sausage out of the dough and roll it out so that one end becomes thinner.
We stick the tail to the desired place and make a small fold near it. Drying our salt dough craft
.
The small salt dough dog discussed in this master class is ideal for making your own refrigerator magnet.
The charming pug has reliefs only on the front side, and the back is flat. This technique simplifies the work and speeds up drying. A funny puppy can also be used for a panel, postcard, tableware decoration or other souvenir decoration. Don’t be afraid of difficulties - step-by-step photos and detailed descriptions of all steps are designed for beginner needlewomen.
Preparation of material for modeling
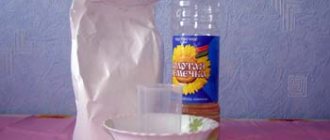
To prepare salt dough for sculpting a dog figurine you will need:
- flour,
- salt,
- PVA glue,
- water.
It is best to take fine and clean salt; if you don’t have one on hand, you need to sift it through a sieve.
- Mix 200 g flour, 200 g salt and 2 tbsp in a bowl. l. PVA glue. Glue is an optional ingredient, but it will make the material stronger
. - Mix everything and pour in 125 ml of water in small portions; the flour may take a little less or a little more liquid.
- Knead the dough to a consistency similar to plasticine.
- Immediately place the mixture in a bag or wrap it in cling film; due to contact with air, it will weather and dry out.
Learn more about how to work with testoplasty dedicated to this hobby. See also how to make the original one. Such gifts look much more expensive than they cost.
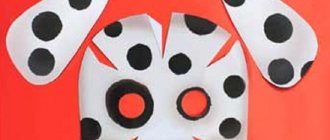
Print the one provided or prepare your own sketch.
Please keep in mind that there should be no fine details
, which may break off in the finished product. Choose the size according to your taste. Using this master class you can make not only a magnet, but also a beautiful panel.
Now proceed directly to sculpting a dog from salt dough with your own hands. Each time you sculpt a separate part, pinch off a piece of the required size, and hide the rest in a bag and close it so that there is no access to air.
Take a sketch, cut a rectangle from baking paper or tracing paper, slightly larger in size. Attach the tracing paper directly to the drawing using masking tape or any adhesive tape. Be careful that the drawing does not move.
Now place a piece of dough on tracing paper and roll it out to about 5-7 mm thick. Try to roll out so that the entire outline of the pattern fits under the cake, but not with too much margin.
Start forming the outline. Using your fingers and available tools (stacks, toothpicks, etc.), carefully form the outline of the workpiece. Slightly lift the edge of the transparent paper and see where the outline of the image passes. Trim off any excess and carefully smooth the uneven edges with your fingers moistened with water.
When finished, peel off the paper and compare the sketch with the tracing paper blank - you may need to make adjustments.
Slide the tracing paper with the dough up and mark where the dog's paws, folds and belly go.
Make fairly deep grooves along these lines; if the edge of the groove crumbles, smooth the edges with water. Don't use a lot of water
, otherwise the product will begin to blur. Just a drop is enough.
Now form the dog's belly from the salt dough. Below the already marked tummy fold, lightly press down without touching the paws. This will give the dog visual volume.
Make a small cake and apply it to your belly. This will be the pug's bulging belly.
While moistening the tool, gently smooth the cake on all sides. From above so that the border is not visible.
From below so that the tummy becomes round and thicker.
Start decorating the dog's head. Transfer the sketch onto tracing paper with a pencil. To prevent the image from moving, you can re-secure the paper with adhesive tape at the corners.
Place the tracing paper with the image so that the contours of the dog and the salt dough blanks match. Using a needle, transfer the image to the layer in parts: along the contour, pierce part of the picture with a sharp end along with the dough. Raise the tracing paper and draw the resulting stack. Do not try to prick the entire silhouette with a needle at once, because the mass will blur and you will not see where you marked the lines.
Work out the lines of the puppy's muzzle well, but do not deepen them as much as the paws and abdomen.
Lightly wet a cotton swab with water and go over all the grooves you just marked. Smooth the uneven edges without affecting the lines themselves.
Roll a small ball out of it - it will be a ladybug on the dog's nose. Wet the joint with water using a cotton swab and stick the ball.
Sculpt ear blanks according to the sketch, carefully forming their outline. Make the ends pointed and slightly upturned.
Moisten the junction of the salt dough dog's ears with the body with a cotton swab.
Press the ears onto the wetted area.
Use a damp cotton swab to smooth out all the joints and edges, otherwise the ears may fall off.
Sculpt the puppy's toes in exactly the same way. Don't forget to iron the joints.
When all the details of the dog for the magnet are ready, carefully examine all the lines, joints, outline, and, if adjustments are needed, make them at this stage.
Place the pug on a flat surface and leave to dry. It is best to keep the product at room temperature
, in a dry and warm place, then it will dry evenly and will not change shape. Drying usually takes at least a day.
If you are in a hurry to make a gift or New Year's dog from salt dough, you can dry the craft in the oven with the door open and a temperature of about 60 degrees
. Stay close to the oven and monitor the drying process! A dog made with such difficulty with your own hands can bend or even burn.
When the pug dries, it will change color from yellowish to white, the salt crystals will begin to shine, and the product will become uniformly hard.
It's time to color the pug and breathe life into it. For this, as for decorating a fish, it is better to use acrylic paints or gouache. Don't use watercolor
, painting with watercolors requires a lot of water, and water can harm the craft.
This master class uses gold gouache; it makes the finished dog look more interesting.
Start with a light beige shade. Mix white gouache, add a little brown and, if desired, gold or yellow.
Paint the entire salt dough pug with this shade, except for the ears and face.
Using a darker beige shade, go over the folds and places where there should be shadows, between the dog's toes.
Use brown with the addition of yellow and gold to color the pug's face.
Paint the ears with the darkest brown shade, and use the same color to enhance the shadows on the face.
Lightly brush the gold paint over all the folds. The dog will immediately become brighter and more interesting!
Paint the nose and tips of the ears black on the salt dough magnet dog figurine.
White are the eyes and belly of the dog.
Toes and feet – pink.
Now color the irises and the ladybug.
Add small gold accents to your dog's nose.
Let the paints dry.
Add white highlights to the eyes, nose and ladybug.
You can cover your homemade pug with varnish, acrylic or regular clear nail polish. After final drying, glue the magnet to the wrong side. Don't be afraid to include your ideas in your work to make it unique and original.
Anna Bikeshkina, photo of the author of the master class, shared the secrets of how to make a dog from salt dough - the symbol of 2018 - with readers of the Women's Hobbies website.
– this is a popular area of home creativity, because before the holidays you really want to prepare at least small memorable gifts for all your friends, colleagues and relatives. It is unlikely that you will be able to buy so many ready-made gifts - not every budget can support such expenses. But home creativity allows you to make many pleasant surprises with minimal financial investment.
Today, craft stores offer a wide selection of materials - you can buy sets of polymer clay, blanks for scrapbooking, Christmas tree decorations and cards, templates for embroidery or painting. However, you can make unusual toys for the New Year from scrap materials - to do this, it is enough to master the technique of testoplasty or bioceramics. This line of creativity is truly exciting and, what’s nice, requires virtually no additional financial costs.
Salt dough figurines look great and last indefinitely
All you need is to make a special salted dough, from which you can mold whatever your heart desires! The working material has another important quality - it is completely harmless, so feel free to involve children in creativity and make unusual gifts for grandparents, prepare for New Year's exhibitions in kindergarten, engage in joint production, etc. And we will tell you how to make a dog from salt dough for the New Year 2020.
Step-by-step instructions for making dough crafts for beginners
Now that you know how to prepare material for creativity, it’s time to begin the sculpting process itself. Let's start with the simplest. I will show you step by step how you can easily and quickly make a beautiful thing. We will sculpt a cute bear.
We will need:
- Flour;
- Salt;
- Water;
- Cup;
- Acrylic paints or gouache;
- Brush.
Manufacturing process:
1. First, knead the dough: mix half a glass of flour and half a glass of salt, add a little water and mix everything well. Next, wait 2 hours, during which time the dough sits in the refrigerator.
2. Now we start sculpting the figure: we make one medium-sized ball for the head, a larger one for the body and 7 smaller ovals for the paws, ears and nose. We connect everything together. Then we put the product in the oven and dry it for an hour. After drying, take out the craft and cool it.
Advice!! Cover the finished souvenir with varnish. This will make the craft brighter and more practical!!
Thus, the step-by-step instructions for sculpting products from salt dough are as follows:
- knead the dough;
- we sculpt the necessary elements and connect them together;
- dry the work in the oven;
- paint and wait for it to dry.
And remember that the main sculpting techniques are balls and sausages.