Modeling a cymbidium orchid from polymer clay
Today I sat down to work early in the morning and just finished. I tried to show you everything in as much detail as possible, but I will be happy to answer any questions. Friends, I will repeat that I did a master class on exactly how I sculpt an orchid. Perhaps I’m doing something not quite right and I’ll be glad if experienced professionals give advice! I also want to express my deep gratitude to my husband for helping me film everything. I will be glad if you later show me what flowers you managed to make with my help! And later I’ll conduct a survey on how useful my photos were. When copying materials, a link to the original source is required.
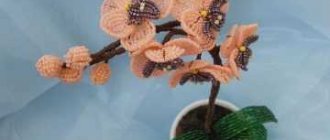
To begin with, a photo of a living flower, which I dissected a long time ago to make my very first cymbidium.
This was the result!
Now I propose to make an orchid like this!
This is a photo of a living flower
Basic materials needed for sculpting.
Mix the color of the clay. Add a little yellow and even less ocher.
Roll out the clay using a pasta machine to thickness No. 6.
The rolling thickness may vary on different machines. We need the petals to be dense after drying, like those of a living flower.
Be sure to thin the edges along the entire perimeter of the petals (visible in the light).
After we take the petals out of the film, we need to let them dry a little, literally less than a minute, then carefully place them on the mold. (The mold can be pre-lubricated with baby oil to prevent the flower part from sticking).
Then we roll out the edges a little, making them thinner and more wavy.
The tip of the petal can be made sharper by pinching it and using your fingers to shape it into the desired shape.
Now let's start forming the orchid's lip. The edges of the part also need to be rolled out and thinned.
In the places indicated by the stack, I roll out the clay a little, moving the stack left and right to form a fold on the front side of the lip. Afterwards we leave the part to dry a little.
Then, carefully, so as not to tear the clay, we twist it onto a stack, as shown in the photo below.
Forming the orchid's lip. Round the edges with a stack of balls from the edges to the center. We do this with light pressure on the dried part. Using a stack with a small ball, we make a small bend on the back side of the part. This way the lip will take the correct shape.
Using a stack with a large ball, we shape the petals so that they are not flat. Roll the stack along the edges with slight pressure. The petal should not be sticky at this moment; it must first be dried. But, most importantly, do not overdo it, otherwise the clay will crack, turn white and break.
To ensure that the lip holds its shape better and does not break, we glue the wire on the back side with super glue, having first bent it to the desired shape. In this case, wire No. 22. But I think it could be thinner. After tinting, the wire on the front side will not be visible at all.
The desired shape has been achieved. Let the part dry.
Next, we begin to sculpt the orchid column. I use a special form. It is important that before starting work the mold is clean, without any remnants of old clay. Before placing the clay in it, grease the mold with baby oil. This will prevent the clay from sticking and will make it easier for you to remove the part from it.
We roll the sausage a little longer than the mold and carefully place it inside, carefully distributing the clay so that there are no voids and the texture is imprinted well.
Using a stack with a ball (I don’t have the right size, so I use the opposite end of a cat’s paw stack), we make a depression in the column. Don't keep the part in the mold for too long, otherwise you will have a hard time shaping it later. It is better to grease the mold more thoroughly with oil.
We finalize the column and give it the desired shape. After we take the part out of the mold, we must make sure to correct it. First you need to make “sides”, like a living flower. We give the desired shape with our fingers, very carefully so as not to tear the clay.
Use a stack to adjust the shape of the spout on the column. Look at as many pictures as possible on the Internet, or better yet, study a living flower to understand what this element looks like.
I sculpt the inner element of the orchid's lip by hand, without using special tools. We make a small sausage. Then use a stack knife to make a depression, after which we roll out the stack and thin the edges, as shown in the photo. The part should resemble the shape of a checkmark.
After drying, glue the inner part with super glue. We reinforce the orchid column with wire No. 22. This way we can give the part the desired bend, and we will also need this wire when assembling the flower.
Lubricate the wire with latex glue. (I do not recommend using super glue in this case, because if you do not have time to move the wire to the required depth, it will instantly harden at the very base).
The wire must first be slightly bent. It can be inserted into the column only after the part has dried sufficiently from the outside, so as not to wrinkle it.
To ensure that the orchid's lip retains the desired shape when it dries, I use this trick (see top photo on the right).
Now let's hide the wire. To do this, roll a thin sausage of the required length. We distribute the clay in the film for the pasta machine and make it thinner at the edges. We glue the resulting clay with latex glue to the orchid's lip on the back side. We distribute the clay so that there are no seams and the wire is securely hidden. Let's do this using water and a silicone brush (or a simple brush with synthetic bristles).
Let's start tinting.
Apply light green paint to the petal, and then blend it with a semi-dry brush. On the palette, the paint can be diluted with a small amount of art thinner. This way the paint will dry faster, but will not apply as intensely.
Apply grass green oil paint closer to the base of the petal. Let's blend it out.
We tone the edges of the petals with ocher paint and also shade them. We tint the petals at the base with cherry color, and lightly tint the corners with pre-rubbed pastel chalk of a reddish-brick color.
Apply and blend light green paint at the base of the orchid’s lip, as well as at the base of the column.
Let's tone the orchid's lip from the reverse side.
Using chaotic movements and using enough paint so that it falls in droplets, we apply a pattern to the orchid’s lip. To paint the lips I use acrylic glass paint. It looks the brightest and most advantageous. However, you can also use simple acrylic paints. They are bright and dry quickly.
Glue the orchid's lip to the column at the very base using super glue. First, attach the parts to each other, since super glue does not allow you to adjust the position of the parts after just a few seconds. Then your movements should be clear and precise.
We will also coat the wires with glue and press them tightly together, so the structure will be much stronger. After the glue has dried, wrap the wire with tape.
Let's glue the petals. Apply a small drop of glue to the very base (first, attach a petal to see if it lies evenly). Firmly but gently press the petal so as not to deform the orchid column.
First we glue the side petals, then the lower and upper ones.
Our flower is almost ready. All that remains is to mold and protonate the stem.
For the stem, roll a sausage and make a hole in it with a stack. The stem wire must be very well lubricated with latex glue. Then we put the clay on the stem to the very base of the flower and press it well.
We put the clay on the stem and carefully pull it down, gradually pressing and leveling it.
Quickly move your fingers up and down to smooth out the stem. We do this with virtually no pressure on the stem, so as not to deform it, but on the contrary, we only lightly touch it.
Using a silicone brush, carefully apply the flower stem to the petals. Wet the brush with water. The clay on the stem should be quite damp, then it will be smoothly leveled.
We smeared the stem with a silicone brush and carefully smoothed the joint with a wet finger. We cut off the excess. Leave the stem approximately 4.5 - 5 cm long.
Let's protonate the stem to make it look more alive and be sure to give it a bend.
The wire should not be cut if you plan to make a branch of cymbidium orchids. You will need it to attach the flower to the stem.
Congratulations! Your orchid is ready.
Thanks to everyone who read and watched to the end! Good luck to you creatively!
Artificial white Phalaenopsis orchid bush with roots 82 cm (Real Touch)
Moscow and region:
Possible payment methods: cash, payment by card upon receipt, payment by card through the website, account for legal entities.
Moscow and up to 10 km from the Moscow Ring Road - 390 rubles, 1-2 days. Free delivery over RUB 10,000! Delivery within the Moscow region from 10 km from the Moscow Ring Road - 30 rubles/km. Climbing up to the floor and bringing it into an apartment or office is free if there is an elevator. If, for reasons beyond our control, you refuse the delivered goods at the time of their actual receipt, you pay the company’s transportation costs - 390 rubles, in accordance with clause 3 of Article 497 of the Civil Code of the Russian Federation. Thanks for understanding!
St. Petersburg and region:
Possible payment methods: cash, card payment via the website, invoice for legal entities, receipt for payment through a bank.
St. Petersburg and up to 10 km from the Ring Road - 390 rubles, 1-3 days. Free delivery over RUB 10,000! Delivery in the Leningrad region from 10 km from the Ring Road - 30 rubles/km. Climbing up to the floor and bringing it into an apartment or office is free if there is an elevator. If, for reasons beyond our control, you refuse the delivered goods at the time of their actual receipt, you pay the company’s transportation costs - 390 rubles, in accordance with clause 3 of Article 497 of the Civil Code of the Russian Federation. Thanks for understanding!
Other cities:
Possible payment methods: cash, card payment via the website, invoice for legal entities, receipt for payment through a bank.
We deliver throughout Russia by transport companies SDEK, PEK, ZhelDorExpedition, Business Lines, DPD, KIT, Nord Trans (to the northern regions), as well as any other company of your choice. The cost of delivery depends on the weight, dimensions of the goods, as well as the tariffs of the transport company. Our managers will help you calculate the delivery of your order. In almost all cities of Russia you can pay for your order in cash upon receipt (cash on delivery). Delivery to the transport company is free!
Approximate cost and delivery time to some Russian cities: Voronezh: 1-2 days, from 290 rubles. Bryansk: 1-2 days, from 290 rub. Nizhny Novgorod: 2 days, from 290 rub. Rostov-on-Don: 2-3 days, from 290 rubles. Ekaterinburg: 3 days, from 290 rub. Kazan: 2-3 days, from 290 rub. Novosibirsk: 3-4 days, from 290 rub. Omsk: 3-4 days, from 290 rub. Samara: 2-3 days, from 290 rub. Ufa: 2-3 days, from 290 rub. Vladivostok: 3-4 days, from 290 rub. Murmansk: 3-4 days, from 290 rub. Sochi: 2-3 days, from 290 rub. Sevastopol: 3-5 days, from 290 rub.
We deliver to the following cities: Abakan, Almetyevsk, Armavir, Arkhangelsk, Astrakhan, Achinsk, Balakovo, Barnaul, Belgorod, Belogorsk, Berezniki, Biysk, Birobidzhan, Blagoveshchensk, Bratsk, Bryansk, Veliky Novgorod, Vladivostok, Vladimir, Volgograd, Volzhsky, Vologda , Voronezh, Glazov, Ekaterinburg, Ivanovo, Izhevsk, Irkutsk, Yoshkar-Ola, Kazan, Kaluga, Kemerovo, Kirov, Komsomolsk-on-Amur, Kostroma, Krasnodar, Krasnoyarsk, Kurgan, Kursk, Lipetsk, Magadan, Magnitogorsk, Makhachkala, Miass , Murmansk, Naberezhnye Chelny, Nakhodka, Neryungri, Neftekamsk, Nizhnevartovsk, Nizhny Novgorod, Nizhny Tagil, Novokuznetsk, Novorossiysk, Novosibirsk, Novy Urengoy, Norilsk, Noyabrsk, Omsk, Orel, Orenburg, Orsk, Penza, Perm, Petrozavodsk, Petropavlovsk-Kamchatsky , Pskov, Pyatigorsk, Rostov-on-Don, Rubtsovsk, Ryazan, Samara, St. Petersburg, Saransk, Saratov, Severodvinsk, Smolensk, Sochi, Stavropol, Sterlitamak, Surgut, Syktyvkar, Taganrog, Tambov, Tver, Tolyatti, Tomsk, Tula , Tyumen, Ulan-Ude, Ulyanovsk, Ust-Ilimsk, Ufa, Khabarovsk, Khanty-Mansiysk, Tchaikovsky, Cheboksary, Chelyabinsk, Cherepovets, Chita, Yuzhno-Sakhalinsk, Yakutsk, Yaroslavl, Crimea (Sevastopol, Simferopol, Evpatoria, Yalta, Feodosia ) and others. In all these cities you can pay for your order in cash upon receipt (cash on delivery).