New Year's motive
The most significant and anticipated event of the winter period is the New Year holidays. The presenter suggests crocheting a heating pad, which will be an indispensable addition to a family tea party and will be an ideal New Year and Christmas gift for friends, colleagues, and relatives. The base is made of burgundy yarn, the connecting element under the eye is a loop and a beautiful button to match. Fans of strict design can leave the blank in this form, but a white openwork snowflake attached on top of the base will turn the product into an elegant winter accessory. Beads added during the sewing process will create a glitter effect.
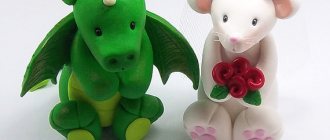
Crochet mouse on a teapot
To knit a heating pad for a teapot we will need:
We begin to knit the base of the heating pad with blue yarn. You need to knit 12 dc into the slip stitch. Instead of the very first one, we make 3 VPs. At the end, we connect the row using a joint loop (connecting loop).
Now let's start knitting rows with increases. We need to knit 2 dc into each of all the loops.
Having knitted this row and moved on to the next, we again continue to increase. We make them every 2 loops. In the new row we increase again, but only after every 3 loops, in the next after 4 and so on. So we will knit a circle with a diameter equal to the largest part of the teapot.
Now we will divide the knitting in half and knit 2 walls in turn with DC and turning rows.
We do not tie each wall to the bottom of the teapot by about 1 cm.
Then we knit 1 more row of DC on one wall and immediately on the other. So let's connect the knitting on one side. And we won’t connect with the other. Let's unfold and knit 1 more row of sc.
Let's make a loop of 8-10 VP at one end. And on the other side we will sew a button.
Now you can try the heating pad on the teapot. The base is ready.
Since it will be in the shape of a mouse, we begin knitting the head. We knit it with the same yarn.
We collect 2 VP. And we knit 6 sc. In total we need 42 sc. Therefore, we begin to make increases. We knit 2 sc into loops. Next we will also knit with increases in some places. In this row, you need to increase through a loop, and then start a new row, after 2, after this row in the new row, we increase through 3 loops and so on until we get 42 RLS. We knit 3 rows in the round and decrease. First we make them every 5 loops, in a new row after 4, then after 3, then after 2. We will not decrease further. Fill with padding polyester.
We knit a muzzle . We dial 2 VP and perform a row of 6 RLS. We knit 1 row. In the next one we make increases in every 2 stitches. There were 12 sc in total. And we knit the row again.
All that remains is to tie the ears . We knit 12 dc in a slip stitch. And then we knit 2 sc in a loop with pink yarn.
Sew the ears and muzzle to the head. And sew it to the heating pad. We sew on the eyes and embroider a nose for the mouse. We decorate the heating pad with an artificial flower and a satin ribbon.
The crochet warmer for a teapot in the shape of a mouse is ready!
Felt Pikachu on a mug
Pikachu is a Pokémon whose popularity has not waned over the years. Having first appeared in a computer game, the character eventually became recognizable to people far from games and anime cartoons. The video shows the creation of a set (case and stand) imitating your favorite hero. You will need yellow felt and a heat gun. All parts are glued together, which allows people who do not have sewing skills to acquire a set. The craft is practical (protects hands, protects the table cover from drops and thermal effects), and children will like its funny appearance.
Cup warmers:
In the first two cups, the main emphasis is on metal buttons, in addition to the braid pattern, of course.
And in this warmer the buttons are very simple, but there are a lot of them, and on a white background with embossed knitting it looks very cute:
The following options are fantasies with braids and plaits... They can be all possible, and much more complex than in the photo:
These large wooden buttons also interestingly complement the heating pad:
The oldest garter stitch looks very good on the following cup:
And now a limitless fantasy of beads, pearls, lace, etc...
Cups for coffee or tea were not left out either. They can also be decorated using knitted warmers:
Warmers for cups and bowls:
And this is an original idea from designer Beata Faron, who came up with woolen warmers for cups and bowls. These cute little things create coziness, serve as potholders, keep your tea hot and, most importantly, warm your hands on winter evenings.
Her warmers have a kind of elongated tail, which on the cup, for example, is attached to the bottom and forms a pocket for your fingers. This bowl’s tail serves as a stand, and the designer also inserted two silicone ribbons into these warmers, two in each, so that they hold the warmer firmly on the cup.
Cup warmer:
- straight knitting needles 6 mm;
- 50 grams of wool yarn;
- 1 button for decoration.
Video master class in English on how to knit this heating pad with a “waffle” pattern:
Video master class in Russian on how to knit a “waffle” pattern:
Description of the waffle pattern:
Cast on 30 loops (the number of loops must be a multiple of 10, this includes edge loops).
1st, 3rd and 5th rows: 3 knit stitches, 2 purl stitches, etc.
2nd and all others are even , i.e. We knit the purl rows according to the pattern.
7th row: after the edge loop, grab 8 loops with a double loop, to do this, from the front side, from the gap behind the 8th loop (but not from the broach), pull the working thread with the right knitting needle, knit it with a knit loop, without returning it to the knitting needle (i.e. by weight). Pull the new loop out a little. Next, without knitting, remove 8 wrapped loops onto the right knitting needle, insert the left knitting needle into a new loop before work and throw it on 8 wrapped ones. Then make 1 increase from the broach with a purl loop, 2 purls, 1 increase, etc. At the end of the row, before 1 edge increase, there is no need to do it.
8th row: 3 purl, 2 knit, 3 purl, 4 knit, etc.
11th row: knit 3, purl 2, knit 3, purl 2 together, purl 2 together, etc.
Row 13: knit 3, * inc 1, purl 2, inc 1, pick up 8 stitches (as in row 7).
From *repeat to the end of the row. At the end of the row, purl 2, knit 3 and 1 edge. Do not increase beyond the last loop.
14th row: 3 purl, 2 knit, * 3 purl, 2 knit, 3 purl, 4 knit. From *repeat to the end of the row. At the end of the row, purl 3 and edge 1.
Row 17: knit 3, * purl 2 together, purl 2 together, knit 3, purl 2, knit 3. From *repeat to the end of the row. At the end of the row, purl 2, knit 3 and 1 edge.
19th row: repeat the pattern from the 7th row.
Knitted warmer for a mug Link to main publication
Exhaust fan in the basement
Construction
Exhaust fan in the basement
Most modern garages are equipped with cellars, where it is customary to store various products, vegetables, pickles, etc. In the event that the basement is arranged...
DIY switchblade drawings
Construction
DIY switchblade drawings
Want to make your own switchblade? Then take a closer look at these instructions. Such a knife will be very useful in your pocket, especially if you go...
Automatic switches iek va47 29m
Construction
Automatic switches iek va47 29m
Automatic switches (automatic circuit breakers) are designed to protect the electrical network from short circuits. Automatic machines can have different characteristics: rated current, number of poles,…
Exhaust fan silent 100
Construction
Exhaust fan silent 100
Soler&Palau SILENT [100 CZ] is sold in 16 configurations. Select the configuration and store that suits you best. Follow the link “Buy”...
In shades of pink
The original warmers of delicate colors stand out against the background of the usual knitted products. The basic rectangle is decorated with a composition of multi-colored hearts and a funny little owl. All parts are cut out of felt and sewn onto the base, with Velcro as a fastener. The video is not a master class, but the technology is so simple that it won’t be difficult to repeat. The components of the decor are easy to draw by hand; if you wish, you can come up with your own composition, vary the colors, using the author’s idea and maintaining the general principles of tailoring.
How to crochet a heating pad for a mug Scheme and description of a penguin
Source – blog.hobbycraft.co.uk, translation of the knitting pattern into Russian – Handcraft Studio.
You will need:
- Wool yarn – black, white, yellow
- Hooks 3 mm and 4 mm
- Black button (for fastening)
- 2 small beads (for eyes)
Legend:
ch = chain dc = double crochet joint. = connecting post VM = together 2 dc together = 2 dc knitted together
Knitting Instructions:
Turn the work by working 1 ch inc at the end of each row unless otherwise indicated.
Case base
Using a 4 mm crochet hook and black yarn, knit chains of 15 ch. Row 1 – work 1 dc in 2nd ch from hook and in each. from the remaining ch. (14dc). Row 2 – knit 1 dc each. dc. Repeat row 2 until you get the base of the required length, corresponding to the circumference of the mug.
Track. row – ch 1, knit 1 dc in each. track. 2 dc, turn. Knit 2 more rows of dc on these 2 loops. Fasten the thread. (This small piece will go under the handle of the mug and will be sewn onto the initial chain of the cover later).
Skip 6 dc in the last row and attach the thread to the next row. dc. Work approximately 10 ch and connect st. in the same dc to make a loop. Fasten the thread. Try the warmer on the mug and thread a loop through the handle of the mug, then sew on a button so that the warmer fits snugly.
White belly
Using white yarn and a 4 mm hook, knit a chain of 10 ch. Row 1 – work 1dc in 2nd ch from hook and in each. from the remaining ch. (9 dc). Rows 2-4 inclusive, knit dc. (9 dc). Row 5 – 2 dc together, 5 dc, 2 dc together. (7 dc). Row 6 – dc (7 dc). Row 7 – 2 dc together, 3 dc, 2 dc together. (5dc). Row 8 – dc (5 dc). Row 9 – 2 dc together, 1 dc, 2 dc together. (3 dc). Row 10 – dc (3 dc). Row 11 – 3 dc in place. Fasten the thread.
Legs
Using yellow yarn and a 3mm hook, attach yarn to the last stitch of the starting white belly chain, work 1dc in the same loop and 1dc in each next. 2dc. (3dc). to turn. Row 2 – work 4 ch, connect st. in the 1st dc, 4 ch, conn.st. in the 2nd dc, 4 ch conn.st. in the 3rd dc. Fasten the thread. Skip 3 dc in the initial chain, attach the yellow thread to the next. ch and repeat rows 1 and 2 for the first leg. Fasten the thread.
Beak
Using yellow yarn and a 4mm hook, work 2 ch, work 3 dc into 1st ch, turn. Row 2 – knit dc (3 dc). Row 3 – work 2dc in the first dc, 1dc, 2dc in the last one. dc. (5 dc). Row 4 – dc. Fasten the thread. Fold the beak in half lengthwise and sew on the longer side.
Eyes (2 pcs.)
Using white yarn and a 3 mm crochet hook, work 3 ch and join st in 1st ch to make a ring. Tie 1 ch and 6 dc into a ring, connecting st. in the first dc and secure the thread. Sew a small black bead into the center of each eye.
Wings (2 pcs.)
Using black yarn, work 2ch, 1dc into 1st ch. To turn. Row 2 – ch 1, 3 dc in the next row. dc. (3dc). Row 3 – knit dc (3 dc). Repeat row 3 until you get the wing of the desired length. Fasten the thread.
Shutdown
1. Sew a button onto the cover opposite the loop. 2. Place the wings, eyes and white belly as in the photo, sew on, making sure that the bottom of the white belly with the legs coincides with the bottom of the base of the cover (then the legs will stick out).
An interesting, but at the same time useful gift for the upcoming holidays can be made very simply and quickly with your own hands. To do this you need to be at least a beginner crochet knitter, and our master class will help you with this.
Necessary materials:
- knitting yarn, any, suitable in thickness for hook No. 3
- crochet hook No. 3
- (optional)
- sewing threads in the color of the yarn and a needle
Progress
Using pink yarn, make a chain of chain stitches. The length of the chain should correspond to the circumference of the bottom of the mug.
Close the chain in a circle with a connecting loop and making two lifting air loops, knit two rows in a circle with half double crochets.
Knit the third, like all subsequent rows, in the same way, with half double crochets. There is no need to close the third row.
If the mug on which you need to tie a pig warmer is flat, then there is no need to add columns. And if the circle at the top expands, then in each row, starting from the fifth, add two loops - one at the beginning and one at the end, i.e. In the first loop of the row, knit two stitches and in the last stitch, too, two stitches. In this way, knit so many rows so that the height of the heating pad reaches the top of the handle of the mug.
Try the heating pad on the mug and knit two or three air loops to close the row. Hide all the “tails”.
The base of the heating pad is ready. In order to knit the ears for a pig, cast on a chain of seven air loops. Next, without making a lifting loop, knit the first row with single crochets.
In the next row, as in all the others, do not make lifting loops. Knit single crochet stitches by inserting a hook between the stitches of the previous row. Skip the first loop in the row - this way you will reduce the number of loops in the row.
Knit the next five rows similarly to the previous ones, decreasing a loop in each row and not knitting a lifting loop.
Two such ears need to be connected.
For the pig's patch, knit a circle of 15-16 double crochets closed in a circle.
Get everything ready to assemble the heating pad. To do this, heat up the heat gun, sew or glue the ears, snout and eyes. At the snout, make two lines-nostrils with white thread. So the warmer for the mug is ready - piggy.
You can use a mug with a heating pad for its intended purpose, or you can make a funny pencil holder for a child out of an unnecessary mug, dressed in a cheerful Greek style. And if you give the pig snowflake cheeks, it will look very New Year’s.
We knit a new heating pad for a teapot with the symbol of the year - cute monkeys
The New Year holidays are getting closer and closer. Some have already stocked up on gifts for family and friends, while others are still getting ready. Since 2020 is the year of the monkey, I propose to knit these simple, funny monkeys.
I have them living on teapot warmers. But if you attach a loop to the monkey, you will get a keychain for a child’s backpack or a pendant for the car. You can attach the monkey to the main gift, or you can hang it on the Christmas tree. You can also glue a magnet to the monkey's back. Using the same principle, you can connect a wide variety of monkeys. You just have to change the color of the yarn or add decorations. Imagine!
In order to knit a monkey you need to be able to: knit an air loop, a connecting stitch, a single crochet; make increases and decreases; knit in the round (in a spiral).
Materials:
- yarn of different colors for the monkey itself and clothes (more details in the text);
- red thin yarn (for the mouth);
- white yarn of medium thickness (for the whites of the eyes);
- two black beads or ready-made eyes;
- monofilament or thin thread to match the color of the yarn;
- holofiber or other filler;
- optional: small buttons, acrylic paints or pastels.
Tools:
- crochet hooks;
- needle with a large eye;
- sewing needle;
- ruler.
We knit all the parts that are knitted in the round in a spiral (without lifting loops). We knit with single crochets.
For a monkey, it is better to take yarn of medium thickness - acrylic, half-wool or wool.
I knitted the head and paws of the monkey from acrylic yarn of unknown thickness and yardage. Therefore, in the master class I will give the dimensions of the resulting parts. As you work, you will understand how many rows you need to knit. The knitting patterns are simple - there shouldn't be any difficulties.
Head
1. We knit 6 single crochets into the amigurumi ring and knit according to the circle pattern (that is, we make 6 increases in each row).
You should get a circle about 4 cm in diameter (photo A). For this, I needed to knit 4 rows.
3. We knit one row, making 5 decreases (photo B). The diameter of the resulting hole in the “cup” should be approximately 2-2.5 cm. If it turns out a little larger or smaller, it’s not scary. Monkeys, they are different).
4. Again we knit without decreasing, approximately 1.5 cm (photo D).
This is what the pear looks like:
Knitting ears
Before knitting the ears, mark with something writing where they will be located (2 dots per ear). Make the ears in the middle of the head or slightly lower. If you do it higher, you won’t get a monkey, but an unidentified animal.
1. Insert the hook under the post at the first point of the ear. Pick up the thread and pull out the loop (photo A). Leave the “tail” long, it will participate in knitting.
2. Knit a chain of 3-4 chain stitches. Knit with both threads (working and tail) (photo B).
3. Attach the chain with a connecting loop at the second point. You will get a loop-the base of the eye (photo B).
4. Turn your head around and tie the base with single crochets. At the same time, knit only with a working thread. Place the “tail” along the base loop and tie the base together with it (photo D). I got 6 sc. Depending on the thickness of the yarn, you may have more or fewer stitches.
5. Knit a connecting stitch in the same place where you started knitting.
6. Unfold the knitting again and knit a row of connecting stitches. Knit the last connecting stitch to the second starting point of knitting (where the chain of air loops was attached when forming the base) (photo A). Cut the yarn leaving the second “tail” longer.
You have an ear with two “tails”.
7. Thread the upper tail into the needle. Insert the needle into the base of the ear and out at the back of the head (photo B). Pull the thread and secure with a knot.
8. Thread the lower “tail” into the needle as well. To make the eyelet more neat, insert the needle under the first connecting post of the row (photo B).
9. Insert the needle into the base of the ear and out at the back of the head (photo D). Pull and secure the thread.
10. Symmetrically to the first, tie the second eye.
If desired, you can tint the face with acrylic paint. To do this, moisten the desired areas with clean water. Dilute the paint to liquid ink and apply it to the face with a brush. I tinted the upper part of the muzzle with brown paint. I painted my cheeks and ears with red paint.
Attention! If you tint, like me, with acrylic paint, do this before you embroider the nose and sew on the eyes. If you plan to do the tinting with pastels (you can use pastel pencils or even powder), then only after you have embroidered the nose and made the eyes.
Before further work, mark the places where the nose, eyes and mouth will be located. Our monkey is, of course, stylized. But in order for it to be recognizable, the details need to be correctly positioned relative to each other.
Remember what features apes have? Absence or complete absence of the bridge of the nose. Often a wide nose. Eyes set close to each other, powerful lower jaw. Sound scary? But it is precisely these features that need to be emphasized so that the monkey turns out to be a monkey, and not a little man.
Embroidering the nose
For the nose, use the same yarn as for the head or a lighter one. You should not make a black or brown nose.
1. Fasten off the yarn and make a cover of cross stitches (Photo A).
2. Perpendicular to the first layer, make a second layer. Place the stitches close to each other, without overlaps or gaps. If you want a more convex nose, then do a couple more layers (photo B). Bring the thread to the back of the head and secure.
In the future, the place behind the head, where all the knots will be, will be covered by the upper part of the body - mark this place in advance.
If desired, the nose can be tinted.
Making eyes
1. Sew beads with black thread. Place them close together and close or almost close to your nose. The same applies to ready-made eyes if you attach them.
2. Attach a white thread to the back of your head. Bring it near the bead (photo A).
3. Wrap the thread around the eyes. Insert the needle into the starting point and bring it to the back of the head (photo B).
4. Pull the thread and secure (photo B). The resulting loop should not slide off the bead. If the white of the eye seems too thin and unnoticeable, apply a second layer and repeat all steps again.
5. Place the needle on the face again, this time around the second bead, and repeat the entire procedure (photo D). Fasten the thread to the back of the head.
Embroidering the mouth
We will embroider a wide mouth, almost to the ears. And let's place it low, away from the nose.
1. Take a red thread (I have “Children’s New”) and secure it to the back of the head. Bring onto the face and embroider the base of the mouth using a backstitch (photo A).
2. Now pick up each resulting stitch with a needle one by one and pull the thread through it. Do not pierce the fabric with a needle. The thread should only pass under the stitches. You seem to wrap around the stitches of the original seam (photo B). Always insert the needle in one direction. If you started, for example, from right to left, then continue that way (photo B).
3) It turns out such a neat lace (photo D).
Knitting the body
Well, we knit the body, that’s a big word :), we knit a bell coat.
I knitted from Alize fine yarn (wool blend, 390 m/100 g).
1. We start knitting with 6 single crochets in an amigurumi ring.
Do not forget to shift the increases relative to the increases of the previous row.
We knit until the height of the bell is approximately 6-7 cm. We knit tightly so that the bell holds its shape well.
2. Having finished knitting, we tie it with yarn of a different color. It will look elegant and winter-appropriate if you tie it with textured yarn. I knitted with Alize softy yarn (100% micropolyester) in two threads. Using the same yarn, but in one thread, I made a chain stitch using a hook, along the bell coat.
Sew the head to the body
Knitting paws
We knit a chain of air loops of the required length. We knit a series of connecting posts on it.
For the upper legs we knit two blanks. For the lower ones - one long one.
Knitting mittens
I also knitted the mittens from Alize fine yarn, but yellow.
1. We knit 6 single crochets into an amigurumi ring.
2. In the second row we make 3-4 increases.
4. We put the mittens on the paws and sew them on.
Knitting felt boots
It’s good to knit felt boots from some fluffy yarn.
I knitted from Alize real 40 Angora in two threads.
1. We knit the sole with single crochets according to the oval pattern. I did not present the diagram here. If you have never knitted an oval before, then look on the Internet - there are sooooo many patterns and patterns!
I started knitting with a chain of 6 chain stitches, plus a rise loop. To get the sole size I needed, I needed to knit one row. In order for the toe of the felt boot to be wider than the heel, I started knitting the second row by making three increases from the toe side (see photo).
2. Then we knit without increasing/decreasing until the end of the row.
You should get something like this. We make the size of the “bast shoe” hole to your liking. The main thing is that the monkey's paw fits into it.
4. We knit the boot (is that what they call it in a felt boot?). In the first row, from the heel side, make 1 decrease.
6. In the last row, from the toe side, make 1-2 increases.
Finish knitting with a connecting stitch. Leave the “tail” longer. Then you will use it to sew the felt boot onto the monkey’s paw.
Place a small lump of filler in your felt boots socks.
Sew the upper legs to the monkey's body.
She is already looking with lust at her future feet in felt boots.
We put the lower legs into the bell body and sew them on.
Knitting a hat and scarf
For the scarf, knit a chain of chain stitches of the required length.
Knit several rows with single crochets until the desired width of the scarf is achieved.
I knitted a scarf from Alize real 40 Angora yarn in one thread, Bosnian knitting.
Bosnian knitting is knitting with connecting stitches.
I knitted each row only in the back half loop. The result is a fabric similar to knitting.
Since the fabric in Bosnian knitting is very dense, it is better to use a thick hook. Then the scarf will turn out soft. One more point - when knitting with connecting stitches, at the beginning of each row, a lifting loop is also made.
We knit the hat in the same way as the bell body. Only in each row we do not 2, but 1 increase. We knit until the hat fits on the monkey’s head.
Making a pompom is not difficult. Then it can be sewn or tied to the top of the hat.
Doing your hair
The previous monkey has a cap on its head. It is sewn on and therefore I did not do the hair.
If you want, you can do our monkeys' hair.
1. Prepare pieces of yarn (photo A). It is better to take yarn that can be easily unraveled into separate threads and combed. We make the segments longer, with a margin. Then you can trim everything.
2. Insert the hook under the post on the monkey’s head (photo B).
3. Fold a piece of yarn in half. We hook it and pull it out (photo B).
We pull the “tails” through the resulting loop and tighten (photo D).
We tie this around the entire top of the monkey’s head.
Let's trim. We unravel the yarn with a needle and comb it with a brush. We trim again.
This is the kind of forelock this monkey boy got
And this shy girl with a ponytail on top of her head, warmed herself with a knitted bandage.
Bandage:
1. We knit a chain of air loops along the width of the bandage.
2. Knit in single crochets until the bandage is the desired length.
We knit only in the back half loop - you get an elastic band.
3. Sew the ends of the bandage and put it on the monkey’s head.
I dusted my monkeys with snow. To do this, I applied undiluted white acrylic paint to a semi-dry brush. I removed the excess by poking a napkin and touched up the monkeys. It has become completely winter.
And this is a monkey from warm countries. She also has a ponytail on top of her head. And the bandage is not for insulation, but for beauty.
Here the headband is two chains of air loops decorated with beads.
And, by the way, about the tail. Not just the one on the top of the head, but the one on the butt.
The tail can be knitted in the same way as the paws were knitted and sewn in its proper place.
As I already said, my monkeys live on heating pads. For example, on this one.
How to knit a heating pad itself, watch this
master class .
By combining two master classes, you can easily knit an elegant winter warmer for yourself or as a gift.
How does the morning begin? Of course, with aromatic coffee or scalding tea. But sometimes, during our morning routine, we often pour ourselves a drink and simply forget about it, and when we remember, it has long since cooled down. But this problem can be solved by making a warm heating pad with your own hands that you can put on your mug. Thanks to it, tea or coffee will remain hot for a long time. And these warmers in the shape of the symbol of 2019 - a pig and a pig - will be an excellent gift for the New Year.
Floral motifs
Evgeniya shares an easy-to-follow idea suitable for beginning needlewomen. You need a hook and a thread of two shades - light for the main fabric, dark for the binding. The author took acrylic and matched the button to the harness. The final stage is decorating with tied flowers. Eugene gives the sequence of creating the core and petals in the second part of the video. Using this principle, you can make any number of elements, experiment with colors, and add a bead while sewing.
Mouse on a teapot with knitting needles
In this master class we suggest you knit a mouse warmer on a teapot using knitting needles.
To knit a heating pad for a teapot we will need:
We begin to knit the base of the heating pad with champagne-colored yarn (you can use a different color). We cast on 8 loops and distribute 2 loops onto 4 knitting needles.
We knit in a circle with a row of facial loops. Next we will knit a row with an increase in each first and last stitch on all 4 knitting needles. Then we knit the row again without increases. And so we continue to alternate rows with and without increases until the diameter of the canvas corresponds to the diameter of the teapot along with the handle and spout, plus 2-3 centimeters.
Next, we simply knit rows of knit stitches to the bottom of the teapot. The result should be a base that resembles a cap.
To keep the heating pad warm longer, you need to make a warm lining . We take a thick fabric and put a base on it. We outline it and add 5 mm for the seam. You can add 1 cm at the bottom to hem. We cut out 2 of these parts and stitch the lining. You will get a bag like this.
We simply sew it into the heating pad using a machine or by hand.
And then we knit the mouse's head .
We cast on 2 loops for 3 knitting needles. Then we knit 1 row in a circle with facial loops. Next we alternate the rows: 1 row with an increase of 1 loop on each knitting needle and 1 row without increases. We knit until there are 8 loops on each knitting needle.
Next, we will make increases in the 1st and last loops of each knitting needle and we will knit 1 row without increases. And so we knit until 18 loops are formed on each knitting needle. We knit 5 more rows in stockinette stitch in the round. And then we move on to decreases. We knit the first 2 loops on the knitting needle together and also knit the last 2 stitches together. Do the same on the remaining 2 knitting needles until all the loops are closed. At the same time, we fill the head with padding polyester.
We embroider the nose with brown threads. And sew or glue the eyes.
Crochet ears . We make a sliding loop and knit 12 double crochets into it. And then we connect the beginning and end of this row. In the next row we knit 2 double crochets in each stitch.
the paws with pink yarn. We cast on 6 loops and distribute them onto 2 knitting needles. We knit 8 rows in stockinette stitch in the round.
We tighten the loops and hide the thread.
Sew the mouse's head to the base.
Sew on the bottom of the paw.
We knit the tail with pink yarn. We put 2 loops on 2 knitting needles and knit several rows in a circle to get a thin mouse tail. We sew it to the heating pad. We also decorate it with a decorative element. It could be a flower, a twig or something else.
The mouse warmer for the teapot with knitting needles is ready!
"Stars"
The winter two-color “Stars” pattern, proposed by Svetlana, will make any mug, glass, bottle elegant (you need to tie the neck with an elastic band). The motif is formed by interlacing air chains, blue and white. Distinctive feature: the heating pad is knitted in a circle, starting from the bottom. Using technology, it is convenient to make expansion in the lower rows - an option for cups that taper towards the bottom. Svetlana created the most detailed sequential master class, demonstrating and commenting on each action. This allows, despite the average complexity of the work, to be repeated by beginners. The rich colors of the yarn give the motif brightness and expressiveness.
Master class “Mug Warmer”
Good day! I decided to prepare a master class on knitting a heating pad for a cup, so that every time my mother drank tea, her eyes would be happy and she would smile.
To work we need:
Mug;
Yarn, any;
Crochet hook matching the number for the yarn you chose;
2 buttons.
The heating pad will consist of 2 parts: the base and the decor.
First we will knit the base:
We cast on air loops equal to the height of your mug, for example I have 20 chain stitches.
Then we count 1 VP from the end. Insert the hook into the second loop. Next we pick up the working thread. And then we pull it through the loop of the chain. Thus, we have two loops on the hook. Now insert the hook under the thread and pick it up. And finally, we pull it through the two loops on the hook. That's all, the first single crochet is completed. The same must be done with each subsequent loop of the chain, but not in the second loop, but in each one until the end of the row.
At the beginning of the next row, you need to knit one chain lifting loop again and then knit single crochets again. If you want to get a tightly knitted fabric, you need to knit a loop on both walls. If you hook a single crochet stitch behind the front wall or behind the back wall, the knitting will be softer. And we knit single crochets row by row until we cover our mug.
Then you need to tie button loops at the top and bottom of the mug handle. We collect air loops so that they reach the future buttons and close them in a circle.
Sew buttons on the top and bottom of the mug handle. I also tied it around with the same single crochets to hide the unevenness.
Our base is ready!
For decoration we will knit a heart, for convenience I made a diagram:
Description of the heart:
We cast on 2 air loops, one of them is a lifting loop. We knit a single crochet into the second chain stitch and turn the knitting. Next we knit 1 chain stitch and 2 single crochets.
We knit this way until we get 6 loops on the heart. Having turned the knitting, we knit 5 stitches with a nikid into the third loop. To do this: make a yarn over (take the working thread onto the hook), insert the hook into the third loop of the previous row, grab the working thread and pull it through the loop. There are now 3 loops on the hook. Next, pick up the thread with a hook and pull it through the 2 loops on the hook, 2 remain, then again take the working thread and knit through the remaining 2 loops.
After 5 double crochets, we knit a half-crochet. Then again we count 3 loops from the edge and knit 5 double crochets into the third loop.
For beauty, I tied the heart with single crochets.
All that remains is to sew the heart to our base:
Our mug warmer is ready! Thank you for your attention!
Mug case “Braid”
Master class for those who prefer knitting needles. A scarf for a mug with a simple braided pattern will be a great idea for experienced craftswomen, and a step-by-step master class will help beginners follow the lead. The work will take about an hour. You need to choose thick yarn, knitting needles one size smaller than recommended - this way the pattern will be denser and more prominent. For those who are better at following diagrams, Zhanna gives a sketch at the beginning of the video; you can pause the video, redraw it on paper, and keep it before your eyes during the manufacturing process. The result is a snow-white case with a voluminous “Pigtail” in the center - it looks elegant, helps keep your drink warm longer, and protects your hands.
Hot water bottle "Pig"
In this master class we will crochet a wonderful hot water bottle for a mug in the shape of a pink pig.
To knit such an accessory you will need:
- Yarn “Alize Baby Best” pink;
- Hook 3 mm;
- Scissors;
- Needle.
First we need to knit a fabric with a width and height depending on the mug on which we will knit a heating pad. We assemble a chain of such length that it will be the height of the mug. Next, make 1 more loop and knit 1 single crochet into each loop.
Next we knit several rows. You should get a fabric that can be wrapped around the mug up to the handle.
In the last row we will make loops. We climb 18 loops. We skip 3 loops and perform 1 stitch in 4. Next we knit along the column, leaving 4 loops. We make 18 more loops and knit 1 single crochet into the very last loop.
Sew 2 buttons on the other end. A heating pad will be attached to them.
Now we will knit a muzzle for the pig. Let's start with the ears. We will knit 2 loops and in the very first we will knit 3 single crochets. Let's turn around. In the new row you need to add to the very first and very last loop. We turn around again and knit a row, but do not add any more. In the new row we continue to increase the eye, so we knit with increases on the sides. That is, in the first and last loops. And we will knit 1 more row without adding. And once again we add in the 1st row and knit the row without adding. We do not cut the thread, but make a binding. When making the binding, we knit 2 loops in the corners.
We knit a patch. We make 5 loops. In the 2nd loop we will make 2 single crochets. Next we knit in 2 loops, 1 single crochet. We will knit 3 stitches into the last loop. We knit the connecting post into the lifting loop (5th loop of the initial chain). Make 2 loops on top in the center. We start the row with single crochets. We knit 1 stitch. And in the 2 loops in the center that we marked, we knit 1 half double crochet and here 1 double crochet. In the next loop we first knit 1 double crochet and then 1 half double crochet. We finish the row with single crochets. In the new row we will knit from the back half loop. We knit 1 single crochet. We knit 1 more row with single crochets.
Sew on the ears.
We stuff the patch with padding polyester and sew the patch on. Now you need white felt. Cut out the eyes and glue them on with hot glue. Use black nail polish to paint the pupils and nose.
The crochet mug warmer in the shape of a pig is ready! It will be an excellent decoration for the New Year's table.
See also:
Warmer for a mug “Snowman”, crocheted. An ordinary mug can be decorated with a knitted warmer. Such decoration will even bring benefits. A knitted heating pad will warm your hands holding a hot mug and also protect your hands from overheating. To make a heating pad, you will need the following materials: 1. Dark blue threads (the base of the heating pad). 2.White threads (edging and decoration). 3.Yellow threads (Snowman’s nose). 4. Two-color threads (forelock and ties). 5.Sewing threads in white and black. 6.Hooks 1 and 2.5 mm thick. 7. Scissors.
The process of making a warmer for a mug. 1.First of all, you need to take measurements of the mug. I propose to knit a heating pad measuring 25.5 cm * 9 cm. Using a 2.5 cm crochet hook, you need to pick up a chain. It will consist of air loops (AP) 25.5 cm long.
2. We start with a set of double crochets (DC) along the entire length of the chain. 3. We knit the fabric in this way until the desired height is obtained. 4. The heating pad should not go beyond the handle of the mug. 5. In order for the heating pad to have a beautiful outline, you need to tie the edge with white thread. To do this, tie a thread in the corner of the main blue fabric. 6. We tie the outline of the heating pad with single crochets (SC). We cut the thread and fasten it. 7.The base of the heating pad is ready. Let's start making the decoration. The main element is the Snowman. It will consist of two circles. We begin to knit a large circle. To do this, we collect 4 VPs on a 1 mm thick hook. 8.Using a connecting loop (SP), you need to connect the chain from the VP into a ring. 9.Then we dial 3 VP. 10. We make a set of 21 CCHs in a circle. We connect the last column to the beginning of the row. 11. We collect a chain consisting of 3 VPs. 12.Then we make a dc, catching it under the same loop from which the VP of this row was collected. 13.Next you need to dial 2 Dcs from each VP of the previous row. At the end we connect the row. 14. We tie the last row of the large circle using RLS. 15. We knit the second circle in a smaller size. The knitting technique is similar to large circle knitting. 16.Sew the circles to the heating pad. 17.Use black threads to make the Snowman’s eyes and mouth. We knit the nose with a yellow thread. We make a forelock for the Snowman using two-color threads. We knit snowflakes around the Snowman. 18.We get a beautiful winter composition. 19. In order for the heating pad to be attached to the mug, it is necessary to make ties. To do this, take 4 threads of the same size. 20.Fold the thread in half and pull the loop into the corner of the heating pad on the wrong side. 21.2 free ends are pulled into the loop.
After studying the diagram and illustrated master class, you will learn how to knit a cover for a mug with your own hands in one evening.
The knitted case not only looks beautiful, but also performs practical functions - it protects your hands from a hot cup and keeps the drink warm. This universal case will come in handy both at home and at work. It can be given to a man for the New Year, February 23 or another holiday. The yarn consumption is low, the technique is simple and suitable for beginners. Use different colors so that everyone gets an original surprise.
Knitting materials and tools
To knit a cover for a mug, prepare a kit that includes:
- a cylindrical mug, preferably without a pattern or with a print that can be hidden under a case;
- knitting needles No. 3;
- hook No. 2.5-3 (this tool is optional);
- acrylic or mixed yarn - for a guy, choose strict colors, and for women, brighter ones;
- centimeter (ruler);
- a button of small diameter - more strict for a man, romantic for a girl;
- needle and thread.